
Product Manual
Page 3
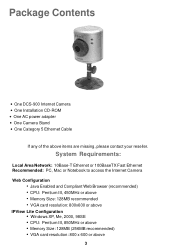
System Requirements: Local Area Network: 10Base-T Ethernet or 100BaseTX Fast Ethernet Recommended: PC, Mac or Notebook to access the Internet Camera Web Configuration • Java Enabled and Compliant Web Browser (recommended) • CPU: Pentium III, 450MHz or above • Memory ... recommended) • VGA card resolution: 800 x 600 or above items are missing, please contact your reseller. Package Contents • One DCS-900 Internet Camera • One Installation CD-ROM • One AC power adapter • One Camera Stand • One Category 5 Ethernet Cable If any of the above 3
System Requirements: Local Area Network: 10Base-T Ethernet or 100BaseTX Fast Ethernet Recommended: PC, Mac or Notebook to access the Internet Camera Web Configuration • Java Enabled and Compliant Web Browser (recommended) • CPU: Pentium III, 450MHz or above • Memory ... recommended) • VGA card resolution: 800 x 600 or above items are missing, please contact your reseller. Package Contents • One DCS-900 Internet Camera • One Installation CD-ROM • One AC power adapter • One Camera Stand • One Category 5 Ethernet Cable If any of the above 3

Product Manual
Page 4
..., making the DCS-900 easy to Use The DCS-900 is a computer with a 10Mbps Ethernet based network or 100Mbps Fast Ethernet based network. 4 The DCS-900 is a stand-alone system with remote monitoring capability for monitoring. All that transmits high quality video images for a complete and cost-effective solution. Supports a Variety of the DCS-900 Internet Camera! The DCS-900 supports both ActiveX...
..., making the DCS-900 easy to Use The DCS-900 is a computer with a 10Mbps Ethernet based network or 100Mbps Fast Ethernet based network. 4 The DCS-900 is a stand-alone system with remote monitoring capability for monitoring. All that transmits high quality video images for a complete and cost-effective solution. Supports a Variety of the DCS-900 Internet Camera! The DCS-900 supports both ActiveX...
Product Manual
Page 5
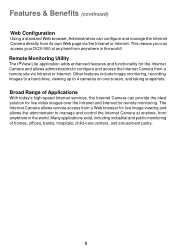
..., including industrial and public monitoring of Applications With today's high-speed Internet services, the Internet Camera can configure and manage the Internet Camera directly from a remote site via the Intranet or Internet. This means you can access your DCS-900 at anytime, from anywhere in the world. Features & Benefits (continued) Web Configuration Using a standard...
..., including industrial and public monitoring of Applications With today's high-speed Internet services, the Internet Camera can configure and manage the Internet Camera directly from a remote site via the Intranet or Internet. This means you can access your DCS-900 at anytime, from anywhere in the world. Features & Benefits (continued) Web Configuration Using a standard...

Product Manual
Page 8
Steady green confirms that the DCS-900 is positioned on the right side of the DCS-900's lens. Depending on the right side of the DCS-900 lens. LAN LED The LAN LED is positioned on the data traffic, the LED will begin to flash to the LAN network. 8 Note: There are three... settings for the Power LED for Light-Emitting Diode. It is powered ON. Please refer to the LAN. LEDS LED stands for monitoring purposes: Normal / Off / Dummy. Steady orange confirms a good connection to the DCS-900 Camera Configuration section for detailed...
Steady green confirms that the DCS-900 is positioned on the right side of the DCS-900's lens. Depending on the right side of the DCS-900 lens. LAN LED The LAN LED is positioned on the data traffic, the LED will begin to flash to the LAN network. 8 Note: There are three... settings for the Power LED for Light-Emitting Diode. It is powered ON. Please refer to the LAN. LEDS LED stands for monitoring purposes: Normal / Off / Dummy. Steady orange confirms a good connection to the DCS-900 Camera Configuration section for detailed...

Product Manual
Page 13
...change the Admin ID and Password immediately to begin You must correspond with your network settings for you are blank. Your camera's IP Address will be , please check with your network administrator. Click Next The IP Address and Subnet Mask of what these settings ...camera, Gateway, and DNS addresses must change the Admin ID and Password, select both Change boxes and enter a New ID and New Password. Click Wizard to protect your camera against unauthorized access. Click Next 13 Using the Setup Wizard (continued) To run the Setup Wizard, click on Start->Programs->DCS-900...
...change the Admin ID and Password immediately to begin You must correspond with your network settings for you are blank. Your camera's IP Address will be , please check with your network administrator. Click Next The IP Address and Subnet Mask of what these settings ...camera, Gateway, and DNS addresses must change the Admin ID and Password, select both Change boxes and enter a New ID and New Password. Click Wizard to protect your camera against unauthorized access. Click Next 13 Using the Setup Wizard (continued) To run the Setup Wizard, click on Start->Programs->DCS-900...

Product Manual
Page 14
Click Restart Your setup is now displayed in the Web browser. 14 Otherwise, click Restart to save and apply your images. Click Link Your camera is now complete! Click Link to modify your camera settings. Using the Setup Wizard (continued) If you need to make any changes, click Back to launch your Web browser and view your settings.
Click Restart Your setup is now displayed in the Web browser. 14 Otherwise, click Restart to save and apply your images. Click Link Your camera is now complete! Click Link to modify your camera settings. Using the Setup Wizard (continued) If you need to make any changes, click Back to launch your Web browser and view your settings.

Product Manual
Page 15
...and click OK to continue. Click OK 15 If you are unsure of what these settings should be, please check with your network settings for you to access the camera. Click Yes By default, the Admin ID and Password are running this Setup Wizard for the first time, leave both Admin ID... and Password fields blank and simply click OK to continue. Click OK The IP Address of the camera (192.168.0.20) does not correspond with your local area network settings. You must correspond with your network administrator. If you are blank. Using the Setup Wizard (continued) If you change any of the ...
...and click OK to continue. Click OK 15 If you are unsure of what these settings should be, please check with your network settings for you to access the camera. Click Yes By default, the Admin ID and Password are running this Setup Wizard for the first time, leave both Admin ID... and Password fields blank and simply click OK to continue. Click OK The IP Address of the camera (192.168.0.20) does not correspond with your local area network settings. You must correspond with your network administrator. If you are blank. Using the Setup Wizard (continued) If you change any of the ...
Product Manual
Page 16
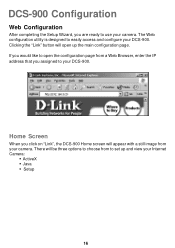
... to set up the main configuration page. Home Screen When you click on "Link", the DCS-900 Home screen will open the configuration page from your DCS-900. The Web configuration utility is designed to easily access and configure your camera. Clicking the "Link" button will appear with a still image from a Web Browser, enter the IP address...
... to set up the main configuration page. Home Screen When you click on "Link", the DCS-900 Home screen will open the configuration page from your DCS-900. The Web configuration utility is designed to easily access and configure your camera. Clicking the "Link" button will appear with a still image from a Web Browser, enter the IP address...

Product Manual
Page 18
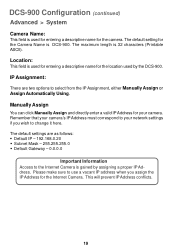
To access the System menu, click on the Advanced Tab in the menu bar, then the System tab in the left hand bar and the System screen will appear as illustrated below: 18 DCS-900 Configuration (continued) Advanced > System The System menu allows you may view/change your DCS-900 for operation. If you already set up your camera using the Setup Wizard, you to configure and set up your settings here.
To access the System menu, click on the Advanced Tab in the menu bar, then the System tab in the left hand bar and the System screen will appear as illustrated below: 18 DCS-900 Configuration (continued) Advanced > System The System menu allows you may view/change your DCS-900 for operation. If you already set up your camera using the Setup Wizard, you to configure and set up your settings here.
Product Manual
Page 19
... IP Address for your network settings if you wish to your camera. The maximum length is used for entering a descriptive name for the location used for entering a descriptive name for the Camera Name is DCS-900. Remember that your camera's IP Address must correspond to change it here. DCS-900 Configuration (continued) Advanced > System Camera Name: This field is...
... IP Address for your network settings if you wish to your camera. The maximum length is used for entering a descriptive name for the location used for entering a descriptive name for the Camera Name is DCS-900. Remember that your camera's IP Address must correspond to change it here. DCS-900 Configuration (continued) Advanced > System Camera Name: This field is...

Product Manual
Page 21
... OFF during active monitoring. Loading ActiveX From: This field is either active or inactive. Please refer to customize the LEDs for discreet camera operation in .ocx format, for the LED control is present, the LED indicator will be replaced with your company's DNS server. Under.... 21 When LAN activity is Normal. The default setting for example: http://www..com/ xplug.ocx where must be applied after 1 minute. DCS-900 Configuration (continued) Advanced > System Username/E-mail- Enter your username or e-mail used to set up the LED illumination as desired. LED Control:...
... OFF during active monitoring. Loading ActiveX From: This field is either active or inactive. Please refer to customize the LEDs for discreet camera operation in .ocx format, for the LED control is present, the LED indicator will be replaced with your company's DNS server. Under.... 21 When LAN activity is Normal. The default setting for example: http://www..com/ xplug.ocx where must be applied after 1 minute. DCS-900 Configuration (continued) Advanced > System Username/E-mail- Enter your username or e-mail used to set up the LED illumination as desired. LED Control:...
Product Manual
Page 22
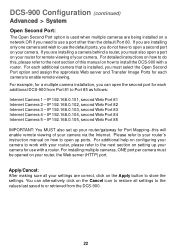
... open a port on setting up ports. IP 192.168.0.102, second Web Port 82 Internet Camera 3 - For each additional DCS-900 from the DCS-900. 22 IP 192.168.0.104, second Web Port 84 Internet Camera 5 - IP 192.168.0.105, second Web Port 85 IMPORTANT: You MUST also set up your..., you do this manual on how to install the DCS-900 with a router. For example, for a multiple camera installation, you can alternatively click on the Apply button to Port 85 as follows: Internet Camera 1 - You can open a second port on a network OR if you must select the Open Second Port option...
... open a port on setting up ports. IP 192.168.0.102, second Web Port 82 Internet Camera 3 - For each additional DCS-900 from the DCS-900. 22 IP 192.168.0.104, second Web Port 84 Internet Camera 5 - IP 192.168.0.105, second Web Port 85 IMPORTANT: You MUST also set up your..., you do this manual on how to install the DCS-900 with a router. For example, for a multiple camera installation, you can alternatively click on the Apply button to Port 85 as follows: Internet Camera 1 - You can open a second port on a network OR if you must select the Open Second Port option...

Product Manual
Page 23
DCS-900 Configuration (continued) Installing the DCS-900 Behind a Router Single Camera Installation If you are installing a single camera on your network the installation is an easy 4-step procedure: 1) Identify Your Camera on the Network 2) Assign a Local IP Address for Your Camera 3) Determine Your Router's WAN IP Address (Enable Remote Viewing) 4) Open Virtual Server Ports for Your Router (Enable Remote Viewing...
DCS-900 Configuration (continued) Installing the DCS-900 Behind a Router Single Camera Installation If you are installing a single camera on your network the installation is an easy 4-step procedure: 1) Identify Your Camera on the Network 2) Assign a Local IP Address for Your Camera 3) Determine Your Router's WAN IP Address (Enable Remote Viewing) 4) Open Virtual Server Ports for Your Router (Enable Remote Viewing...

Product Manual
Page 24
... the camera settings correspond to view your camera within your local (home) network. Assign a Local IP Address 24 Enter a Unique camera name and location Identify Your Camera on Your Network 2) Assign a Local IP Address for your camera. DCS-900 Configuration (continued) Installing the DCS-900 Behind a Router 1) Identify Your Camera on the Network Once you are installing several cameras on your network. Enter a unique Camera Name...
... the camera settings correspond to view your camera within your local (home) network. Assign a Local IP Address 24 Enter a Unique camera name and location Identify Your Camera on Your Network 2) Assign a Local IP Address for your camera. DCS-900 Configuration (continued) Installing the DCS-900 Behind a Router 1) Identify Your Camera on the Network Once you are installing several cameras on your network. Enter a unique Camera Name...
Product Manual
Page 25
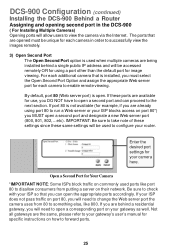
...same, please refer to your gateway's user's manual for Your Camera *IMPORTANT NOTE: Some ISPs block traffic on commonly used ports ...the camera uses from putting a server on your camera here. Enter the desired port settings for image viewing. DCS-900 Configuration (continued) Installing the DCS-900 Behind...accordingly. Not all gateways are available for each camera in the DCS-900 ( For Installing Multiple Cameras) Opening ports will allow users to the next ...your ISP so that you can proceed to view the camera via the Internet. The ports that is open a second port and...
...same, please refer to your gateway's user's manual for Your Camera *IMPORTANT NOTE: Some ISPs block traffic on commonly used ports ...the camera uses from putting a server on your camera here. Enter the desired port settings for image viewing. DCS-900 Configuration (continued) Installing the DCS-900 Behind...accordingly. Not all gateways are available for each camera in the DCS-900 ( For Installing Multiple Cameras) Opening ports will allow users to the next ...your ISP so that you can proceed to view the camera via the Internet. The ports that is open a second port and...

Product Manual
Page 26
... from your ISP. The D-Link DI-614+ is a fixed IP address that you have on your ISP, you to use to access your camera from a remote location. You can change over time and will be listed here. DCS-900 Configuration (continued) Installing the DCS-900 Behind a Router ROUTER SET...-UP AND INSTALLATION The following steps generally apply to any router that will not change from time to time depending on your network....
... from your ISP. The D-Link DI-614+ is a fixed IP address that you have on your ISP, you to use to access your camera from a remote location. You can change over time and will be listed here. DCS-900 Configuration (continued) Installing the DCS-900 Behind a Router ROUTER SET...-UP AND INSTALLATION The following steps generally apply to any router that will not change from time to time depending on your network....
Product Manual
Page 27
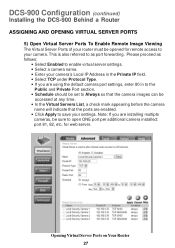
... Virtual Servers List, a check mark appearing before the camera name will indicate that the ports are installing multiple cameras, be opened for web server. This is also referred to save your settings. Opening Virtual Server Ports on Your Router 27 DCS-900 Configuration (continued) Installing the DCS-900 Behind a Router ASSIGNING AND OPENING VIRTUAL SERVER PORTS...
... Virtual Servers List, a check mark appearing before the camera name will indicate that the ports are installing multiple cameras, be opened for web server. This is also referred to save your settings. Opening Virtual Server Ports on Your Router 27 DCS-900 Configuration (continued) Installing the DCS-900 Behind a Router ASSIGNING AND OPENING VIRTUAL SERVER PORTS...
Product Manual
Page 28
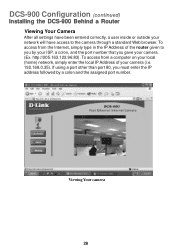
... the local IP Address of the router given to the camera through a standard Web browser. DCS-900 Configuration (continued) Installing the DCS-900 Behind a Router Viewing Your Camera After all settings have access to you gave your network will have been entered correctly, a user inside or outside your camera. (Ex. To access from the Internet, simply type in...
... the local IP Address of the router given to the camera through a standard Web browser. DCS-900 Configuration (continued) Installing the DCS-900 Behind a Router Viewing Your Camera After all settings have access to you gave your network will have been entered correctly, a user inside or outside your camera. (Ex. To access from the Internet, simply type in...

Product Manual
Page 32
...a time server with your camera is recommended for time/date accuracy for your region of the Time Server in the Time settings are Synchronized with the time server information on the GMT setting. Time Protocol is critical for the DCS-900. DCS-900 Configuration (continued) Tools >... Time The Time menu sets the DCS-900's time and date requirements to provide correct information to users who are available on the web...
...a time server with your camera is recommended for time/date accuracy for your region of the Time Server in the Time settings are Synchronized with the time server information on the GMT setting. Time Protocol is critical for the DCS-900. DCS-900 Configuration (continued) Tools >... Time The Time menu sets the DCS-900's time and date requirements to provide correct information to users who are available on the web...

Product Manual
Page 35
Location- Date/Time - The location of the DCS-900 will be displayed in the top bar located above the camera image when the Camera Name field is entered in the next section. The date/time of the DCS-900 will be displayed according to your time server settings or from the ...browser, click on how to install ActiveX. 35 DCS-900 Configuration (continued) Status Completing Your Camera Configuration Once the configuration is completed, click on Home to return to the Home screen and select the desired Viewing...
Location- Date/Time - The location of the DCS-900 will be displayed in the top bar located above the camera image when the Camera Name field is entered in the next section. The date/time of the DCS-900 will be displayed according to your time server settings or from the ...browser, click on how to install ActiveX. 35 DCS-900 Configuration (continued) Status Completing Your Camera Configuration Once the configuration is completed, click on Home to return to the Home screen and select the desired Viewing...


