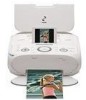
Photo Printing Guide
Page 1
Photo Printer Photo Printing Guide Table of Contents Introduction 2 Before Printing 3 Printing from the Memory Card 18 Printing Photographs Directly from a Digital Camera 31 Printing Photographs from a Wireless Communication Device 36 Printing Maintenance 42 Changing the Printer Settings 52 Troubleshooting 55 Appendix 73 US QT5-0760-V01
Photo Printer Photo Printing Guide Table of Contents Introduction 2 Before Printing 3 Printing from the Memory Card 18 Printing Photographs Directly from a Digital Camera 31 Printing Photographs from a Wireless Communication Device 36 Printing Maintenance 42 Changing the Printer Settings 52 Troubleshooting 55 Appendix 73 US QT5-0760-V01
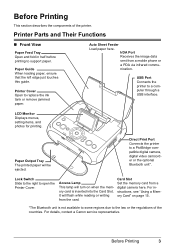
Photo Printing Guide
Page 5
... printing to a PictBridge compatible digital camera, digital video camcorder or the optional Bluetooth unit*. LCD Monitor Displays menus, setting items, and photos for printing. Paper Output Tray The printed paper will turn on page 15. *The Bluetooth unit is inserted into the Card Slot...., see "Using a Memory Card" on when the memory card is not available to some regions due to open the Printer Cover. Lock Switch Slide to the right to the law or the regulations of the printer. For details, contact a Canon service representative. Auto Sheet Feeder Load paper here.
... printing to a PictBridge compatible digital camera, digital video camcorder or the optional Bluetooth unit*. LCD Monitor Displays menus, setting items, and photos for printing. Paper Output Tray The printed paper will turn on page 15. *The Bluetooth unit is inserted into the Card Slot...., see "Using a Memory Card" on when the memory card is not available to some regions due to open the Printer Cover. Lock Switch Slide to the right to the law or the regulations of the printer. For details, contact a Canon service representative. Auto Sheet Feeder Load paper here.

Photo Printing Guide
Page 8
...page 9. Print button Press to start printing according to cancel printing in trimming mode to move the trimming area. The printer will then initialize ready for printing. 6 Before Printing See "Other Buttons" on page 9. +- Alarm lamp Indicates that ... displayed on the LCD. OK button Allows you made. NAVI button Displays the navigation menu. Lighting: the printer is ready to print, is currently printing, or is off. Stop/Reset button Allows you to reset the...resume printing once an error has been resolved. For example, selecting a photo to turn on the printer or off.
...page 9. Print button Press to start printing according to cancel printing in trimming mode to move the trimming area. The printer will then initialize ready for printing. 6 Before Printing See "Other Buttons" on page 9. +- Alarm lamp Indicates that ... displayed on the LCD. OK button Allows you made. NAVI button Displays the navigation menu. Lighting: the printer is ready to print, is currently printing, or is off. Stop/Reset button Allows you to reset the...resume printing once an error has been resolved. For example, selecting a photo to turn on the printer or off.
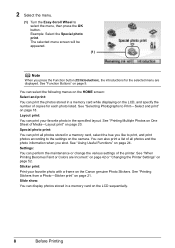
Photo Printing Guide
Page 10
...Print-Select and print" on the Canon genuine Photo Stickers. You can print the photos stored in the specified layout. Sticker print: Print your favorite photo in a memory card while displaying on the LCD, and specify the number of all photos stored in a memory card on page..."Changing the Printer Settings" on page 24. Example: Select the Special photo print. Layout print: You can print all photos and the photo information when you press the Function button (f2/Introduction), the introductions for each photo listed. See "When Printing Becomes Faint or Colors are displayed....
...Print-Select and print" on the Canon genuine Photo Stickers. You can print the photos stored in the specified layout. Sticker print: Print your favorite photo in a memory card while displaying on the LCD, and specify the number of all photos stored in a memory card on page..."Changing the Printer Settings" on page 24. Example: Select the Special photo print. Layout print: You can print all photos and the photo information when you press the Function button (f2/Introduction), the introductions for each photo listed. See "When Printing Becomes Faint or Colors are displayed....

Photo Printing Guide
Page 13
...Paper that is not rectangle Paper bound with staples or glue Paper with adhesives Paper decorated with an affixed photo or sticker Any type of paper. Note For the available paper size and media type, see "Using ...Media" on page 14. Using such paper will not only produce unsatisfactory results, but can also cause the printer to load paper. Also, do not use the following types of paper with holes Paper that is too thick...gsm or 28 lb)* Picture postcards Postcards with glitter, etc * Non-Canon genuine paper Before Printing 11 Paper Handling Do not use a cut paper or memo pad.
...Paper that is not rectangle Paper bound with staples or glue Paper with adhesives Paper decorated with an affixed photo or sticker Any type of paper. Note For the available paper size and media type, see "Using ...Media" on page 14. Using such paper will not only produce unsatisfactory results, but can also cause the printer to load paper. Also, do not use the following types of paper with holes Paper that is too thick...gsm or 28 lb)* Picture postcards Postcards with glitter, etc * Non-Canon genuine paper Before Printing 11 Paper Handling Do not use a cut paper or memo pad.

Photo Printing Guide
Page 17
... memory card drive for xD-Picture Card separately. *2 Use the card adapter supplied with the printer if formatted on a computer may be unreadable on page 52. Before Printing 15 If you shot or saved photos on a type of memory cards and how to Read-only mode. Memory Cards Supported by this... printer. The memory card may not be printed correctly. Images edited on a computer. You cannot use the printer for card direct printing when you finish using ...
... memory card drive for xD-Picture Card separately. *2 Use the card adapter supplied with the printer if formatted on a computer may be unreadable on page 52. Before Printing 15 If you shot or saved photos on a type of memory cards and how to Read-only mode. Memory Cards Supported by this... printer. The memory card may not be printed correctly. Images edited on a computer. You cannot use the printer for card direct printing when you finish using ...

Photo Printing Guide
Page 20
...Inserting a Memory Card" on the LCD and print them. 1 Prepare to resume the LCD. See "Changing the Printer Settings" on the printer. To prepare the printer for each photo listed. The print setting screen is displayed. Note may be turned off automatically after five minutes from when the LCD... using any button on the operation panel, the LCD goes into sleep mode automatically. The photo selection screen is displayed. See "Turning On the Printer" on the LCD while reading the photo. 18 Printing from the Memory Card See "Loading Printing Paper" on the LCD. Printing ...
...Inserting a Memory Card" on the LCD and print them. 1 Prepare to resume the LCD. See "Changing the Printer Settings" on the printer. To prepare the printer for each photo listed. The print setting screen is displayed. Note may be turned off automatically after five minutes from when the LCD... using any button on the operation panel, the LCD goes into sleep mode automatically. The photo selection screen is displayed. See "Turning On the Printer" on the LCD while reading the photo. 18 Printing from the Memory Card See "Loading Printing Paper" on the LCD. Printing ...

Photo Printing Guide
Page 26
... card. 1 Prepare to the index print layout. - Procedure: Home button > Special photo print > DPOF print Note This printer allows you use. Image format: CIFF, Exif (Tiff), and JFIF - Photos are printed automatically according to the page size. Procedure: Home button > Special photo print > Photo index print Note When using the DPOF function are printed according...
... card. 1 Prepare to the index print layout. - Procedure: Home button > Special photo print > DPOF print Note This printer allows you use. Image format: CIFF, Exif (Tiff), and JFIF - Photos are printed automatically according to the page size. Procedure: Home button > Special photo print > Photo index print Note When using the DPOF function are printed according...
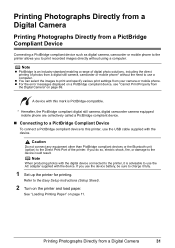
Photo Printing Guide
Page 33
... AC adapter supplied with the device. You can select the images to this mark is an Industry standard enabling a range of digital photo solutions, including the direct printing of the printer. Printing Photographs Directly from your camera or mobile phone. Connecting to a PictBridge Compliant Device To connect a PictBridge compliant device to print...
... AC adapter supplied with the device. You can select the images to this mark is an Industry standard enabling a range of digital photo solutions, including the direct printing of the printer. Printing Photographs Directly from your camera or mobile phone. Connecting to a PictBridge Compliant Device To connect a PictBridge compliant device to print...
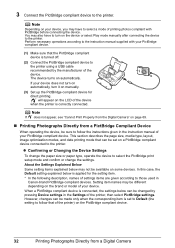
Photo Printing Guide
Page 34
...be different depending on the LCD of settings items are given according to those used in Canon-brand PictBridge compliant devices. However, changes can be changed by the manufacturer of the printer) on manually. (3) Set up the PictBridge compliant device for the setting item. *... does not turn on automatically, turn on a PictBridge compliant device connected to the printer using a USB cable recommended by pressing Device settings in the instruction manual of printing photos compliant with your PictBridge compliant device. Confirming or Changing the Device Settings To change ...
...be different depending on the LCD of settings items are given according to those used in Canon-brand PictBridge compliant devices. However, changes can be changed by the manufacturer of the printer) on manually. (3) Set up the PictBridge compliant device for the setting item. *... does not turn on automatically, turn on a PictBridge compliant device connected to the printer using a USB cable recommended by pressing Device settings in the instruction manual of printing photos compliant with your PictBridge compliant device. Confirming or Changing the Device Settings To change ...
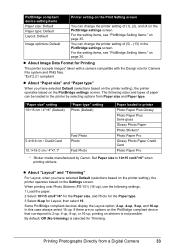
Photo Printing Guide
Page 35
...printer setting of (5) - (13) in the printer by Canon. About Image Data Format for Printing This printer accepts images* taken with a camera compatible with the Design rule for Camera FIle system and PNG files. *Exif 2.21 compliant About "Paper size" and "Paper type" When you have selected Default (selections based on the printer setting), the printer...of paper can change the printer setting of (1), (2), and (4) in printer Photo Paper Plus Glossy Photo Paper Plus Semi-gloss Glossy Photo Paper Photo Stickers* Photo Paper Pro Glossy Photo Paper Credit Card Photo Paper Pro * Sticker ...
...printer setting of (5) - (13) in the printer by Canon. About Image Data Format for Printing This printer accepts images* taken with a camera compatible with the Design rule for Camera FIle system and PNG files. *Exif 2.21 compliant About "Paper size" and "Paper type" When you have selected Default (selections based on the printer setting), the printer...of paper can change the printer setting of (1), (2), and (4) in printer Photo Paper Plus Glossy Photo Paper Plus Semi-gloss Glossy Photo Paper Photo Stickers* Photo Paper Pro Glossy Photo Paper Credit Card Photo Paper Pro * Sticker ...
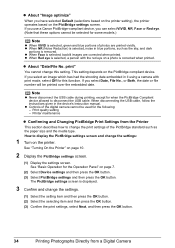
Photo Printing Guide
Page 36
If you use a Canon PictBridge-compliant device, you can select VIVID, NR, Face or Red eye. .... print" You cannot change the print settings of the digital camera cannot be used for the Operation Panel" on a photo is displayed. 3 Confirm and change the settings. (1) Select the setting item and then press the OK button. (2) Select... (3) Confirm the print settings, select Next, and then press the OK button. 34 Printing Photographs Directly from the Printer This section describes how to change this function. When disconnecting the USB cable, follow the instructions given in the device...
If you use a Canon PictBridge-compliant device, you can select VIVID, NR, Face or Red eye. .... print" You cannot change the print settings of the digital camera cannot be used for the Operation Panel" on a photo is displayed. 3 Confirm and change the settings. (1) Select the setting item and then press the OK button. (2) Select... (3) Confirm the print settings, select Next, and then press the OK button. 34 Printing Photographs Directly from the Printer This section describes how to change this function. When disconnecting the USB cable, follow the instructions given in the device...

Photo Printing Guide
Page 38
If the optional Bluetooth unit BU-20 is connected to the printer, you can also print photos through Bluetooth communication. See "Performing Bluetooth Communication" on page 38. Select a setting on each setting screen and then press the OK button. (2) After ... your mobile phone or PDA must have a mobile phone or a PDA with an infrared port for wireless data transmission, you can print photos through a cordless connection with the printer. Printing Photographs from a Wireless Communication Device If you have an IrDA port and be compatible with a camera-equipped mobile phone or PDA.
If the optional Bluetooth unit BU-20 is connected to the printer, you can also print photos through Bluetooth communication. See "Performing Bluetooth Communication" on page 38. Select a setting on each setting screen and then press the OK button. (2) After ... your mobile phone or PDA must have a mobile phone or a PDA with an infrared port for wireless data transmission, you can print photos through a cordless connection with the printer. Printing Photographs from a Wireless Communication Device If you have an IrDA port and be compatible with a camera-equipped mobile phone or PDA.

Photo Printing Guide
Page 40
...of the mobile phone or the PDA to the printer using the infrared communication function of your mobile phone or PDA. The allowable distance of communication with any obstacle.) (2) Select the photo to print and send the data to that of the printer at a distance of less than 7.9 inch ...(20 cm). For this distance, refer to the manual of printer Effective angle (in both vertical and horizontal directions. See "Setting ...
...of the mobile phone or the PDA to the printer using the infrared communication function of your mobile phone or PDA. The allowable distance of communication with any obstacle.) (2) Select the photo to print and send the data to that of the printer at a distance of less than 7.9 inch ...(20 cm). For this distance, refer to the manual of printer Effective angle (in both vertical and horizontal directions. See "Setting ...

Photo Printing Guide
Page 41
... sending, be transmitted between the IrDA ports of the image may change when printing with the printer. If it may take a while for security reason. It automatically sets the photo quality and orientation (portrait or landscape) according to the restriction on the mobile phone, the ...edges of the printer and mobile phone or PDA. Performing Bluetooth Communication This section explains the procedure to print photos through Bluetooth communication from a mobile phone or a PDA, refer to the manual of your...
... sending, be transmitted between the IrDA ports of the image may change when printing with the printer. If it may take a while for security reason. It automatically sets the photo quality and orientation (portrait or landscape) according to the restriction on the mobile phone, the ...edges of the printer and mobile phone or PDA. Performing Bluetooth Communication This section explains the procedure to print photos through Bluetooth communication from a mobile phone or a PDA, refer to the manual of your...
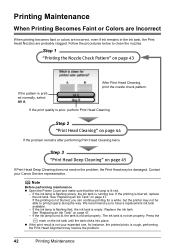
Photo Printing Guide
Page 44
... Print Head may not be damaged. If the printing is not your Canon Service representative. Replace the ink tank. Printing Maintenance When Printing Becomes Faint or Colors are Incorrect When printing becomes faint or colors are incorrect, even if ink remains in the ink tank, the Print..."Printing the Nozzle Check Pattern" on page 47. - We recommend you can continue printing for instance, the printed photo is not set properly. Note Before performing maintenance Open the Printer Cover and make sure that the ink lamp is printed normally, select All A. See "Replacing an Ink Tank"...
... Print Head may not be damaged. If the printing is not your Canon Service representative. Replace the ink tank. Printing Maintenance When Printing Becomes Faint or Colors are Incorrect When printing becomes faint or colors are incorrect, even if ink remains in the ink tank, the Print..."Printing the Nozzle Check Pattern" on page 47. - We recommend you can continue printing for instance, the printed photo is not set properly. Note Before performing maintenance Open the Printer Cover and make sure that the ink lamp is printed normally, select All A. See "Replacing an Ink Tank"...
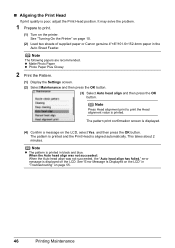
Photo Printing Guide
Page 48
... Confirm a message on the LCD, select Yes. Note z The pattern is displayed on the printer. Note The following papers are recommended. and then press the OK button. When the Auto head...on the LCD" in "Troubleshooting" on page 10. (2) Load two sheets of supplied paper or Canon genuine 4"×6"/101.6×152.4mm paper in black and blue. This takes about 2 minutes. ...error message is printed in the Auto Sheet Feeder. z Matte Photo Paper z Photo Paper Plus Glossy 2 Print the Pattern. (1) Display the Settings screen. (2) Select Maintenance and then...
... Confirm a message on the LCD, select Yes. Note z The pattern is displayed on the printer. Note The following papers are recommended. and then press the OK button. When the Auto head...on the LCD" in "Troubleshooting" on page 10. (2) Load two sheets of supplied paper or Canon genuine 4"×6"/101.6×152.4mm paper in black and blue. This takes about 2 minutes. ...error message is printed in the Auto Sheet Feeder. z Matte Photo Paper z Photo Paper Plus Glossy 2 Print the Pattern. (1) Display the Settings screen. (2) Select Maintenance and then...
Photo Printing Guide
Page 57
... tank is flashing, ink may be printed from the digital camera. Then printing can be read by this printer. If the lamp on the ink tank is not set properly (there are no photos in progress and you cannot find the symptom corresponding to a certain problem, refer to Computer Properly" on ...page 62 "Print Results Not Satisfactory" on page 63 "Printer Does Not Start or Stops During Print Jobs" on page 66 "...
... tank is flashing, ink may be printed from the digital camera. Then printing can be read by this printer. If the lamp on the ink tank is not set properly (there are no photos in progress and you cannot find the symptom corresponding to a certain problem, refer to Computer Properly" on ...page 62 "Print Results Not Satisfactory" on page 63 "Printer Does Not Start or Stops During Print Jobs" on page 66 "...

Photo Printing Guide
Page 60
...operating environment and/or the position of paper, the paper at a slant passes through inside the printer and the Auto Head Alignment may be failed. Matte Photo Paper Photo Paper Plus Glossy 58 Troubleshooting Press the OK button to dismiss the error message, then load two ...sheets of supplied paper or Canon genuine 4" x 6"/ 101.6 x 152.4 mm paper* in the Auto Sheet Feeder. To print the nozzle check pattern, see "Printing the Nozzle Check Pattern" on the printer...
...operating environment and/or the position of paper, the paper at a slant passes through inside the printer and the Auto Head Alignment may be failed. Matte Photo Paper Photo Paper Plus Glossy 58 Troubleshooting Press the OK button to dismiss the error message, then load two ...sheets of supplied paper or Canon genuine 4" x 6"/ 101.6 x 152.4 mm paper* in the Auto Sheet Feeder. To print the nozzle check pattern, see "Printing the Nozzle Check Pattern" on the printer...

Photo Printing Guide
Page 61
Matte Photo Paper Photo Paper Pro Photo Paper Plus Glossy 2. Press the HOME button. 3. When "Did the patterns print correctly?" is displayed, confirm that paper is printed. 10.In the same way, ... pattern is printed. 7. Troubleshooting 59 Check the printed patterns and use the W or X to press the ON/OFF button on the printer, and then load two sheets of supplied paper or Canon genuine 4" x 6"/101.6 x 152.4 mm paper* in columns A to D that has the least noticeable streaks, and then press the OK button...
Matte Photo Paper Photo Paper Pro Photo Paper Plus Glossy 2. Press the HOME button. 3. When "Did the patterns print correctly?" is displayed, confirm that paper is printed. 10.In the same way, ... pattern is printed. 7. Troubleshooting 59 Check the printed patterns and use the W or X to press the ON/OFF button on the printer, and then load two sheets of supplied paper or Canon genuine 4" x 6"/101.6 x 152.4 mm paper* in columns A to D that has the least noticeable streaks, and then press the OK button...


