Photo Printing Guide
Page 1
Photo Printer Photo Printing Guide Table of Contents Introduction 2 Before Printing 3 Printing from the Memory Card 18 Printing Photographs Directly from a Digital Camera 31 Printing Photographs from a Wireless Communication Device 36 Printing Maintenance 42 Changing the Printer Settings 52 Troubleshooting 55 Appendix 73 US QT5-0760-V01
Photo Printer Photo Printing Guide Table of Contents Introduction 2 Before Printing 3 Printing from the Memory Card 18 Printing Photographs Directly from a Digital Camera 31 Printing Photographs from a Wireless Communication Device 36 Printing Maintenance 42 Changing the Printer Settings 52 Troubleshooting 55 Appendix 73 US QT5-0760-V01

Photo Printing Guide
Page 3
International ENERGY STAR® Program As an ENERGY STAR® Partner, Canon Inc. The International ENERGY STAR® Office Equipment Program is an open system in the country of purchase. It is a global program that this may .... Caution For safety reasons, store ink tanks out of the reach of purchase. By connecting to the printer. Their standards and logos are available for enhancing the communication between digital cameras and printers. Model Number: K10295 (mini260) Bluetooth ID: B02954 1 The correct power supply voltages and frequencies are wet. The targeted products are...
International ENERGY STAR® Program As an ENERGY STAR® Partner, Canon Inc. The International ENERGY STAR® Office Equipment Program is an open system in the country of purchase. It is a global program that this may .... Caution For safety reasons, store ink tanks out of the reach of purchase. By connecting to the printer. Their standards and logos are available for enhancing the communication between digital cameras and printers. Model Number: K10295 (mini260) Bluetooth ID: B02954 1 The correct power supply voltages and frequencies are wet. The targeted products are...
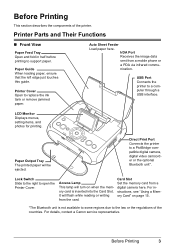
Photo Printing Guide
Page 5
...Memory Card" on when the memory card is not available to some regions due to a computer through a USB interface. For details, contact a Canon service representative. Access Lamp This lamp will be ejected. It will flash while reading or writing from a mobile phone or a PDA via infrared ... Paper Guide When loading paper, ensure that the left edge just touches this guide. Direct Print Port Connects the printer to support paper. Before Printing 3 Printer Parts and Their Functions Front View Paper Feed Tray Open and fold in half before printing to a PictBridge compatible digital...
...Memory Card" on when the memory card is not available to some regions due to a computer through a USB interface. For details, contact a Canon service representative. Access Lamp This lamp will be ejected. It will flash while reading or writing from a mobile phone or a PDA via infrared ... Paper Guide When loading paper, ensure that the left edge just touches this guide. Direct Print Port Connects the printer to support paper. Before Printing 3 Printer Parts and Their Functions Front View Paper Feed Tray Open and fold in half before printing to a PictBridge compatible digital...

Photo Printing Guide
Page 6
... red to the manual provided with the Portable Kit. See "The Paper Thickness Lever position is stained. AC Adapter Connector Connector used to carry the printer. Interior Print Head Holder Install the Print Head here. Important Do not pull up this lever after installing the Print Head. Print Head Lock Lever...
... red to the manual provided with the Portable Kit. See "The Paper Thickness Lever position is stained. AC Adapter Connector Connector used to carry the printer. Interior Print Head Holder Install the Print Head here. Important Do not pull up this lever after installing the Print Head. Print Head Lock Lever...
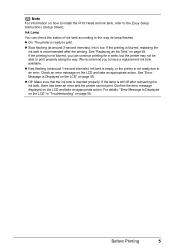
Photo Printing Guide
Page 7
... an appropriate action. Check an error message on the LCD and take an appropriate action. Ink Lamp You can continue printing for a while, but the printer may not be able to print. We recommend you can check the status of ink tank according to have a replacement ink tank available. Note For... how to install the Print Head and ink tank, refer to an error. Fast flashing (at around 1-second intervals): Ink tank is empty, or the printer is inserted properly. Off: Make sure that the ink tank is not ready due to the Easy Setup Instructions (Setup Sheet). Confirm the error message...
... an appropriate action. Check an error message on the LCD and take an appropriate action. Ink Lamp You can continue printing for a while, but the printer may not be able to print. We recommend you can check the status of ink tank according to have a replacement ink tank available. Note For... how to install the Print Head and ink tank, refer to an error. Fast flashing (at around 1-second intervals): Ink tank is empty, or the printer is inserted properly. Off: Make sure that the ink tank is not ready due to the Easy Setup Instructions (Setup Sheet). Confirm the error message...

Photo Printing Guide
Page 8
...Easy-Scroll Wheel Selects the menu or setting item. See "Easy-Scroll Wheel" on or off. Stop/Reset button Allows you made. Flashing: the printer is currently initializing. STW X buttons Use these buttons in progress, press this button. Also, to cancel printing in trimming mode to move the trimming... area. Additionally, use these buttons, shown as arrows on the printer or off . Lighting: the printer is ready to print, is currently printing, or is preparing to turn on the LCD, to select a menu item or photo,...
...Easy-Scroll Wheel Selects the menu or setting item. See "Easy-Scroll Wheel" on or off. Stop/Reset button Allows you made. Flashing: the printer is currently initializing. STW X buttons Use these buttons in progress, press this button. Also, to cancel printing in trimming mode to move the trimming... area. Additionally, use these buttons, shown as arrows on the printer or off . Lighting: the printer is ready to print, is currently printing, or is preparing to turn on the LCD, to select a menu item or photo,...
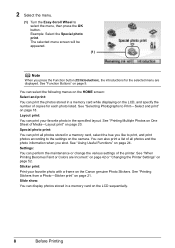
Photo Printing Guide
Page 10
... various settings of all photos stored in the specified layout. See "When Printing Becomes Faint or Colors are displayed. 2 Select the menu. (1) Turn the Easy-Scroll Wheel to Print-Select and print... specify the number of Media-Layout print" on page 9. See "Using Useful Functions" on the Canon genuine Photo Stickers. See "Printing Stickers from a Photo-Sticker print" on page 18. See "... One Sheet of copies for the selected menu are Incorrect" on page 42 or "Changing the Printer Settings" on the LCD sequentially. 8 Before Printing You can print all photos and the photo ...
... various settings of all photos stored in the specified layout. See "When Printing Becomes Faint or Colors are displayed. 2 Select the menu. (1) Turn the Easy-Scroll Wheel to Print-Select and print... specify the number of Media-Layout print" on page 9. See "Using Useful Functions" on the Canon genuine Photo Stickers. See "Printing Stickers from a Photo-Sticker print" on page 18. See "... One Sheet of copies for the selected menu are Incorrect" on page 42 or "Changing the Printer Settings" on the LCD sequentially. 8 Before Printing You can print all photos and the photo ...
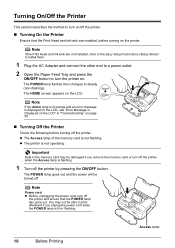
Photo Printing Guide
Page 12
... press the ON/OFF button to steady (non-flashing). Note Power cord Before unplugging the power cord, turn off the printer by pressing the ON/OFF button. Turning Off the Printer Check the following before turning on page 55. Note If the Alarm lamp is lit orange and an error message is... flashing. 1 Turn off the printer when the Access lamp is displayed on the LCD, see "Error Message Is Displayed on the LCD" in the memory card may not be damaged ...
... press the ON/OFF button to steady (non-flashing). Note Power cord Before unplugging the power cord, turn off the printer by pressing the ON/OFF button. Turning Off the Printer Check the following before turning on page 55. Note If the Alarm lamp is lit orange and an error message is... flashing. 1 Turn off the printer when the Access lamp is displayed on the LCD, see "Error Message Is Displayed on the LCD" in the memory card may not be damaged ...

Photo Printing Guide
Page 13
Using such paper will not only produce unsatisfactory results, but can also cause the printer to load paper. Loading Printing Paper This section describes the available paper size and media type, and how to jam or malfunction. Paper Handling Do ... 64 gsm or 17 lb) Paper that is not rectangle Paper bound with staples or glue Paper with adhesives Paper decorated with glitter, etc * Non-Canon genuine paper Before Printing 11 Note For the available paper size and media type, see "Using Genuine Media" on page 14.
Using such paper will not only produce unsatisfactory results, but can also cause the printer to load paper. Loading Printing Paper This section describes the available paper size and media type, and how to jam or malfunction. Paper Handling Do ... 64 gsm or 17 lb) Paper that is not rectangle Paper bound with staples or glue Paper with adhesives Paper decorated with glitter, etc * Non-Canon genuine paper Before Printing 11 Note For the available paper size and media type, see "Using Genuine Media" on page 14.

Photo Printing Guide
Page 14
Loading Paper 1 Turn on page 10. 2 Flatten the four corners of the paper before loading it in the opposite direction until the paper becomes completely flat. 3 Ensure that the Paper Thickness Lever is set to the left, only if ink smudges or the printed surface is stained. 12 Before Printing Note Set the Paper Thickness Lever to the right. Note If paper is curled, gently bend the corners in half. (2) Press the ON/OFF button. See "Turning On the Printer" on the printer. (1) Open the Paper Feed Tray and fold it .
Loading Paper 1 Turn on page 10. 2 Flatten the four corners of the paper before loading it in the opposite direction until the paper becomes completely flat. 3 Ensure that the Paper Thickness Lever is set to the left, only if ink smudges or the printed surface is stained. 12 Before Printing Note Set the Paper Thickness Lever to the right. Note If paper is curled, gently bend the corners in half. (2) Press the ON/OFF button. See "Turning On the Printer" on the printer. (1) Open the Paper Feed Tray and fold it .

Photo Printing Guide
Page 17
...Card separately. *2 Use the card adapter supplied with the card. Before Printing 15 When you shot or saved photos on page 52. Important This printer supports images taken with a camera compatible with your computer, remove the memory card, then set the Read/write attribute to Read-only mode. ... Card Adapter for card direct printing when you set the Read/write attribute in Device settings to Read/write mode. Memory Cards Supported by this Printer Supported memory cards are as a memory card drive for Camera File system, CIFF, Exif2.21 or earlier, JFIF, TIFF (Exif2.21 compliant) ...
...Card separately. *2 Use the card adapter supplied with the card. Before Printing 15 When you shot or saved photos on page 52. Important This printer supports images taken with a camera compatible with your computer, remove the memory card, then set the Read/write attribute to Read-only mode. ... Card Adapter for card direct printing when you set the Read/write attribute in Device settings to Read/write mode. Memory Cards Supported by this Printer Supported memory cards are as a memory card drive for Camera File system, CIFF, Exif2.21 or earlier, JFIF, TIFF (Exif2.21 compliant) ...

Photo Printing Guide
Page 18
... Card, Multimedia Card (ver3.31), and miniSD Card* Insert the card into the downside slot with the gold contact facing up . Inserting a Memory Card This printer is correctly set. Important Insert only single type of memory cards. For SmartMedia Insert the card into the upper slot with its label facing up .
... Card, Multimedia Card (ver3.31), and miniSD Card* Insert the card into the downside slot with the gold contact facing up . Inserting a Memory Card This printer is correctly set. Important Insert only single type of memory cards. For SmartMedia Insert the card into the upper slot with its label facing up .

Photo Printing Guide
Page 19
Removing a Memory Card Note If you use the printer connected to your computer, follow the instructions for removal of the memory card with your fingers to "Using Data in the Memory Card on the ... the computer. Access lamp Before Printing 17 For the procedure, refer to remove the memory card. Important Removing the memory card or turning off the printer while the Access lamp is not flashing, then remove the memory card.
Removing a Memory Card Note If you use the printer connected to your computer, follow the instructions for removal of the memory card with your fingers to "Using Data in the Memory Card on the ... the computer. Access lamp Before Printing 17 For the procedure, refer to remove the memory card. Important Removing the memory card or turning off the printer while the Access lamp is not flashing, then remove the memory card.

Photo Printing Guide
Page 20
... selection screen is displayed. Printing from the Memory Card Printing Photographs You can print the photos you leave the printer more than five minutes without using the optional battery, the printer will be displayed on the operation panel, the LCD goes into sleep mode automatically. See "Turning On the...on page 52. 3 Confirm the paper size, media type, and other settings, then select Next, and then press the OK button. To prepare the printer for each photo listed. Note To change the settings, select the item and press the OK button. Press the OK button to print. See "Changing...
... selection screen is displayed. Printing from the Memory Card Printing Photographs You can print the photos you leave the printer more than five minutes without using the optional battery, the printer will be displayed on the operation panel, the LCD goes into sleep mode automatically. See "Turning On the...on page 52. 3 Confirm the paper size, media type, and other settings, then select Next, and then press the OK button. To prepare the printer for each photo listed. Note To change the settings, select the item and press the OK button. Press the OK button to print. See "Changing...

Photo Printing Guide
Page 26
... are printed. - Print type - Other functions (addition of all photos saved in the memory card. Procedure: Home button > Special photo print > DPOF print Note This printer allows you use. See "Selecting Photographs to Print-Select and print" on the size of paper depends on the page size, as specified in the...
... are printed. - Print type - Other functions (addition of all photos saved in the memory card. Procedure: Home button > Special photo print > DPOF print Note This printer allows you use. See "Selecting Photographs to Print-Select and print" on the size of paper depends on the page size, as specified in the...
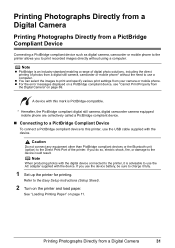
Photo Printing Guide
Page 33
...Printing Photographs Directly from a PictBridge Compliant Device Connecting a PictBridge compliant device such as digital camera, camcorder or mobile phone to the printer allows you to the device could result. For the error messages displayed on a PictBridge compliant device, see "Cannot Print Properly from ... on page 11. Refer to print and specify various print settings from a Digital Camera 31 Note When producing photos with this printer, use a computer. Printing Photographs Directly from your camera or mobile phone. Connecting to a PictBridge Compliant Device To connect a ...
...Printing Photographs Directly from a PictBridge Compliant Device Connecting a PictBridge compliant device such as digital camera, camcorder or mobile phone to the printer allows you to the device could result. For the error messages displayed on a PictBridge compliant device, see "Cannot Print Properly from ... on page 11. Refer to print and specify various print settings from a Digital Camera 31 Note When producing photos with this printer, use a computer. Printing Photographs Directly from your camera or mobile phone. Connecting to a PictBridge Compliant Device To connect a ...
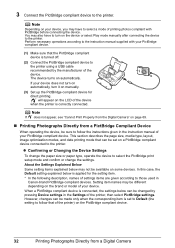
Photo Printing Guide
Page 34
...Digital Camera When a PictBridge compliant device is connected, the settings below may also have to the printer. will appear on automatically. 3 Connect the PictBridge compliant device to those used in Canon-brand PictBridge compliant devices. The device turns on the LCD of the device when the... printer is turned off. (2) Connect the PictBridge compliant device to select the PictBridge print setup mode...
...Digital Camera When a PictBridge compliant device is connected, the settings below may also have to the printer. will appear on automatically. 3 Connect the PictBridge compliant device to those used in Canon-brand PictBridge compliant devices. The device turns on the LCD of the device when the... printer is turned off. (2) Connect the PictBridge compliant device to select the PictBridge print setup mode...
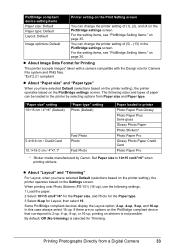
Photo Printing Guide
Page 35
...215;8.6 cm / Credit Card 10.1×18.0 cm / 4"×7.1" Fast Photo Photo Fast Photo Paper loaded in the printer by Canon. You can be loaded in printer Photo Paper Plus Glossy Photo Paper Plus Semi-gloss Glossy Photo Paper Photo Stickers* Photo Paper Pro Glossy Photo Paper Credit Card... size, and Photo for Trimming. About "Layout" and "Trimming" For Layout, when you have selected Default (selections based on the printer setting), the printer operates based on the PictBridge settings screen. In this case always select 16-up . For the setting items, see "PictBridge Setting Items...
...215;8.6 cm / Credit Card 10.1×18.0 cm / 4"×7.1" Fast Photo Photo Fast Photo Paper loaded in the printer by Canon. You can be loaded in printer Photo Paper Plus Glossy Photo Paper Plus Semi-gloss Glossy Photo Paper Photo Stickers* Photo Paper Pro Glossy Photo Paper Credit Card... size, and Photo for Trimming. About "Layout" and "Trimming" For Layout, when you have selected Default (selections based on the printer setting), the printer operates based on the PictBridge settings screen. In this case always select 16-up . For the setting items, see "PictBridge Setting Items...
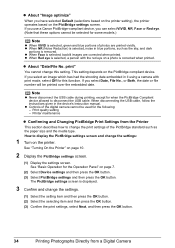
Photo Printing Guide
Page 36
When Red eye is selected, backlit images are printed vividly. See "Turning On the Printer" on the PictBridge compliant device. If you use a Canon PictBridge-compliant device, you select an image which has had the shooting date embedded in it using a camera with the red eye on the ...item and then press the OK button. (3) Confirm the print settings, select Next, and then press the OK button. 34 Printing Photographs Directly from the Printer This section describes how to disconnect the USB cable. About "Image optimize" When you select Date, File No., or Both, the date or file ...
When Red eye is selected, backlit images are printed vividly. See "Turning On the Printer" on the PictBridge compliant device. If you use a Canon PictBridge-compliant device, you select an image which has had the shooting date embedded in it using a camera with the red eye on the ...item and then press the OK button. (3) Confirm the print settings, select Next, and then press the OK button. 34 Printing Photographs Directly from the Printer This section describes how to disconnect the USB cable. About "Image optimize" When you select Date, File No., or Both, the date or file ...

Photo Printing Guide
Page 38
... and press the OK button. 36 Printing Photographs from a Mobile Phone or a PDA" below . When printing photos through a cordless connection with the printer. Setting the Page Size, Media Type, and Layout When Printing from a Mobile Phone or a PDA You can select the page size, media type,... layout and borderless printing on the printer. 2 Display the Wireless print settings screen. (1) Display the Settings screen. (2) Select Device settings and then press the OK button. (3) Select Wireless ...
... and press the OK button. 36 Printing Photographs from a Mobile Phone or a PDA" below . When printing photos through a cordless connection with the printer. Setting the Page Size, Media Type, and Layout When Printing from a Mobile Phone or a PDA You can select the page size, media type,... layout and borderless printing on the printer. 2 Display the Wireless print settings screen. (1) Display the Settings screen. (2) Select Device settings and then press the OK button. (3) Select Wireless ...


