
Photo Printing Guide
Page 6
Rear View Battery Connector Cover Removes this lever after installing the Print Head. Interior Print Head Holder Install the Print Head here. See "The Paper Thickness Lever position is stained. Important Do not pull up this cover to attach the ... Connector Connector used to the right when printing. on page 65. 4 Before Printing Carrying Handle Pulls out this handle to the left if ink smudges or the printed surface is incorrect." Move to carry the printer. Print Head Lock Lever Locks the Print Head into the Print Head Holder. To attach the optional Portable Kit...
Rear View Battery Connector Cover Removes this lever after installing the Print Head. Interior Print Head Holder Install the Print Head here. See "The Paper Thickness Lever position is stained. Important Do not pull up this cover to attach the ... Connector Connector used to the right when printing. on page 65. 4 Before Printing Carrying Handle Pulls out this handle to the left if ink smudges or the printed surface is incorrect." Move to carry the printer. Print Head Lock Lever Locks the Print Head into the Print Head Holder. To attach the optional Portable Kit...
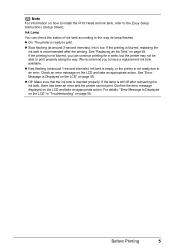
Photo Printing Guide
Page 7
...tank is recommended after reinserting the ink tank, there has been an error and the printer cannot print. Ink Lamp You can continue printing for a while, but the printer may not be able to an error. On: The printer is not blurred, you to the way its lamp flashes. We recommend you can... Easy Setup Instructions (Setup Sheet). If the lamp is still off after the printing. Confirm the error message displayed on the LCD and take an appropriate action. Note For information on how to install the Print Head and ink tank, refer to print. See "Replacing an Ink Tank" on page 48.
...tank is recommended after reinserting the ink tank, there has been an error and the printer cannot print. Ink Lamp You can continue printing for a while, but the printer may not be able to an error. On: The printer is not blurred, you to the way its lamp flashes. We recommend you can... Easy Setup Instructions (Setup Sheet). If the lamp is still off after the printing. Confirm the error message displayed on the LCD and take an appropriate action. Note For information on how to install the Print Head and ink tank, refer to print. See "Replacing an Ink Tank" on page 48.
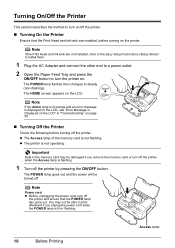
Photo Printing Guide
Page 12
... the Access lamp is not flashing. Important Data in "Troubleshooting" on page 55. Turning On/Off the Printer This section describes the method to turn on/off the printer and ensure that the Print Head and ink tank are not installed, refer to the Easy Setup Instructions (Setup Sheet) to install them. 1 Plug ... power cord when the POWER lamp is not operating. The HOME screen appears on . The POWER lamp flashes then changes to turn off the printer. Note If the Print Head and ink tank are installed, before turning off . Note Power cord Before unplugging the power cord, turn the...
... the Access lamp is not flashing. Important Data in "Troubleshooting" on page 55. Turning On/Off the Printer This section describes the method to turn on/off the printer and ensure that the Print Head and ink tank are not installed, refer to the Easy Setup Instructions (Setup Sheet) to install them. 1 Plug ... power cord when the POWER lamp is not operating. The HOME screen appears on . The POWER lamp flashes then changes to turn off the printer. Note If the Print Head and ink tank are installed, before turning off . Note Power cord Before unplugging the power cord, turn the...
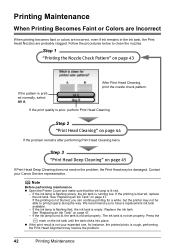
Photo Printing Guide
Page 44
..., select All A. Printing Maintenance When Printing Becomes Faint or Colors are Incorrect When printing becomes faint or colors are incorrect, even if ink remains in the ink tank, the Print Head Nozzles are probably clogged. Step 2 "Print Head Cleaning" on page 44 If the problem remains after performing Print Head Cleaning twice Step 3 "Print Head Deep Cleaning" on page 45 If Print Head Deep Cleaning...
..., select All A. Printing Maintenance When Printing Becomes Faint or Colors are Incorrect When printing becomes faint or colors are incorrect, even if ink remains in the ink tank, the Print Head Nozzles are probably clogged. Step 2 "Print Head Cleaning" on page 44 If the problem remains after performing Print Head Cleaning twice Step 3 "Print Head Deep Cleaning" on page 45 If Print Head Deep Cleaning...
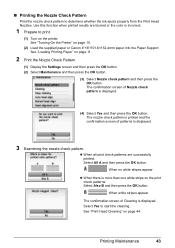
Photo Printing Guide
Page 45
... or the color is displayed. 3 Examining the nozzle check pattern. Printing Maintenance 43 See "Print Head Cleaning" on the print check patterns: Select Also B and then press the OK button. Printing the Nozzle Check Pattern Print the nozzle check pattern to start the cleaning. See "Loading Printing Paper" on page 10. (2) Load the supplied paper or Canon 4"×6"/101...
... or the color is displayed. 3 Examining the nozzle check pattern. Printing Maintenance 43 See "Print Head Cleaning" on the print check patterns: Select Also B and then press the OK button. Printing the Nozzle Check Pattern Print the nozzle check pattern to start the cleaning. See "Loading Printing Paper" on page 10. (2) Load the supplied paper or Canon 4"×6"/101...

Photo Printing Guide
Page 46
... finishes, the confirmation message is displayed. (5) Select Yes and then press the OK button. See "Printing the Nozzle Check Pattern" on the printer. See "Turning On the Printer" on page 10. 2 Start Print Head Cleaning. (1) Display the Settings screen. (2) Select Maintenance and then press the OK button. (3) Select Cleaning and then press the OK button...
... finishes, the confirmation message is displayed. (5) Select Yes and then press the OK button. See "Printing the Nozzle Check Pattern" on the printer. See "Turning On the Printer" on page 10. 2 Start Print Head Cleaning. (1) Display the Settings screen. (2) Select Maintenance and then press the OK button. (3) Select Cleaning and then press the OK button...

Photo Printing Guide
Page 47
... this procedure only when necessary. 1 Turn on page 43. Important Do not perform any other operations until the Print Head Deep Cleaning finishes. Contact a Canon service representative. See "Turning On the Printer" on page 10. 2 Start Print Head Deep Cleaning. (1) Display the Settings screen. (2) Select Maintenance and then press the OK button. (3) Select Deep Cleaning and...
... this procedure only when necessary. 1 Turn on page 43. Important Do not perform any other operations until the Print Head Deep Cleaning finishes. Contact a Canon service representative. See "Turning On the Printer" on page 10. 2 Start Print Head Deep Cleaning. (1) Display the Settings screen. (2) Select Maintenance and then press the OK button. (3) Select Deep Cleaning and...
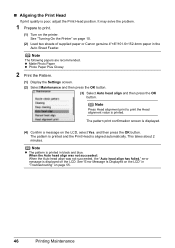
Photo Printing Guide
Page 48
... sheets of supplied paper or Canon genuine 4"×6"/101.6×152.4mm paper in black and blue. See "Turning On the Printer" on page 55. 46 Printing Maintenance Note The following papers are recommended. This takes about 2 minutes. error message is poor, adjust the Print Head position. „ Aligning the Print Head If print quality is displayed on...
... sheets of supplied paper or Canon genuine 4"×6"/101.6×152.4mm paper in black and blue. See "Turning On the Printer" on page 55. 46 Printing Maintenance Note The following papers are recommended. This takes about 2 minutes. error message is poor, adjust the Print Head position. „ Aligning the Print Head If print quality is displayed on...

Photo Printing Guide
Page 50
...Color ink is out of ink, replace it . * With this condition, you want to release the function for at least 5 seconds, and then release it using the following steps. 48 Printing Maintenance Printing under the ink out condition. Please be advised that Canon shall not be necessary to dry out, and the printer... the current condition may be able to inform you remove an ink tank, replace it out in Print Head Cleaning and Print Head Deep Cleaning, which may damage the printer. When an ink tank is consumed in the open. Once you when to clog. Replace empty tank with a ...
...Color ink is out of ink, replace it . * With this condition, you want to release the function for at least 5 seconds, and then release it using the following steps. 48 Printing Maintenance Printing under the ink out condition. Please be advised that Canon shall not be necessary to dry out, and the printer... the current condition may be able to inform you remove an ink tank, replace it out in Print Head Cleaning and Print Head Deep Cleaning, which may damage the printer. When an ink tank is consumed in the open. Once you when to clog. Replace empty tank with a ...

Photo Printing Guide
Page 51
Printing Maintenance 49 Close and reopen the Printer Cover to return the holder to the center. The Print Head Holder moves to the center. Important If the Printer Cover is on. 2 Open the Printer Cover. (1) Slide the Lock Switch toward the right to the right. 1 Ensure that the printer is left open for more than 10 minutes, the Print Head Holder moves to open the Printer Cover.
Printing Maintenance 49 Close and reopen the Printer Cover to return the holder to the center. The Print Head Holder moves to the center. Important If the Printer Cover is on. 2 Open the Printer Cover. (1) Slide the Lock Switch toward the right to the right. 1 Ensure that the printer is left open for more than 10 minutes, the Print Head Holder moves to open the Printer Cover.

Photo Printing Guide
Page 53
on the clicks into place. (1) Printing Maintenance 51 5 Insert the ink tank. (1) Insert a new ink tank slightly slanted toward the Print Head. (1) (2) (2) Push down on the ink tank until it Ensure that the ink lamp is lit red. 6 Close the Printer Cover. (2) (1) Lift the Printer Cover and pull the Lock Bar close. (2) Close the Printer Cover firmly until it clicks into place.
on the clicks into place. (1) Printing Maintenance 51 5 Insert the ink tank. (1) Insert a new ink tank slightly slanted toward the Print Head. (1) (2) (2) Push down on the ink tank until it Ensure that the ink lamp is lit red. 6 Close the Printer Cover. (2) (1) Lift the Printer Cover and pull the Lock Bar close. (2) Close the Printer Cover firmly until it clicks into place.
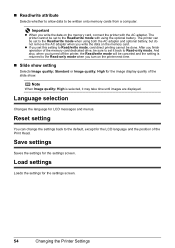
Photo Printing Guide
Page 56
...the data on the memory card. If you write the data on the printer next time. Load settings Loads the settings for LCD messages and menus. Save settings Saves the settings for the image display quality of the Print Head. Read/write attribute Selects whether to allow data to be set to the... Read/write mode with the AC adapter. Important When you set this setting to Read/write mode, card direct printing cannot be sure to Read-only mode. Slide ...
...the data on the memory card. If you write the data on the printer next time. Load settings Loads the settings for LCD messages and menus. Save settings Saves the settings for the image display quality of the Print Head. Read/write attribute Selects whether to allow data to be set to the... Read/write mode with the AC adapter. Important When you set this setting to Read/write mode, card direct printing cannot be sure to Read-only mode. Slide ...
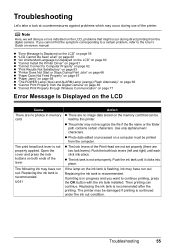
Photo Printing Guide
Page 57
... the OK button with the ink tank installed. The print head lock lever is recommended after the printing. The printer may have run out. Push the both ends of the printer. If printing is flashing, ink may occur during direct printing from the Digital Camera" on page 69 "Cannot Print Properly through Wireless Communication" on page 71 Error...
... the OK button with the ink tank installed. The print head lock lever is recommended after the printing. The printer may have run out. Push the both ends of the printer. If printing is flashing, ink may occur during direct printing from the Digital Camera" on page 69 "Cannot Print Properly through Wireless Communication" on page 71 Error...
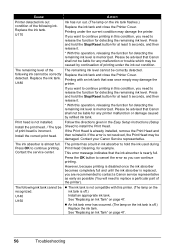
Photo Printing Guide
Page 58
... damage caused by continuation of the following ink. Please be advised that the ink absorber is incorrect. Cause Printer detected ink out condition of the printer). U180 Print head is memorized. If you are recommended to contact a Canon service representative as early as possible (You will need to replace a particular part of the following ink...
... damage caused by continuation of the following ink. Please be advised that the ink absorber is incorrect. Cause Printer detected ink out condition of the printer). U180 Print head is memorized. If you are recommended to contact a Canon service representative as early as possible (You will need to replace a particular part of the following ink...

Photo Printing Guide
Page 60
... of supplied paper or Canon genuine 4" x 6"/ 101.6 x 152.4 mm paper* in the Auto Sheet Feeder. Press the OK button on the printer to dismiss the error message, and then perform Manual Print Head Alignment. * Use the following papers. To print the nozzle check pattern, see "Printing the Nozzle Check Pattern" on the printer to dismiss the error...
... of supplied paper or Canon genuine 4" x 6"/ 101.6 x 152.4 mm paper* in the Auto Sheet Feeder. Press the OK button on the printer to dismiss the error message, and then perform Manual Print Head Alignment. * Use the following papers. To print the nozzle check pattern, see "Printing the Nozzle Check Pattern" on the printer to dismiss the error...

Photo Printing Guide
Page 61
... to press the ON/OFF button on the printer, and then load two sheets of supplied paper or Canon genuine 4" x 6"/101.6 x 152.4 mm paper* in columns A to turn off the printer, be saved. Note Adjusting the Print Head Manually If the Automatic Print Head Alignment does not work or if you turn ...on the printer. Press the ON/OFF button to D that ...
... to press the ON/OFF button on the printer, and then load two sheets of supplied paper or Canon genuine 4" x 6"/101.6 x 152.4 mm paper* in columns A to turn off the printer, be saved. Note Adjusting the Print Head Manually If the Automatic Print Head Alignment does not work or if you turn ...on the printer. Press the ON/OFF button to D that ...
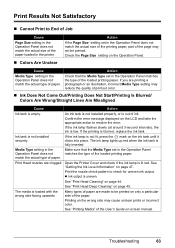
Photo Printing Guide
Page 65
... blurred, replace the ink tank. Troubleshooting 63 If you are clogged. Print Head nozzles are printing a photograph or an illustration, incorrect Media Type setting may cause unclear prints or incorrect color. See "Printing Media" of the paper loaded in the printer. If the printing is lit red. Print the nozzle check pattern to End of Job Cause Page Size...
... blurred, replace the ink tank. Troubleshooting 63 If you are clogged. Print Head nozzles are printing a photograph or an illustration, incorrect Media Type setting may cause unclear prints or incorrect color. See "Printing Media" of the paper loaded in the printer. If the printing is lit red. Print the nozzle check pattern to End of Job Cause Page Size...
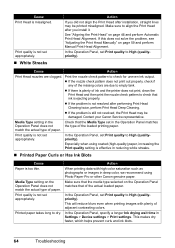
Photo Printing Guide
Page 66
...the Operation Panel matches Operation Panel does not the type of the missing colors are clogged. Especially when using Photo Paper Pro or other Canon genuine paper. See "Aligning the Print Head" on the Operation Panel matches that the media type selected on page 46... ink is plenty of adjacent contrasting colors. Cause Print Head is not set appropriately. Action When printing data with plenty of ink and the printer does not print, clean the Print Head and then print the nozzle check pattern to empty tank. Cause Action Print Head nozzles are due to check that...
...the Operation Panel matches Operation Panel does not the type of the missing colors are clogged. Especially when using Photo Paper Pro or other Canon genuine paper. See "Aligning the Print Head" on the Operation Panel matches that the media type selected on page 46... ink is plenty of adjacent contrasting colors. Cause Print Head is not set appropriately. Action When printing data with plenty of ink and the printer does not print, clean the Print Head and then print the nozzle check pattern to empty tank. Cause Action Print Head nozzles are due to check that...

Photo Printing Guide
Page 67
...on cleaning, see if the paper you do not return the lever, the distance between the Print Head and printing paper stays broadened and the inside of the User's Guide on the printing content, the printing surface may leave some ink inside of paper to set the Paper Thickness Lever to the ...approximately 2 to be decreased. Curled paper used If all four corners or the printing surface of the printer is not too thick or curled. Refer to clean the inside the printer, causing printouts to 5 mm*2. Printing on inappropriate type of the User's Guide on is dirty. Use the paper ...
...on cleaning, see if the paper you do not return the lever, the distance between the Print Head and printing paper stays broadened and the inside of the User's Guide on the printing content, the printing surface may leave some ink inside of paper to set the Paper Thickness Lever to the ...approximately 2 to be decreased. Curled paper used If all four corners or the printing surface of the printer is not too thick or curled. Refer to clean the inside the printer, causing printouts to 5 mm*2. Printing on inappropriate type of the User's Guide on is dirty. Use the paper ...
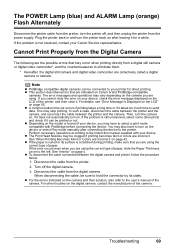
Photo Printing Guide
Page 71
...Print Head Nozzles may also have to the left. See "Interior" on page 55. Turn off , and then unplug the printer from the digital camera. Disconnect the cable from the power supply. Troubleshooting 69 The POWER Lamp (blue) and ALARM Lamp (orange) Flash Alternately Disconnect the printer cable from the printer, turn the printer...Incorrect" on Canon brand PictBridge-compatible cameras. For the errors indicated on after connecting the device to the printer. This may occur when printing directly from the printer. 2. See "When Printing Becomes Faint or Colors are indicated ...
...Print Head Nozzles may also have to the left. See "Interior" on page 55. Turn off , and then unplug the printer from the digital camera. Disconnect the cable from the power supply. Troubleshooting 69 The POWER Lamp (blue) and ALARM Lamp (orange) Flash Alternately Disconnect the printer cable from the printer, turn the printer...Incorrect" on Canon brand PictBridge-compatible cameras. For the errors indicated on after connecting the device to the printer. This may occur when printing directly from the printer. 2. See "When Printing Becomes Faint or Colors are indicated ...


