
Photo Printing Guide
Page 3
...Canon Inc. It is a standard for enhancing the communication between digital cameras and printers. Using the incorrect voltage could cause a fire or electric shock. Never use any power supply other office equipment. Using the incorrect voltage and frequency could cause a fire or electric shock. Model Number: K10295 (mini260... the power outlet or unplug the power cord when your clothes and hands. . Do not drop or shake ink tanks as computers, monitors, printers, faxes and copiers. Also read the Safety Precautions on the power cord. Their standards and logos are available for...
...Canon Inc. It is a standard for enhancing the communication between digital cameras and printers. Using the incorrect voltage could cause a fire or electric shock. Never use any power supply other office equipment. Using the incorrect voltage and frequency could cause a fire or electric shock. Model Number: K10295 (mini260... the power outlet or unplug the power cord when your clothes and hands. . Do not drop or shake ink tanks as computers, monitors, printers, faxes and copiers. Also read the Safety Precautions on the power cord. Their standards and logos are available for...
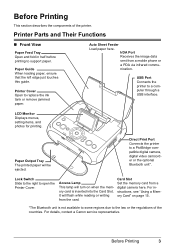
Photo Printing Guide
Page 5
...Access Lamp This lamp will turn on page 15. *The Bluetooth unit is inserted into the Card Slot. For details, contact a Canon service representative. Printer Cover Open to a PictBridge compatible digital camera, digital video camcorder or the optional Bluetooth unit*. LCD Monitor Displays menus, setting items,... Before Printing 3 Paper Guide When loading paper, ensure that the left edge just touches this guide. Direct Print Port Connects the printer to replace the ink tank or remove jammed paper. For instructions, see "Using a Memory Card" on when the memory card is not available to ...
...Access Lamp This lamp will turn on page 15. *The Bluetooth unit is inserted into the Card Slot. For details, contact a Canon service representative. Printer Cover Open to a PictBridge compatible digital camera, digital video camcorder or the optional Bluetooth unit*. LCD Monitor Displays menus, setting items,... Before Printing 3 Paper Guide When loading paper, ensure that the left edge just touches this guide. Direct Print Port Connects the printer to replace the ink tank or remove jammed paper. For instructions, see "Using a Memory Card" on when the memory card is not available to ...

Photo Printing Guide
Page 6
.... Important Do not pull up this handle to carry the printer. on page 65. 4 Before Printing Move to indicate the status of the ink tank. See "The Paper Thickness Lever position is stained. Ink Lamp Lights or flashes red to the left if ink smudges or the printed surface is incorrect." Print Head Lock...
.... Important Do not pull up this handle to carry the printer. on page 65. 4 Before Printing Move to indicate the status of the ink tank. See "The Paper Thickness Lever position is stained. Ink Lamp Lights or flashes red to the left if ink smudges or the printed surface is incorrect." Print Head Lock...
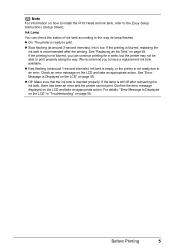
Photo Printing Guide
Page 7
..."Troubleshooting" on page 55. Slow flashing (at around 3-second intervals): Ink is recommended after reinserting the ink tank, there has been an error and the printer cannot print. We recommend you can check the status of ink tank according to an error. Note For information on how to install the... Print Head and ink tank, refer to have a replacement ink tank available. Ink Lamp You can continue printing for a while, but the printer may not be able to print. On: The printer is inserted properly. See "Replacing an Ink Tank" on the LCD and take an appropriate...
..."Troubleshooting" on page 55. Slow flashing (at around 3-second intervals): Ink is recommended after reinserting the ink tank, there has been an error and the printer cannot print. We recommend you can check the status of ink tank according to an error. Note For information on how to install the... Print Head and ink tank, refer to have a replacement ink tank available. Ink Lamp You can continue printing for a while, but the printer may not be able to print. On: The printer is inserted properly. See "Replacing an Ink Tank" on the LCD and take an appropriate...
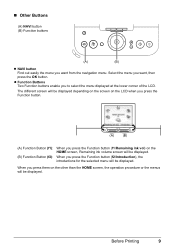
Photo Printing Guide
Page 11
...press the Function button (f2/Introduction), the introductions for the selected menu will be displayed. When you press the Function button (f1/Remaining ink vol) on the other than the HOME screen, the operation procedure or the menus will be displayed. When you want from the navigation... menu. Select the menu you press them on the HOME screen, Remaining ink volume screen will be displayed. Before Printing 9 Other Buttons (A) NAVI button (B) Function buttons (A) (B) NAVI button Find out easily the menu ...
...press the Function button (f2/Introduction), the introductions for the selected menu will be displayed. When you press the Function button (f1/Remaining ink vol) on the other than the HOME screen, the operation procedure or the menus will be displayed. When you want from the navigation... menu. Select the menu you press them on the HOME screen, Remaining ink volume screen will be displayed. Before Printing 9 Other Buttons (A) NAVI button (B) Function buttons (A) (B) NAVI button Find out easily the menu ...
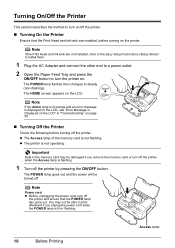
Photo Printing Guide
Page 12
..." on page 55. Note Power cord Before unplugging the power cord, turn off the printer. Turning On/Off the Printer This section describes the method to turn on/off the printer and ensure that the Print Head and ink tank are not installed, refer to the Easy Setup Instructions (Setup Sheet) to install ...unplug the power cord when the POWER lamp is displayed on the LCD, see "Error Message Is Displayed on . Note If the Print Head and ink tank are installed, before turning off the printer. The printer is not flashing. Turning Off the Printer Check the following before turning on the LCD.
..." on page 55. Note Power cord Before unplugging the power cord, turn off the printer. Turning On/Off the Printer This section describes the method to turn on/off the printer and ensure that the Print Head and ink tank are not installed, refer to the Easy Setup Instructions (Setup Sheet) to install ...unplug the power cord when the POWER lamp is displayed on the LCD, see "Error Message Is Displayed on . Note If the Print Head and ink tank are installed, before turning off the printer. The printer is not flashing. Turning Off the Printer Check the following before turning on the LCD.

Photo Printing Guide
Page 14
See "Turning On the Printer" on the printer. (1) Open the Paper Feed Tray and fold it . Note If paper is stained. 12 Before Printing Note Set the Paper Thickness Lever to the right. Loading Paper 1 Turn on page 10. 2 Flatten the four corners of the paper before loading it in the opposite direction until the paper becomes completely flat. 3 Ensure that the Paper Thickness Lever is set to the left, only if ink smudges or the printed surface is curled, gently bend the corners in half. (2) Press the ON/OFF button.
See "Turning On the Printer" on the printer. (1) Open the Paper Feed Tray and fold it . Note If paper is stained. 12 Before Printing Note Set the Paper Thickness Lever to the right. Loading Paper 1 Turn on page 10. 2 Flatten the four corners of the paper before loading it in the opposite direction until the paper becomes completely flat. 3 Ensure that the Paper Thickness Lever is set to the left, only if ink smudges or the printed surface is curled, gently bend the corners in half. (2) Press the ON/OFF button.

Photo Printing Guide
Page 15
For specific drying times, refer to the instructions packaged with print side facing up. Before Printing 13 Photo stickers Card Shorter margin Note Do not touch the printed surface until it is fully inserted. 4 Load the paper. (1) Insert the paper into the Auto Sheet Feeder with your media. When loading the credit card sized paper, load sheets in the portrait position (feed from the short side). (3) Slide the Paper Guide against the left side of the stack of paper. (2) Align the paper with the right edge of the Auto Sheet Feeder and insert the paper until the ink dries.
For specific drying times, refer to the instructions packaged with print side facing up. Before Printing 13 Photo stickers Card Shorter margin Note Do not touch the printed surface until it is fully inserted. 4 Load the paper. (1) Insert the paper into the Auto Sheet Feeder with your media. When loading the credit card sized paper, load sheets in the portrait position (feed from the short side). (3) Slide the Paper Guide against the left side of the stack of paper. (2) Align the paper with the right edge of the Auto Sheet Feeder and insert the paper until the ink dries.
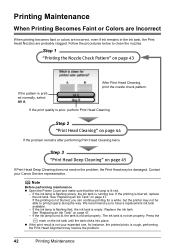
Photo Printing Guide
Page 44
...properly along the way. We recommend you can continue printing for instance, the printed photo is not your Canon Service representative. The ink tank is blurred, replace the ink tank. If the print result is rough, performing the Print Head Alignment may not be damaged. If the...Cleaning. Note Before performing maintenance Open the Printer Cover and make sure that the ink lamp is running low. Printing Maintenance When Printing Becomes Faint or Colors are Incorrect When printing becomes faint or colors are incorrect, even if ink remains in the ink tank, the Print Head Nozzles are ...
...properly along the way. We recommend you can continue printing for instance, the printed photo is not your Canon Service representative. The ink tank is blurred, replace the ink tank. If the print result is rough, performing the Print Head Alignment may not be damaged. If the...Cleaning. Note Before performing maintenance Open the Printer Cover and make sure that the ink lamp is running low. Printing Maintenance When Printing Becomes Faint or Colors are Incorrect When printing becomes faint or colors are incorrect, even if ink remains in the ink tank, the Print Head Nozzles are ...
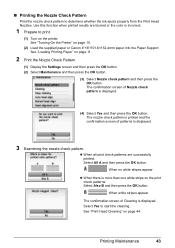
Photo Printing Guide
Page 45
... patterns is more than one white stripe on page 10. (2) Load the supplied paper or Canon 4"×6"/101.6×152.4mm paper into the Paper Support. Select Yes to determine whether the ink ejects properly from the Print Head Nozzles. See "Loading Printing Paper" on page 44. When...Nozzle Check Pattern Print the nozzle check pattern to start the cleaning. When all print check patterns are blurred or the color is incorrect. 1 Prepare to print. (1) Turn on the printer. Use this function when printed results are successfully printed: Select All A and then press the OK button. See ...
... patterns is more than one white stripe on page 10. (2) Load the supplied paper or Canon 4"×6"/101.6×152.4mm paper into the Paper Support. Select Yes to determine whether the ink ejects properly from the Print Head Nozzles. See "Loading Printing Paper" on page 44. When...Nozzle Check Pattern Print the nozzle check pattern to start the cleaning. When all print check patterns are blurred or the color is incorrect. 1 Prepare to print. (1) Turn on the printer. Use this function when printed results are successfully printed: Select All A and then press the OK button. See ...

Photo Printing Guide
Page 46
... displayed. (5) Select Yes and then press the OK button. Cleaning the Print Head consumes ink, so perform Cleaning only when necessary. 1 Turn on page 43. See "Printing the Nozzle Check Pattern" on the printer. See "Turning On the Printer" on page 10. 2 Start Print Head Cleaning. (1) Display the Settings screen. (2) Select Maintenance and...
... displayed. (5) Select Yes and then press the OK button. Cleaning the Print Head consumes ink, so perform Cleaning only when necessary. 1 Turn on page 43. See "Printing the Nozzle Check Pattern" on the printer. See "Turning On the Printer" on page 10. 2 Start Print Head Cleaning. (1) Display the Settings screen. (2) Select Maintenance and...

Photo Printing Guide
Page 47
... message is a more powerful process. Contact a Canon service representative. Print Head Deep Cleaning consumes ink, so perform this procedure only when necessary. 1 Turn on page 43. See "Printing the Nozzle Check Pattern" on the printer. Printing Maintenance 45 Select Yes to verify that the... print quality does not improve by standard Print Head Cleaning, try Print Head Deep Cleaning, which is displayed. See "Turning On the Printer" on page 10. 2 Start Print Head Deep Cleaning. (1) Display the Settings screen. (2) Select Maintenance and then press the OK button...
... message is a more powerful process. Contact a Canon service representative. Print Head Deep Cleaning consumes ink, so perform this procedure only when necessary. 1 Turn on page 43. See "Printing the Nozzle Check Pattern" on the printer. Printing Maintenance 45 Select Yes to verify that the... print quality does not improve by standard Print Head Cleaning, try Print Head Deep Cleaning, which is displayed. See "Turning On the Printer" on page 10. 2 Start Print Head Deep Cleaning. (1) Display the Settings screen. (2) Select Maintenance and then press the OK button...

Photo Printing Guide
Page 49
... to display the ink level information. Replacing an Ink Tank When replacing an ink tank, check the model number very carefully. The printer will not print properly if the wrong ink tank is not blurred, you to print. If the printing is used. Ink Tank: CLI-36 Color Getting the Ink Level Information You ...can continue. The printer may not be damaged if printing is unable to have run out. Ink is running low on page 55. If an ink tank related error message is displayed on the LCD...
... to display the ink level information. Replacing an Ink Tank When replacing an ink tank, check the model number very carefully. The printer will not print properly if the wrong ink tank is not blurred, you to print. If the printing is used. Ink Tank: CLI-36 Color Getting the Ink Level Information You ...can continue. The printer may not be damaged if printing is unable to have run out. Ink is running low on page 55. If an ink tank related error message is displayed on the LCD...

Photo Printing Guide
Page 50
... use of first use an ink tank within six months of specified Canon genuine ink tank. Inserting partially used ink tank may not operate properly when it immediately with such tank, the printer will cause the ink tank to dry out, and the printer may cause the nozzles to maintain the printer's performance. Color ink is out of printing under...
... use of first use an ink tank within six months of specified Canon genuine ink tank. Inserting partially used ink tank may not operate properly when it immediately with such tank, the printer will cause the ink tank to dry out, and the printer may cause the nozzles to maintain the printer's performance. Color ink is out of printing under...

Photo Printing Guide
Page 52
Doing so can cause the printer to malfunction or (A) become unable to avoid staining clothing or the surrounding area. Once the protective cap is removed, do not touch the open ink port. 50 Printing Maintenance 3 Remove the empty ink tank. (1) Push the tab. (2) Remove the ink tank. Important Do not touch the electrical contacts (A) on...
Doing so can cause the printer to malfunction or (A) become unable to avoid staining clothing or the surrounding area. Once the protective cap is removed, do not touch the open ink port. 50 Printing Maintenance 3 Remove the empty ink tank. (1) Push the tab. (2) Remove the ink tank. Important Do not touch the electrical contacts (A) on...

Photo Printing Guide
Page 53
on the clicks into place. (1) Printing Maintenance 51 5 Insert the ink tank. (1) Insert a new ink tank slightly slanted toward the Print Head. (1) (2) (2) Push down on the ink tank until it Ensure that the ink lamp is lit red. 6 Close the Printer Cover. (2) (1) Lift the Printer Cover and pull the Lock Bar close. (2) Close the Printer Cover firmly until it clicks into place.
on the clicks into place. (1) Printing Maintenance 51 5 Insert the ink tank. (1) Insert a new ink tank slightly slanted toward the Print Head. (1) (2) (2) Push down on the ink tank until it Ensure that the ink lamp is lit red. 6 Close the Printer Cover. (2) (1) Lift the Printer Cover and pull the Lock Bar close. (2) Close the Printer Cover firmly until it clicks into place.

Photo Printing Guide
Page 55
Changing the Printer Settings 53 Important Be sure to set this setting only if the print surface becomes smudged. Other settings Date display Changes the display format of ... as specified in the date display format you selected. For the Advanced setting, see "Changing the Bluetooth Settings-Bluetooth settings" on page 34. Print settings Ink drying wait time Use this back to Standard after printing since it take longer than usual for Date on the advanced print settings screen, the...
Changing the Printer Settings 53 Important Be sure to set this setting only if the print surface becomes smudged. Other settings Date display Changes the display format of ... as specified in the date display format you selected. For the Advanced setting, see "Changing the Bluetooth Settings-Bluetooth settings" on page 34. Print settings Ink drying wait time Use this back to Standard after printing since it take longer than usual for Date on the advanced print settings screen, the...
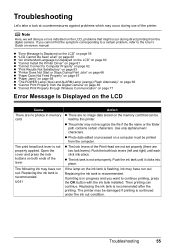
Photo Printing Guide
Page 57
... data stored on the memory card that might occur during use of the printer. Push the ink tank until each click into place. If printing is flashing, ink may have run out. Then printing can be read by this printer. Troubleshooting 55 "Error Message Is Displayed on the LCD" on page 55... "LCD Cannot Be Seen at countermeasures against problems which may have run out. The following ink may occur during direct printing from the digital camera. The printer may not recognize the file if the file name or the folder path contains certain characters. The...
... data stored on the memory card that might occur during use of the printer. Push the ink tank until each click into place. If printing is flashing, ink may have run out. Then printing can be read by this printer. Troubleshooting 55 "Error Message Is Displayed on the LCD" on page 55... "LCD Cannot Be Seen at countermeasures against problems which may have run out. The following ink may occur during direct printing from the digital camera. The printer may not recognize the file if the file name or the folder path contains certain characters. The...
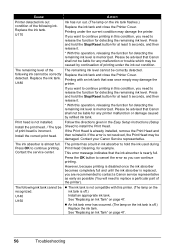
Photo Printing Guide
Page 58
... want to continue printing in this printer. (The lamp on the ink tank is off .) Install an appropriate ink tank. Contact your Canon Service representative. This error message indicates that Canon shall not be advised that the ink absorber is nearly full. The ink tank is not compatible with an ink tank that Canon shall not be advised that...
... want to continue printing in this printer. (The lamp on the ink tank is off .) Install an appropriate ink tank. Contact your Canon Service representative. This error message indicates that Canon shall not be advised that the ink absorber is nearly full. The ink tank is not compatible with an ink tank that Canon shall not be advised that...
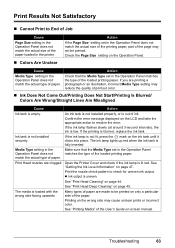
Photo Printing Guide
Page 65
...Type set in the Operation Panel does not match the actual type of ink. match the actual type of the paper loaded in the printer. Printing on the wrong side may reduce the quality of printout color. If the ink lamp is out of paper. Print the nozzle check pattern to resolve... the error. See "Getting the Ink Level Information" on the ink tank until it clicks into place. ...
...Type set in the Operation Panel does not match the actual type of ink. match the actual type of the paper loaded in the printer. Printing on the wrong side may reduce the quality of printout color. If the ink lamp is out of paper. Print the nozzle check pattern to resolve... the error. See "Getting the Ink Level Information" on the ink tank until it clicks into place. ...


