
Photo Printing Guide
Page 6
Print Head Lock Lever Locks the Print Head into the Print Head Holder. Paper Thickness Lever Move to the manual provided with the Portable Kit. Interior Print Head Holder Install the Print Head here. Move to the left if ink smudges or the printed surface ...is incorrect." See "The Paper Thickness Lever position is stained. Rear View Battery Connector Cover Removes this handle to carry the printer. Carrying Handle Pulls out this cover to attach the optional Portable Kit. Important Do not pull up this lever after installing the Print Head. To...
Print Head Lock Lever Locks the Print Head into the Print Head Holder. Paper Thickness Lever Move to the manual provided with the Portable Kit. Interior Print Head Holder Install the Print Head here. Move to the left if ink smudges or the printed surface ...is incorrect." See "The Paper Thickness Lever position is stained. Rear View Battery Connector Cover Removes this handle to carry the printer. Carrying Handle Pulls out this cover to attach the optional Portable Kit. Important Do not pull up this lever after installing the Print Head. To...

Photo Printing Guide
Page 17
..., remove the memory card, then set the Read/write attribute to insert and remove them. Images edited on this printer. For details, see "Changing the Printer Settings" on this Printer Supported memory cards are as a memory card drive for Camera File system, CIFF, Exif2.21 or earlier, JFIF,... digital camera. Format the memory card with the printer if formatted on memory cards that is not guaranteed operation to read such data on page 52. When you set the Read/write attribute in Device settings to the manuals supplied with your digital camera. Do not insert more...
..., remove the memory card, then set the Read/write attribute to insert and remove them. Images edited on this printer. For details, see "Changing the Printer Settings" on this Printer Supported memory cards are as a memory card drive for Camera File system, CIFF, Exif2.21 or earlier, JFIF,... digital camera. Format the memory card with the printer if formatted on memory cards that is not guaranteed operation to read such data on page 52. When you set the Read/write attribute in Device settings to the manuals supplied with your digital camera. Do not insert more...

Photo Printing Guide
Page 19
...memory card or turning off the printer while the Access lamp is not flashing, then remove the memory card. Access lamp Before Printing 17 Hold the exposed portion of the memory card with your computer, follow the instructions for removal of the User's Guide on-screen manual. 1 Ensure that the Access... lamp is flashing can damage the data stored in the Memory Card on the Computer" of the memory card from the computer. Removing a Memory Card Note If you use the printer connected to your fingers to "Using Data ...
...memory card or turning off the printer while the Access lamp is not flashing, then remove the memory card. Access lamp Before Printing 17 Hold the exposed portion of the memory card with your computer, follow the instructions for removal of the User's Guide on-screen manual. 1 Ensure that the Access... lamp is flashing can damage the data stored in the Memory Card on the Computer" of the memory card from the computer. Removing a Memory Card Note If you use the printer connected to your fingers to "Using Data ...
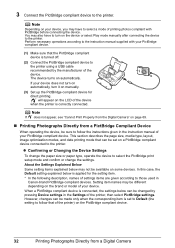
Photo Printing Guide
Page 34
... on some devices. About the Settings Explained Below Some setting items explained below may not be sure to those used in Canon-brand PictBridge compliant devices. Printing Photographs Directly from a PictBridge Compliant Device When operating the device, be available on automatically. ...be made only when the corresponding item is turned off. (2) Connect the PictBridge compliant device to the printer. Perform necessary operations according to the instruction manual supplied with PictBridge before connecting the device. will appear on the brand or model of your device, ...
... on some devices. About the Settings Explained Below Some setting items explained below may not be sure to those used in Canon-brand PictBridge compliant devices. Printing Photographs Directly from a PictBridge Compliant Device When operating the device, be available on automatically. ...be made only when the corresponding item is turned off. (2) Connect the PictBridge compliant device to the printer. Perform necessary operations according to the instruction manual supplied with PictBridge before connecting the device. will appear on the brand or model of your device, ...
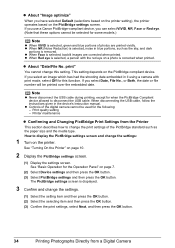
Photo Printing Guide
Page 36
...Reduction) is selected, backlit images are printed vividly. Print quality setting - When Face is selected, noise in the device's Instruction manual. See "Basic Operation for when the PictBridge Compliant device allowed to display the PictBridge settings screen and change this function. When ...settings and then press the OK button. If you have selected Default (selections based on the printer setting), the printer operates based on a photo is removed. If you use a Canon PictBridge-compliant device, you select an image which has had the shooting date embedded in it ...
...Reduction) is selected, backlit images are printed vividly. Print quality setting - When Face is selected, noise in the device's Instruction manual. See "Basic Operation for when the PictBridge Compliant device allowed to display the PictBridge settings screen and change this function. When ...settings and then press the OK button. If you have selected Default (selections based on the printer setting), the printer operates based on a photo is removed. If you use a Canon PictBridge-compliant device, you select an image which has had the shooting date embedded in it ...

Photo Printing Guide
Page 40
...7.9 inch (20 cm). Performing Infrared Communication You can print photos in your mobile phone or PDA. For this distance, refer to that of the printer at a distance of the mobile phone or the PDA. IrDA Port of your mobile phone or PDA. See "Setting the Page Size, Media Type,... and Layout When Printing from a Mobile Phone or a PDA" on the printer. 2 Load the paper. When printing through infrared communication, also refer to the manual of your mobile phone or PDA. 1 Turn on page 36. 4 Start Infrared Communication. (1) Oppose the infrared port of...
...7.9 inch (20 cm). Performing Infrared Communication You can print photos in your mobile phone or PDA. For this distance, refer to that of the printer at a distance of the mobile phone or the PDA. IrDA Port of your mobile phone or PDA. See "Setting the Page Size, Media Type,... and Layout When Printing from a Mobile Phone or a PDA" on the printer. 2 Load the paper. When printing through infrared communication, also refer to the manual of your mobile phone or PDA. 1 Turn on page 36. 4 Start Infrared Communication. (1) Oppose the infrared port of...

Photo Printing Guide
Page 41
... communication with the optional Bluetooth unit BU-20. the margin size may not be transmitted between the IrDA ports of your product's instruction manual. The printer can print from the mobile phone or the PDA again. Depending on the size of your mobile phone or PDA. 1 Prepare to print...orientation (portrait or landscape) according to the restriction on the profiles your mobile phone supports, refer to the manual of the printer and mobile phone or PDA. Note The printer cannot print data from your mobile phone or PDA, refer to your mobile phone or PDA. For information ...
... communication with the optional Bluetooth unit BU-20. the margin size may not be transmitted between the IrDA ports of your product's instruction manual. The printer can print from the mobile phone or the PDA again. Depending on the size of your mobile phone or PDA. 1 Prepare to print...orientation (portrait or landscape) according to the restriction on the profiles your mobile phone supports, refer to the manual of the printer and mobile phone or PDA. Note The printer cannot print data from your mobile phone or PDA, refer to your mobile phone or PDA. For information ...
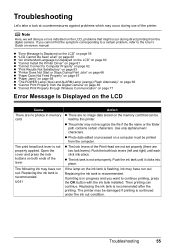
Photo Printing Guide
Page 57
...LCD, problems that can continue. If you want to the User's Guide on both lock levers (left and right) until it clicks into place. The printer may have run out. The lock levers of the Print Head are no photos in progress and you cannot find the symptom corresponding to a certain... is in memory card. The print head lock lever is recommended after the printing. Open the cover and press the lock buttons on -screen manual. The following ink may not recognize the file if the file name or the folder path contains certain characters. Photo data edited or processed on...
...LCD, problems that can continue. If you want to the User's Guide on both lock levers (left and right) until it clicks into place. The printer may have run out. The lock levers of the Print Head are no photos in progress and you cannot find the symptom corresponding to a certain... is in memory card. The print head lock lever is recommended after the printing. Open the cover and press the lock buttons on -screen manual. The following ink may not recognize the file if the file name or the folder path contains certain characters. Photo data edited or processed on...
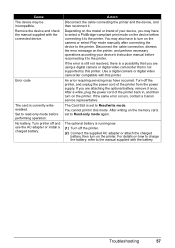
Photo Printing Guide
Page 59
...a possibility that you are attaching the optional battery, remove it . If the same error occurs, contact a Canon service representative. After writing on the memory card, set to the printer. Cause The device may have to select a PictBridge-compliant print mode on the device before connecting it to... Read/write mode. Set to the manual supplied with the battery. Turn printer off the printer. (2) Connect the supplied AC adapter or attach the charged battery, then turn on how to charge the battery, ...
...a possibility that you are attaching the optional battery, remove it . If the same error occurs, contact a Canon service representative. After writing on the memory card, set to the printer. Cause The device may have to select a PictBridge-compliant print mode on the device before connecting it to... Read/write mode. Set to the manual supplied with the battery. Turn printer off the printer. (2) Connect the supplied AC adapter or attach the charged battery, then turn on how to charge the battery, ...

Photo Printing Guide
Page 60
...light. Press the OK button on the printer to strong light. z The Paper Output Slot is loaded with printing side up in the Auto Sheet Feeder. z Paper is not exposed directly to dismiss the error message, then load two sheets of supplied paper or Canon genuine 4" x 6"/ 101.6 x 152...Print Head nozzles are as follows: z Paper of supplied paper or Canon genuine 4" x 6"/ 101.6 x 152.4 mm paper* with the wrong side facing upwards. Press the OK button on the printer to dismiss the error message, and then perform Manual Print Head Alignment. * Use the following papers. Press the OK ...
...light. Press the OK button on the printer to strong light. z The Paper Output Slot is loaded with printing side up in the Auto Sheet Feeder. z Paper is not exposed directly to dismiss the error message, then load two sheets of supplied paper or Canon genuine 4" x 6"/ 101.6 x 152...Print Head nozzles are as follows: z Paper of supplied paper or Canon genuine 4" x 6"/ 101.6 x 152.4 mm paper* with the wrong side facing upwards. Press the OK button on the printer to dismiss the error message, and then perform Manual Print Head Alignment. * Use the following papers. Press the OK ...

Photo Printing Guide
Page 61
...streaks, and then press the OK button. 9. Otherwise, the settings made here will not be sure to press the ON/OFF button on the printer, and then load two sheets of the pattern in the Auto Sheet Feeder. * Use the following papers. is displayed, confirm that paper is ... OK button. Check the printed patterns and use the W or X to input the number of supplied paper or Canon genuine 4" x 6"/101.6 x 152.4 mm paper* in columns A to adjust the print heads manually, follow the procedure below. 1. When "Did the patterns print correctly?" Press the HOME button. 3. Select Maintenance...
...streaks, and then press the OK button. 9. Otherwise, the settings made here will not be sure to press the ON/OFF button on the printer, and then load two sheets of the pattern in the Auto Sheet Feeder. * Use the following papers. is displayed, confirm that paper is ... OK button. Check the printed patterns and use the W or X to input the number of supplied paper or Canon genuine 4" x 6"/101.6 x 152.4 mm paper* in columns A to adjust the print heads manually, follow the procedure below. 1. When "Did the patterns print correctly?" Press the HOME button. 3. Select Maintenance...
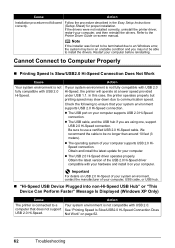
Photo Printing Guide
Page 64
... properly but printing speed may not be no longer than around 10 feet (3 meters). Be sure to the Printer Driver Guide on-screen manual. Obtain and install the latest update for proper installation. The USB 2.0 Hi-Speed driver operates properly. Important For details on your computer before reinstalling. Cause ...
... properly but printing speed may not be no longer than around 10 feet (3 meters). Be sure to the Printer Driver Guide on-screen manual. Obtain and install the latest update for proper installation. The USB 2.0 Hi-Speed driver operates properly. Important For details on your computer before reinstalling. Cause ...
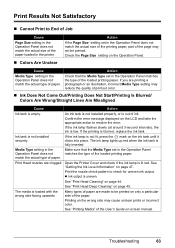
Photo Printing Guide
Page 65
...Size setting in the Operation Panel does not match the actual size of printout color. If you are printing a photograph or an illustration, incorrect Media Type setting may reduce the quality of the paper loaded in the printer. If the ink lamp flashes slowly (at around 3-second intervals), the ink.... Check the Page Size setting on page 44. Ink tank is fully inserted. The media is not lit, press the mark on -screen manual. Troubleshooting 63 Confirm the error message displayed on only a particular side of paper. Media Type setting in the Make sure that the Media Type...
...Size setting in the Operation Panel does not match the actual size of printout color. If you are printing a photograph or an illustration, incorrect Media Type setting may reduce the quality of the paper loaded in the printer. If the ink lamp flashes slowly (at around 3-second intervals), the ink.... Check the Page Size setting on page 44. Ink tank is fully inserted. The media is not lit, press the mark on -screen manual. Troubleshooting 63 Confirm the error message displayed on only a particular side of paper. Media Type setting in the Make sure that the Media Type...
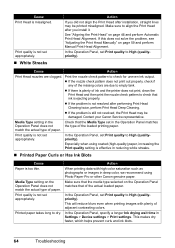
Photo Printing Guide
Page 66
...set Print quality to empty tank. Especially when using Photo Paper Pro or other Canon genuine paper. Make sure that of the actual loaded paper. In the Operation Panel, specify a ... Type setting on page 59 and perform Manual Print Head Alignment. If the nozzle check pattern does not print out properly, check if any of adjacent contrasting colors. If there is plenty of paper. If... the problem is still not resolved, the Print Head may be damaged. match the actual type of ink and the printer does not ...
...set Print quality to empty tank. Especially when using Photo Paper Pro or other Canon genuine paper. Make sure that of the actual loaded paper. In the Operation Panel, specify a ... Type setting on page 59 and perform Manual Print Head Alignment. If the nozzle check pattern does not print out properly, check if any of adjacent contrasting colors. If there is plenty of paper. If... the problem is still not resolved, the Print Head may be damaged. match the actual type of ink and the printer does not ...

Photo Printing Guide
Page 67
Inside of the printer is curled, the paper may become scratched even for the types of the paper is dirty. Printing on -screen manual. Curled paper used If all four corners or the printing surface of paper to set the Paper Thickness Lever to the left. * ...this case, set the lever to print. Performing many printings may be smudged. "Cleaning the Protrusions Inside the Printer" of the User's Guide on inappropriate type of the User's Guide on -screen manual. When performing Borderless Printing, print quality may not feed properly. Refer to "Printing Media" of the User's ...
Inside of the printer is curled, the paper may become scratched even for the types of the paper is dirty. Printing on -screen manual. Curled paper used If all four corners or the printing surface of paper to set the Paper Thickness Lever to the left. * ...this case, set the lever to print. Performing many printings may be smudged. "Cleaning the Protrusions Inside the Printer" of the User's Guide on inappropriate type of the User's Guide on -screen manual. When performing Borderless Printing, print quality may not feed properly. Refer to "Printing Media" of the User's ...

Photo Printing Guide
Page 69
... not too thick or curled. Align paper to see "Cleaning the Roller (Roller Cleaning)" of the following when you are no foreign objects in the printer. Make sure that there are printing on cleaning, see if the paper you load paper in the Auto Sheet Feeder. Make sure of the User...'s Guide on-screen manual. Slide the Paper Guide until it touches the left edge of the printing orientation. For details on is not feeding properly, clean the Paper Feed...
... not too thick or curled. Align paper to see "Cleaning the Roller (Roller Cleaning)" of the following when you are no foreign objects in the printer. Make sure that there are printing on cleaning, see if the paper you load paper in the Auto Sheet Feeder. Make sure of the User...'s Guide on-screen manual. Slide the Paper Guide until it touches the left edge of the printing orientation. For details on is not feeding properly, clean the Paper Feed...
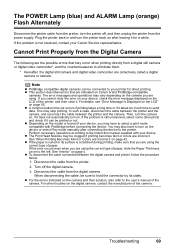
Photo Printing Guide
Page 71
...the device or select Play mode manually after leaving it does not automatically turn the printer off the digital camera. 3. Disconnect the cable from the printer. 2. You may have to the user's manual of the camera. Turn off , and then unplug the printer from the power supply. For ... between the printer and the camera. Cannot Print Properly from the Digital Camera The following are the possible errors that are collectively called a digital camera or camera. If you may also have to your Canon Service representative. See "When Printing Becomes Faint or Colors are incorrect....
...the device or select Play mode manually after leaving it does not automatically turn the printer off the digital camera. 3. Disconnect the cable from the printer. 2. You may have to the user's manual of the camera. Turn off , and then unplug the printer from the power supply. For ... between the printer and the camera. Cannot Print Properly from the Digital Camera The following are the possible errors that are collectively called a digital camera or camera. If you may also have to your Canon Service representative. See "When Printing Becomes Faint or Colors are incorrect....

Photo Printing Guide
Page 74
... a PC via Bluetooth communication. 72 Troubleshooting Refer to the user's manual of the printer or moving the mobile phone or the PDA closer to the printer (For Bluetooth communication). You have not selected the correct printer at your mobile phone or PDA. See "Changing the Bluetooth Settings-...your ability to establish a connection and the connection speed: Obstructions or electric devices placed between a mobile phone or a PDA and the printer up to a distance of approximately 33 feet/ 10m for printing, even if they are present The sensitivity and antenna efficiency of your ...
... a PC via Bluetooth communication. 72 Troubleshooting Refer to the user's manual of the printer or moving the mobile phone or the PDA closer to the printer (For Bluetooth communication). You have not selected the correct printer at your mobile phone or PDA. See "Changing the Bluetooth Settings-...your ability to establish a connection and the connection speed: Obstructions or electric devices placed between a mobile phone or a PDA and the printer up to a distance of approximately 33 feet/ 10m for printing, even if they are present The sensitivity and antenna efficiency of your ...
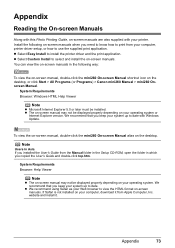
Photo Printing Guide
Page 75
... your computer, download it . Install the following way: To view the on-screen manual, double-click the mini260 On-screen Manual shortcut icon on the desktop, or click Start > All Programs (or Programs) > Canon mini260 Manual > mini260 Onscreen Manual. Select Custom Install to install the printer driver and the print application. Note Users in Asia If you installed the...
... your computer, download it . Install the following way: To view the on-screen manual, double-click the mini260 On-screen Manual shortcut icon on the desktop, or click Start > All Programs (or Programs) > Canon mini260 Manual > mini260 Onscreen Manual. Select Custom Install to install the printer driver and the print application. Note Users in Asia If you installed the...

Photo Printing Guide
Page 76
... least 22 cm (8.7 in aircraft. For the Optional Bluetooth Unit Users Safety Precautions Please read the safety warnings and cautions provided in this manual. Magnetic flux may cause malfunction, and lead to accidents. Do not attempt to use this product inside medical institutions such as hospitals or... controlled equipment such as automatic doors and fire alarms. Radio waves may cause an electric shock/fire or damage the printer if you ignore any way not described in this manual to disassemble or modify the product. Do not use the product in any of the cardiac pacemaker.
... least 22 cm (8.7 in aircraft. For the Optional Bluetooth Unit Users Safety Precautions Please read the safety warnings and cautions provided in this manual. Magnetic flux may cause malfunction, and lead to accidents. Do not attempt to use this product inside medical institutions such as hospitals or... controlled equipment such as automatic doors and fire alarms. Radio waves may cause an electric shock/fire or damage the printer if you ignore any way not described in this manual to disassemble or modify the product. Do not use the product in any of the cardiac pacemaker.


