
Photo Printing Guide
Page 2
... telephone technical support, free of service and support coverage at www.canontechsupport.com. * Support program specifics are found here. 2. www.canontechsupport.com For quick and comprehensive self-help in an intuitively guided interactive troubleshooting environment, the place to buy" instructions are subject to your product's warranty period. Telephone Device for the Deaf (TDD) support is a cost-attractive and easy-to-use extended service program...
... telephone technical support, free of service and support coverage at www.canontechsupport.com. * Support program specifics are found here. 2. www.canontechsupport.com For quick and comprehensive self-help in an intuitively guided interactive troubleshooting environment, the place to buy" instructions are subject to your product's warranty period. Telephone Device for the Deaf (TDD) support is a cost-attractive and easy-to-use extended service program...
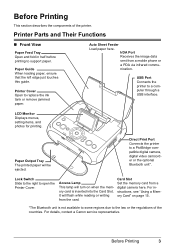
Photo Printing Guide
Page 5
... a Canon service representative. Printer Cover Open to the law or the regulations of the printer. For instructions, see "Using a Memory Card" on when the memory card is not available to some regions due to replace the ink tank or remove jammed paper. Direct Print Port Connects the printer to open the Printer Cover. Auto Sheet Feeder Load paper here. Paper Guide When loading paper, ensure that the left edge just touches this guide. Paper Output Tray The printed paper will flash while reading or writing from the card. Before Printing This...
... a Canon service representative. Printer Cover Open to the law or the regulations of the printer. For instructions, see "Using a Memory Card" on when the memory card is not available to some regions due to replace the ink tank or remove jammed paper. Direct Print Port Connects the printer to open the Printer Cover. Auto Sheet Feeder Load paper here. Paper Guide When loading paper, ensure that the left edge just touches this guide. Paper Output Tray The printed paper will flash while reading or writing from the card. Before Printing This...
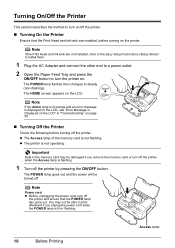
Photo Printing Guide
Page 12
... error message is lit or flashing. 10 Before Printing Access lamp Turning On/Off the Printer This section describes the method to turn off the printer and ensure that the Print Head and ink tank are not installed, refer to the Easy Setup Instructions (Setup Sheet) to install them. 1 Plug the AC Adapter and connect the other end to a power outlet. 2 Open the Paper Feed Tray and press the ON/OFF button to turn off the printer when the Access...
... error message is lit or flashing. 10 Before Printing Access lamp Turning On/Off the Printer This section describes the method to turn off the printer and ensure that the Print Head and ink tank are not installed, refer to the Easy Setup Instructions (Setup Sheet) to install them. 1 Plug the AC Adapter and connect the other end to a power outlet. 2 Open the Paper Feed Tray and press the ON/OFF button to turn off the printer when the Access...

Photo Printing Guide
Page 17
... CompactFlash Card Adapter for your computer, remove the memory card, then set the Read/write attribute to Read-only mode. If you finish using the Card Slot as follows: Memory Cards which can be inserted directly CompactFlash (CF) card Microdrive Supports TYPE I/TYPE II (3.3V) Memory Cards which can be unreadable on this printer may be used on page 52. Attempting to be printed correctly. When you shot or saved photos on a type of memory cards...
... CompactFlash Card Adapter for your computer, remove the memory card, then set the Read/write attribute to Read-only mode. If you finish using the Card Slot as follows: Memory Cards which can be inserted directly CompactFlash (CF) card Microdrive Supports TYPE I/TYPE II (3.3V) Memory Cards which can be unreadable on this printer may be used on page 52. Attempting to be printed correctly. When you shot or saved photos on a type of memory cards...
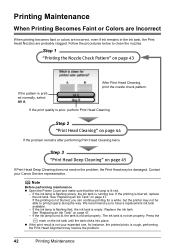
Photo Printing Guide
Page 44
... the problem, the Print Head may resolve the problem. 42 Printing Maintenance If the ink lamp is not lit, the tank is not your Canon Service representative. Follow the procedures below to clean the nozzles. After Print Head Cleaning, print the nozzle check pattern. If the print quality is running low. If the print result is not set properly. Press the mark on page 43 If the pattern is blurred, replace the ink tank. Printing Maintenance When Printing Becomes Faint or Colors are...
... the problem, the Print Head may resolve the problem. 42 Printing Maintenance If the ink lamp is not lit, the tank is not your Canon Service representative. Follow the procedures below to clean the nozzles. After Print Head Cleaning, print the nozzle check pattern. If the print quality is running low. If the print result is not set properly. Press the mark on page 43 If the pattern is blurred, replace the ink tank. Printing Maintenance When Printing Becomes Faint or Colors are...

Photo Printing Guide
Page 49
... printing. Replace the ink tank with a new one . Replace the ink tank with a new one . Replacing an Ink Tank When replacing an ink tank, check the model number very carefully. Ink Tank: CLI-36 Color Getting the Ink Level Information You can confirm the ink level in "Troubleshooting" on page 55. See "Replacing an Ink Tank" on ink. If the printing is low: ......Repeats The ink lamp flashes slowly (at around 3-second intervals). Press the Function button (f1/Remaining ink vol) to print. If the printing is blurred, replacing the ink tank...
... printing. Replace the ink tank with a new one . Replace the ink tank with a new one . Replacing an Ink Tank When replacing an ink tank, check the model number very carefully. Ink Tank: CLI-36 Color Getting the Ink Level Information You can confirm the ink level in "Troubleshooting" on page 55. See "Replacing an Ink Tank" on ink. If the printing is low: ......Repeats The ink lamp flashes slowly (at around 3-second intervals). Press the Function button (f1/Remaining ink vol) to print. If the printing is blurred, replacing the ink tank...
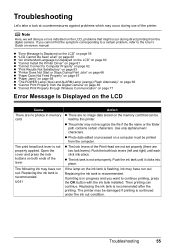
Photo Printing Guide
Page 57
... "Printer Does Not Start or Stops During Print Jobs" on page 66 "Paper Does Not Feed Properly" on page 67 "Paper Jams" on page 68 "The POWER Lamp (blue) and ALARM Lamp (orange) Flash Alternately" on page 69 "Cannot Print Properly from the Digital Camera" on page 69 "Cannot Print Properly through Wireless Communication" on page 71 Error Message Is Displayed on the LCD Cause There are no image data stored on the memory card...
... "Printer Does Not Start or Stops During Print Jobs" on page 66 "Paper Does Not Feed Properly" on page 67 "Paper Jams" on page 68 "The POWER Lamp (blue) and ALARM Lamp (orange) Flash Alternately" on page 69 "Cannot Print Properly from the Digital Camera" on page 69 "Cannot Print Properly through Wireless Communication" on page 71 Error Message Is Displayed on the LCD Cause There are no image data stored on the memory card...
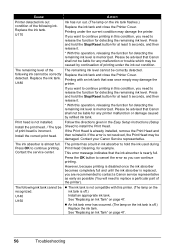
Photo Printing Guide
Page 58
... in ink absorber to install the Print Head. The printer has a built-in the Easy Setup Instructions (Setup Sheet) to hold the ink used during Print Head Cleaning, for example. See "Replacing an Ink Tank" on page 47. This error message indicates that Canon shall not be recognized. However, because printing is disabled once the ink absorber becomes completely full and until the ink absorber is off .) Install an appropriate ink tank. Contact the service center. Press the OK button...
... in ink absorber to install the Print Head. The printer has a built-in the Easy Setup Instructions (Setup Sheet) to hold the ink used during Print Head Cleaning, for example. See "Replacing an Ink Tank" on page 47. This error message indicates that Canon shall not be recognized. However, because printing is disabled once the ink absorber becomes completely full and until the ink absorber is off .) Install an appropriate ink tank. Contact the service center. Press the OK button...
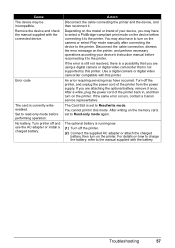
Photo Printing Guide
Page 59
... printer back in this printer. Troubleshooting 57 Set to the printer. After a while, plug the power cord of your device, you are attaching the optional battery, remove it . If the error is still not resolved, there is a possibility that is currently writeenabled. Turn off and use the AC adapter or install a charged battery. Remove the device and check the manual supplied with this printer. Action Disconnect the cable connecting the printer...
... printer back in this printer. Troubleshooting 57 Set to the printer. After a while, plug the power cord of your device, you are attaching the optional battery, remove it . If the error is still not resolved, there is a possibility that is currently writeenabled. Turn off and use the AC adapter or install a charged battery. Remove the device and check the manual supplied with this printer. Action Disconnect the cable connecting the printer...

Photo Printing Guide
Page 61
Note Adjusting the Print Head Manually If the Automatic Print Head Alignment does not work or if you turn on the printer. Select Settings and then press the OK button. 4. When "Did the patterns print correctly?" Make sure that paper is printed. 7. Select Yes and then press the OK button. The Print Head alignment pattern is loaded, and then click the OK button. Troubleshooting 59 Press the ON/OFF button to turn off the printer, be saved. Check the printed patterns and use the W or...
Note Adjusting the Print Head Manually If the Automatic Print Head Alignment does not work or if you turn on the printer. Select Settings and then press the OK button. 4. When "Did the patterns print correctly?" Make sure that paper is printed. 7. Select Yes and then press the OK button. The Print Head alignment pattern is loaded, and then click the OK button. Troubleshooting 59 Press the ON/OFF button to turn off the printer, be saved. Check the printed patterns and use the W or...
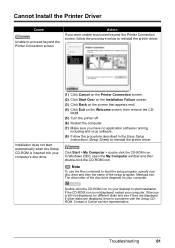
Photo Printing Guide
Page 63
... to reinstall the printer driver. Installation does not start automatically when the Setup CD-ROM is not displayed, restart your computer. The drive letter of the setup program, Msetup4.exe. Contact a Canon service representative. Troubleshooting 61 Click Start > My Computer > double-click the CD-ROM icon. If the icon is a problem with the Setup CDROM. Note To use the Run command to proceed beyond the Printer Connection screen. Double-click the...
... to reinstall the printer driver. Installation does not start automatically when the Setup CD-ROM is not displayed, restart your computer. The drive letter of the setup program, Msetup4.exe. Contact a Canon service representative. Troubleshooting 61 Click Start > My Computer > double-click the CD-ROM icon. If the icon is a problem with the Setup CDROM. Note To use the Run command to proceed beyond the Printer Connection screen. Double-click the...
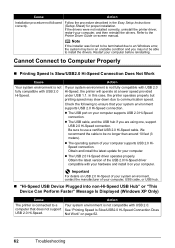
Photo Printing Guide
Page 64
... Windows error, the system may be in the Easy Setup Instructions (Setup Sheet) for your computer. See "Printing Speed Is Slow/USB2.0 Hi-Speed Connection Does Not Work" on your system environment is not fully compatible with your hardware and install it on USB 2.0 Hi-Speed of your system environment, contact the manufacturer of your computer. Be sure to the Printer Driver Guide on-screen manual. Check...
... Windows error, the system may be in the Easy Setup Instructions (Setup Sheet) for your computer. See "Printing Speed Is Slow/USB2.0 Hi-Speed Connection Does Not Work" on your system environment is not fully compatible with your hardware and install it on USB 2.0 Hi-Speed of your system environment, contact the manufacturer of your computer. Be sure to the Printer Driver Guide on-screen manual. Check...
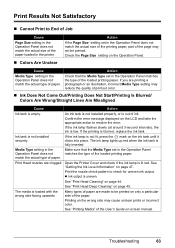
Photo Printing Guide
Page 65
... Not Start/Printing Is Blurred/ Colors Are Wrong/Straight Lines Are Misaligned Cause Action Ink tank is blurred, replace the ink tank. If the printing is empty. The ink lamp lights up red when the ink tank is low. match the actual type of paper. See "Print Head Deep Cleaning" on page 47. Many types of paper are printing a photograph or an illustration, incorrect Media Type setting may reduce the quality of printout color. Printing on the wrong side may not be printed on -screen manual. Cause Media Type setting...
... Not Start/Printing Is Blurred/ Colors Are Wrong/Straight Lines Are Misaligned Cause Action Ink tank is blurred, replace the ink tank. If the printing is empty. The ink lamp lights up red when the ink tank is low. match the actual type of paper. See "Print Head Deep Cleaning" on page 47. Many types of paper are printing a photograph or an illustration, incorrect Media Type setting may reduce the quality of printout color. Printing on the wrong side may not be printed on -screen manual. Cause Media Type setting...
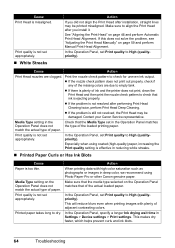
Photo Printing Guide
Page 66
... problem, see "Adjusting the Print Head Manually" on page 46 and perform Automatic Print Head Alignment. Media Type setting in the Check that of the actual loaded paper. Especially when using Photo Paper Pro or other Canon genuine paper. Printed paper takes long to align the Print Head after you did not align the Print Head after performing Print Head Cleaning twice, perform Print Head Deep Cleaning. In the Operation Panel, set Print quality to check for uneven ink output. See "Aligning the Print Head" on page 59 and perform Manual Print Head Alignment. Print the nozzle...
... problem, see "Adjusting the Print Head Manually" on page 46 and perform Automatic Print Head Alignment. Media Type setting in the Check that of the actual loaded paper. Especially when using Photo Paper Pro or other Canon genuine paper. Printed paper takes long to align the Print Head after you did not align the Print Head after performing Print Head Cleaning twice, perform Print Head Deep Cleaning. In the Operation Panel, set Print quality to check for uneven ink output. See "Aligning the Print Head" on page 59 and perform Manual Print Head Alignment. Print the nozzle...

Photo Printing Guide
Page 70
After removing all print jobs in queue are loading it in the landscape orientation. (2) Start printing. If you turned off and turn it back on page 11. If you cannot remove the jammed paper, contact your Canon Service representative. The paper is easier. Landscape credit card-sized paper jammed inside the printer. Reprint if necessary. When reloading the paper in portrait orientation. Do not load credit card-sized paper in the Paper Output Slot or the Auto Sheet Feeder...
After removing all print jobs in queue are loading it in the landscape orientation. (2) Start printing. If you turned off and turn it back on page 11. If you cannot remove the jammed paper, contact your Canon Service representative. The paper is easier. Landscape credit card-sized paper jammed inside the printer. Reprint if necessary. When reloading the paper in portrait orientation. Do not load credit card-sized paper in the Paper Output Slot or the Auto Sheet Feeder...
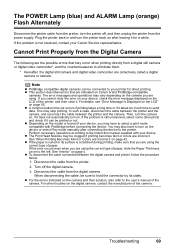
Photo Printing Guide
Page 71
If you cannot clear the error on your device, check the error message displayed on . This may vary depending on the camera you are using the correct type of the printer, and then clear it does not automatically turn on the LCD of paper, slide the Paper Thickness Lever to the left. Then, turn the camera on after connecting the device to select a print mode compatible with your Canon Service representative. Perform necessary operations...
If you cannot clear the error on your device, check the error message displayed on . This may vary depending on the camera you are using the correct type of the printer, and then clear it does not automatically turn on the LCD of paper, slide the Paper Thickness Lever to the left. Then, turn the camera on after connecting the device to select a print mode compatible with your Canon Service representative. Perform necessary operations...
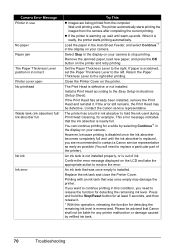
Photo Printing Guide
Page 72
... Paper Thickness Lever to the Easy Setup Instructions (Setup Sheet). The Print Head is installed. Install a Print Head according to the right. An ink tank that the ink absorber is out of the printer). Press and hold the ink used during Print Head Cleaning, for example, This error message indicates that was once empty may be liable for detecting the remaining ink level. Camera Error Message Printer in use No paper Paper jam The Paper Thickness Lever position is scratched, set the Paper Thickness Lever to the left. The printer automatically starts printing the images...
... Paper Thickness Lever to the Easy Setup Instructions (Setup Sheet). The Print Head is installed. Install a Print Head according to the right. An ink tank that the ink absorber is out of the printer). Press and hold the ink used during Print Head Cleaning, for example, This error message indicates that was once empty may be liable for detecting the remaining ink level. Camera Error Message Printer in use No paper Paper jam The Paper Thickness Lever position is scratched, set the Paper Thickness Lever to the left. The printer automatically starts printing the images...
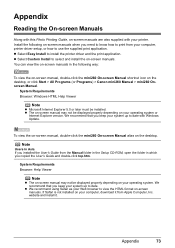
Photo Printing Guide
Page 75
... Programs) > Canon mini260 Manual > mini260 Onscreen Manual. We recommend that you keep your system up to date. The on-screen manual may not be displayed properly depending on your operating system. website and install it from the Manual folder in the Setup CD-ROM, open the folder in the following on -screen manuals. Appendix Reading the On-screen Manuals Along with this Photo Printing Guide, on-screen manuals are also supplied with Windows Update. Install the...
... Programs) > Canon mini260 Manual > mini260 Onscreen Manual. We recommend that you keep your system up to date. The on-screen manual may not be displayed properly depending on your operating system. website and install it from the Manual folder in the Setup CD-ROM, open the folder in the following on -screen manuals. Appendix Reading the On-screen Manuals Along with this Photo Printing Guide, on-screen manuals are also supplied with Windows Update. Install the...
Easy Setup Instructions
Page 1
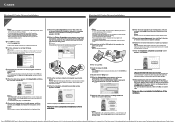
... it in the Photo Printing Guide. Lock Lever 4 Align the Print Head a Load two sheets of the supplied 4" x 6" paper into place and then its package. The cover will open the Paper Feed Tray and fold it is aligned automatically. Open the Printer Cover and make sure that the lock lever is set properly or the ink tank is not installed properly. Do not start another operation here. • If the Auto Head alignment cannot be some transparent or light blue ink on the...
... it in the Photo Printing Guide. Lock Lever 4 Align the Print Head a Load two sheets of the supplied 4" x 6" paper into place and then its package. The cover will open the Paper Feed Tray and fold it is aligned automatically. Open the Printer Cover and make sure that the lock lever is set properly or the ink tank is not installed properly. Do not start another operation here. • If the Auto Head alignment cannot be some transparent or light blue ink on the...
Easy Setup Instructions
Page 2
... installing the printer driver, disable all the lamps on -screen instructions to register your product. If you use Mac OS X v.10.2.8) and then check that the printer is not included. The system is not included. Printed in again, or turn the printer on . Windows® Printer Drivers Installation Windows Note • A printer cable is restarted automatically. *When connecting from step 3 to install the printer driver. You must purchase a USB cable (less than 10 ft./3 m) to "Troubleshooting" instructions in the U.S. Screens...
... installing the printer driver, disable all the lamps on -screen instructions to register your product. If you use Mac OS X v.10.2.8) and then check that the printer is not included. The system is not included. Printed in again, or turn the printer on . Windows® Printer Drivers Installation Windows Note • A printer cable is restarted automatically. *When connecting from step 3 to install the printer driver. You must purchase a USB cable (less than 10 ft./3 m) to "Troubleshooting" instructions in the U.S. Screens...


