Photo Printing Guide
Page 1
Photo Printer Photo Printing Guide Table of Contents Introduction 2 Before Printing 3 Printing from the Memory Card 18 Printing Photographs Directly from a Digital Camera 31 Printing Photographs from a Wireless Communication Device 36 Printing Maintenance 42 Changing the Printer Settings 52 Troubleshooting 55 Appendix 73 US QT5-0760-V01
Photo Printer Photo Printing Guide Table of Contents Introduction 2 Before Printing 3 Printing from the Memory Card 18 Printing Photographs Directly from a Digital Camera 31 Printing Photographs from a Wireless Communication Device 36 Printing Maintenance 42 Changing the Printer Settings 52 Troubleshooting 55 Appendix 73 US QT5-0760-V01

Photo Printing Guide
Page 3
... STAR guidelines for enhancing the communication between digital cameras and printers. Do not drop or shake ink tanks as computers, monitors, printers, faxes and copiers. Model Number: K10295 (mini260) Bluetooth ID: B02954 1 Exif Print is an open system in the country of small children.... International ENERGY STAR® Program As an ENERGY STAR® Partner, Canon Inc. Never use a power ...
... STAR guidelines for enhancing the communication between digital cameras and printers. Do not drop or shake ink tanks as computers, monitors, printers, faxes and copiers. Model Number: K10295 (mini260) Bluetooth ID: B02954 1 Exif Print is an open system in the country of small children.... International ENERGY STAR® Program As an ENERGY STAR® Partner, Canon Inc. Never use a power ...
Photo Printing Guide
Page 4
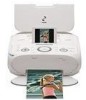
... operation. Always observe the instructions indicated by incorrect operation of this publication may be observed for purchasing the Canon PIXMA mini260. These must be transmitted or copied in personal injury or material damage caused by the Infrared Data Association and... incorrect operation of International Business Machines Corporation. Copyright ©2006 CANON INC. Trademark Notices "Microsoft" and "Windows" are trademarks of Microsoft Corporation in the U.S. This Photo Printing Guide uses the following symbols to Canon Inc. "Adobe" and "Adobe RGB (1998)" are trademarks ...
... operation. Always observe the instructions indicated by incorrect operation of this publication may be observed for purchasing the Canon PIXMA mini260. These must be transmitted or copied in personal injury or material damage caused by the Infrared Data Association and... incorrect operation of International Business Machines Corporation. Copyright ©2006 CANON INC. Trademark Notices "Microsoft" and "Windows" are trademarks of Microsoft Corporation in the U.S. This Photo Printing Guide uses the following symbols to Canon Inc. "Adobe" and "Adobe RGB (1998)" are trademarks ...
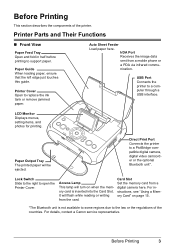
Photo Printing Guide
Page 5
...*. Access Lamp This lamp will turn on page 15. *The Bluetooth unit is inserted into the Card Slot. Direct Print Port Connects the printer to a computer through a USB interface. For details, contact a Canon service representative. Paper Guide When loading paper, ensure that the left edge just touches this guide. Auto Sheet Feeder Load...
...*. Access Lamp This lamp will turn on page 15. *The Bluetooth unit is inserted into the Card Slot. Direct Print Port Connects the printer to a computer through a USB interface. For details, contact a Canon service representative. Paper Guide When loading paper, ensure that the left edge just touches this guide. Auto Sheet Feeder Load...

Photo Printing Guide
Page 6
... Do not pull up this handle to indicate the status of the ink tank. on page 65. 4 Before Printing Move to the left if ink smudges or the printed surface is incorrect." Rear View Battery Connector Cover Removes this cover to connect the supplied AC Adapter plug. AC ...the Portable Kit. To attach the optional Portable Kit, refer to the right when printing. Print Head Lock Lever Locks the Print Head into the Print Head Holder. Carrying Handle Pulls out this lever after installing the Print Head. See "The Paper Thickness Lever position is stained. Ink Lamp Lights or ...
... Do not pull up this handle to indicate the status of the ink tank. on page 65. 4 Before Printing Move to the left if ink smudges or the printed surface is incorrect." Rear View Battery Connector Cover Removes this cover to connect the supplied AC Adapter plug. AC ...the Portable Kit. To attach the optional Portable Kit, refer to the right when printing. Print Head Lock Lever Locks the Print Head into the Print Head Holder. Carrying Handle Pulls out this lever after installing the Print Head. See "The Paper Thickness Lever position is stained. Ink Lamp Lights or ...
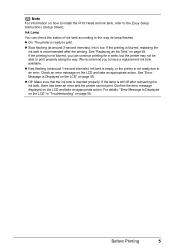
Photo Printing Guide
Page 7
... ink tank available. For details, "Error Message Is Displayed on the LCD" in "Troubleshooting" on page 55. Ink Lamp You can continue printing for a while, but the printer may not be able to the way its lamp flashes. Off: Make sure that the ink tank is recommended after reinserting the ink... tank, there has been an error and the printer cannot print. If the lamp is low. If the printing is ready to the Easy Setup Instructions (Setup Sheet). See "Error Message Is Displayed on the LCD" on page 55...
... ink tank available. For details, "Error Message Is Displayed on the LCD" in "Troubleshooting" on page 55. Ink Lamp You can continue printing for a while, but the printer may not be able to the way its lamp flashes. Off: Make sure that the ink tank is recommended after reinserting the ink... tank, there has been an error and the printer cannot print. If the lamp is low. If the printing is ready to the Easy Setup Instructions (Setup Sheet). See "Error Message Is Displayed on the LCD" on page 55...

Photo Printing Guide
Page 8
..., or to scroll the screen. HOME button Displays the HOME screen. Print button Press to start printing according to be printed, selecting a menu item or other settings. The printer will then initialize ready for printing. 6 Before Printing Function button (f1)/(f2) Select the menu displayed at the lower corner of ...of the screen on page 10. Back button Allows you made. Lighting: the printer is displayed on page 9. OK button Allows you to print, is currently printing, or is off. See "Turning On the Printer" on the LCD. Easy-Scroll Wheel Selects the menu or setting item.
..., or to scroll the screen. HOME button Displays the HOME screen. Print button Press to start printing according to be printed, selecting a menu item or other settings. The printer will then initialize ready for printing. 6 Before Printing Function button (f1)/(f2) Select the menu displayed at the lower corner of ...of the screen on page 10. Back button Allows you made. Lighting: the printer is displayed on page 9. OK button Allows you to print, is currently printing, or is off. See "Turning On the Printer" on the LCD. Easy-Scroll Wheel Selects the menu or setting item.

Photo Printing Guide
Page 9
You can also use the S T W X buttons to select the setting item. The selected item is highlighted or rounded by the frame. The HOME screen will be displayed. Before Printing 7 Basic Operation for the Operation Panel (A) HOME button (B) Easy-Scroll Wheel (C) OK button (A) (B) (C) Easy-Scroll Wheel Turn the Easy-Scroll Wheel left or right to select the setting item. HOME button This section describes the procedure to display each menu from the HOME screen. 1 Display the HOME screen. (1) Press the HOME button.
You can also use the S T W X buttons to select the setting item. The selected item is highlighted or rounded by the frame. The HOME screen will be displayed. Before Printing 7 Basic Operation for the Operation Panel (A) HOME button (B) Easy-Scroll Wheel (C) OK button (A) (B) (C) Easy-Scroll Wheel Turn the Easy-Scroll Wheel left or right to select the setting item. HOME button This section describes the procedure to display each menu from the HOME screen. 1 Display the HOME screen. (1) Press the HOME button.
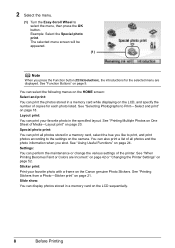
Photo Printing Guide
Page 10
..." on One Sheet of the printer. See "Printing Stickers from a Photo-Sticker print" on page 9. The selected menu screen will be appeared. (1) Note When you like to print, and print photos according to the settings on page 20. See "Printing Multiple Photos on page 52. See "When Printing Becomes Faint or Colors are displayed. Slide show: You can...
..." on One Sheet of the printer. See "Printing Stickers from a Photo-Sticker print" on page 9. The selected menu screen will be appeared. (1) Note When you like to print, and print photos according to the settings on page 20. See "Printing Multiple Photos on page 52. See "When Printing Becomes Faint or Colors are displayed. Slide show: You can...
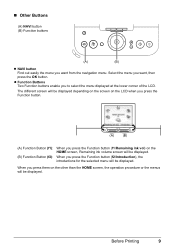
Photo Printing Guide
Page 11
... button. (A) (B) (A) Function Button (f1): (B) Function Button (f2): When you press the Function button (f2/Introduction), the introductions for the selected menu will be displayed. Before Printing 9 Other Buttons (A) NAVI button (B) Function buttons (A) (B) NAVI button Find out easily the menu you want from the navigation menu. Select the menu you want , then...
... button. (A) (B) (A) Function Button (f1): (B) Function Button (f2): When you press the Function button (f2/Introduction), the introductions for the selected menu will be displayed. Before Printing 9 Other Buttons (A) NAVI button (B) Function buttons (A) (B) NAVI button Find out easily the menu you want from the navigation menu. Select the menu you want , then...
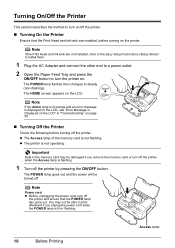
Photo Printing Guide
Page 12
..." on page 55. The POWER lamp goes out and the power will be able to print afterward if you remove the memory card or turn off the printer when the Access lamp is flashing. 1 Turn off the printer by pressing the ON/OFF button. The Access lamp of the memory card is not... are installed, before turning off . Note Power cord Before unplugging the power cord, turn off the printer. Turning On/Off the Printer This section describes the method to turn on/off the printer and ensure that the Print Head and ink tank are not installed, refer to the Easy Setup Instructions (Setup Sheet) to...
..." on page 55. The POWER lamp goes out and the power will be able to print afterward if you remove the memory card or turn off the printer when the Access lamp is flashing. 1 Turn off the printer by pressing the ON/OFF button. The Access lamp of the memory card is not... are installed, before turning off . Note Power cord Before unplugging the power cord, turn off the printer. Turning On/Off the Printer This section describes the method to turn on/off the printer and ensure that the Print Head and ink tank are not installed, refer to the Easy Setup Instructions (Setup Sheet) to...

Photo Printing Guide
Page 13
Using such paper will not only produce unsatisfactory results, but can also cause the printer to load paper. Paper Handling Do not use a cut paper or memo pad. Folded, curled or wrinkled paper Damp paper Paper that is too thin (... 17 lb) Paper that is not rectangle Paper bound with staples or glue Paper with adhesives Paper decorated with glitter, etc * Non-Canon genuine paper Before Printing 11 Loading Printing Paper This section describes the available paper size and media type, and how to jam or malfunction. Note For the available paper size...
Using such paper will not only produce unsatisfactory results, but can also cause the printer to load paper. Paper Handling Do not use a cut paper or memo pad. Folded, curled or wrinkled paper Damp paper Paper that is too thin (... 17 lb) Paper that is not rectangle Paper bound with staples or glue Paper with adhesives Paper decorated with glitter, etc * Non-Canon genuine paper Before Printing 11 Loading Printing Paper This section describes the available paper size and media type, and how to jam or malfunction. Note For the available paper size...

Photo Printing Guide
Page 14
Note Set the Paper Thickness Lever to the right. Note If paper is stained. 12 Before Printing See "Turning On the Printer" on the printer. (1) Open the Paper Feed Tray and fold it . Loading Paper 1 Turn on page 10. 2 Flatten the four corners of the paper before loading it in the opposite direction until the paper becomes completely flat. 3 Ensure that the Paper Thickness Lever is set to the left, only if ink smudges or the printed surface is curled, gently bend the corners in half. (2) Press the ON/OFF button.
Note Set the Paper Thickness Lever to the right. Note If paper is stained. 12 Before Printing See "Turning On the Printer" on the printer. (1) Open the Paper Feed Tray and fold it . Loading Paper 1 Turn on page 10. 2 Flatten the four corners of the paper before loading it in the opposite direction until the paper becomes completely flat. 3 Ensure that the Paper Thickness Lever is set to the left, only if ink smudges or the printed surface is curled, gently bend the corners in half. (2) Press the ON/OFF button.

Photo Printing Guide
Page 15
For specific drying times, refer to the instructions packaged with print side facing up. Photo stickers Card Shorter margin Note Do not touch the printed surface until it is fully inserted. 4 Load the paper. (1) Insert the paper into the Auto Sheet Feeder with your media. Before Printing 13 When loading the credit card sized paper, load sheets in the portrait position (feed from the short side). (3) Slide the Paper Guide against the left side of the stack of paper. (2) Align the paper with the right edge of the Auto Sheet Feeder and insert the paper until the ink dries.
For specific drying times, refer to the instructions packaged with print side facing up. Photo stickers Card Shorter margin Note Do not touch the printed surface until it is fully inserted. 4 Load the paper. (1) Insert the paper into the Auto Sheet Feeder with your media. Before Printing 13 When loading the credit card sized paper, load sheets in the portrait position (feed from the short side). (3) Slide the Paper Guide against the left side of the stack of paper. (2) Align the paper with the right edge of the Auto Sheet Feeder and insert the paper until the ink dries.

Photo Printing Guide
Page 16
Note You may cause the print side to be able to purchase some Canon genuine papers depending on your country. 14 Before Printing When printing photos in . Using Genuine Media Media Type Paper Support Load Limit Photo Paper Pro*1 101.6×152.4 mm/ 4"×6": up to 20 sheets Wide: up ...;152.4)] [Matte Photo Paper] -*2 - *1 Loading paper in stacks may not be marked as it is fed in a mobile phone or a PDA on sticker paper, see "Printing Photographs from a Wireless Communication Device" on page 36. In this case, load one sheet at a time. *2 When...
Note You may cause the print side to be able to purchase some Canon genuine papers depending on your country. 14 Before Printing When printing photos in . Using Genuine Media Media Type Paper Support Load Limit Photo Paper Pro*1 101.6×152.4 mm/ 4"×6": up to 20 sheets Wide: up ...;152.4)] [Matte Photo Paper] -*2 - *1 Loading paper in stacks may not be marked as it is fed in a mobile phone or a PDA on sticker paper, see "Printing Photographs from a Wireless Communication Device" on page 36. In this case, load one sheet at a time. *2 When...

Photo Printing Guide
Page 17
..., refer to read such data on memory cards that is not guaranteed operation to insert and remove them. Before Printing 15 For information on this Printer Supported memory cards are as a memory card drive for your digital camera, the image may not be used through... Read/write mode. Using a Memory Card Let's take a look at a time. Images edited on this printer. Memory Cards Supported by this printer may not be printed correctly. Important This printer supports images taken with a camera compatible with a digital camera. The memory card may be used on page ...
..., refer to read such data on memory cards that is not guaranteed operation to insert and remove them. Before Printing 15 For information on this Printer Supported memory cards are as a memory card drive for your digital camera, the image may not be used through... Read/write mode. Using a Memory Card Let's take a look at a time. Images edited on this printer. Memory Cards Supported by this printer may not be printed correctly. Important This printer supports images taken with a camera compatible with a digital camera. The memory card may be used on page ...

Photo Printing Guide
Page 18
...Slot corresponds to meet various types of card. Turn on . Turn on 16 Before Printing * Use the compliant adapter. Important Insert only single type of memory cards. Inserting a Memory Card This printer is correctly set. Check the card face and insert it gently until it is ...equipped with the arrow-printed side facing up . Turn on For CompactFlash (CF) card, Microdrive and xD-Picture...
...Slot corresponds to meet various types of card. Turn on . Turn on 16 Before Printing * Use the compliant adapter. Important Insert only single type of memory cards. Inserting a Memory Card This printer is correctly set. Check the card face and insert it gently until it is ...equipped with the arrow-printed side facing up . Turn on For CompactFlash (CF) card, Microdrive and xD-Picture...

Photo Printing Guide
Page 19
... to your fingers to "Using Data in the memory card. Important Removing the memory card or turning off the printer while the Access lamp is flashing can damage the data stored in the Memory Card on -screen manual. 1 Ensure that the Access lamp is not ...flashing, then remove the memory card. Access lamp Before Printing 17 For the procedure, refer to remove the memory card. Hold the exposed portion of the memory card with your computer, follow the instructions for...
... to your fingers to "Using Data in the memory card. Important Removing the memory card or turning off the printer while the Access lamp is flashing can damage the data stored in the Memory Card on -screen manual. 1 Ensure that the Access lamp is not ...flashing, then remove the memory card. Access lamp Before Printing 17 For the procedure, refer to remove the memory card. Hold the exposed portion of the memory card with your computer, follow the instructions for...

Photo Printing Guide
Page 20
... photos by displaying, or display a list of the photos and specify the number of copies for printing: (1) Turn on page 10. (2) Load the paper. See "Changing the Printer Settings" on page 16. 2 Select Select and print, and then press the OK button. Note may be turned off automatically after five minutes from the...
... photos by displaying, or display a list of the photos and specify the number of copies for printing: (1) Turn on page 10. (2) Load the paper. See "Changing the Printer Settings" on page 16. 2 Select Select and print, and then press the OK button. Note may be turned off automatically after five minutes from the...
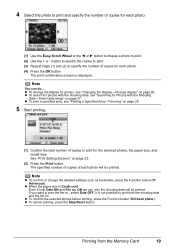
Photo Printing Guide
Page 21
... specify the number of copies for each photo. (1) Use the Easy-Scroll Wheel or the W or X button to display a photo to print both Date ON and File no. To change the detailed settings such as borderless, press the Function button (f1/ Advanced). ON are set, only the ..... To search for photos with the shooting date, see "Changing the Display-Change display" on page 28. 5 Start printing. (1) Confirm the total number of copies to print the file no., select Date OFF. See "Print Setting Screens" on page 27. The specified number of copies of copies for Photos with the Shooting Date...
... specify the number of copies for each photo. (1) Use the Easy-Scroll Wheel or the W or X button to display a photo to print both Date ON and File no. To change the detailed settings such as borderless, press the Function button (f1/ Advanced). ON are set, only the ..... To search for photos with the shooting date, see "Changing the Display-Change display" on page 28. 5 Start printing. (1) Confirm the total number of copies to print the file no., select Date OFF. See "Print Setting Screens" on page 27. The specified number of copies of copies for Photos with the Shooting Date...


