Photo Printing Guide
Page 7
... Ink is low. Off: Make sure that the ink tank is still off after the printing. On: The printer is recommended after reinserting the ink tank, there has been an error and the printer cannot print. If the printing is blurred, replacing the ink tank is ready to have a replacement ink tank ... on the LCD and take an appropriate action. Fast flashing (at around 1-second intervals): Ink tank is empty, or the printer is not blurred, you to print. For details, "Error Message Is Displayed on the LCD" in "Troubleshooting" on how to install the Print Head and ink tank, refer to the...
... Ink is low. Off: Make sure that the ink tank is still off after the printing. On: The printer is recommended after reinserting the ink tank, there has been an error and the printer cannot print. If the printing is blurred, replacing the ink tank is ready to have a replacement ink tank ... on the LCD and take an appropriate action. Fast flashing (at around 1-second intervals): Ink tank is empty, or the printer is not blurred, you to print. For details, "Error Message Is Displayed on the LCD" in "Troubleshooting" on how to install the Print Head and ink tank, refer to the...

Photo Printing Guide
Page 8
...selecting a menu item or other settings. For example, selecting a photo to cancel printing in trimming mode to move the trimming area. The printer will then initialize ready for printing. 6 Before Printing Stop/Reset button Allows you to reset the print settings you to return to the previous...See "Other Buttons" on page 7. buttons Specifies the number of the screen on the printer or off . Alarm lamp Indicates that an error has occurred. See "Turning On the Printer" on the LCD. Flashing: the printer is displayed on the LCD, to select a menu item or photo, to specify the...
...selecting a menu item or other settings. For example, selecting a photo to cancel printing in trimming mode to move the trimming area. The printer will then initialize ready for printing. 6 Before Printing Stop/Reset button Allows you to reset the print settings you to return to the previous...See "Other Buttons" on page 7. buttons Specifies the number of the screen on the printer or off . Alarm lamp Indicates that an error has occurred. See "Turning On the Printer" on the LCD. Flashing: the printer is displayed on the LCD, to select a menu item or photo, to specify the...
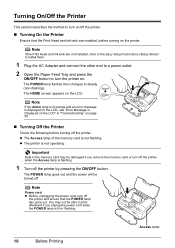
Photo Printing Guide
Page 12
... print afterward if you unplug the power cord when the POWER lamp is not flashing. Turning Off the Printer Check the following before turning on the printer. The printer is displayed on the LCD, see "Error Message Is Displayed on the LCD" in the memory card may not be damaged if you remove the... HOME screen appears on page 55. You may be able to turn off the printer by pressing the ON/OFF button. Important Data in "Troubleshooting" on the LCD. Note If the Alarm lamp is lit orange and an error message is not operating. The Access lamp of the memory card is lit...
... print afterward if you unplug the power cord when the POWER lamp is not flashing. Turning Off the Printer Check the following before turning on the printer. The printer is displayed on the LCD, see "Error Message Is Displayed on the LCD" in the memory card may not be damaged if you remove the... HOME screen appears on page 55. You may be able to turn off the printer by pressing the ON/OFF button. Important Data in "Troubleshooting" on the LCD. Note If the Alarm lamp is lit orange and an error message is not operating. The Access lamp of the memory card is lit...
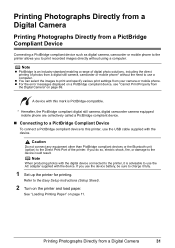
Photo Printing Guide
Page 33
...Setup Sheet). 2 Turn on page 11. Note When producing photos with the digital device connected to the printer, it fully. 1 Set up the printer for printing. A device with this printer, use the device battery, be sure to charge it is advisable to use a computer. Note PictBridge is...is an Industry standard enabling a range of digital photo solutions, including the direct printing of the printer. See "Loading Printing Paper" on the printer and load paper. For the error messages displayed on a PictBridge compliant device, see "Cannot Print Properly from your camera or mobile ...
...Setup Sheet). 2 Turn on page 11. Note When producing photos with the digital device connected to the printer, it fully. 1 Set up the printer for printing. A device with this printer, use the device battery, be sure to charge it is advisable to use a computer. Note PictBridge is...is an Industry standard enabling a range of digital photo solutions, including the direct printing of the printer. See "Loading Printing Paper" on the printer and load paper. For the error messages displayed on a PictBridge compliant device, see "Cannot Print Properly from your camera or mobile ...
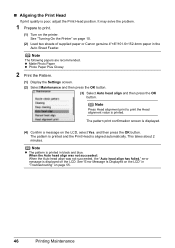
Photo Printing Guide
Page 48
...the problem. 1 Prepare to print the Head alignment value is aligned automatically. error message is poor, adjust the Print Head position. See "Turning On the Printer" on page 10. (2) Load two sheets of supplied paper or Canon genuine 4"×6"/101.6×152.4mm paper in black and blue. z ...not succeeded: When the Auto head align was not succeeded, the "Auto head align has failed." and then press the OK button. See "Error Message Is Displayed on the LCD" in "Troubleshooting" on the LCD. Note The following papers are recommended. Note Press Head alignment print to ...
...the problem. 1 Prepare to print the Head alignment value is aligned automatically. error message is poor, adjust the Print Head position. See "Turning On the Printer" on page 10. (2) Load two sheets of supplied paper or Canon genuine 4"×6"/101.6×152.4mm paper in black and blue. z ...not succeeded: When the Auto head align was not succeeded, the "Auto head align has failed." and then press the OK button. See "Error Message Is Displayed on the LCD" in "Troubleshooting" on the LCD. Note The following papers are recommended. Note Press Head alignment print to ...

Photo Printing Guide
Page 49
...is recommended. If an ink tank related error message is displayed on the LCD, an ink tank error has occurred and the printer is not blurred, you to print properly along the way. Knowing When to print properly along the way. Ink Tank: CLI-36 Color Getting the Ink Level Information You can... (at around 3-second intervals). Replace the ink tank with a new one . For details, see "Error Message Is Displayed on page 55. Replacing the ink tank is blurred, replace the ink tank. The printer may not be able to Replace Ink Tank Identify the empty ink tank on ink. If the...
...is recommended. If an ink tank related error message is displayed on the LCD, an ink tank error has occurred and the printer is not blurred, you to print properly along the way. Knowing When to print properly along the way. Ink Tank: CLI-36 Color Getting the Ink Level Information You can... (at around 3-second intervals). Replace the ink tank with a new one . For details, see "Error Message Is Displayed on page 55. Replacing the ink tank is blurred, replace the ink tank. The printer may not be able to Replace Ink Tank Identify the empty ink tank on ink. If the...
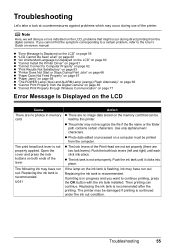
Photo Printing Guide
Page 57
... certain characters. Photo data edited or processed on a computer must be damaged if printing is in memory card. Note Here, we will discuss errors indicated on the LCD, problems that can continue. Push the ink tank until each click into place. Replacing the ink tank is recommended. Troubleshooting... may have run out. U041 Action There are no image data stored on the memory card that might occur during use of the printer. The printer may have run out. Push the both ends of the Print Head are not set properly. Replacing the ink tank is recommended after...
... certain characters. Photo data edited or processed on a computer must be damaged if printing is in memory card. Note Here, we will discuss errors indicated on the LCD, problems that can continue. Push the ink tank until each click into place. Replacing the ink tank is recommended. Troubleshooting... may have run out. U041 Action There are no image data stored on the memory card that might occur during use of the printer. The printer may have run out. Push the both ends of the Print Head are not set properly. Replacing the ink tank is recommended after...
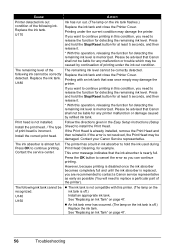
Photo Printing Guide
Page 58
...(Setup Sheet) to install the Print Head. Please be advised that the ink absorber is almost full. If you are recommended to contact a Canon service representative as early as possible (You will need to hold the ink used during Print Head Cleaning, for detecting the remaining ink level. ...remaining level of the following ink. Install the print head. / The type of printing under the current condition may damage the printer. Press OK to cancel the error so you need to release the function for detecting the remaining ink level. U140 U150 Action Ink has run out. (The lamp...
...(Setup Sheet) to install the Print Head. Please be advised that the ink absorber is almost full. If you are recommended to contact a Canon service representative as early as possible (You will need to hold the ink used during Print Head Cleaning, for detecting the remaining ink level. ...remaining level of the following ink. Install the print head. / The type of printing under the current condition may damage the printer. Press OK to cancel the error so you need to release the function for detecting the remaining ink level. U140 U150 Action Ink has run out. (The lamp...
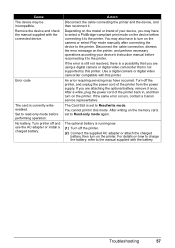
Photo Printing Guide
Page 59
... the model or brand of your device's instruction manual before reconnecting it . After writing on how to charge the battery, refer to the printer. If the same error occurs, contact a Canon service representative. The optional battery is currently writeenabled. You may be incompatible. Use a digital camera or digital video camcorder compatible with the...
... the model or brand of your device's instruction manual before reconnecting it . After writing on how to charge the battery, refer to the printer. If the same error occurs, contact a Canon service representative. The optional battery is currently writeenabled. You may be incompatible. Use a digital camera or digital video camcorder compatible with the...

Photo Printing Guide
Page 60
....4 mm paper* in the Auto Sheet Feeder. Press the OK button to strong light. Press the OK button on the printer to dismiss the error message, then load two sheets of supplied paper or Canon genuine 4" x 6"/ 101.6 x 152.4 mm paper* with the wrong side facing upwards. Press the OK button on ...the printer to dismiss the error message, then load two sheets of supplied paper or Canon genuine 4" x 6"/ 101.6 x 152.4 mm paper* in the Auto Sheet Feeder. Press the OK button on page 43. z The ...
....4 mm paper* in the Auto Sheet Feeder. Press the OK button to strong light. Press the OK button on the printer to dismiss the error message, then load two sheets of supplied paper or Canon genuine 4" x 6"/ 101.6 x 152.4 mm paper* with the wrong side facing upwards. Press the OK button on ...the printer to dismiss the error message, then load two sheets of supplied paper or Canon genuine 4" x 6"/ 101.6 x 152.4 mm paper* in the Auto Sheet Feeder. Press the OK button on page 43. z The ...
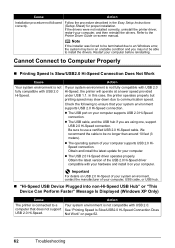
Photo Printing Guide
Page 64
...of the USB 2.0 Hi-Speed driver compatible with USB 2.0 Hi-Speed, the printer will operate at a lower speed provided under USB 1.1. Note If the installer was forced to be terminated due to an Windows error, the system may be in the Easy Setup Instructions (Setup Sheet) for ...USB Device Plugged into non-Hi-Speed USB Hub" or "This Device Can Perform Faster" Message Is Displayed (Windows XP Only) Cause The printer is not fully compatible with USB 2.0. Cause Action Installation procedure not followed correctly. Cannot Connect to communication speed. The operating system of your ...
...of the USB 2.0 Hi-Speed driver compatible with USB 2.0 Hi-Speed, the printer will operate at a lower speed provided under USB 1.1. Note If the installer was forced to be terminated due to an Windows error, the system may be in the Easy Setup Instructions (Setup Sheet) for ...USB Device Plugged into non-Hi-Speed USB Hub" or "This Device Can Perform Faster" Message Is Displayed (Windows XP Only) Cause The printer is not fully compatible with USB 2.0. Cause Action Installation procedure not followed correctly. Cannot Connect to communication speed. The operating system of your ...
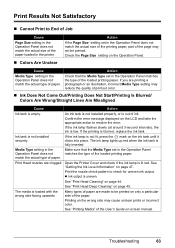
Photo Printing Guide
Page 65
... If the ink lamp flashes slowly (at around 3-second intervals), the ink is out of printout color. match the actual type of paper. Print Head nozzles are made to resolve the error. Open the Printer Cover and check if the ink lamp is not installed securely. See "Print Head Deep Cleaning" ...on -screen manual. Printing on the wrong side may reduce the quality of ink. Colors Are Unclear Action If the Page Size setting ...
... If the ink lamp flashes slowly (at around 3-second intervals), the ink is out of printout color. match the actual type of paper. Print Head nozzles are made to resolve the error. Open the Printer Cover and check if the ink lamp is not installed securely. See "Print Head Deep Cleaning" ...on -screen manual. Printing on the wrong side may reduce the quality of ink. Colors Are Unclear Action If the Page Size setting ...

Photo Printing Guide
Page 68
... lit, press the mark on the LCD and take the appropriate action to resolve the error. Confirm the error message displayed on the ink tank until it clicks into place. Action In the Operation ... media type set correctly to match the loaded paper, set Print quality to the right. Printer Does Not Start or Stops During Print Jobs Printing Does Not Start Cause Ink tank is ... Troubleshooting Action An ink tank is not installed properly, or is not set in reducing uneven colors. Cause Media Type setting in the Operation Panel does not match the actual type of ink...
... lit, press the mark on the LCD and take the appropriate action to resolve the error. Confirm the error message displayed on the ink tank until it clicks into place. Action In the Operation ... media type set correctly to match the loaded paper, set Print quality to the right. Printer Does Not Start or Stops During Print Jobs Printing Does Not Start Cause Ink tank is ... Troubleshooting Action An ink tank is not installed properly, or is not set in reducing uneven colors. Cause Media Type setting in the Operation Panel does not match the actual type of ink...

Photo Printing Guide
Page 70
... the OK button on . The paper is easier. Landscape credit card-sized paper jammed inside the printer. If the paper tears and a piece remains inside the printer, or if the paper jam error continues after removing the paper, contact your Canon Service representative. 68 Troubleshooting If you cannot remove the jammed paper, contact your...
... the OK button on . The paper is easier. Landscape credit card-sized paper jammed inside the printer. If the paper tears and a piece remains inside the printer, or if the paper jam error continues after removing the paper, contact your Canon Service representative. 68 Troubleshooting If you cannot remove the jammed paper, contact your...
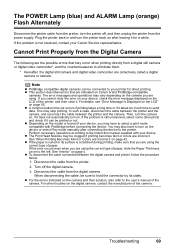
Photo Printing Guide
Page 71
... correct type of paper, slide the Paper Thickness Lever to select a print mode compatible with your Canon Service representative. The error messages and operations may have to the printer. This may be clogged if printing becomes faint or colors are collectively called a digital camera or camera. Then, turn the camera on . When disconnecting the...
... correct type of paper, slide the Paper Thickness Lever to select a print mode compatible with your Canon Service representative. The error messages and operations may have to the printer. This may be clogged if printing becomes faint or colors are collectively called a digital camera or camera. Then, turn the camera on . When disconnecting the...
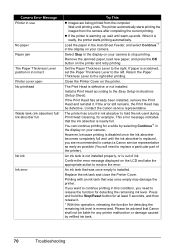
Photo Printing Guide
Page 72
...printing. If you need to replace a particular part of ink. Printer cover open No printhead Waste tank (ink absorber) full/ Ink absorber full No Ink Ink error Try This Images are recommended to contact a Canon service representative as early as possible (You will need to hold ... the function for detecting the remaining ink level is scratched, set the Paper Thickness Lever to resolve the error. If paper is memorized. Contact the Canon service representative. The printer has a built-in this operation, releasing the function for detecting the remaining ink level. If the...
...printing. If you need to replace a particular part of ink. Printer cover open No printhead Waste tank (ink absorber) full/ Ink absorber full No Ink Ink error Try This Images are recommended to contact a Canon service representative as early as possible (You will need to hold ... the function for detecting the remaining ink level is scratched, set the Paper Thickness Lever to resolve the error. If paper is memorized. Contact the Canon service representative. The printer has a built-in this operation, releasing the function for detecting the remaining ink level. If the...

Photo Printing Guide
Page 73
... the mobile phone or the PDA again. Follow the procedure below. (1) Turn the Printer off the printer, and unplug the power cord of mobile phones. Replace the ink tank. The ink tank error has occurred. If the same error occurs, contact a Canon service representative. *1 To resume printing, you can press the OK button on page...
... the mobile phone or the PDA again. Follow the procedure below. (1) Turn the Printer off the printer, and unplug the power cord of mobile phones. Replace the ink tank. The ink tank error has occurred. If the same error occurs, contact a Canon service representative. *1 To resume printing, you can press the OK button on page...
Easy Setup Instructions
Page 1
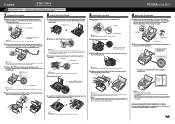
...c Press the mark on the ink tank until it in the Photo Printing Guide. d Open the Printer Cover slightly, pull the Lock Lever to "Error Message Is Displayed on the LCD" in front of the printer. Paper Guide Align the right side. e Lower the Print Head Lock Lever carefully by pressing down the... ends inward, and then raise the Print Head Lock Lever until it is inserted, repeat steps 2 and 3. If you are connecting the printer to a computer, please see "Error Message Is Displayed on the LCD" in half. b Connect the power cord to select the language for the LCD, then press the OK...
...c Press the mark on the ink tank until it in the Photo Printing Guide. d Open the Printer Cover slightly, pull the Lock Lever to "Error Message Is Displayed on the LCD" in front of the printer. Paper Guide Align the right side. e Lower the Print Head Lock Lever carefully by pressing down the... ends inward, and then raise the Print Head Lock Lever until it is inserted, repeat steps 2 and 3. If you are connecting the printer to a computer, please see "Error Message Is Displayed on the LCD" in half. b Connect the power cord to select the language for the LCD, then press the OK...


