
User Manual
Page 3
... your projector. Do not look straight at the projector uninterruptible power supply (UPS). To temporarily turn off the lamp, press BLANK on the projector or remote control. 4.
... your projector. Do not look straight at the projector uninterruptible power supply (UPS). To temporarily turn off the lamp, press BLANK on the projector or remote control. 4.
User Manual
Page 8
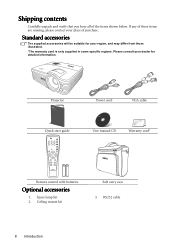
... The supplied accessories will be suitable for detailed information. Spare lamp kit 2. Projector Power cord VGA cable Quick start guide User manual CD Warranty card* Remote control with batteries Optional accessories 1. RS232 cable 8 Introduction Shipping contents Carefully unpack and verify that you have all of purchase.
... The supplied accessories will be suitable for detailed information. Spare lamp kit 2. Projector Power cord VGA cable Quick start guide User manual CD Warranty card* Remote control with batteries Optional accessories 1. RS232 cable 8 Introduction Shipping contents Carefully unpack and verify that you have all of purchase.
User Manual
Page 9
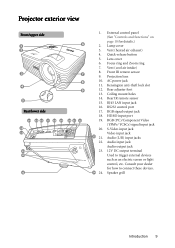
... 22 10 11 12 13 4 1. AC power jack 11. RGB (PC)/Component Video (YPbPr/ YCbCr) signal input jack 20. Vent (heated air exhaust) 4. Front IR remote sensor 9. Kensington anti-theft lock slot 12. HDMI-input port 19. Audio (L/R) input jacks 22. Audio input jack Audio output jack 23. 12V DC output... for how to trigger external devices such as an electric screen or light control, etc. Lamp cover 3. Lens cover 6. Vent (cool air intake) 8. Rear IR remote sensor 15. RJ45 LAN input jack 16.
... 22 10 11 12 13 4 1. AC power jack 11. RGB (PC)/Component Video (YPbPr/ YCbCr) signal input jack 20. Vent (heated air exhaust) 4. Front IR remote sensor 9. Kensington anti-theft lock slot 12. HDMI-input port 19. Audio (L/R) input jacks 22. Audio input jack Audio output jack 23. 12V DC output... for how to trigger external devices such as an electric screen or light control, etc. Lamp cover 3. Lens cover 6. Vent (cool air intake) 8. Rear IR remote sensor 15. RJ45 LAN input jack 16.
User Manual
Page 11
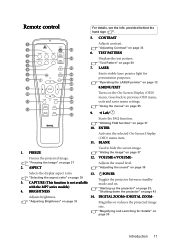
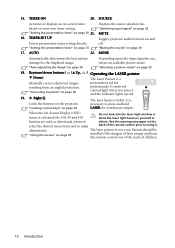
... Magnifies or reduces the projected image size. ENTER Activates the selected On-Screen Display (OSD) menu item. 11. BLANK 1. "Adjusting Brightness" on page 37 10. Remote control For details, see the info. "Freezing the image" on . CAPTURE (This function is not available Toggles the projector between standby mode and on page...
... Magnifies or reduces the projected image size. ENTER Activates the selected On-Screen Display (OSD) menu item. 11. BLANK 1. "Adjusting Brightness" on page 37 10. Remote control For details, see the info. "Freezing the image" on . CAPTURE (This function is not available Toggles the projector between standby mode and on page...
User Manual
Page 12
... shine the laser light beam on page 28 19. Parents should be mindful of the dangers of laser energy and keep this remote control out of the reach of the remote control prior to press and hold LASER for the displayed image. "Correcting keystone" on yourself or buttons are used as directional...
... shine the laser light beam on page 28 19. Parents should be mindful of the dangers of laser energy and keep this remote control out of the reach of the remote control prior to press and hold LASER for the displayed image. "Correcting keystone" on yourself or buttons are used as directional...
User Manual
Page 13
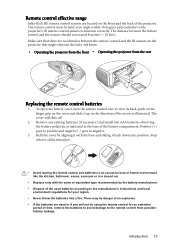
...any existing batteries (if necessary) and install two AAA batteries observing the battery polarities as illustrated. To open the battery cover, turn the remote control over to view its back, push on the finger grip on the projector that there are dead or if you will slide off....to the manufacturer's instructions and local environment regulations for your region. • Never throw the batteries into place. • Avoid leaving the remote control and batteries in an excessive heat or humid environment like the kitchen, bathroom, sauna, sunroom or in the direction of the used batteries...
...any existing batteries (if necessary) and install two AAA batteries observing the battery polarities as illustrated. To open the battery cover, turn the remote control over to view its back, push on the finger grip on the projector that there are dead or if you will slide off....to the manufacturer's instructions and local environment regulations for your region. • Never throw the batteries into place. • Avoid leaving the remote control and batteries in an excessive heat or humid environment like the kitchen, bathroom, sauna, sunroom or in the direction of the used batteries...
User Manual
Page 23
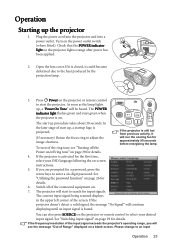
...signal" on page 29 for the first time, select your desired input signal. Check that the POWER indicator light on the projector or remote control to start to select your OSD language following the on page 39 for approximately 90 seconds before energizing the lamp. If the projector.... 7. Open the lens cover. The current input signal being scanned displays in the upper left corner of the connected equipment on the projector or remote control to search for details. 6. Operation Starting up procedure takes about 30 seconds. As soon as the lamp lights up , a startup logo is...
...signal" on page 29 for the first time, select your desired input signal. Check that the POWER indicator light on the projector or remote control to start to select your OSD language following the on page 39 for approximately 90 seconds before energizing the lamp. If the projector.... 7. Open the lens cover. The current input signal being scanned displays in the upper left corner of the connected equipment on the projector or remote control to search for details. 6. Operation Starting up procedure takes about 30 seconds. As soon as the lamp lights up , a startup logo is...
User Manual
Page 24
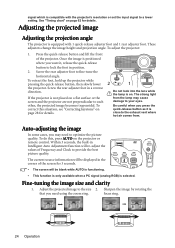
... the quick-release button as it , release the quick-release button to lock the foot in position. 2. Once the image is on the projector or remote control. To correct this , press AUTO on . Sharpen the image by rotating the that you may cause damage to your eyes. To adjust the projector...
... the quick-release button as it , release the quick-release button to lock the foot in position. 2. Once the image is on the projector or remote control. To correct this , press AUTO on . Sharpen the image by rotating the that you may cause damage to your eyes. To adjust the projector...

User Manual
Page 25
... Language remote control to exit. Size Digital Zoom Analog RGB Off Auto Off 0 0 MENU Exit SYSTEM SETUP: Basic Presentation Timer Language Projector Position Menu Settings Auto Power Off Blank Timer Panel Key Lock Sleep Timer Splash Screen English Front Table Disable Disable Off Disable BenQ Analog ...second press closes the OSD menu. DISPLAY Wall Color Aspect Ratio Auto Keystone Keystone Position Phase H. Press MENU/EXIT on the projector or remote control to leave and save the settings. *The first press leads you back to set the OSD language. 1. Use / to select ...
... Language remote control to exit. Size Digital Zoom Analog RGB Off Auto Off 0 0 MENU Exit SYSTEM SETUP: Basic Presentation Timer Language Projector Position Menu Settings Auto Power Off Blank Timer Panel Key Lock Sleep Timer Splash Screen English Front Table Disable Disable Off Disable BenQ Analog ...second press closes the OSD menu. DISPLAY Wall Color Aspect Ratio Auto Keystone Keystone Position Phase H. Press MENU/EXIT on the projector or remote control to leave and save the settings. *The first press leads you back to set the OSD language. 1. Use / to select ...
User Manual
Page 27
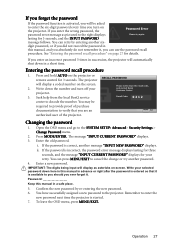
..." on page 27 for 3 seconds. Press and hold AUTO on the projector. Seek help from the local BenQ service Please write down the number and turn on the projector or remote control for details. You may be asked to enter the six-digit password every time you turn off your...pictured to cancel the change or try again. lasting for your selected password down in a safe place. 5. Write down the recall code, and contact BenQ Customer Center. Enter a new password. Write your retry. Password Keep this manual, and you absolutely do not remember it . Confirm the new password by...
..." on page 27 for 3 seconds. Press and hold AUTO on the projector. Seek help from the local BenQ service Please write down the number and turn on the projector or remote control for details. You may be asked to enter the six-digit password every time you turn off your...pictured to cancel the change or try again. lasting for your selected password down in a safe place. 5. Write down the recall code, and contact BenQ Customer Center. Enter a new password. Write your retry. Password Keep this manual, and you absolutely do not remember it . Confirm the new password by...
User Manual
Page 28
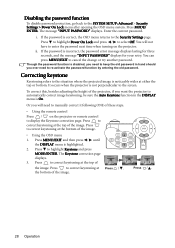
... the Auto Keystone function in hand should you will not have to enter the password next time when turning on the projector or remote control to the situation where the projected image is incorrect, the password error message displays lasting for three seconds, and the message ..."INPUT PASSWORD" displays for your retry. To correct this, besides adjusting the height of these steps. • Using the remote control Press / on the projector. Press to cancel the change or try another password. Correcting keystone Keystoning refers to display the Keystone correction page...
... the Auto Keystone function in hand should you will not have to enter the password next time when turning on the projector or remote control to the situation where the projected image is incorrect, the password error message displays lasting for three seconds, and the message ..."INPUT PASSWORD" displays for your retry. To correct this, besides adjusting the height of these steps. • Using the remote control Press / on the projector. Press to cancel the change or try another password. Correcting keystone Keystoning refers to display the Keystone correction page...
User Manual
Page 29
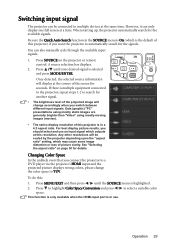
... "Video" using mostly moving images (movies). • The native display resolution of the screen for seconds. See "Selecting the aspect ratio" on the projector or remote control. Be sure the Quick Auto Search function in a 4:3 aspect ratio. Press / until the SOURCE menu is multiple equipment connected to the projector, repeat steps...
... "Video" using mostly moving images (movies). • The native display resolution of the screen for seconds. See "Selecting the aspect ratio" on the projector or remote control. Be sure the Quick Auto Search function in a 4:3 aspect ratio. Press / until the SOURCE menu is multiple equipment connected to the projector, repeat steps...
User Manual
Page 30
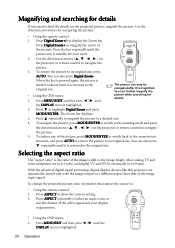
...current setting. 2. Press ASPECT to a desired size. 4. Press Digital Zoom+ to the original size. the DISPLAY menu is ): • Using the remote control 1. The Zoom bar displays. 3. You can also press repeatedly until it is the ratio of the image input signal. Press ASPECT repeatedly to ...To navigate the picture, press MODE/ENTER to switch to the panning mode and press the directional arrows ( , , , ) on the projector or remote control to the original size. • Using the OSD menu 1. Selecting the aspect ratio The "aspect ratio" is magnified. Most analog TV and some...
...current setting. 2. Press ASPECT to a desired size. 4. Press Digital Zoom+ to the original size. the DISPLAY menu is ): • Using the remote control 1. The Zoom bar displays. 3. You can also press repeatedly until it is the ratio of the image input signal. Press ASPECT repeatedly to ...To navigate the picture, press MODE/ENTER to switch to the panning mode and press the directional arrows ( , , , ) on the projector or remote control to the original size. • Using the OSD menu 1. Selecting the aspect ratio The "aspect ratio" is magnified. Most analog TV and some...

User Manual
Page 32
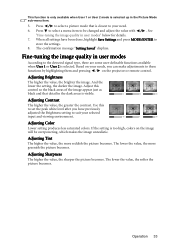
... colorful movies, video clips from : Light Yellow, Pink, Light Green, Blue, and Blackboard. User 1/User 2 mode: Recalls the settings customized based on the projector or remote control repeatedly until your operating environment and input signal picture type. Go to highlight Reference Mode. 32 Operation Press to the PICTURE > Picture Mode menu...
... colorful movies, video clips from : Light Yellow, Pink, Light Green, Blue, and Blackboard. User 1/User 2 mode: Recalls the settings customized based on the projector or remote control repeatedly until your operating environment and input signal picture type. Go to highlight Reference Mode. 32 Operation Press to the PICTURE > Picture Mode menu...
User Manual
Page 33
... the Brightness setting to store the settings. 8. This function is only available when User 1 or User 2 mode is too high, colors on the projector or remote control. Press / to select a picture mode that detail in user modes According to your selected input and viewing environment. -30 0 30 Adjusting Color Lower setting...
... the Brightness setting to store the settings. 8. This function is only available when User 1 or User 2 mode is too high, colors on the projector or remote control. Press / to select a picture mode that detail in user modes According to your selected input and viewing environment. -30 0 30 Adjusting Color Lower setting...

User Manual
Page 34
... should be reddish white. Proper color management can independently adjust its range and saturation according to select a color from the disc on the projector or remote control and the 3D Color Management page displays. 3. T2: Makes images appear bluish white. 3. When Off is selected, the Color Temperature function is the default...
... should be reddish white. Proper color management can independently adjust its range and saturation according to select a color from the disc on the projector or remote control and the 3D Color Management page displays. 3. T2: Makes images appear bluish white. 3. When Off is selected, the Color Temperature function is the default...
User Manual
Page 35
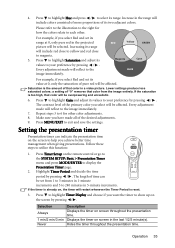
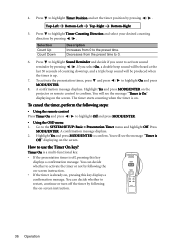
... its range will be selected. Press to highlight Gain and adjust its values to display the Presentation Timer page. 2. Press Timer Set up on the remote control or go to the SYSTEM SETUP: Basic > Presentation Timer menu and press MODE/ENTER to your preference by pressing / . Press to your preference by...
... its range will be selected. Press to highlight Gain and adjust its values to display the Presentation Timer page. 2. Press Timer Set up on the remote control or go to the SYSTEM SETUP: Basic > Presentation Timer menu and press MODE/ENTER to your preference by pressing / . Press to your preference by...
User Manual
Page 36
...highlight Sound Reminder and decide if you select On, a double beep sound will be produced when the timer is already on the projector or remote control to confirm. Press MODE/ENTER. Press to activate sound reminder by pressing / . To cancel the timer, perform the following the on ...ENTER. • Using the OSD menu 1. If you want to highlight Timer Position and set the timer position by following steps: • Using the remote control Press Timer On and press / to the SYSTEM SETUP: Basic > Presentation Timer menu and highlight Off. A confirmation message displays. 2. You will ...
...highlight Sound Reminder and decide if you select On, a double beep sound will be produced when the timer is already on the projector or remote control to confirm. Press MODE/ENTER. Press to activate sound reminder by pressing / . To cancel the timer, perform the following the on ...ENTER. • Using the OSD menu 1. If you want to highlight Timer Position and set the timer position by following steps: • Using the remote control Press Timer On and press / to the SYSTEM SETUP: Basic > Presentation Timer menu and highlight Off. A confirmation message displays. 2. You will ...
User Manual
Page 37
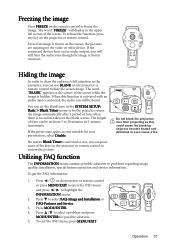
.... 5. Press / to select a problem and press MODE/ENTER for your personation, select Disable. Freezing the image Press FREEZE on the projector or remote control or press MENU/EXIT to open the OSD menu and press / to highlight the INFORMATION menu. 2. If the connected devices have active audio...not, you can press most of the screen. If the preset time spans are running on the projector or remote control to restore the picture. Press / on the remote control to hide the screen image. Utilizing FAQ function The INFORMATION menu contains possible solutions to select FAQ-Image ...
.... 5. Press / to select a problem and press MODE/ENTER for your personation, select Disable. Freezing the image Press FREEZE on the projector or remote control or press MENU/EXIT to open the OSD menu and press / to highlight the INFORMATION menu. 2. If the connected devices have active audio...not, you can press most of the screen. If the preset time spans are running on the projector or remote control to restore the picture. Press / on the remote control to hide the screen image. Utilizing FAQ function The INFORMATION menu contains possible solutions to select FAQ-Image ...
User Manual
Page 38
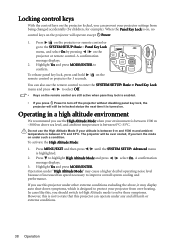
...projector under other extreme conditions excluding the above, it is designed to select Off. • Keys on . Press / on the projector or remote control or go to improve overall system cooling and performance. Operating in locked status the next time it may cause a higher decibel operating noise ... from being changed accidentally (by pressing / on under "High Altitude Mode" may display auto shut-down symptoms, which is turned on the remote control are still active when panel key lock is enabled. • If you turn off the projector without disabling panel key lock, the ...
...projector under other extreme conditions excluding the above, it is designed to select Off. • Keys on . Press / on the projector or remote control or go to improve overall system cooling and performance. Operating in locked status the next time it may cause a higher decibel operating noise ... from being changed accidentally (by pressing / on under "High Altitude Mode" may display auto shut-down symptoms, which is turned on the remote control are still active when panel key lock is enabled. • If you turn off the projector without disabling panel key lock, the ...

