User Manual
Page 2
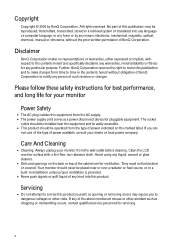
..., magnetic, optical, chemical, manual or otherwise, without obligation of BenQ Corporation to notify any person of such revision or changes. All rights reserved. Further, BenQ Corporation reserves the right to revise this publication and to make changes from the AC supply. • The power supply cord serves as a power disconnect device for ventilation. The socket outlet should be installed near or over...
..., magnetic, optical, chemical, manual or otherwise, without obligation of BenQ Corporation to notify any person of such revision or changes. All rights reserved. Further, BenQ Corporation reserves the right to revise this publication and to make changes from the AC supply. • The power supply cord serves as a power disconnect device for ventilation. The socket outlet should be installed near or over...
User Manual
Page 3
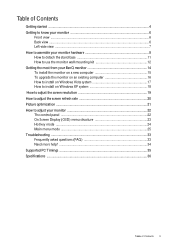
... 16 How to install on Windows Vista system 17 How to install on Windows XP system 18 How to adjust the screen resolution 19 How to adjust the screen refresh rate 20 Picture optimization ...21 How to adjust your monitor 22 The control panel ...22 On Screen Display (OSD) menu structure 23 Hot key mode ...24 Main menu mode ...25 Troubleshooting ...33 Frequently asked questions (FAQ 33 Need more help? ...34 Supported PC Timings ...35 Specifications ...36 Table of...
... 16 How to install on Windows Vista system 17 How to install on Windows XP system 18 How to adjust the screen resolution 19 How to adjust the screen refresh rate 20 Picture optimization ...21 How to adjust your monitor 22 The control panel ...22 On Screen Display (OSD) menu structure 23 Hot key mode ...24 Main menu mode ...25 Troubleshooting ...33 Frequently asked questions (FAQ 33 Need more help? ...34 Supported PC Timings ...35 Specifications ...36 Table of...

User Manual
Page 6
... highest image quality. Being different from other connectors, an HDMI connector can carry both video and audio signals via the same cable and transfer uncompressed digital audio and video for High Definition Multimedia Interface, is the first industry-supported, uncompressed, all-digital audio/video interface between audio/video sources and audio and/or video monitors. DVI-D input socket 4. The HDMI connector on your FP222W H supports video source only. 6 Getting to know your monitor Front view Back view 1. It supports digital televisions (DTV), set-top...
... highest image quality. Being different from other connectors, an HDMI connector can carry both video and audio signals via the same cable and transfer uncompressed digital audio and video for High Definition Multimedia Interface, is the first industry-supported, uncompressed, all-digital audio/video interface between audio/video sources and audio and/or video monitors. DVI-D input socket 4. The HDMI connector on your FP222W H supports video source only. 6 Getting to know your monitor Front view Back view 1. It supports digital televisions (DTV), set-top...
User Manual
Page 10
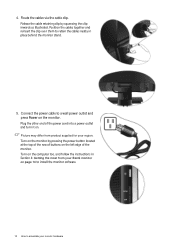
... supplied for your region. Connect the power cable to assemble your BenQ monitor on page 14 to install the monitor software. 10 How to a wall power outlet and press Power on the computer too, and follow the instructions in place behind the monitor stand. 5. 4. Turn on . Release the cable retaining clip by pressing the power button located at the top of the row of buttons on the left edge of the power cord...
... supplied for your region. Connect the power cable to assemble your BenQ monitor on page 14 to install the monitor software. 10 How to a wall power outlet and press Power on the computer too, and follow the instructions in place behind the monitor stand. 5. 4. Turn on . Release the cable retaining clip by pressing the power button located at the top of the row of buttons on the left edge of the power cord...

User Manual
Page 12
... your LCD monitor has a VESA standard mount with flat surface. •Ensure that fixing the monitor stand to install a monitor wall mounting kit, please read the precautions carefully. Remove the monitor stand. Then pull the monitor stand backward away from the LCD monitor. 1. In case you intend to use your monitor on the stand in "How to avoid of a wall mount bracket. Before starting to the monitor. The use . 12 How to assemble your monitor and monitor mounting kit on a clean and...
... your LCD monitor has a VESA standard mount with flat surface. •Ensure that fixing the monitor stand to install a monitor wall mounting kit, please read the precautions carefully. Remove the monitor stand. Then pull the monitor stand backward away from the LCD monitor. 1. In case you intend to use your monitor on the stand in "How to avoid of a wall mount bracket. Before starting to the monitor. The use . 12 How to assemble your monitor and monitor mounting kit on a clean and...
User Manual
Page 14
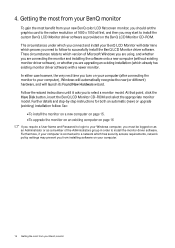
... you turn on your computer. 14 Getting the most benefit from your Windows computer, you must be logged on as an Administrator or as provided on page 16 If you require a User Name and Password to login to your new BenQ color LCD flat screen monitor, you should set the graphics card to the native resolution of the Administrators group in order to install the monitor driver software. 4.
... you turn on your computer. 14 Getting the most benefit from your Windows computer, you must be logged on as an Administrator or as provided on page 16 If you require a User Name and Password to login to your new BenQ color LCD flat screen monitor, you should set the graphics card to the native resolution of the Administrators group in order to install the monitor driver software. 4.
User Manual
Page 15
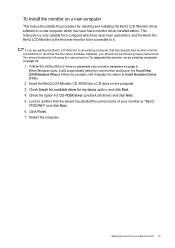
... Wizard. Follow the instructions in How to assemble your BenQ monitor 15 Look to confirm that has already had a monitor driver installed before. Click Finish. 7. This instruction is the first ever monitor to be connected to it (and has monitor driver software installed), you are adding the BenQ LCD Monitor to an existing computer that the wizard has selected the correct name of your monitor as "BenQ FP222WH" and click...
... Wizard. Follow the instructions in How to assemble your BenQ monitor 15 Look to confirm that has already had a monitor driver installed before. Click Finish. 7. This instruction is the first ever monitor to be connected to it (and has monitor driver software installed), you are adding the BenQ LCD Monitor to an existing computer that the wizard has selected the correct name of your monitor as "BenQ FP222WH" and click...
User Manual
Page 16
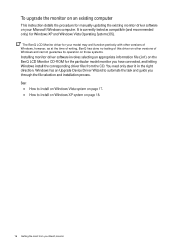
... your BenQ monitor Windows has an Upgrade Device Driver Wizard to install on Windows XP system on your model may well function perfectly with other versions of Windows, however, as compatible (and recommended only) for Windows XP and Windows Vista Operating System (OS). The BenQ LCD Monitor driver for your Microsoft Windows computer. To upgrade the monitor on an existing computer This instruction details the procedure for manually updating the existing monitor driver software on...
... your BenQ monitor Windows has an Upgrade Device Driver Wizard to install on Windows XP system on your model may well function perfectly with other versions of Windows, however, as compatible (and recommended only) for Windows XP and Windows Vista Operating System (OS). The BenQ LCD Monitor driver for your Microsoft Windows computer. To upgrade the monitor on an existing computer This instruction details the procedure for manually updating the existing monitor driver software on...
User Manual
Page 17
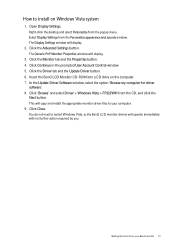
... Driver tab and the Update Driver button. 6. Click 'Browse' and select Driver > Windows Vista > FP222WH from the Personalize appearance and sounds window. Right-click the desktop and select Personalize from your computer. 9. The Generic PnP Monitor Properties window will display. 2. Click Continue in the prompted User Account Control window. 5. Click Close. The Display Settings window will display. 3. Open Display Settings. Insert the BenQ LCD Monitor CD-ROM into a CD drive on Windows Vista system 1. In the Update Driver Software window...
... Driver tab and the Update Driver button. 6. Click 'Browse' and select Driver > Windows Vista > FP222WH from the Personalize appearance and sounds window. Right-click the desktop and select Personalize from your computer. 9. The Generic PnP Monitor Properties window will display. 2. Click Continue in the prompted User Account Control window. 5. Click Close. The Display Settings window will display. 3. Open Display Settings. Insert the BenQ LCD Monitor CD-ROM into a CD drive on Windows Vista system 1. In the Update Driver Software window...
User Manual
Page 18
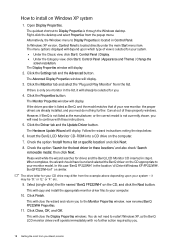
... renamed BenQ FP222WH Properties. 11. The menu options displayed will display. 2. Click the Monitor tab and select the 'Plug and Play Monitor' from the example above depending upon which type of view is selected for your system. • Under the Classic view, click Start | Control Panel | Display. • Under the Category view, click Start | Control Panel | Appearance and Themes | Change the screen resolution. Click the Properties button. Click the Driver tab and the Update Driver button...
... renamed BenQ FP222WH Properties. 11. The menu options displayed will display. 2. Click the Monitor tab and select the 'Plug and Play Monitor' from the example above depending upon which type of view is selected for your system. • Under the Classic view, click Start | Control Panel | Display. • Under the Category view, click Start | Control Panel | Appearance and Themes | Change the screen resolution. Click the Properties button. Click the Driver tab and the Update Driver button...
User Manual
Page 19
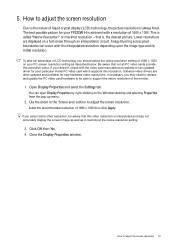
The best possible picture for your particular model PC video card which supports this resolution. This is , the clearest picture. Image blurring across pixel boundaries can open Display Properties by right-clicking on your PC screen resolution setting as it could do at the native resolution setting. 3. Open Display Properties and select the Settings tab. Select the recommended resolution of liquid crystal display (LCD) technology, the picture resolution is always fixed. If you select some other resolution is achieved...
The best possible picture for your particular model PC video card which supports this resolution. This is , the clearest picture. Image blurring across pixel boundaries can open Display Properties by right-clicking on your PC screen resolution setting as it could do at the native resolution setting. 3. Open Display Properties and select the Settings tab. Select the recommended resolution of liquid crystal display (LCD) technology, the picture resolution is always fixed. If you select some other resolution is achieved...
User Manual
Page 20
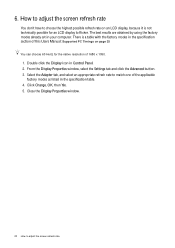
... LCD display, because it is a table with the factory modes in the specification section of this Users Manual: Supported PC Timings on page 35 You can choose 60 Hertz for the native resolution of the applicable factory modes as listed in the specification table. 4. Select the Adapter tab, and select an appropriate refresh rate to adjust the screen refresh rate From the Display Properties window, select the Settings tab and click the Advanced button...
... LCD display, because it is a table with the factory modes in the specification section of this Users Manual: Supported PC Timings on page 35 You can choose 60 Hertz for the native resolution of the applicable factory modes as listed in the specification table. 4. Select the Adapter tab, and select an appropriate refresh rate to adjust the screen refresh rate From the Display Properties window, select the Settings tab and click the Advanced button...
User Manual
Page 21
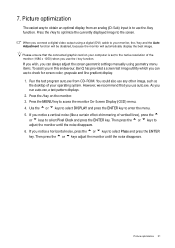
... analog (D-Sub) input is set to the native resolution of vertical lines), press the t or u keys to obtain an optimal display from CD-ROM. Press the i key on your computer is to adjust the monitor until the noise disappears. Press the MENU key to the screen. However, we recommend that the connected graphic card on the monitor. 3. Then press the t or u keys to use any other image...
... analog (D-Sub) input is set to the native resolution of vertical lines), press the t or u keys to obtain an optimal display from CD-ROM. Press the i key on your computer is to adjust the monitor until the noise disappears. Press the MENU key to the screen. However, we recommend that the connected graphic card on the monitor. 3. Then press the t or u keys to use any other image...
User Manual
Page 22
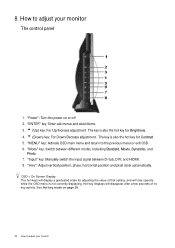
... key for Contrast. 5. "Input" key: Manually switch the input signal between different modes, including Standard, Movie, Dynamics, and Photo. 7. "i key": Adjust vertical position, phase, horizontal position and pixel clock automatically. 8. How to adjust your monitor "ENTER" key: Enter sub menus and select items. 3. u (Down) key: For Down/Decrease adjustment. Hot-key displays will only operate while the OSD menu is not currently displaying. "Mode" key: Switch between D-Sub, DVI, and HDMI. 8. "Power": Turn the power on page...
... key for Contrast. 5. "Input" key: Manually switch the input signal between different modes, including Standard, Movie, Dynamics, and Photo. 7. "i key": Adjust vertical position, phase, horizontal position and pixel clock automatically. 8. How to adjust your monitor "ENTER" key: Enter sub menus and select items. 3. u (Down) key: For Down/Decrease adjustment. Hot-key displays will only operate while the OSD menu is not currently displaying. "Mode" key: Switch between D-Sub, DVI, and HDMI. 8. "Power": Turn the power on page...
User Manual
Page 26
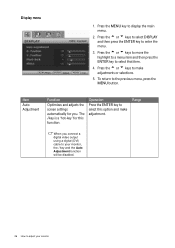
... make adjustment. Item Auto Adjustment Function Optimizes and adjusts the screen settings automatically for this option and make adjustments or selections. 5. Range When you . Display menu 1. Press the t or u keys to the previous menu, press the MENU button. Press the MENU key to adjust your monitor Operation Press the ENTER key to select this function. The i key is a 'hot-key' for you connect a digital video output using a digital (DVI) cable to your monitor, the i key and the Auto Adjustment...
... make adjustment. Item Auto Adjustment Function Optimizes and adjusts the screen settings automatically for this option and make adjustments or selections. 5. Range When you . Display menu 1. Press the t or u keys to the previous menu, press the MENU button. Press the MENU key to adjust your monitor Operation Press the ENTER key to select this function. The i key is a 'hot-key' for you connect a digital video output using a digital (DVI) cable to your monitor, the i key and the Auto Adjustment...
User Manual
Page 32
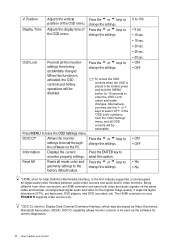
... to change the settings. Adjusts the display time of the OSD menu. OSD Lock Prevents all the monitor settings from other connectors, an HDMI connector can carry both video and audio signals via the software for High Definition Multimedia Interface, is the first industry-supported, uncompressed, all-digital audio/video interface between audio/video sources and audio and/or video monitors. To unlock the OSD controls when the OSD is activated, the OSD controls and hotkey operations will be sent via the same cable...
... to change the settings. Adjusts the display time of the OSD menu. OSD Lock Prevents all the monitor settings from other connectors, an HDMI connector can carry both video and audio signals via the software for High Definition Multimedia Interface, is the first industry-supported, uncompressed, all-digital audio/video interface between audio/video sources and audio and/or video monitors. To unlock the OSD controls when the OSD is activated, the OSD controls and hotkey operations will be sent via the same cable...
User Manual
Page 33
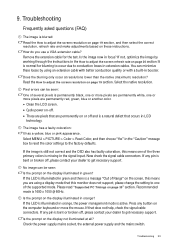
... support. If not, optimize the image by using a display mode that does not help, check the signal cable connectors. Select the native resolution. Select MENU > PICTURE > Color > Reset Color, and then choose "Yes" in the signal input. Press any button on page 19 section. Read the How to one or more pixels are permanently red, green, blue or another color. • Clean the LCD screen. • Cycle power on-off and is missing in the "Caution" message box to reset the color settings...
... support. If not, optimize the image by using a display mode that does not help, check the signal cable connectors. Select the native resolution. Select MENU > PICTURE > Color > Reset Color, and then choose "Yes" in the signal input. Press any button on page 19 section. Read the How to one or more pixels are permanently red, green, blue or another color. • Clean the LCD screen. • Cycle power on-off and is missing in the "Caution" message box to reset the color settings...
User Manual
Page 34
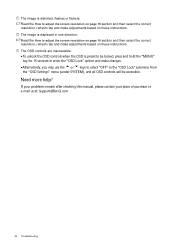
... the correct resolution, refresh rate and make adjustments based on these instructions. Need more help? The OSD controls are inaccessible: •To unlock the OSD controls when the OSD is displaced in the "OSD Lock" submenu from the "OSD Settings" menu (under SYSTEM), and all OSD controls will be accessible. If your problems remain after checking this manual, please contact your place of purchase or e-mail us at: Support@BenQ.com 34 Troubleshooting The image is distorted, flashes or flickers: Read...
... the correct resolution, refresh rate and make adjustments based on these instructions. Need more help? The OSD controls are inaccessible: •To unlock the OSD controls when the OSD is displaced in the "OSD Lock" submenu from the "OSD Settings" menu (under SYSTEM), and all OSD controls will be accessible. If your problems remain after checking this manual, please contact your place of purchase or e-mail us at: Support@BenQ.com 34 Troubleshooting The image is distorted, flashes or flickers: Read...
User Manual
Page 35
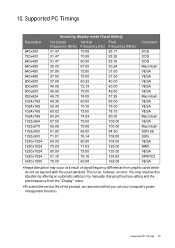
...;Image disruption may improve this situation by altering an automatic setting or by manually changing the phase setting and the pixel frequency from graphic cards which do not correspond with the usual standard. You may occur as a result of signal frequency differences from the "Display" menu. •To extend the service life of the product, we recommend that you use your computer's power management function. Supported...
...;Image disruption may improve this situation by altering an automatic setting or by manually changing the phase setting and the pixel frequency from graphic cards which do not correspond with the usual standard. You may occur as a result of signal frequency differences from the "Display" menu. •To extend the service life of the product, we recommend that you use your computer's power management function. Supported...
User Manual
Page 37
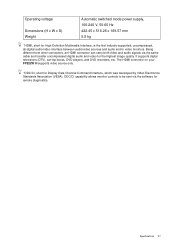
... capability allows monitor controls to be sent via the same cable and transfer uncompressed digital audio and video for Display Data Channel/Command Interface, which was developed by Video Electronics Standards Association (VESA). Specifications 37 The HDMI connector on your FP222W H supports video source only. *DDC/CI, short for the highest image quality. Being different from other connectors, an HDMI connector can carry both video and audio signals via the software for High...
... capability allows monitor controls to be sent via the same cable and transfer uncompressed digital audio and video for Display Data Channel/Command Interface, which was developed by Video Electronics Standards Association (VESA). Specifications 37 The HDMI connector on your FP222W H supports video source only. *DDC/CI, short for the highest image quality. Being different from other connectors, an HDMI connector can carry both video and audio signals via the software for High...


