
User Manual
Page 1
FP222W H 22" Wide-Screen LCD Monitor User Manual Welcome
FP222W H 22" Wide-Screen LCD Monitor User Manual Welcome

User Manual
Page 2
...mechanical, magnetic, optical, chemical, manual or otherwise, without obligation of BenQ Corporation to service this product yourself, as a power disconnect device for your dealer or local power company. Always unplug your monitor from time to time in the contents hereof without the prior written ...permission of BenQ Corporation. Please follow these safety instructions for best performance, and long life for pluggable...
...mechanical, magnetic, optical, chemical, manual or otherwise, without obligation of BenQ Corporation to service this product yourself, as a power disconnect device for your dealer or local power company. Always unplug your monitor from time to time in the contents hereof without the prior written ...permission of BenQ Corporation. Please follow these safety instructions for best performance, and long life for pluggable...
User Manual
Page 3
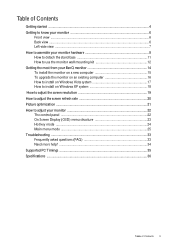
...started ...4 Getting to know your monitor 6 Front view ...6 Back view ...6 Left-side view ...7 How to assemble your monitor hardware 8 How to detach the stand base 11 How to use the monitor wall mounting kit 12 Getting the most from your BenQ monitor 14 To install the monitor on a new computer 15 ...To upgrade the monitor on an existing computer 16 How to install ...
...started ...4 Getting to know your monitor 6 Front view ...6 Back view ...6 Left-side view ...7 How to assemble your monitor hardware 8 How to detach the stand base 11 How to use the monitor wall mounting kit 12 Getting the most from your BenQ monitor 14 To install the monitor on a new computer 15 ...To upgrade the monitor on an existing computer 16 How to install ...
User Manual
Page 4
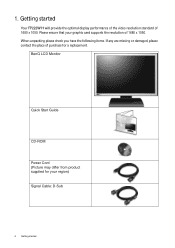
When unpacking please check you have the following items. If any are missing or damaged, please contact the place of purchase for your graphic card supports the resolution of 1680 x 1050. 1. Please ensure that your region) Signal Cable: D-Sub 4 Getting started Your FP222W H will provide the optimal display performance of the video resolution standard of 1680 x 1050. Getting started BenQ LCD Monitor Quick Start Guide CD-ROM Power Cord (Picture may differ from product supplied for a replacement.
When unpacking please check you have the following items. If any are missing or damaged, please contact the place of purchase for your graphic card supports the resolution of 1680 x 1050. 1. Please ensure that your region) Signal Cable: D-Sub 4 Getting started Your FP222W H will provide the optimal display performance of the video resolution standard of 1680 x 1050. Getting started BenQ LCD Monitor Quick Start Guide CD-ROM Power Cord (Picture may differ from product supplied for a replacement.

User Manual
Page 5
Signal Cable: DVI-D (optional) Consider keeping the box and packaging in storage for protecting the monitor during transport. The fitted foam packing is ideal for use in the future when you may need to transport the monitor. Getting started 5
Signal Cable: DVI-D (optional) Consider keeping the box and packaging in storage for protecting the monitor during transport. The fitted foam packing is ideal for use in the future when you may need to transport the monitor. Getting started 5

User Manual
Page 6
... for High Definition Multimedia Interface, is the first industry-supported, uncompressed, all-digital audio/video interface between audio/video sources and audio and/or video monitors. D-Sub input socket *HDMI, short for the highest image quality. HDMI* input socket 3. Power AC input jack 2. Getting to know your...
... for High Definition Multimedia Interface, is the first industry-supported, uncompressed, all-digital audio/video interface between audio/video sources and audio and/or video monitors. D-Sub input socket *HDMI, short for the highest image quality. HDMI* input socket 3. Power AC input jack 2. Getting to know your...

User Manual
Page 8
...attempt to pull them together until instructed to check that they click and lock into place. 3. Carefully lift the monitor, turn it over and place it off before continuing. Sliding or scraping the monitor around on your warranty. Orient and align the stand base socket with the end of the... your desk and placing a soft item like a stapler or a mouse will scratch or damage the monitor surround and controls. How to the monitor. Please be careful to prevent damage to assemble your monitor hardware Do not plug-in or turn it upright on its stand on a flat clean padded surface....
...attempt to pull them together until instructed to check that they click and lock into place. 3. Carefully lift the monitor, turn it over and place it off before continuing. Sliding or scraping the monitor around on your warranty. Orient and align the stand base socket with the end of the... your desk and placing a soft item like a stapler or a mouse will scratch or damage the monitor surround and controls. How to the monitor. Please be careful to prevent damage to assemble your monitor hardware Do not plug-in or turn it upright on its stand on a flat clean padded surface....

User Manual
Page 9
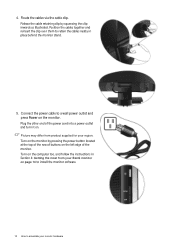
... Do not use . 3. Connect the other plug of the DVI-D cable to the monitor DVI-D socket and the other end to the monitor. Do not connect the other end to the monitor D-Sub socket. Connect the power cable to a power point just yet. Plug one ...end of the D-Sub cable (at the end without the ferrite filter) to the DVI-D port on your monitor hardware 9 The only case in which both DVI-D cable and D-Sub cable on the rear of the power cord into the socket... plug of the D-Sub cable (at the end with appropriate video systems. Connect one end of the monitor.
... Do not use . 3. Connect the other plug of the DVI-D cable to the monitor DVI-D socket and the other end to the monitor. Do not connect the other end to the monitor D-Sub socket. Connect the power cable to a power point just yet. Plug one ...end of the D-Sub cable (at the end without the ferrite filter) to the DVI-D port on your monitor hardware 9 The only case in which both DVI-D cable and D-Sub cable on the rear of the power cord into the socket... plug of the D-Sub cable (at the end with appropriate video systems. Connect one end of the monitor.
User Manual
Page 10
... Turn on the left edge of the monitor. Release the cable retaining clip by pressing the power button located at the top of the row of the power cord into a power outlet and turn it on the monitor. Picture may differ from your BenQ monitor on the computer too, and follow the... instructions in place behind the monitor stand. 5. 4. Plug the other end of buttons on the monitor by squeezing the clip inwards as illustrated. Route the cables via...
... Turn on the left edge of the monitor. Release the cable retaining clip by pressing the power button located at the top of the row of the power cord into a power outlet and turn it on the monitor. Picture may differ from your BenQ monitor on the computer too, and follow the... instructions in place behind the monitor stand. 5. 4. Plug the other end of buttons on the monitor by squeezing the clip inwards as illustrated. Route the cables via...

User Manual
Page 11
... object like a towel on the desk for padding, before unplugging the power cable. Release the other locking clip to assemble your monitor hardware 11 How to the monitor. Turn off the monitor and the power before laying the screen face down on one side of the stand base while pulling the edge of... the base away from the monitor stand arm. Protect the monitor and screen by clearing a flat open area on your desk will crack the glass or damage the LCD substrate voiding your desk and...
... object like a towel on the desk for padding, before unplugging the power cable. Release the other locking clip to assemble your monitor hardware 11 How to the monitor. Turn off the monitor and the power before laying the screen face down on one side of the stand base while pulling the edge of... the base away from the monitor stand arm. Protect the monitor and screen by clearing a flat open area on your desk will crack the glass or damage the LCD substrate voiding your desk and...

User Manual
Page 12
... cross-pointed screwdriver to release the screws that the wall material is recommended to avoid of losing the screws. Then pull the monitor stand backward away from the LCD monitor. 1. Lay the screen face down on a wall with 100mm pattern, allowing the installation of a wall mount bracket. Detach ...a magnetic-head screwdriver is stable to support the weight of the monitor. •Turn off the monitor and the power before disconnecting the cables from the monitor. The use the monitor wall mounting kit The back of your monitor on the stand in "How to detach the stand base on page...
... cross-pointed screwdriver to release the screws that the wall material is recommended to avoid of losing the screws. Then pull the monitor stand backward away from the LCD monitor. 1. Lay the screen face down on a wall with 100mm pattern, allowing the installation of a wall mount bracket. Detach ...a magnetic-head screwdriver is stable to support the weight of the monitor. •Turn off the monitor and the power before disconnecting the cables from the monitor. The use the monitor wall mounting kit The back of your monitor on the stand in "How to detach the stand base on page...
User Manual
Page 13
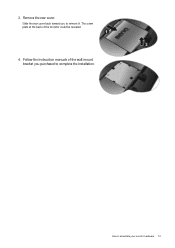
The screw plate at the back of the wall mount bracket you to remove it. How to complete the installation. Follow the instruction manuals of the monitor could be revealed. 4. Slide the rear cover back toward you purchased to assemble your monitor hardware 13 Remove the rear cover. 3.
The screw plate at the back of the wall mount bracket you to remove it. How to complete the installation. Follow the instruction manuals of the monitor could be revealed. 4. Slide the rear cover back toward you purchased to assemble your monitor hardware 13 Remove the rear cover. 3.

User Manual
Page 14
...new) or upgrade (existing) installation follow to select a monitor model. 4. At that point, click the Have Disk button, insert the BenQ LCD Monitor CD-ROM and select the appropriate monitor model. Getting the most from your BenQ monitor To gain the most from your computer), Windows will automatically ...or different) hardware, and will determine which has security access requirements, network policy settings may start to your new BenQ color LCD flat screen monitor, you should set the graphics card to the native resolution of Microsoft Windows you are using, and whether you ...
...new) or upgrade (existing) installation follow to select a monitor model. 4. At that point, click the Have Disk button, insert the BenQ LCD Monitor CD-ROM and select the appropriate monitor model. Getting the most from your BenQ monitor To gain the most from your computer), Windows will automatically ...or different) hardware, and will determine which has security access requirements, network policy settings may start to your new BenQ color LCD flat screen monitor, you should set the graphics card to the native resolution of Microsoft Windows you are using, and whether you ...
User Manual
Page 15
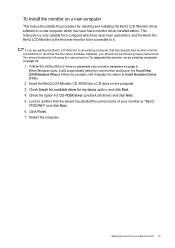
... on page 16. 1. If you should instead be connected to an existing computer that the wizard has selected the correct name of your monitor as "BenQ FP222WH" and click Next. 6. Check the option for my device option, and click Next. 4. Follow the instructions in How to Install Hardware Device drivers. 2. Restart the ...
... on page 16. 1. If you should instead be connected to an existing computer that the wizard has selected the correct name of your monitor as "BenQ FP222WH" and click Next. 6. Check the option for my device option, and click Next. 4. Follow the instructions in How to Install Hardware Device drivers. 2. Restart the ...
User Manual
Page 16
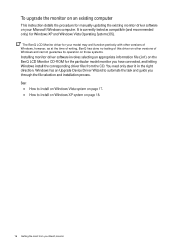
...need only steer it in the right direction. To upgrade the monitor on an existing computer This instruction details the procedure for manually updating the existing monitor driver software on the BenQ LCD Monitor CD-ROM for the particular model monitor you through the file selection and installation process. See: &#...the task and guide you have connected, and letting Windows install the corresponding driver files from your BenQ monitor It is currently tested as at the time of writing, BenQ has done no testing of this driver on other versions of Windows and cannot guarantee its operation on...
...need only steer it in the right direction. To upgrade the monitor on an existing computer This instruction details the procedure for manually updating the existing monitor driver software on the BenQ LCD Monitor CD-ROM for the particular model monitor you through the file selection and installation process. See: &#...the task and guide you have connected, and letting Windows install the corresponding driver files from your BenQ monitor It is currently tested as at the time of writing, BenQ has done no testing of this driver on other versions of Windows and cannot guarantee its operation on...
User Manual
Page 17
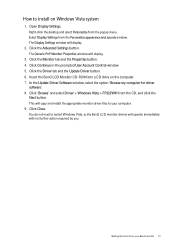
...prompted User Account Control window. 5. Click Close. The Display Settings window will display. 3. The Generic PnP Monitor Properties window will display. 2. Insert the BenQ LCD Monitor CD-ROM into a CD drive on Windows Vista system 1. Right-click the desktop and select Personalize from the...'. 8. Click 'Browse' and select Driver > Windows Vista > FP222WH from the popup menu. Select Display Settings from your computer. 9. Click the Driver tab and the Update Driver button. 6. How to your BenQ monitor 17 Open Display Settings. You do not need to restart Windows ...
...prompted User Account Control window. 5. Click Close. The Display Settings window will display. 3. The Generic PnP Monitor Properties window will display. 2. Insert the BenQ LCD Monitor CD-ROM into a CD drive on Windows Vista system 1. Right-click the desktop and select Personalize from the...'. 8. Click 'Browse' and select Driver > Windows Vista > FP222WH from the popup menu. Select Display Settings from your computer. 9. Click the Driver tab and the Update Driver button. 6. How to your BenQ monitor 17 Open Display Settings. You do not need to restart Windows ...

User Manual
Page 18
.... The Hardware Update Wizard will display. Please wait while the wizard searches for your new monitor, the proper drivers are already installed, and you to the Monitor Properties window, now renamed BenQ FP222WH Properties. 11. The drive letter for the best driver in step 6. Click Close, OK...these locations' and also check 'Search removable media', then click Next. Insert the BenQ LCD Monitor CD-ROM into a CD drive on Windows XP system 1. Select (single-click) the file named 'BenQ FP222WH' on the CD appropriate to Display Properties is located directly under the main Start...
.... The Hardware Update Wizard will display. Please wait while the wizard searches for your new monitor, the proper drivers are already installed, and you to the Monitor Properties window, now renamed BenQ FP222WH Properties. 11. The drive letter for the best driver in step 6. Click Close, OK...these locations' and also check 'Search removable media', then click Next. Insert the BenQ LCD Monitor CD-ROM into a CD drive on Windows XP system 1. Select (single-click) the file named 'BenQ FP222WH' on the CD appropriate to Display Properties is located directly under the main Start...
User Manual
Page 19
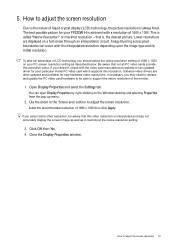
How to adjust the screen resolution Due to support the native resolution of the monitor. 1. Lower resolutions are often updated and available for new hardware video resolutions. Open Display Properties and select the Settings tab. This is , the clearest picture. ...
How to adjust the screen resolution Due to support the native resolution of the monitor. 1. Lower resolutions are often updated and available for new hardware video resolutions. Open Display Properties and select the Settings tab. This is , the clearest picture. ...
User Manual
Page 21
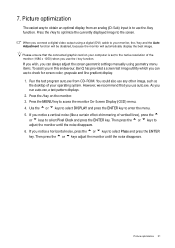
...to select DISPLAY and press the ENTER key to the screen. If you notice a horizontal noise, press the t or u keys to access the monitor On-Screen Display (OSD) menu. 4. Picture optimization 21 Please ensure that you can always adjust the screen geometric settings manually using a digital (DVI.... Then press the t or u keys adjust the monitor until the noise disappears. 6. When you run auto.exe, a test pattern displays. 2. As you connect a digital video output using geometry menu items. To assist you in this endeavour, BenQ has provided a screen test image utility which you use...
...to select DISPLAY and press the ENTER key to the screen. If you notice a horizontal noise, press the t or u keys to access the monitor On-Screen Display (OSD) menu. 4. Picture optimization 21 Please ensure that you can always adjust the screen geometric settings manually using a digital (DVI.... Then press the t or u keys adjust the monitor until the noise disappears. 6. When you run auto.exe, a test pattern displays. 2. As you connect a digital video output using geometry menu items. To assist you in this endeavour, BenQ has provided a screen test image utility which you use...
User Manual
Page 22
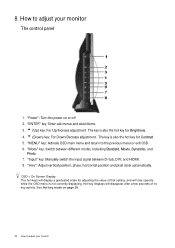
... key is also the hot key for adjusting the value of no key activity. "MENU" key: Activate OSD main menu and return to adjust your monitor "Mode" key: Switch between D-Sub, DVI, and HDMI. 8. The hot-keys will disappear after a few seconds of that setting, and will only operate ... display a graduated scale for Contrast. 5. How to the previous menu or exit OSD. 6. "Power": Turn the power on page 24. 22 How to adjust your monitor The control panel 1. "ENTER" key: Enter sub menus and select items. 3. u (Down) key: For Down/Decrease adjustment. See Hot key mode on or off. 2. t...
... key is also the hot key for adjusting the value of no key activity. "MENU" key: Activate OSD main menu and return to adjust your monitor "Mode" key: Switch between D-Sub, DVI, and HDMI. 8. The hot-keys will disappear after a few seconds of that setting, and will only operate ... display a graduated scale for Contrast. 5. How to the previous menu or exit OSD. 6. "Power": Turn the power on page 24. 22 How to adjust your monitor The control panel 1. "ENTER" key: Enter sub menus and select items. 3. u (Down) key: For Down/Decrease adjustment. See Hot key mode on or off. 2. t...

