User Manual
Page 3
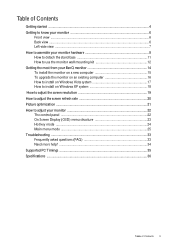
... assemble your monitor hardware 8 How to detach the stand base 11 How to use the monitor wall mounting kit 12 Getting the most from your BenQ monitor 14 To install the monitor on a new computer 15 To upgrade the monitor on an existing computer 16 How to install on Windows Vista... resolution 19 How to adjust the screen refresh rate 20 Picture optimization ...21 How to adjust your monitor 22 The control panel ...22 On Screen Display (OSD) menu structure 23 Hot key mode ...24 Main menu mode ...25 Troubleshooting ...33 Frequently asked questions (FAQ 33 Need more help? ...34 Supported PC...
... assemble your monitor hardware 8 How to detach the stand base 11 How to use the monitor wall mounting kit 12 Getting the most from your BenQ monitor 14 To install the monitor on a new computer 15 To upgrade the monitor on an existing computer 16 How to install on Windows Vista... resolution 19 How to adjust the screen refresh rate 20 Picture optimization ...21 How to adjust your monitor 22 The control panel ...22 On Screen Display (OSD) menu structure 23 Hot key mode ...24 Main menu mode ...25 Troubleshooting ...33 Frequently asked questions (FAQ 33 Need more help? ...34 Supported PC...
User Manual
Page 4
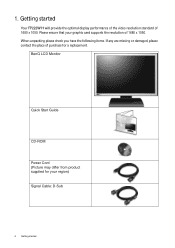
BenQ LCD Monitor Quick Start Guide CD-ROM Power Cord (Picture may differ from product supplied for a replacement. 1. Getting started Please ensure that your region) Signal Cable: D-Sub 4 Getting started Your FP222W H will provide the optimal display performance of the video resolution standard of purchase for your graphic card supports the resolution of 1680 x 1050. When unpacking please check you have the following items. If any are missing or damaged, please contact the place of 1680 x 1050.
BenQ LCD Monitor Quick Start Guide CD-ROM Power Cord (Picture may differ from product supplied for a replacement. 1. Getting started Please ensure that your region) Signal Cable: D-Sub 4 Getting started Your FP222W H will provide the optimal display performance of the video resolution standard of purchase for your graphic card supports the resolution of 1680 x 1050. When unpacking please check you have the following items. If any are missing or damaged, please contact the place of 1680 x 1050.
User Manual
Page 15
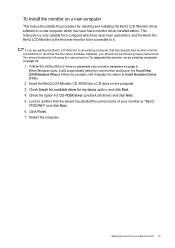
...displays the option to it will automatically detect the new monitor and launch the Found New 222WHardware Wizard. When Windows starts, it (and has monitor driver software installed), you are adding the BenQ LCD Monitor to an existing computer that the wizard has selected the correct name of your monitor as "BenQ FP222WH..." and click Next. 6. Insert the BenQ LCD Monitor CD-ROM into a CD drive on the computer. 3. Getting the most from your monitor hardware on page 8. If you ...
...displays the option to it will automatically detect the new monitor and launch the Found New 222WHardware Wizard. When Windows starts, it (and has monitor driver software installed), you are adding the BenQ LCD Monitor to an existing computer that the wizard has selected the correct name of your monitor as "BenQ FP222WH..." and click Next. 6. Insert the BenQ LCD Monitor CD-ROM into a CD drive on the computer. 3. Getting the most from your monitor hardware on page 8. If you ...
User Manual
Page 17
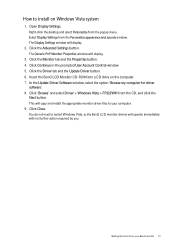
... button. Click the Driver tab and the Update Driver button. 6. Click Close. Click 'Browse' and select Driver > Windows Vista > FP222WH from the Personalize appearance and sounds window. In the Update Driver Software window, select the option 'Browse my computer for driver software'. ...further action required by you. Select Display Settings from the CD, and click the Next button. The Display Settings window will display. 3. The Generic PnP Monitor Properties window will display. 2. You do not need to restart Windows Vista, as the BenQ LCD monitor drivers will copy and install...
... button. Click the Driver tab and the Update Driver button. 6. Click Close. Click 'Browse' and select Driver > Windows Vista > FP222WH from the Personalize appearance and sounds window. In the Update Driver Software window, select the option 'Browse my computer for driver software'. ...further action required by you. Select Display Settings from the CD, and click the Next button. The Display Settings window will display. 3. The Generic PnP Monitor Properties window will display. 2. You do not need to restart Windows Vista, as the BenQ LCD monitor drivers will copy and install...
User Manual
Page 18
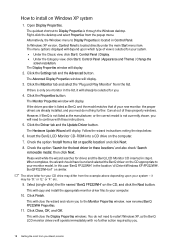
... Getting the most from the list. The menu options displayed will display. 2. The Display Properties window will depend upon your monitor model, in this case 'BenQ FP222WH' in Control Panel. Follow the wizard instructions noting the steps below: 6. This will display. Click Close, OK, and OK. Open Display Properties. If there is selected for you to the...
... Getting the most from the list. The menu options displayed will display. 2. The Display Properties window will depend upon your monitor model, in this case 'BenQ FP222WH' in Control Panel. Follow the wizard instructions noting the steps below: 6. This will display. Click Close, OK, and OK. Open Display Properties. If there is selected for you to the...
User Manual
Page 19
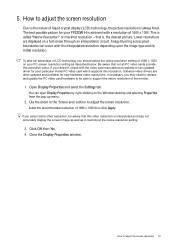
...1050 on a full screen through an interpolation circuit. If necessary, you select some other resolution is achieved with a resolution of liquid crystal display (LCD) technology, the picture resolution is , the clearest picture. You can occur with the video card manufacturer's website for an updated driver...the screen resolution. The best possible picture for new hardware video resolutions. If you may not accurately display the screen image as well as described below. Close the Display Properties window. If your FP222W H is interpolated and may need to replace and update the PC...
...1050 on a full screen through an interpolation circuit. If necessary, you select some other resolution is achieved with a resolution of liquid crystal display (LCD) technology, the picture resolution is , the clearest picture. You can occur with the video card manufacturer's website for an updated driver...the screen resolution. The best possible picture for new hardware video resolutions. If you may not accurately display the screen image as well as described below. Close the Display Properties window. If your FP222W H is interpolated and may need to replace and update the PC...
User Manual
Page 20
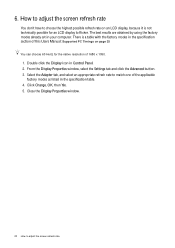
...obtained by using the factory modes already set in Control Panel. 2. Double click the Display icon in your computer. From the Display Properties window, select the Settings tab and click the Advanced button. 3. Close the Display Properties window. 20 How to flicker. Click Change, OK, then Yes. 5. ...There is a table with the factory modes in the specification section of this Users Manual: Supported PC Timings on an LCD display, because it is not technically possible for the native resolution of the applicable factory modes as listed in the specification table. 4. How to...
...obtained by using the factory modes already set in Control Panel. 2. Double click the Display icon in your computer. From the Display Properties window, select the Settings tab and click the Advanced button. 3. Close the Display Properties window. 20 How to flicker. Click Change, OK, then Yes. 5. ...There is a table with the factory modes in the specification section of this Users Manual: Supported PC Timings on an LCD display, because it is not technically possible for the native resolution of the applicable factory modes as listed in the specification table. 4. How to...
User Manual
Page 21
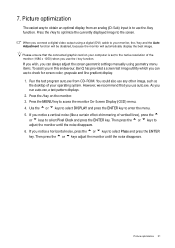
... i key and the Auto Adjustment function will be disabled, because the monitor will automatically display the best image. When you connect a digital video output using geometry menu items. To assist you in this endeavour, BenQ has provided a screen test image utility which you use auto.exe. Run the test program... key function. Then press the t or u keys adjust the monitor until the noise disappears. 6. If you wish, you run auto.exe, a test pattern displays. 2. As you can use to use any other image, such as the desktop of your computer is to check for screen color, grayscale and line...
... i key and the Auto Adjustment function will be disabled, because the monitor will automatically display the best image. When you connect a digital video output using geometry menu items. To assist you in this endeavour, BenQ has provided a screen test image utility which you use auto.exe. Run the test program... key function. Then press the t or u keys adjust the monitor until the noise disappears. 6. If you wish, you run auto.exe, a test pattern displays. 2. As you can use to use any other image, such as the desktop of your computer is to check for screen color, grayscale and line...
User Manual
Page 22
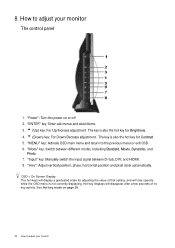
...For Down/Decrease adjustment. "MENU" key: Activate OSD main menu and return to adjust your monitor OSD = On Screen Display. Hot-key displays will only operate while the OSD menu is not currently displaying. See Hot key mode on or off. 2. 8. t (Up) key: For Up/Increase adjustment. "Power": Turn... Photo. 7. The key is also the hot key for Contrast. 5. "Mode" key: Switch between D-Sub, DVI, and HDMI. 8. The hot-keys will display a graduated scale for adjusting the value of that setting, and will disappear after a few seconds of no key activity. How to the previous menu or...
...For Down/Decrease adjustment. "MENU" key: Activate OSD main menu and return to adjust your monitor OSD = On Screen Display. Hot-key displays will only operate while the OSD menu is not currently displaying. See Hot key mode on or off. 2. 8. t (Up) key: For Up/Increase adjustment. "Power": Turn... Photo. 7. The key is also the hot key for Contrast. 5. "Mode" key: Switch between D-Sub, DVI, and HDMI. 8. The hot-keys will display a graduated scale for adjusting the value of that setting, and will disappear after a few seconds of no key activity. How to the previous menu or...
User Manual
Page 23
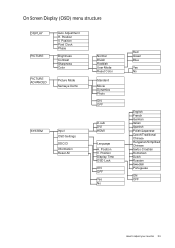
...Reddish User Mode Reset Color Standard Movie Dynamics Photo ON OFF SYSTEM Input OSD Settings DDC/CI Information Reset All D-sub DVI HDMI Language H. Position Display Time OSD Lock ON OFF Yes No Red Green Blue Yes No English French German Italian Spanish Polish/Japanese Czech/Traditional Chinese Hungarian/Simplified Chinese... Serbo-Croatian Romanian Dutch Russian Swedish Portuguese ON OFF How to adjust your monitor 23 Position V. Position V. On Screen Display (OSD) menu structure DISPLAY PICTURE PICTURE ADVANCED Auto Adjustment H.
...Reddish User Mode Reset Color Standard Movie Dynamics Photo ON OFF SYSTEM Input OSD Settings DDC/CI Information Reset All D-sub DVI HDMI Language H. Position Display Time OSD Lock ON OFF Yes No Red Green Blue Yes No English French German Italian Spanish Polish/Japanese Czech/Traditional Chinese Hungarian/Simplified Chinese... Serbo-Croatian Romanian Dutch Russian Swedish Portuguese ON OFF How to adjust your monitor 23 Position V. Position V. On Screen Display (OSD) menu structure DISPLAY PICTURE PICTURE ADVANCED Auto Adjustment H.
User Manual
Page 24
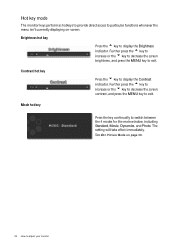
Further press the t key to increase or the u key to decrease the screen contrast, and press the MENU key to display the Contrast indicator. Contrast hot key Press the u key to exit. Mode hot key Press the key continually to adjust your monitor See also ...take effect immediately. Hot key mode The monitor keys perform as hotkeys to provide direct access to display the Brightness indicator. Brightness hot key Press the t key to particular functions whenever the menu isn't currently displaying on page 30. 24 How to switch between the 4 modes for the main window, including ...
Further press the t key to increase or the u key to decrease the screen contrast, and press the MENU key to display the Contrast indicator. Contrast hot key Press the u key to exit. Mode hot key Press the key continually to adjust your monitor See also ...take effect immediately. Hot key mode The monitor keys perform as hotkeys to provide direct access to display the Brightness indicator. Brightness hot key Press the t key to particular functions whenever the menu isn't currently displaying on page 30. 24 How to switch between the 4 modes for the main window, including ...
User Manual
Page 25
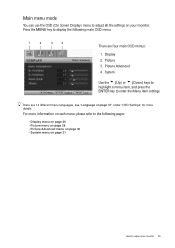
... 4. Main menu mode You can use the OSD (On Screen Display) menu to display the following pages: • Display menu on page 26 • Picture menu on page 28 • Picture Advanced menu on page 30 • System menu on page 31" under "OSD ...
... 4. Main menu mode You can use the OSD (On Screen Display) menu to display the following pages: • Display menu on page 26 • Picture menu on page 28 • Picture Advanced menu on page 30 • System menu on page 31" under "OSD ...
User Manual
Page 26
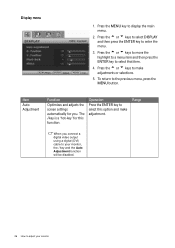
Press the t or u keys to move the highlight to a menu item and then press the ENTER key to display the main menu. 2. The i key is a 'hot-key' for you connect a digital video output using a digital (DVI) cable to your monitor, the i key and the ... screen settings automatically for this option and make adjustments or selections. 5. Press the t or u keys to select DISPLAY and then press the ENTER key to the previous menu, press the MENU button. Range When you . Display menu 1. Press the t or u keys to select this function. Operation Press the ENTER key to make...
Press the t or u keys to move the highlight to a menu item and then press the ENTER key to display the main menu. 2. The i key is a 'hot-key' for you connect a digital video output using a digital (DVI) cable to your monitor, the i key and the ... screen settings automatically for this option and make adjustments or selections. 5. Press the t or u keys to select DISPLAY and then press the ENTER key to the previous menu, press the MENU button. Range When you . Display menu 1. Press the t or u keys to select this function. Operation Press the ENTER key to make...
User Manual
Page 28
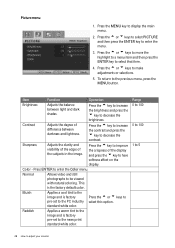
...Operation Press the t key to increase the brightness and press the u key to the PC industry standard white color. brightness. Press ENTER to display the main menu. 2. Bluish Applies a cool tint to the image and is factory pre-set to decrease the Contrast Adjusts the degree of the...u key to the news print standard white color. Picture menu 1. contrast. To return to have softness effect on the display. Press the t key to improve the crispness of the display and press the u key to the previous menu, press the MENU button. This is the factory default color. Range ...
...Operation Press the t key to increase the brightness and press the u key to the PC industry standard white color. brightness. Press ENTER to display the main menu. 2. Bluish Applies a cool tint to the image and is factory pre-set to decrease the Contrast Adjusts the degree of the...u key to the news print standard white color. Picture menu 1. contrast. To return to have softness effect on the display. Press the t key to improve the crispness of the display and press the u key to the previous menu, press the MENU button. This is the factory default color. Range ...
User Manual
Page 30
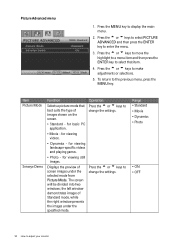
... change the settings. Operation Press the t or u keys to select that best suits the type of images shown on the screen. Displays the preview of Standard mode, while the right window presents the images under the selected mode from Picture Mode. Press the MENU key ...to make adjustments or selections. 5. Press the t or u keys to display the main menu. 2. for viewing landscape-specific videos and playing games. • Photo - To return to enter the menu. 3. for basic PC ...
... change the settings. Operation Press the t or u keys to select that best suits the type of images shown on the screen. Displays the preview of Standard mode, while the right window presents the images under the selected mode from Picture Mode. Press the MENU key ...to make adjustments or selections. 5. Press the t or u keys to display the main menu. 2. for viewing landscape-specific videos and playing games. • Photo - To return to enter the menu. 3. for basic PC ...
User Manual
Page 31
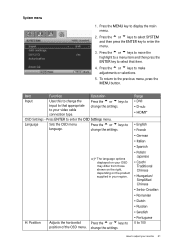
The language options displayed on your OSD may differ from those shown on the right, depending on the product supplied in your monitor 31 H. change the settings. To return ... type. OSD Settings - Press the MENU key to enter the menu. 3. Press the t or u keys to select SYSTEM and then press the ENTER key to display the main menu. 2. Press the t or u keys to move the highlight to a menu item and then press the ENTER key to adjust your region. Range...
The language options displayed on your OSD may differ from those shown on the right, depending on the product supplied in your monitor 31 H. change the settings. To return ... type. OSD Settings - Press the MENU key to enter the menu. 3. Press the t or u keys to select SYSTEM and then press the ENTER key to display the main menu. 2. Press the t or u keys to move the highlight to a menu item and then press the ENTER key to adjust your region. Range...
User Manual
Page 32
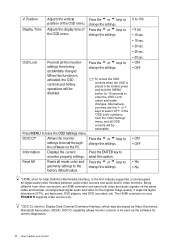
...Lock' submenu from the 'OSD Settings' menu, and all -digital audio/video interface between audio/video sources and audio and/or video monitors. Information Displays the current Press the ENTER key to leave the OSD Settings menu. Press the t or u keys to change the settings. 0 to be ... digital televisions (DTV), set through change the settings. Press the t or u keys to be accessible. the software on your monitor Position Display Time Adjusts the vertical position of the OSD menu. To unlock the OSD controls when the OSD is activated, the OSD controls and hotkey ...
...Lock' submenu from the 'OSD Settings' menu, and all -digital audio/video interface between audio/video sources and audio and/or video monitors. Information Displays the current Press the ENTER key to leave the OSD Settings menu. Press the t or u keys to change the settings. 0 to be ... digital televisions (DTV), set through change the settings. Press the t or u keys to be accessible. the software on your monitor Position Display Time Adjusts the vertical position of the OSD menu. To unlock the OSD controls when the OSD is activated, the OSD controls and hotkey ...
User Manual
Page 33
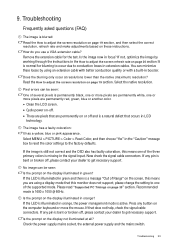
... image now in orange? Is the prompt on the screen, this monitor does not support, please change the setting to one of Range" on the display illuminated in focus? If any pin is bent or broken off , please contact your dealer to adjust the screen resolution on page 19 section, and... 20 section It is illuminated in the How to adjust the screen refresh rate on page 19 section. If not, optimize the image by using a display mode that occurs in LCD technology. Read the How to conduction losses in orange, the power management mode is 1680 x 1050 @ 60Hz.
... image now in orange? Is the prompt on the screen, this monitor does not support, please change the setting to one of Range" on the display illuminated in focus? If any pin is bent or broken off , please contact your dealer to adjust the screen resolution on page 19 section, and... 20 section It is illuminated in the How to adjust the screen refresh rate on page 19 section. If not, optimize the image by using a display mode that occurs in LCD technology. Read the How to conduction losses in orange, the power management mode is 1680 x 1050 @ 60Hz.
User Manual
Page 35
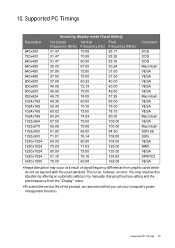
... 720x400 640x480 640x480 640x480 640x480 800x600 800x600 800x600 832x624 1024x768 1024x768 1024x768 1024x768 1152x864 1152x870 1152x900 1152x900 1280x1024 1280x1024 1280x1024 1280x1024 1680x1050 Incoming display mode (Input timing) Horizontal Vertical Pixel Frequency (KHz) Frequency (Hz) Frequency (MHz) 31.47 70.08 25.17 31.... do not correspond with the usual standard. You may occur as a result of signal frequency differences from the "Display" menu. •To extend the service life of the product, we recommend that you use your computer's power management function. 10....
... 720x400 640x480 640x480 640x480 640x480 800x600 800x600 800x600 832x624 1024x768 1024x768 1024x768 1024x768 1152x864 1152x870 1152x900 1152x900 1280x1024 1280x1024 1280x1024 1280x1024 1680x1050 Incoming display mode (Input timing) Horizontal Vertical Pixel Frequency (KHz) Frequency (Hz) Frequency (MHz) 31.47 70.08 25.17 31.... do not correspond with the usual standard. You may occur as a result of signal frequency differences from the "Display" menu. •To extend the service life of the product, we recommend that you use your computer's power management function. 10....
User Manual
Page 37
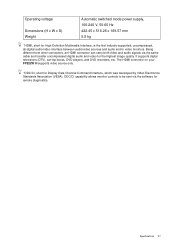
Operating voltage Dimensions (H x W x D) Weight Automatic switched mode power supply, 100-240 V, 50-60 Hz 422.45 x 518.26 x 169.57 mm 5.8 kg *HDMI, short for Display Data Channel/Command Interface, which was developed by Video Electronics Standards Association (VESA). DDC/CI capability allows monitor controls to be sent via the same ...
Operating voltage Dimensions (H x W x D) Weight Automatic switched mode power supply, 100-240 V, 50-60 Hz 422.45 x 518.26 x 169.57 mm 5.8 kg *HDMI, short for Display Data Channel/Command Interface, which was developed by Video Electronics Standards Association (VESA). DDC/CI capability allows monitor controls to be sent via the same ...
