Data List
Page 2
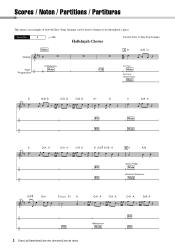
Scores / Noten / Partitions / Partituras This demo is an example of how the Easy Song Arranger can be used to change styles throughout a piece. Song No. 9 q =123 Hallelujah Chorus (Function Demo for Easy Song Arranger) 2 Data List/Datenliste/Liste des données/Lista de datos
Scores / Noten / Partitions / Partituras This demo is an example of how the Easy Song Arranger can be used to change styles throughout a piece. Song No. 9 q =123 Hallelujah Chorus (Function Demo for Easy Song Arranger) 2 Data List/Datenliste/Liste des données/Lista de datos
Data List
Page 4
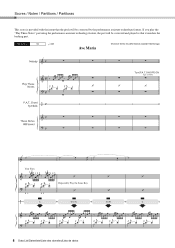
Scores / Noten / Partitions / Partituras This score is provided with the intent that it matches the backing part. If you play the "Play These Notes" part using the performance assistant technology feature, the part will be corrected and played so that the pitch will be corrected by the performance assistant technology feature. Repeatedly Play the Same Key. 4 Data List/Datenliste/Liste des données/Lista de datos Song No. 10 q =61 Ave Maria (Function Demo for performance assistant technology) Turn [P.A.T. ON/OFF] ON Type =CHORD Your Turn.
Scores / Noten / Partitions / Partituras This score is provided with the intent that it matches the backing part. If you play the "Play These Notes" part using the performance assistant technology feature, the part will be corrected and played so that the pitch will be corrected by the performance assistant technology feature. Repeatedly Play the Same Key. 4 Data List/Datenliste/Liste des données/Lista de datos Song No. 10 q =61 Ave Maria (Function Demo for performance assistant technology) Turn [P.A.T. ON/OFF] ON Type =CHORD Your Turn.
Data List
Page 6
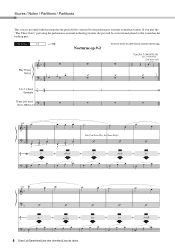
Scores / Noten / Partitions / Partituras This score is provided with the intent that it matches the backing part. If you play the "Play These Notes" part using the performance assistant technology feature, the part will be corrected and played so that the pitch will be corrected by the performance assistant technology feature. Song No. 11 q =108 Nocturne op.9-2 (Function Demo for performance assistant technology) Turn [P.A.T. ON/OFF] ON Type =CHORD/FREE 6 Data List/Datenliste/Liste des données/Lista de datos
Scores / Noten / Partitions / Partituras This score is provided with the intent that it matches the backing part. If you play the "Play These Notes" part using the performance assistant technology feature, the part will be corrected and played so that the pitch will be corrected by the performance assistant technology feature. Song No. 11 q =108 Nocturne op.9-2 (Function Demo for performance assistant technology) Turn [P.A.T. ON/OFF] ON Type =CHORD/FREE 6 Data List/Datenliste/Liste des données/Lista de datos
Data List
Page 14
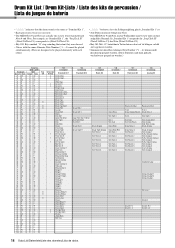
... kits de percussion / Lista de juegos de batería •" " indicates that the drum sound is the same as "Standard Kit 1". • Each percussion voice uses one note. • The MIDI Note # and Note are designed to be played simultaneously. (They are actually one octave lower than keyboard Note # and Note...
... kits de percussion / Lista de juegos de batería •" " indicates that the drum sound is the same as "Standard Kit 1". • Each percussion voice uses one note. • The MIDI Note # and Note are designed to be played simultaneously. (They are actually one octave lower than keyboard Note # and Note...
Owner's Manual
Page 2
... any optional fixtures (where applicable) are designed for battery disposal information. Please make sure that is recommended by Yamaha are well secured BEFORE using one described in the ears, you should be aware of knowledge relating to comply with the components supplied or;... non-rechargeable battery which can not locate the appropriate retailer, please contact Yamaha Corporation of America, Electronic Service Division, 6600 Orangethorpe Ave, Buena Park, CA90620 The above statements apply ONLY to use an extension cord, the minimum wire size for Class "B" digital devices....
... any optional fixtures (where applicable) are designed for battery disposal information. Please make sure that is recommended by Yamaha are well secured BEFORE using one described in the ears, you should be aware of knowledge relating to comply with the components supplied or;... non-rechargeable battery which can not locate the appropriate retailer, please contact Yamaha Corporation of America, Electronic Service Division, 6600 Orangethorpe Ave, Buena Park, CA90620 The above statements apply ONLY to use an extension cord, the minimum wire size for Class "B" digital devices....
Owner's Manual
Page 3
...wires) COMPLIANCE INFORMATION STATEMENT (DECLARATION OF CONFORMITY PROCEDURE) Responsible Party : Yamaha Corporation of America Address : 6600 Orangethorpe Ave., Buena Park, Calif. 90620 Telephone : 714-522-9011 Type of Equipment : Digital Piano Model Name : DGX-640 This device complies with your dealer or supplier for Users on Collection...vägguttaget, även om själva apparaten har stängts av. Model No. Making sure that used electrical and electronic products should note this serial number in the space provided below and retain this apparatus may not correspond ...
...wires) COMPLIANCE INFORMATION STATEMENT (DECLARATION OF CONFORMITY PROCEDURE) Responsible Party : Yamaha Corporation of America Address : 6600 Orangethorpe Ave., Buena Park, Calif. 90620 Telephone : 714-522-9011 Type of Equipment : Digital Piano Model Name : DGX-640 This device complies with your dealer or supplier for Users on Collection...vägguttaget, även om själva apparaten har stängts av. Model No. Making sure that used electrical and electronic products should note this serial number in the space provided below and retain this apparatus may not correspond ...
Owner's Manual
Page 4
.... • Check the electric plug periodically and remove any openings. If any way. A burning item may have the device inspected by Yamaha service personnel. • The power cord or plug becomes frayed or damaged. • It emits unusual smells or smoke. • ... cause overheating in the ears, consult a physician. 4 Owner's Manual (7)-1 1/2 When attaching the stand or rack, use immediately and have the instrument inspected by qualified Yamaha service personnel. If some trouble or malfunction occurs, immediately turn off for a long period of physical injury to you ...
.... • Check the electric plug periodically and remove any openings. If any way. A burning item may have the device inspected by Yamaha service personnel. • The power cord or plug becomes frayed or damaged. • It emits unusual smells or smoke. • ... cause overheating in the ears, consult a physician. 4 Owner's Manual (7)-1 1/2 When attaching the stand or rack, use immediately and have the instrument inspected by qualified Yamaha service personnel. If some trouble or malfunction occurs, immediately turn off for a long period of physical injury to you ...

Owner's Manual
Page 5
... instrument for instructional purposes only, and may not play them to the proper format music data for your personal use. • This product incorporates and bundles computer programs and contents in which Yamaha owns copyrights or with respect to which it has license to a USB storage device/or other external device such...
... instrument for instructional purposes only, and may not play them to the proper format music data for your personal use. • This product incorporates and bundles computer programs and contents in which Yamaha owns copyrights or with respect to which it has license to a USB storage device/or other external device such...
Owner's Manual
Page 6
... chord types. 6 Owner's Manual Naturally, you can be accurately played by any XG song data using an XGlite tone generator. However, keep in mind that support GM System Level. XF The Yamaha XF format enhances the SMF (Standard MIDI File) standard with greater functionality and open-ended expandability for... XF file containing lyric data is played. Logos GM System Level 1 "GM System Level 1" is an addition to the MIDI standard which uses a unique conversion system to provide high-quality automatic accompaniment based on a wide range of Yamaha's high-quality XG tone generation format.
... chord types. 6 Owner's Manual Naturally, you can be accurately played by any XG song data using an XGlite tone generator. However, keep in mind that support GM System Level. XF The Yamaha XF format enhances the SMF (Standard MIDI File) standard with greater functionality and open-ended expandability for... XF file containing lyric data is played. Logos GM System Level 1 "GM System Level 1" is an addition to the MIDI standard which uses a unique conversion system to provide high-quality automatic accompaniment based on a wide range of Yamaha's high-quality XG tone generation format.
Owner's Manual
Page 7
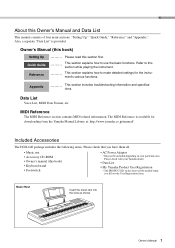
..."Setting Up," "Quick Guide," "Reference," and "Appendix." The MIDI Reference is provided. Please check with your Yamaha dealer. • Data List • My Yamaha Product User Registration * The PRODUCT ID on the sheet will be included depending on your particular area. About this... settings for downloading from the Yamaha Manual Library at: http://www.yamaha.co.jp/manual/ Included Accessories The DGX-640 package includes the following items. Please check that you fill out the User Registration form. This section explains how to use the basic functions. tions. Data...
..."Setting Up," "Quick Guide," "Reference," and "Appendix." The MIDI Reference is provided. Please check with your Yamaha dealer. • Data List • My Yamaha Product User Registration * The PRODUCT ID on the sheet will be included depending on your particular area. About this... settings for downloading from the Yamaha Manual Library at: http://www.yamaha.co.jp/manual/ Included Accessories The DGX-640 package includes the following items. Please check that you fill out the User Registration form. This section explains how to use the basic functions. tions. Data...
Owner's Manual
Page 8
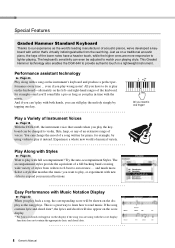
... with action that's virtually indistinguishable from waltzes to 8-beat to euro-trance ... This Graded Hammer technology also enables the DGX-640 to play the melody simply by using with new styles to do is play , or experiment with the score display function does not contain the appropriate lyric ...you have a heavier touch, while the higher ones are using violin to play back a song, the corresponding score will appear on the display as the song plays. and right-hand ranges of Instrument Voices Page 18 With the DGX-640, the instrument voice that sounds when you play in ...
... with action that's virtually indistinguishable from waltzes to 8-beat to euro-trance ... This Graded Hammer technology also enables the DGX-640 to play the melody simply by using with new styles to do is play , or experiment with the score display function does not contain the appropriate lyric ...you have a heavier touch, while the higher ones are using violin to play back a song, the corresponding score will appear on the display as the song plays. and right-hand ranges of Instrument Voices Page 18 With the DGX-640, the instrument voice that sounds when you play in ...

Owner's Manual
Page 9
...32 Display the Lyrics 33 Reference Basic Operation 34 Select a Song For a Lesson 38 The Easy Way to Play Piano 43 Play Using the Music Database 53 Change a Song's Style 54 Record Your Own Performance 56 Memorize Your Favorite Panel Settings 62 Backup and Initialization...The Functions 86 Selecting and Setting Functions 86 Saving and Loading Data 90 Connecting a USB Flash Memory 90 Precautions when using the USB TO DEVICE terminal ..91 Using USB Storage Devices 91 Connecting to a Computer 97 Connecting a Personal Computer 97 Transferring Performance Data to and from a ...
...32 Display the Lyrics 33 Reference Basic Operation 34 Select a Song For a Lesson 38 The Easy Way to Play Piano 43 Play Using the Music Database 53 Change a Song's Style 54 Record Your Own Performance 56 Memorize Your Favorite Panel Settings 62 Backup and Initialization...The Functions 86 Selecting and Setting Functions 86 Saving and Loading Data 90 Connecting a USB Flash Memory 90 Precautions when using the USB TO DEVICE terminal ..91 Using USB Storage Devices 91 Connecting to a Computer 97 Connecting a Personal Computer 97 Transferring Performance Data to and from a ...
Owner's Manual
Page 10
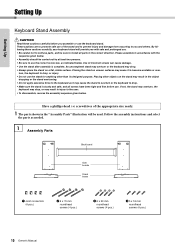
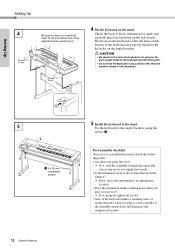
...roundhead screws (4 pcs.) 10 Owner's Manual Setting Up Setting Up Setting Up Keyboard Stand Assembly CAUTION Read these cautions carefully, your keyboard stand will be used. Use of the appropriate size ready. 1 The parts shown in the object dropping or the stand overturning. • Do not apply excessive force to the ...keyboard as it to drop. • Make sure the stand is complete. turn, the keyboard to drop, or injury. • Do not use . • Be careful not to confuse parts, and be carried out by at least two persons. • Be sure to the user. • To...
...roundhead screws (4 pcs.) 10 Owner's Manual Setting Up Setting Up Setting Up Keyboard Stand Assembly CAUTION Read these cautions carefully, your keyboard stand will be used. Use of the appropriate size ready. 1 The parts shown in the object dropping or the stand overturning. • Do not apply excessive force to the ...keyboard as it to drop. • Make sure the stand is complete. turn, the keyboard to drop, or injury. • Do not use . • Be careful not to confuse parts, and be carried out by at least two persons. • Be sure to the user. • To...

Owner's Manual
Page 11
...Attach the back board. Owner's Manual 11 NOTE • If you have trouble fastening the screws, use a screwdriver to the instructions provided with the screw holes on the upper surfaces of the side boards, using the screws e. Attach the "L" (Left) and "R" (Right) stand bases to the next step... proceeding to the bottom of the stand bases. "L" (Left) and "R" (Right) are aligned with your pedal unit. Attach the back board, using the screws w. CAUTION • Be careful not to -front orientation for the side boards. Insert the joint connectors q into the side boards as...
...Attach the back board. Owner's Manual 11 NOTE • If you have trouble fastening the screws, use a screwdriver to the instructions provided with the screw holes on the upper surfaces of the side boards, using the screws e. Attach the "L" (Left) and "R" (Right) stand bases to the next step... proceeding to the bottom of the stand bases. "L" (Left) and "R" (Right) are aligned with your pedal unit. Attach the back board, using the screws w. CAUTION • Be careful not to -front orientation for the side boards. Insert the joint connectors q into the side boards as...
Owner's Manual
Page 12
... angle brackets. Fix the keyboard to -front orientation for stand, and carefully place the keyboard on the stand. Check the back-to the angle brackets, using the screws r.
... angle brackets. Fix the keyboard to -front orientation for stand, and carefully place the keyboard on the stand. Check the back-to the angle brackets, using the screws r.
Owner's Manual
Page 13
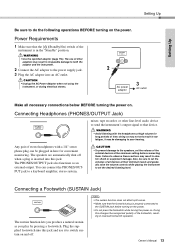
... are automatically shut off . Failure to do the following operations BEFORE turning on . CAUTION • Unplug the AC Power Adaptor when not using the instrument, or during electrical storms. 2 AC power adaptor 3 AC outlet Make all devices at high volume for convenient monitoring. The PHONES... footswitch operation. Also, be damaging to the power supply jack. 3 Plug the AC adaptor into an AC outlet. WARNING • Use the specified adaptor (page 112). Plug the supplied footswitch into this changes the recognized polarity of other line-level audio device to send ...
... are automatically shut off . Failure to do the following operations BEFORE turning on . CAUTION • Unplug the AC Power Adaptor when not using the instrument, or during electrical storms. 2 AC power adaptor 3 AC outlet Make all devices at high volume for convenient monitoring. The PHONES... footswitch operation. Also, be damaging to the power supply jack. 3 Plug the AC adaptor into an AC outlet. WARNING • Use the specified adaptor (page 112). Plug the supplied footswitch into this changes the recognized polarity of other line-level audio device to send ...

Owner's Manual
Page 14
... damper pedal to sustain a chord, for connecting an optional LP-7A pedal unit. Sostenuto (Center) Pedal If you press the pedal. * When using both the Footswitch and pedal unit, the last effect applied takes priority. The soft pedal will not affect notes that are already playing when it ...
... damper pedal to sustain a chord, for connecting an optional LP-7A pedal unit. Sostenuto (Center) Pedal If you press the pedal. * When using both the Footswitch and pedal unit, the last effect applied takes priority. The soft pedal will not affect notes that are already playing when it ...
Owner's Manual
Page 15
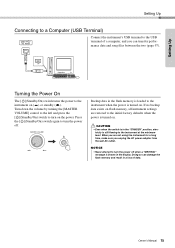
... [ ](Standby/On) switch again to turn the power off when a "WRITING!" NOTICE • Never attempt to turn on flash memory, all instrument settings are not using the instrument for a long time, make sure you can damage the flash memory and result in the display. message is turned on ( ) or standby ( ). When...
... [ ](Standby/On) switch again to turn the power off when a "WRITING!" NOTICE • Never attempt to turn on flash memory, all instrument settings are not using the instrument for a long time, make sure you can damage the flash memory and result in the display. message is turned on ( ) or standby ( ). When...
Owner's Manual
Page 22
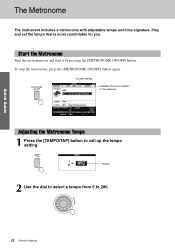
Tempo 2 Use the dial to select a tempo from 5 to call up the tempo setting. Play and set the tempo that is most comfortable for you. Current setting Indicates the beat number in the measure Adjusting the Metronome Tempo 1 Press the [TEMPO/TAP] button to 280. 22 Owner's Manual Start the Metronome Turn the metronome on and start it by pressing the [METRONOME ON/OFF] button. Quick Guide The Metronome The instrument includes a metronome with adjustable tempo and time signature. To stop the metronome, press the [METRONOME ON/OFF] button again.
Tempo 2 Use the dial to select a tempo from 5 to call up the tempo setting. Play and set the tempo that is most comfortable for you. Current setting Indicates the beat number in the measure Adjusting the Metronome Tempo 1 Press the [TEMPO/TAP] button to 280. 22 Owner's Manual Start the Metronome Turn the metronome on and start it by pressing the [METRONOME ON/OFF] button. Quick Guide The Metronome The instrument includes a metronome with adjustable tempo and time signature. To stop the metronome, press the [METRONOME ON/OFF] button again.

Owner's Manual
Page 23
... that is playing, so these parameters cannot be sounded at the first beat of beats per measure. Owner's Manual 23 The available range is playing. 4 Use the dial to select the beat length. Quick Guide The Metronome Setting the Time Signature In this example we'll set up a 5/8 time signature. 1 Press... and hold the [METRONOME ON/OFF] button for longer than a second Numerator (Number of beats per measure.) Denominator (The length of one beat.) 2 Use the dial to select the number of each beat: 2, 4, 8, or 16 (half note, quarter note, eighth note, or 16th note).
... that is playing, so these parameters cannot be sounded at the first beat of beats per measure. Owner's Manual 23 The available range is playing. 4 Use the dial to select the beat length. Quick Guide The Metronome Setting the Time Signature In this example we'll set up a 5/8 time signature. 1 Press... and hold the [METRONOME ON/OFF] button for longer than a second Numerator (Number of beats per measure.) Denominator (The length of one beat.) 2 Use the dial to select the number of each beat: 2, 4, 8, or 16 (half note, quarter note, eighth note, or 16th note).


