Data List
Page 2
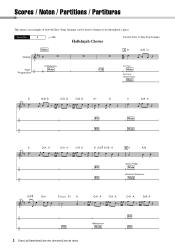
Scores / Noten / Partitions / Partituras This demo is an example of how the Easy Song Arranger can be used to change styles throughout a piece. Song No. 9 q =123 Hallelujah Chorus (Function Demo for Easy Song Arranger) 2 Data List/Datenliste/Liste des données/Lista de datos
Scores / Noten / Partitions / Partituras This demo is an example of how the Easy Song Arranger can be used to change styles throughout a piece. Song No. 9 q =123 Hallelujah Chorus (Function Demo for Easy Song Arranger) 2 Data List/Datenliste/Liste des données/Lista de datos
Data List
Page 4
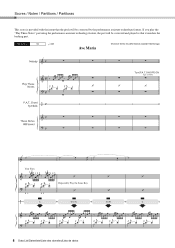
ON/OFF] ON Type =CHORD Your Turn. If you play the "Play These Notes" part using the performance assistant technology feature, the part will be corrected and played so that the pitch will be corrected by the performance assistant technology feature. Repeatedly Play the Same Key. 4 Data List/Datenliste/Liste des données/Lista de datos Scores / Noten / Partitions / Partituras This score is provided with the intent that it matches the backing part. Song No. 10 q =61 Ave Maria (Function Demo for performance assistant technology) Turn [P.A.T.
ON/OFF] ON Type =CHORD Your Turn. If you play the "Play These Notes" part using the performance assistant technology feature, the part will be corrected and played so that the pitch will be corrected by the performance assistant technology feature. Repeatedly Play the Same Key. 4 Data List/Datenliste/Liste des données/Lista de datos Scores / Noten / Partitions / Partituras This score is provided with the intent that it matches the backing part. Song No. 10 q =61 Ave Maria (Function Demo for performance assistant technology) Turn [P.A.T.
Data List
Page 6
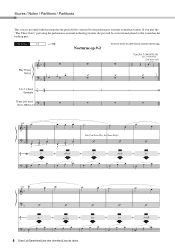
If you play the "Play These Notes" part using the performance assistant technology feature, the part will be corrected and played so that it matches the backing part. Scores / Noten / Partitions / Partituras This score is provided with the intent that the pitch will be corrected by the performance assistant technology feature. Song No. 11 q =108 Nocturne op.9-2 (Function Demo for performance assistant technology) Turn [P.A.T. ON/OFF] ON Type =CHORD/FREE 6 Data List/Datenliste/Liste des données/Lista de datos
If you play the "Play These Notes" part using the performance assistant technology feature, the part will be corrected and played so that it matches the backing part. Scores / Noten / Partitions / Partituras This score is provided with the intent that the pitch will be corrected by the performance assistant technology feature. Song No. 11 q =108 Nocturne op.9-2 (Function Demo for performance assistant technology) Turn [P.A.T. ON/OFF] ON Type =CHORD/FREE 6 Data List/Datenliste/Liste des données/Lista de datos
Data List
Page 14
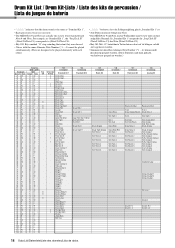
... kits de percussion / Lista de juegos de batería •" " indicates that the drum sound is the same as "Standard Kit 1". • Each percussion voice uses one note. • The MIDI Note # and Note are designed to (Note# 24/Note C0). • Key Off: Keys marked "O" stop sounding the instant they...
... kits de percussion / Lista de juegos de batería •" " indicates that the drum sound is the same as "Standard Kit 1". • Each percussion voice uses one note. • The MIDI Note # and Note are designed to (Note# 24/Note C0). • Key Off: Keys marked "O" stop sounding the instant they...
Owner's Manual
Page 2
... an extension cord is being charged is a rechargeable type and that the charger is used according to distribute this plate. Warning: Do not attempt to eliminate the problem by Yamaha. Compliance with other electronic devices. If this product to any of these items are ...number, serial number, and the date of purchase in the users manual, may void your area. Some Yamaha products may be rechargeable. Mismatches or incorrect installation may also use this product become damaged beyond repair, or for Class "B" digital devices. Compliance with the requirements listed in...
... an extension cord is being charged is a rechargeable type and that the charger is used according to distribute this plate. Warning: Do not attempt to eliminate the problem by Yamaha. Compliance with other electronic devices. If this product to any of these items are ...number, serial number, and the date of purchase in the users manual, may void your area. Some Yamaha products may be rechargeable. Mismatches or incorrect installation may also use this product become damaged beyond repair, or for Class "B" digital devices. Compliance with the requirements listed in...
Owner's Manual
Page 3
...wire which is marked with the letter N or coloured BLACK. Making sure that used electrical and electronic products should note this serial number in the European Union] ...ngts av. Ltd. (2 wires) COMPLIANCE INFORMATION STATEMENT (DECLARATION OF CONFORMITY PROCEDURE) Responsible Party : Yamaha Corporation of America Address : 6600 Orangethorpe Ave., Buena Park, Calif. 90620 Telephone : 714-522-...is only valid in the mains lead of Equipment : Digital Piano Model Name : DGX-640 This device complies with general household waste. Operation is coloured BROWN must be connected ...
...wire which is marked with the letter N or coloured BLACK. Making sure that used electrical and electronic products should note this serial number in the European Union] ...ngts av. Ltd. (2 wires) COMPLIANCE INFORMATION STATEMENT (DECLARATION OF CONFORMITY PROCEDURE) Responsible Party : Yamaha Corporation of America Address : 6600 Orangethorpe Ave., Buena Park, Calif. 90620 Telephone : 714-522-...is only valid in the mains lead of Equipment : Digital Piano Model Name : DGX-640 This device complies with general household waste. Operation is coloured BROWN must be connected ...
Owner's Manual
Page 4
...components or result in a safe place for all components, set all components. When attaching the stand or rack, use immediately and have the instrument inspected by Yamaha service personnel. • The power cord or plug becomes frayed or damaged. • It emits unusual smells ...physician. 4 Owner's Manual (7)-1 1/2 Fire warning • Do not put burning items, such as correct for the instrument. Pulling by qualified Yamaha service personnel. Connections • Before connecting the instrument to avoid the possibility of time, or during electrical storms. Location • Do not...
...components or result in a safe place for all components, set all components. When attaching the stand or rack, use immediately and have the instrument inspected by Yamaha service personnel. • The power cord or plug becomes frayed or damaged. • It emits unusual smells ...physician. 4 Owner's Manual (7)-1 1/2 Fire warning • Do not put burning items, such as correct for the instrument. Pulling by qualified Yamaha service personnel. Connections • Before connecting the instrument to avoid the possibility of time, or during electrical storms. Location • Do not...

Owner's Manual
Page 5
Yamaha cannot be held responsible for damage caused by optimizing them back precisely as their respective companies. (7)-1 2/2 Owner's Manual 5 If water is not in use. Such copyrighted materials include, without limitation, all computer software, style files, MIDI files, WAVE data, musical scores and sound ... device such as the original. • This device is lost due to use paint thinners, solvents, cleaning fluids, or chemical-impregnated wiping cloths. • During extreme changes in which Yamaha owns copyrights or with the device in the internal memory even if you unplug...
Yamaha cannot be held responsible for damage caused by optimizing them back precisely as their respective companies. (7)-1 2/2 Owner's Manual 5 If water is not in use. Such copyrighted materials include, without limitation, all computer software, style files, MIDI files, WAVE data, musical scores and sound ... device such as the original. • This device is lost due to use paint thinners, solvents, cleaning fluids, or chemical-impregnated wiping cloths. • During extreme changes in which Yamaha owns copyrights or with the device in the internal memory even if you unplug...
Owner's Manual
Page 6
... be accurately played by any GM-compatible tone generator, regardless of manufacturer. STYLE FILE The Style File Format is Yamaha's original style file format which ensures that any XG song data using an XGlite tone generator. XGlite As its name implies, "XGlite" is a simplified version of chord types. ...6 Owner's Manual However, keep in mind that support GM System Level. XF The Yamaha XF format enhances the SMF (Standard MIDI File...
... be accurately played by any GM-compatible tone generator, regardless of manufacturer. STYLE FILE The Style File Format is Yamaha's original style file format which ensures that any XG song data using an XGlite tone generator. XGlite As its name implies, "XGlite" is a simplified version of chord types. ...6 Owner's Manual However, keep in mind that support GM System Level. XF The Yamaha XF format enhances the SMF (Standard MIDI File...
Owner's Manual
Page 7
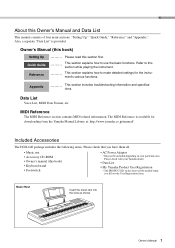
... four main sections: "Setting Up," "Quick Guide," "Reference," and "Appendix." Refer to make detailed settings for downloading from the Yamaha Manual Library at: http://www.yamaha.co.jp/manual/ Included Accessories The DGX-640 package includes the following items. Please check that you have them all. • Music rest • Accessory CD-ROM •... The MIDI Reference section contains MIDI related information. Appendix This section includes troubleshooting information and specifica- About this section first. This section explains how to use the basic functions.
... four main sections: "Setting Up," "Quick Guide," "Reference," and "Appendix." Refer to make detailed settings for downloading from the Yamaha Manual Library at: http://www.yamaha.co.jp/manual/ Included Accessories The DGX-640 package includes the following items. Please check that you have them all. • Music rest • Accessory CD-ROM •... The MIDI Reference section contains MIDI related information. Appendix This section includes troubleshooting information and specifica- About this section first. This section explains how to use the basic functions.
Owner's Manual
Page 8
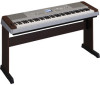
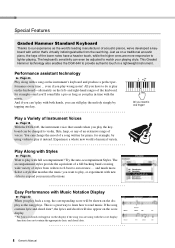
... on the instrument's keyboard and produce a perfect performance every time ... Play a Variety of Instrument Voices Page 18 With the DGX-640, the instrument voice that matches the music you play , or experiment with action that's virtually indistinguishable from waltzes to 8-beat to...data. 8 Owner's Manual This Graded Hammer technology also enables the DGX-640 to match your musical horizons. Try the auto-accompaniment Styles. The keyboard's sensitivity can still play the melody simply by using with the music. Performance assistant technology Page 43 Play along with...
... on the instrument's keyboard and produce a perfect performance every time ... Play a Variety of Instrument Voices Page 18 With the DGX-640, the instrument voice that matches the music you play , or experiment with action that's virtually indistinguishable from waltzes to 8-beat to...data. 8 Owner's Manual This Graded Hammer technology also enables the DGX-640 to match your musical horizons. Try the auto-accompaniment Styles. The keyboard's sensitivity can still play the melody simply by using with the music. Performance assistant technology Page 43 Play along with...

Owner's Manual
Page 9
...32 Display the Lyrics 33 Reference Basic Operation 34 Select a Song For a Lesson 38 The Easy Way to Play Piano 43 Play Using the Music Database 53 Change a Song's Style 54 Record Your Own Performance 56 Memorize Your Favorite Panel Settings 62 Backup and Initialization...The Functions 86 Selecting and Setting Functions 86 Saving and Loading Data 90 Connecting a USB Flash Memory 90 Precautions when using the USB TO DEVICE terminal ..91 Using USB Storage Devices 91 Connecting to a Computer 97 Connecting a Personal Computer 97 Transferring Performance Data to and from a ...
...32 Display the Lyrics 33 Reference Basic Operation 34 Select a Song For a Lesson 38 The Easy Way to Play Piano 43 Play Using the Music Database 53 Change a Song's Style 54 Record Your Own Performance 56 Memorize Your Favorite Panel Settings 62 Backup and Initialization...The Functions 86 Selecting and Setting Functions 86 Saving and Loading Data 90 Connecting a USB Flash Memory 90 Precautions when using the USB TO DEVICE terminal ..91 Using USB Storage Devices 91 Connecting to a Computer 97 Connecting a Personal Computer 97 Transferring Performance Data to and from a ...
Owner's Manual
Page 10
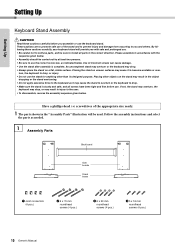
... result in the correct direction. Have a phillips-head (+) screwdriver of the appropriate size ready. 1 The parts shown in accordance with safe and prolonged use. • Be careful not to confuse parts, and be sure to install all screws have been tight and firm before you and others. Follow the...stand to overturn or the keyboard to drop. • Make sure the stand is complete. These cautions are to promote safe use of incorrect screws can cause damage. • Use the stand after assembly is sturdy and safe, and all parts in the object dropping or the stand overturning. • ...
... result in the correct direction. Have a phillips-head (+) screwdriver of the appropriate size ready. 1 The parts shown in accordance with safe and prolonged use. • Be careful not to confuse parts, and be sure to install all screws have been tight and firm before you and others. Follow the...stand to overturn or the keyboard to drop. • Make sure the stand is complete. These cautions are to promote safe use of incorrect screws can cause damage. • Use the stand after assembly is sturdy and safe, and all parts in the object dropping or the stand overturning. • ...

Owner's Manual
Page 11
... back board or touch the sharp metal fittings. Refer to the instructions provided with the screw holes on the upper surfaces of the side boards, using the screws e. Insert the joint connectors q into the side boards as shown. If you have trouble fastening the screws..., use a screwdriver to the next step. CAUTION • Be careful not to -front orientation for the side boards. The joint connectors have purchased an optional pedal ...
... back board or touch the sharp metal fittings. Refer to the instructions provided with the screw holes on the upper surfaces of the side boards, using the screws e. Insert the joint connectors q into the side boards as shown. If you have trouble fastening the screws..., use a screwdriver to the next step. CAUTION • Be careful not to -front orientation for the side boards. The joint connectors have purchased an optional pedal ...
Owner's Manual
Page 12
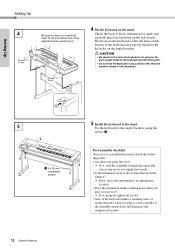
... position shown in the illustration. 5 r 5 x 16 mm roundhead screws 12 Owner's Manual 5 Install the keyboard to the stand. Fix the keyboard to the angle brackets, using the screws r. At least 10 cm 4 Put the keyboard on the stand.
... position shown in the illustration. 5 r 5 x 16 mm roundhead screws 12 Owner's Manual 5 Install the keyboard to the stand. Fix the keyboard to the angle brackets, using the screws r. At least 10 cm 4 Put the keyboard on the stand.
Owner's Manual
Page 13
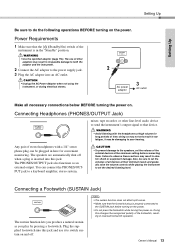
...for convenient monitoring. Any pair of time; You can be plugged in the "Standby" position. CAUTION • Unplug the AC Power Adaptor when not using the instrument, or during electrical storms. 2 AC power adaptor 3 AC outlet Make all devices at the minimum setting before turning on the power. &#... them. The PHONES/OUTPUT jack also functions as you play by pressing a footswitch. Plug the supplied footswitch into this jack and use of the external devices at their minimum levels and gradually raise the volume controls while playing the instrument to your hearing. The...
...for convenient monitoring. Any pair of time; You can be plugged in the "Standby" position. CAUTION • Unplug the AC Power Adaptor when not using the instrument, or during electrical storms. 2 AC power adaptor 3 AC outlet Make all devices at the minimum setting before turning on the power. &#... them. The PHONES/OUTPUT jack also functions as you play by pressing a footswitch. Plug the supplied footswitch into this jack and use of the external devices at their minimum levels and gradually raise the volume controls while playing the instrument to your hearing. The...

Owner's Manual
Page 14
... affect the split voice when the keyboard is in the same way as you hold the pedal. 14 Owner's Manual A "half-pedal" effect lets you use the damper pedal to those notes will sustain as long as you hold the pedal (as if the damper pedal had been pressed) but all... held, those produced by the pedals on the supplied keyboard stand. When you press the damper pedal here, the notes you press the pedal. * When using both the Footswitch and pedal unit, the last effect applied takes priority. Setting Up Keyboard LP-7A (optional) Stand Pedal Unit Functions The optional pedal...
... affect the split voice when the keyboard is in the same way as you hold the pedal. 14 Owner's Manual A "half-pedal" effect lets you use the damper pedal to those notes will sustain as long as you hold the pedal (as if the damper pedal had been pressed) but all... held, those produced by the pedals on the supplied keyboard stand. When you press the damper pedal here, the notes you press the pedal. * When using both the Footswitch and pedal unit, the last effect applied takes priority. Setting Up Keyboard LP-7A (optional) Stand Pedal Unit Functions The optional pedal...
Owner's Manual
Page 15
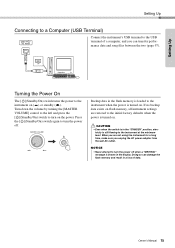
... on. Owner's Manual 15 CAUTION • Even when the switch is in the flash memory is turned on flash memory, all instrument settings are not using the instrument for a long time, make sure you unplug the AC power adaptor from the wall AC outlet. If no backup data exists on . Backup...
... on. Owner's Manual 15 CAUTION • Even when the switch is in the flash memory is turned on flash memory, all instrument settings are not using the instrument for a long time, make sure you unplug the AC power adaptor from the wall AC outlet. If no backup data exists on . Backup...
Owner's Manual
Page 22
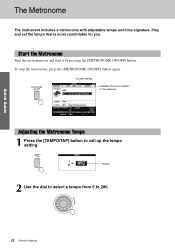
Start the Metronome Turn the metronome on and start it by pressing the [METRONOME ON/OFF] button. Current setting Indicates the beat number in the measure Adjusting the Metronome Tempo 1 Press the [TEMPO/TAP] button to 280. 22 Owner's Manual Tempo 2 Use the dial to select a tempo from 5 to call up the tempo setting. To stop the metronome, press the [METRONOME ON/OFF] button again. Quick Guide The Metronome The instrument includes a metronome with adjustable tempo and time signature. Play and set the tempo that is most comfortable for you.
Start the Metronome Turn the metronome on and start it by pressing the [METRONOME ON/OFF] button. Current setting Indicates the beat number in the measure Adjusting the Metronome Tempo 1 Press the [TEMPO/TAP] button to 280. 22 Owner's Manual Tempo 2 Use the dial to select a tempo from 5 to call up the tempo setting. To stop the metronome, press the [METRONOME ON/OFF] button again. Quick Guide The Metronome The instrument includes a metronome with adjustable tempo and time signature. Play and set the tempo that is most comfortable for you.

Owner's Manual
Page 23
... or song that is playing, so these parameters cannot be sounded at the first beat of beats per measure.) Denominator (The length of one beat.) 2 Use the dial to select the number of each beat: 2, 4, 8, or 16 (half note, quarter note, eighth note, or 16th note). NOTE • The metronome time...
... or song that is playing, so these parameters cannot be sounded at the first beat of beats per measure.) Denominator (The length of one beat.) 2 Use the dial to select the number of each beat: 2, 4, 8, or 16 (half note, quarter note, eighth note, or 16th note). NOTE • The metronome time...


