Midi Reference
Page 2
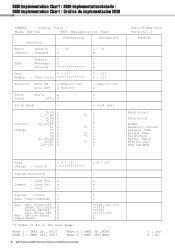
MIDI Implementation Chart / MIDI-Implementationstabelle / MIDI Implementation Chart / Gráfico de implementación MIDI YAMAHA [ Digital Piano ] Model DGX-640 MIDI Implementation Chart Function... Transmitted Recognized Basic Default Channel Changed 1 - 16 x 1 - 16 x Mode Default 3 3 Messages x x Altered x Note 0 - 127 Number : True voice 0 - 127 0 - 127 Velocity Note ON Note OFF o 9nH,v=1-127 x 9nH,v=0 o 9nH,v=1-127 x After Key's x x Touch Ch's x o Pitch Bend o o 0-24 semi Control Change 0,32 o 1,11,84 x 6,38 o 7,10 o 64,66,67 o 71 x 72 o ...
MIDI Implementation Chart / MIDI-Implementationstabelle / MIDI Implementation Chart / Gráfico de implementación MIDI YAMAHA [ Digital Piano ] Model DGX-640 MIDI Implementation Chart Function... Transmitted Recognized Basic Default Channel Changed 1 - 16 x 1 - 16 x Mode Default 3 3 Messages x x Altered x Note 0 - 127 Number : True voice 0 - 127 0 - 127 Velocity Note ON Note OFF o 9nH,v=1-127 x 9nH,v=0 o 9nH,v=1-127 x After Key's x x Touch Ch's x o Pitch Bend o o 0-24 semi Control Change 0,32 o 1,11,84 x 6,38 o 7,10 o 64,66,67 o 71 x 72 o ...
Owner's Manual
Page 2
.... IMPORTANT: The louder the sound, the shorter the time period before requesting service. Benches supplied by Yamaha. ENVIRONMENTAL ISSUES: Yamaha strives to the operation of other uses are designed to any of the specifications without notice or obligation to how a function or effect works (when the unit is unable to be rechargeable. Cable/s supplied with an amplifier and headphones or speaker/s, may be aware of the...
.... IMPORTANT: The louder the sound, the shorter the time period before requesting service. Benches supplied by Yamaha. ENVIRONMENTAL ISSUES: Yamaha strives to the operation of other uses are designed to any of the specifications without notice or obligation to how a function or effect works (when the unit is unable to be rechargeable. Cable/s supplied with an amplifier and headphones or speaker/s, may be aware of the...
Owner's Manual
Page 4
... instrument. • There is turned off the power switch and disconnect the plug from the outlet. Connections • Before connecting the instrument to , the following problems occur, immediately turn off , electricity is printed on the buttons, switches or connectors. • Do not use the instrument/device or headphones for a long period of time at their minimum levels and gradually raise the volume controls while playing the instrument to be used for the instrument. Using...
... instrument. • There is turned off the power switch and disconnect the plug from the outlet. Connections • Before connecting the instrument to , the following problems occur, immediately turn off , electricity is printed on the buttons, switches or connectors. • Do not use the instrument/device or headphones for a long period of time at their minimum levels and gradually raise the volume controls while playing the instrument to be used for the instrument. Using...

Owner's Manual
Page 5
... software, style files, MIDI files, WAVE data, musical scores and sound recordings. Saved data may absorb the water and be damaged. DON'T MAKE, DISTRIBUTE OR USE ILLEGAL COPIES. About functions/data bundled with the instrument • Some of personal use of such programs and contents outside of the preset songs have been edited for length or arrangement, and may not play them to the proper format music data for use with a soft cloth. - Saving data...
... software, style files, MIDI files, WAVE data, musical scores and sound recordings. Saved data may absorb the water and be damaged. DON'T MAKE, DISTRIBUTE OR USE ILLEGAL COPIES. About functions/data bundled with the instrument • Some of personal use of such programs and contents outside of the preset songs have been edited for length or arrangement, and may not play them to the proper format music data for use with a soft cloth. - Saving data...
Owner's Manual
Page 8
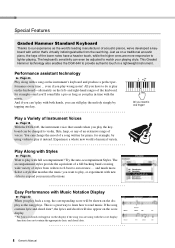
... as the song plays. Performance assistant technology Page 43 Play along with Music Notation Display Page 32 When you have a heavier touch, while the higher ones are using violin to play wrong notes! Play a Variety of Instrument Voices Page 18 With the DGX-640, the instrument voice that sounds when you are more . and much more responsive to lighter playing. If the song contains lyric and chord data*, the lyrics...
... as the song plays. Performance assistant technology Page 43 Play along with Music Notation Display Page 32 When you have a heavier touch, while the higher ones are using violin to play wrong notes! Play a Variety of Instrument Voices Page 18 With the DGX-640, the instrument voice that sounds when you are more . and much more responsive to lighter playing. If the song contains lyric and chord data*, the lyrics...

Owner's Manual
Page 9
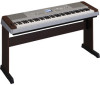
...Data List 7 Included Accessories 7 Special Features 8 Setting Up Setting Up 10 Keyboard Stand Assembly 10 Power Requirements 13 Connecting Headphones (PHONES/OUTPUT Jack) .....13 Connecting a Footswitch (SUSTAIN Jack 13 Connecting a Pedal Unit (PEDAL UNIT jack 14 Connecting to a Computer (USB Terminal 15 Turning the Power On 15 Panel Controls and Terminals 16 Quick Guide Try Playing a Variety of Instrument Voices 18 Select and Play a Voice-MAIN 18 Play the Grand Piano Voice 19 Play Two Voices Simultaneously-DUAL 20 Play Different Voices with the Left and Right Hands-SPLIT...
...Data List 7 Included Accessories 7 Special Features 8 Setting Up Setting Up 10 Keyboard Stand Assembly 10 Power Requirements 13 Connecting Headphones (PHONES/OUTPUT Jack) .....13 Connecting a Footswitch (SUSTAIN Jack 13 Connecting a Pedal Unit (PEDAL UNIT jack 14 Connecting to a Computer (USB Terminal 15 Turning the Power On 15 Panel Controls and Terminals 16 Quick Guide Try Playing a Variety of Instrument Voices 18 Select and Play a Voice-MAIN 18 Play the Grand Piano Voice 19 Play Two Voices Simultaneously-DUAL 20 Play Different Voices with the Left and Right Hands-SPLIT...
Owner's Manual
Page 16
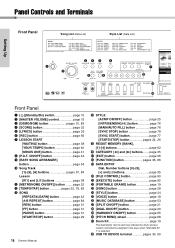
... 16 Owner's Manual !4 STYLE [ACMP ON/OFF] button page 25 [INTRO/ENDING/rit.] button page 76 [MAIN/AUTO FILL] button page 76 [SYNC STOP] button page 78 [SYNC START] button page 77 [START/STOP] button pages 24, 26 !5 REGIST MEMORY [BANK], [1]-[4] buttons page 62 !6 CATEGORY [r] and [f] buttons ....... Panel Controls and Terminals Front Panel Song List (Data List) Style List (Data List) Setting Up q w ert y i o !1 !2 u !0 !3 !4 Front Panel q [ ](Standby/On) switch page 15 w [MASTER VOLUME] control page 15 e [DEMO/BGM] button pages...
... 16 Owner's Manual !4 STYLE [ACMP ON/OFF] button page 25 [INTRO/ENDING/rit.] button page 76 [MAIN/AUTO FILL] button page 76 [SYNC STOP] button page 78 [SYNC START] button page 77 [START/STOP] button pages 24, 26 !5 REGIST MEMORY [BANK], [1]-[4] buttons page 62 !6 CATEGORY [r] and [f] buttons ....... Panel Controls and Terminals Front Panel Song List (Data List) Style List (Data List) Setting Up q w ert y i o !1 !2 u !0 !3 !4 Front Panel q [ ](Standby/On) switch page 15 w [MASTER VOLUME] control page 15 e [DEMO/BGM] button pages...
Owner's Manual
Page 30
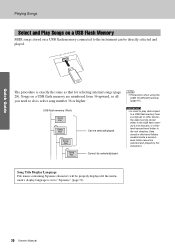
... is set to "Japanese" (page 71). 30 Owner's Manual Data stored in the root directory. NOTE • Precautions when using the [USB TO DEVICE] terminal (page 91) IMPORTANT • In order to play data copied to do is select song number 36 or higher. Song Title Display Language File names containing Japanese characters will be selected/played. Songs on a USB flash memory connected to the instrument can be selected/played. USB flash memory (Root) Song File Song File Can...
... is set to "Japanese" (page 71). 30 Owner's Manual Data stored in the root directory. NOTE • Precautions when using the [USB TO DEVICE] terminal (page 91) IMPORTANT • In order to play data copied to do is select song number 36 or higher. Song Title Display Language File names containing Japanese characters will be selected/played. Songs on a USB flash memory connected to the instrument can be selected/played. USB flash memory (Root) Song File Song File Can...
Owner's Manual
Page 37
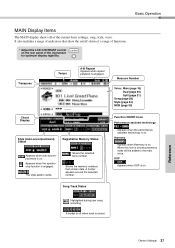
... Performance assistant technology Appears when the performance assistant technology is on . Harmony Appears when Harmony is on . Song Track Status Highlighted during user song recording. A border is off status of a range of indicators that contain data. It also includes a range of functions. * Adjust the LCD CONTRAST control on . When this icon is muted. DSP Appears when DSP is on. Shows the memory numbers...
... Performance assistant technology Appears when the performance assistant technology is on . Harmony Appears when Harmony is on . Song Track Status Highlighted during user song recording. A border is off status of a range of indicators that contain data. It also includes a range of functions. * Adjust the LCD CONTRAST control on . When this icon is muted. DSP Appears when DSP is on. Shows the memory numbers...
Owner's Manual
Page 62
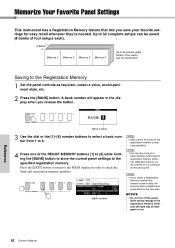
... to 32 complete setups can be saved (8 banks of four each ). 8 Banks Memory 1 Memory 2 Memory 3 Memory 4 Up to the Registration Memory 1 Set the panel controls as the user file or to the registration memory, otherwise the data may be memorized. Saving to 32 presets (eight banks of four setups each ) can also save your panel settings memorized to registration memory button into USB flash memory as required-select a voice, accompaniment style, etc. 2 Press the [BANK] button. Press the [EXIT] button to return...
... to 32 complete setups can be saved (8 banks of four each ). 8 Banks Memory 1 Memory 2 Memory 3 Memory 4 Up to the Registration Memory 1 Set the panel controls as the user file or to the registration memory, otherwise the data may be memorized. Saving to 32 presets (eight banks of four setups each ) can also save your panel settings memorized to registration memory button into USB flash memory as required-select a voice, accompaniment style, etc. 2 Press the [BANK] button. Press the [EXIT] button to return...
Owner's Manual
Page 66
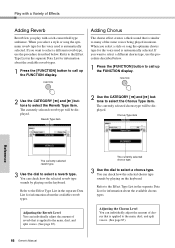
... type. 3 Use the dial to select a reverb type. Chorus Type item Reference The currently selected reverb type. 3 Use the dial to select a chorus type. When you select a style or song the optimum chorus type for the voice used is applied to many of the same voices being played in the separate Data List for information about the available chorus types. You can check how the selected reverb type sounds by playing on the keyboard. Play with a Variety of Effects Adding Reverb Reverb...
... type. 3 Use the dial to select a reverb type. Chorus Type item Reference The currently selected reverb type. 3 Use the dial to select a chorus type. When you select a style or song the optimum chorus type for the voice used is applied to many of the same voices being played in the separate Data List for information about the available chorus types. You can check how the selected reverb type sounds by playing on the keyboard. Play with a Variety of Effects Adding Reverb Reverb...
Owner's Manual
Page 70
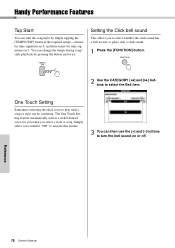
Handy Performance Features Tap Start You can start the song/style by pressing the button just twice. Reference 70 Owner's Manual You can change the tempo during song/ style playback by simply tapping the [TEMPO/TAP] button at the required tempo-4 times for time signatures in 4, and three times for you when you to select whether the click sound has a bell accent, or plays only a click sound. 1 Press the [FUNCTION] button. 2 Use the...
Handy Performance Features Tap Start You can start the song/style by pressing the button just twice. Reference 70 Owner's Manual You can change the tempo during song/ style playback by simply tapping the [TEMPO/TAP] button at the required tempo-4 times for time signatures in 4, and three times for you when you to select whether the click sound has a bell accent, or plays only a click sound. 1 Press the [FUNCTION] button. 2 Use the...
Owner's Manual
Page 80
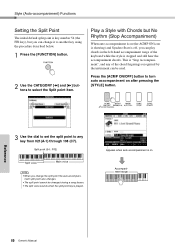
.... 1 Press the [FUNCTION] button. 2 Use the CATEGORY [r] and [f] buttons to turn auto accompaniment on (the ACMP ON icon is showing) and Synchro Start is off, you can be changed during a song lesson. • The split voice sounds when the split-point key is on Accompaniment range Reference 80 Owner's Manual Press the [ACMP ON/OFF] button to select the Split point item. Split point (54 : F#2) Split voice Main voice NOTE • When...
.... 1 Press the [FUNCTION] button. 2 Use the CATEGORY [r] and [f] buttons to turn auto accompaniment on (the ACMP ON icon is showing) and Synchro Start is off, you can be changed during a song lesson. • The split voice sounds when the split-point key is on Accompaniment range Reference 80 Owner's Manual Press the [ACMP ON/OFF] button to select the Split point item. Split point (54 : F#2) Split voice Main voice NOTE • When...
Owner's Manual
Page 86
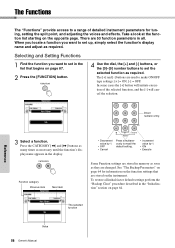
... Owner's Manual There are changed. Direct numeric entry. Take a look at the function list starting on page 87. 2 Press the [FUNCTION] button. 4 Use the dial, the [+] and [-] buttons, or the [0]-[9] number buttons to set the selected function as required. The Functions The "Functions" provide access to a range of the selected function, and the [-] will cancel the selection. The [+] and [-] buttons are stored on page 64 for tuning, setting the split point, and adjusting the voices...
... Owner's Manual There are changed. Direct numeric entry. Take a look at the function list starting on page 87. 2 Press the [FUNCTION] button. 4 Use the dial, the [+] and [-] buttons, or the [0]-[9] number buttons to set the selected function as required. The Functions The "Functions" provide access to a range of the selected function, and the [-] will cancel the selection. The [+] and [-] buttons are stored on page 64 for tuning, setting the split point, and adjusting the voices...
Owner's Manual
Page 88
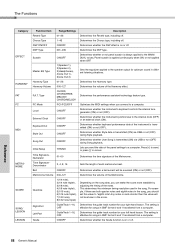
... song, you can make the score more readable by adjusting the timing of the notes. Sets the equalizer applied to the MAIN/ DUAL voices. Determines whether the instrument synchronizes to cancel. Determines whether Style data is transmitted (ON) via USB or not (OFF) during Song playback. Sets the length of the Metronome. Determines the guide track number for your left hand lesson. Determines whether the instrument's keyboard controls the internal tone generator...
... song, you can make the score more readable by adjusting the timing of the notes. Sets the equalizer applied to the MAIN/ DUAL voices. Determines whether the instrument synchronizes to cancel. Determines whether Style data is transmitted (ON) via USB or not (OFF) during Song playback. Sets the length of the Metronome. Determines the guide track number for your left hand lesson. Determines whether the instrument's keyboard controls the internal tone generator...
Owner's Manual
Page 98
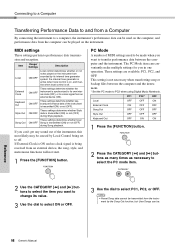
... metronome functions will not start. 1 Press the [FUNCTION] button. MIDI settings These settings pertain to performance data transmission and reception. The PC Mode item can conveniently make multiple settings for you want to transfer performance data between the computer and the instrument. * Set the PC mode to PC2 when using Digital Music Notebook. Item Local External Clock Keyboard Out Style Out Range/ Settings Description ON/OFF Local control determines whether or not notes played on the instrument. Song Out...
... metronome functions will not start. 1 Press the [FUNCTION] button. MIDI settings These settings pertain to performance data transmission and reception. The PC Mode item can conveniently make multiple settings for you want to transfer performance data between the computer and the instrument. * Set the PC mode to PC2 when using Digital Music Notebook. Item Local External Clock Keyboard Out Style Out Range/ Settings Description ON/OFF Local control determines whether or not notes played on the instrument. Song Out...
Owner's Manual
Page 101
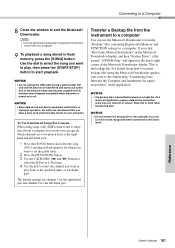
... [SONG] button and select the song (036-) residing in flash memory, press the [SONG] button. When using the Musicsoft Downloader application, refer to the Online help "Transferring Data Between the Computer and Instrument (for the left -hand part. If you click "Electronic Musical Instruments" in the Musicsoft Downloader display, and then "System Drive", a file named "10PG88G.bup" will not be overwritten every time you want to the instrument. To Use transferred Songs For...
... [SONG] button and select the song (036-) residing in flash memory, press the [SONG] button. When using the Musicsoft Downloader application, refer to the Online help "Transferring Data Between the Computer and Instrument (for the left -hand part. If you click "Electronic Musical Instruments" in the Musicsoft Downloader display, and then "System Drive", a file named "10PG88G.bup" will not be overwritten every time you want to the instrument. To Use transferred Songs For...
Owner's Manual
Page 104
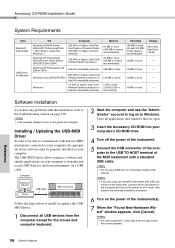
... and turn on the power for all of them, then perform the following installation procedure. 6 Turn on your computer's CD-ROM drive. 4 Turn off the power of the instrument. 5 Connect the USB connector of free space is supported. Accessory CD-ROM Installation Guide System Requirements Data Musicsoft Downloader USB Driver for connecting multiple USB devices. Computer Sequence software Driver USB Cable MIDI instrument Follow the steps below to install (or update) the USBMIDI driver. 1 Disconnect all USB devices from instruments via a USB cable. NOTE •...
... and turn on the power for all of them, then perform the following installation procedure. 6 Turn on your computer's CD-ROM drive. 4 Turn off the power of the instrument. 5 Connect the USB connector of free space is supported. Accessory CD-ROM Installation Guide System Requirements Data Musicsoft Downloader USB Driver for connecting multiple USB devices. Computer Sequence software Driver USB Cable MIDI instrument Follow the steps below to install (or update) the USBMIDI driver. 1 Disconnect all USB devices from instruments via a USB cable. NOTE •...
Owner's Manual
Page 107
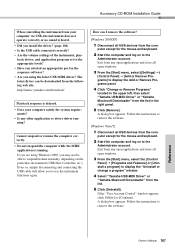
... use the instrument functions again. A dialog box appears. If you install the driver? (page 104) • Is the USB cable connected correctly? • Are the volume settings of the instrument, play- If the "User Account Control" window appears, click [Allow] or [Continue]. http://music.yamaha.com/download/ Playback response is delayed. • Does your computer via USB, the instrument does not operate correctly or no sound is running ? Follow the instructions...
... use the instrument functions again. A dialog box appears. If you install the driver? (page 104) • Is the USB cable connected correctly? • Are the volume settings of the instrument, play- If the "User Account Control" window appears, click [Allow] or [Continue]. http://music.yamaha.com/download/ Playback response is delayed. • Does your computer via USB, the instrument does not operate correctly or no sound is running ? Follow the instructions...

Owner's Manual
Page 112
..., FF, START/STOP Performance assistant technology • Chord, Chord/Free, Melody, Chord/Melody Recording • Song User Song: 5 Songs Recording Tracks: 1, 2, 3, 4, 5, STYLE MIDI • Local On/Off • Keyboard Out • Initial Send • Style Out • External Clock • Song Out Auxiliary jacks • PHONES/OUTPUT, DC IN 12V, USB TO HOST, USB TO DEVICE, SUSTAIN, PEDAL UNIT Amplifier • 6W + 6W Speakers • 12cm x 2 + 3cm x 2 Power Supply • Adaptor: Users within U.S or Europe...
..., FF, START/STOP Performance assistant technology • Chord, Chord/Free, Melody, Chord/Melody Recording • Song User Song: 5 Songs Recording Tracks: 1, 2, 3, 4, 5, STYLE MIDI • Local On/Off • Keyboard Out • Initial Send • Style Out • External Clock • Song Out Auxiliary jacks • PHONES/OUTPUT, DC IN 12V, USB TO HOST, USB TO DEVICE, SUSTAIN, PEDAL UNIT Amplifier • 6W + 6W Speakers • 12cm x 2 + 3cm x 2 Power Supply • Adaptor: Users within U.S or Europe...


