Data List
Page 14
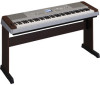
MSB/LSB/PC Keyboard MIDI Key Note# Note Note# Note Off 25 C# 0 13 C# -1 26 D 0 14 D -1 27 D# 0 15 D# -1 28 E 0 16 E -1 29 F 0 17 F -1 30 F# 0 18 F# -1 31 G 0 19 G -1 32 G# 0 20 G# -1 33 A 0 21 A -1 ... sounding the instant they are released. • Voices with the same Alternate Note Number (*1 ... 4) cannot be played simultaneously. (They are actually one octave lower than keyboard Note # and Note. For example, in Wirklichkeit eine Octave tiefer als hier aufgeführt. Beispiel: In „Standard Kit 1" entspricht die „Seq Click...
MSB/LSB/PC Keyboard MIDI Key Note# Note Note# Note Off 25 C# 0 13 C# -1 26 D 0 14 D -1 27 D# 0 15 D# -1 28 E 0 16 E -1 29 F 0 17 F -1 30 F# 0 18 F# -1 31 G 0 19 G -1 32 G# 0 20 G# -1 33 A 0 21 A -1 ... sounding the instant they are released. • Voices with the same Alternate Note Number (*1 ... 4) cannot be played simultaneously. (They are actually one octave lower than keyboard Note # and Note. For example, in Wirklichkeit eine Octave tiefer als hier aufgeführt. Beispiel: In „Standard Kit 1" entspricht die „Seq Click...
Data List
Page 15
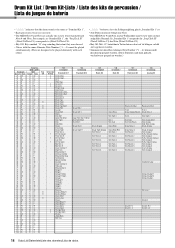
... nota (*1 ... 4) no pueden tocarse simultáneamente. (Están diseñados para tocarse alternativamente el uno con el otro.) Voice No. MSB/LSB/PC Keyboard MIDI Key Note# Note Note# Note Off 25 C# 0 13 C# -1 26 D 0 14 D -1 27 D# 0 15 D# -1 28 E 0 16 E -1 29 F 0 17 F -1 30 F# 0 18 F# -1 31 G 0 19 G -1 32 G# 0 20 G# -1 33 A 0 21...
... nota (*1 ... 4) no pueden tocarse simultáneamente. (Están diseñados para tocarse alternativamente el uno con el otro.) Voice No. MSB/LSB/PC Keyboard MIDI Key Note# Note Note# Note Off 25 C# 0 13 C# -1 26 D 0 14 D -1 27 D# 0 15 D# -1 28 E 0 16 E -1 29 F 0 17 F -1 30 F# 0 18 F# -1 31 G 0 19 G -1 32 G# 0 20 G# -1 33 A 0 21...
Owner's Manual
Page 1
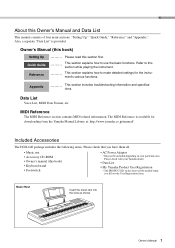
Setting Up Quick Guide Reference Appendix Owner's Manual Keyboard Stand Assembly For information on assembling the keyboard stand, refer to the instructions on page 10 of this manual. EN
Setting Up Quick Guide Reference Appendix Owner's Manual Keyboard Stand Assembly For information on assembling the keyboard stand, refer to the instructions on page 10 of this manual. EN

Owner's Manual
Page 5
...Saved data may not play them to a USB storage device/or other external device such as their respective companies. (7)-1 2/2 Owner's Manual 5 Yamaha cannot be held responsible for a long time, make sure you unplug the power cord from those on the instrument, since this manual •...in this manual are the trademarks or registered trademarks of their producers or composers originally intended. About this might discolor the panel or keyboard. • When cleaning the instrument, use with the instrument • Some of personal use . Even when the [ ](Standby/On) ...
...Saved data may not play them to a USB storage device/or other external device such as their respective companies. (7)-1 2/2 Owner's Manual 5 Yamaha cannot be held responsible for a long time, make sure you unplug the power cord from those on the instrument, since this manual •...in this manual are the trademarks or registered trademarks of their producers or composers originally intended. About this might discolor the panel or keyboard. • When cleaning the instrument, use with the instrument • Some of personal use . Even when the [ ](Standby/On) ...
Owner's Manual
Page 7
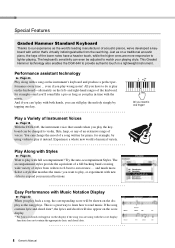
... the music rest into the slots as shown. Refer to make detailed settings for downloading from the Yamaha Manual Library at: http://www.yamaha.co.jp/manual/ Included Accessories The DGX-640 package includes the following items. Please check that you fill out the User Registration form. Also,...consists of four main sections: "Setting Up," "Quick Guide," "Reference," and "Appendix." This section explains how to this book) • Keyboard stand • Footswitch • AC Power Adaptor * May not be included depending on your particular area. About this section first. This section...
... the music rest into the slots as shown. Refer to make detailed settings for downloading from the Yamaha Manual Library at: http://www.yamaha.co.jp/manual/ Included Accessories The DGX-640 package includes the following items. Please check that you fill out the User Registration form. Also,...consists of four main sections: "Setting Up," "Quick Guide," "Reference," and "Appendix." This section explains how to this book) • Keyboard stand • Footswitch • AC Power Adaptor * May not be included depending on your particular area. About this section first. This section...
Owner's Manual
Page 8
...full accompaniment? The accompaniment styles provide the equivalent of a full backing band covering wide variety of acoustic pianos, we've developed a keyboard with the score display function does not contain the appropriate lyric and chord data. 8 Owner's Manual Select a style that sounds when...the music. This Graded Hammer technology also enables the DGX-640 to match your musical horizons. All you play wrong notes! Play a Variety of Instrument Voices Page 18 With the DGX-640, the instrument voice that matches the music you play the keyboard can 't play it instead.
...full accompaniment? The accompaniment styles provide the equivalent of a full backing band covering wide variety of acoustic pianos, we've developed a keyboard with the score display function does not contain the appropriate lyric and chord data. 8 Owner's Manual Select a style that sounds when...the music. This Graded Hammer technology also enables the DGX-640 to match your musical horizons. All you play wrong notes! Play a Variety of Instrument Voices Page 18 With the DGX-640, the instrument voice that matches the music you play the keyboard can 't play it instead.

Owner's Manual
Page 9
Contents Setting Up Quick Guide About this Owner's Manual and Data List 7 Included Accessories 7 Special Features 8 Setting Up Setting Up 10 Keyboard Stand Assembly 10 Power Requirements 13 Connecting Headphones (PHONES/OUTPUT Jack) .....13 Connecting a Footswitch (SUSTAIN Jack 13 Connecting a Pedal Unit (... the Split Point 80 Play a Style with Chords but No Rhythm (Stop Accompaniment 80 AI Fingered 81 Playing Styles Using the Entire Keyboard 81 Looking Up Chords Using the Chord Dictionary 82 Song Settings 83 Changing the tempo of the Song 83 Song Volume 83 A-B Repeat...
Contents Setting Up Quick Guide About this Owner's Manual and Data List 7 Included Accessories 7 Special Features 8 Setting Up Setting Up 10 Keyboard Stand Assembly 10 Power Requirements 13 Connecting Headphones (PHONES/OUTPUT Jack) .....13 Connecting a Footswitch (SUSTAIN Jack 13 Connecting a Pedal Unit (... the Split Point 80 Play a Style with Chords but No Rhythm (Stop Accompaniment 80 AI Fingered 81 Playing Styles Using the Entire Keyboard 81 Looking Up Chords Using the Chord Dictionary 82 Song Settings 83 Changing the tempo of the Song 83 Song Volume 83 A-B Repeat...
Owner's Manual
Page 10
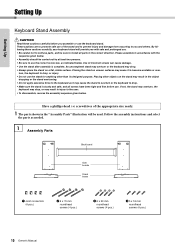
... w 6 x 70 mm roundhead screws (4 pcs.) e 6 x 30 mm roundhead screws (4 pcs.) r 5 x 16 mm roundhead screws (4 pcs.) 10 Owner's Manual turn, the keyboard to drop, or injury. • Do not use of the appropriate size ready. 1 The parts shown in the correct direction. These cautions are to promote... injury to become unstable or over- Setting Up Setting Up Setting Up Keyboard Stand Assembly CAUTION Read these cautions carefully, your keyboard stand will be used. An uncompleted stand may overturn or the keyboard may drop. • Always place the stand on uneven surfaces may ...
... w 6 x 70 mm roundhead screws (4 pcs.) e 6 x 30 mm roundhead screws (4 pcs.) r 5 x 16 mm roundhead screws (4 pcs.) 10 Owner's Manual turn, the keyboard to drop, or injury. • Do not use of the appropriate size ready. 1 The parts shown in the correct direction. These cautions are to promote... injury to become unstable or over- Setting Up Setting Up Setting Up Keyboard Stand Assembly CAUTION Read these cautions carefully, your keyboard stand will be used. An uncompleted stand may overturn or the keyboard may drop. • Always place the stand on uneven surfaces may ...
Owner's Manual
Page 12
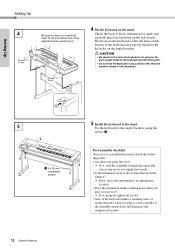
...the instrument to an appropriate location. • Does the instrument make a rattling noise when you play it or move the keyboard so that the holes on the bottom of the keyboard when positioning it , refer carefully to the assembly instructions and diagrams and retighten all screws. CAUTION • Be careful ... a creaking noise or seems unsteady when you play it . At least 10 cm 4 Put the keyboard on the side boards. Check the back-to-front orientation for stand, and carefully place the keyboard on the stand. Setting Up Setting Up 4 At least 10 cm Be sure to place your fingers...
...the instrument to an appropriate location. • Does the instrument make a rattling noise when you play it or move the keyboard so that the holes on the bottom of the keyboard when positioning it , refer carefully to the assembly instructions and diagrams and retighten all screws. CAUTION • Be careful ... a creaking noise or seems unsteady when you play it . At least 10 cm 4 Put the keyboard on the side boards. Check the back-to-front orientation for stand, and carefully place the keyboard on the stand. Setting Up Setting Up 4 At least 10 cm Be sure to place your fingers...
Owner's Manual
Page 13
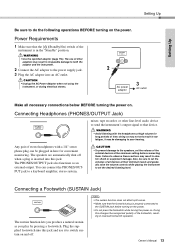
... supply jack. 3 Plug the AC adaptor into an AC outlet. WARNING • Avoid listening with a 1/4" stereo phone plug can connect the PHONES/OUTPUT jack to a keyboard amplifier, stereo system, CAUTION • To prevent damage to the speakers, set the volume of all necessary connections below BEFORE turning the power on the...
... supply jack. 3 Plug the AC adaptor into an AC outlet. WARNING • Avoid listening with a 1/4" stereo phone plug can connect the PHONES/OUTPUT jack to a keyboard amplifier, stereo system, CAUTION • To prevent damage to the speakers, set the volume of all necessary connections below BEFORE turning the power on the...

Owner's Manual
Page 14
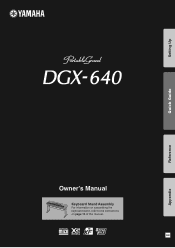
...Right) Pedal The damper pedal functions in split mode. ing the pedal. When the damper pedal is pressed, notes sustain longer. Setting Up Keyboard LP-7A (optional) Stand Pedal Unit Functions The optional pedal unit has three foot pedals that produce a range of notes played while the ...The soft pedal reduces the volume and slightly changes the timbre of expressive effects similar to create partial sustain effects, depending on the supplied keyboard stand. Setting Up Connecting a Pedal Unit (PEDAL UNIT jack) This jack is for example, while other notes are already playing when ...
...Right) Pedal The damper pedal functions in split mode. ing the pedal. When the damper pedal is pressed, notes sustain longer. Setting Up Keyboard LP-7A (optional) Stand Pedal Unit Functions The optional pedal unit has three foot pedals that produce a range of notes played while the ...The soft pedal reduces the volume and slightly changes the timbre of expressive effects similar to create partial sustain effects, depending on the supplied keyboard stand. Setting Up Connecting a Pedal Unit (PEDAL UNIT jack) This jack is for example, while other notes are already playing when ...
Owner's Manual
Page 18
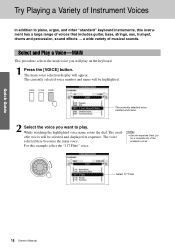
Select and Play a Voice-MAIN This procedure selects the main voice you want to piano, organ, and other "standard" keyboard instruments, this example select the "117 Flute" voice. The currently selected voice number and name 2 Select the voice you will appear. The ... the main voice. Select 117 Flute 18 Owner's Manual Quick Guide Try Playing a Variety of Instrument Voices Quick Guide In addition to play on the keyboard. 1 Press the [VOICE] button. The main voice selection display will play . For this instrument has a large range of voices that includes guitar, bass,...
Select and Play a Voice-MAIN This procedure selects the main voice you want to piano, organ, and other "standard" keyboard instruments, this example select the "117 Flute" voice. The currently selected voice number and name 2 Select the voice you will appear. The ... the main voice. Select 117 Flute 18 Owner's Manual Quick Guide Try Playing a Variety of Instrument Voices Quick Guide In addition to play on the keyboard. 1 Press the [VOICE] button. The main voice selection display will play . For this instrument has a large range of voices that includes guitar, bass,...
Owner's Manual
Page 19
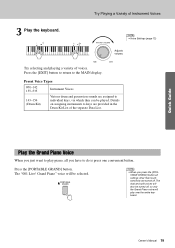
... play piano, all settings other than touch sensitivity are provided in the Drum Kit List of Instrument Voices 3 Play the keyboard. Press the [EXIT] button to return to play over the entire keyboard. Play the Grand Piano Voice When you have to keys are turned off , so only the Grand Piano voice...
... play piano, all settings other than touch sensitivity are provided in the Drum Kit List of Instrument Voices 3 Play the keyboard. Press the [EXIT] button to return to play over the entire keyboard. Play the Grand Piano Voice When you have to keys are turned off , so only the Grand Piano voice...
Owner's Manual
Page 20
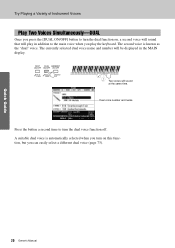
... the dual voice function off. A suitable dual voice is known as the "dual" voice. The currently selected dual voice name and number will play the keyboard. Dual voice number and name Press the button a second time to turn on , a second voice will sound that will be displayed in addition to turn...
... the dual voice function off. A suitable dual voice is known as the "dual" voice. The currently selected dual voice name and number will play the keyboard. Dual voice number and name Press the button a second time to turn on , a second voice will sound that will be displayed in addition to turn...
Owner's Manual
Page 21
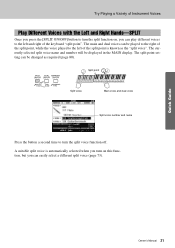
... [SPLIT ON/OFF] button to turn the split function on this function, but you can play different voices to the left and right of the keyboard "split point". Quick Guide Owner's Manual 21
... [SPLIT ON/OFF] button to turn the split function on this function, but you can play different voices to the left and right of the keyboard "split point". Quick Guide Owner's Manual 21
Owner's Manual
Page 24
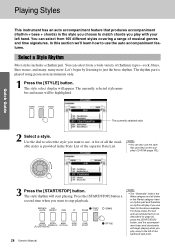
... play with your left of rhythmic types-rock, blues, Euro trance, and many, many more. NOTE • You can select from a wide variety of the keyboard split point. You can also use them for the above example. The currently selected style 2 Select a style. Quick Guide 3 Press the [START/STOP] button. The...
... play with your left of rhythmic types-rock, blues, Euro trance, and many, many more. NOTE • You can select from a wide variety of the keyboard split point. You can also use them for the above example. The currently selected style 2 Select a style. Quick Guide 3 Press the [START/STOP] button. The...
Owner's Manual
Page 25
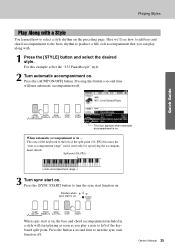
... the desired style. When sync start is used only for specifying the accompani- ment chords. Press the [SYNC START] button to left of the keyboard split point. Press the button a second time to turn the sync start playing as soon as you can play a note to turn automatic accompaniment ...3 Turn sync start is on . For this button a second time will start function off . Press the [ACMP ON/OFF] button. The area of the keyboard to select a style rhythm on ... Flashes when sync start on . Quick Guide This icon appears when automatic accompaniment is on .
... the desired style. When sync start is used only for specifying the accompani- ment chords. Press the [SYNC START] button to left of the keyboard split point. Press the button a second time to turn the sync start playing as soon as you can play a note to turn automatic accompaniment ...3 Turn sync start is on . For this button a second time will start function off . Press the [ACMP ON/OFF] button. The area of the keyboard to select a style rhythm on ... Flashes when sync start on . Quick Guide This icon appears when automatic accompaniment is on .
Owner's Manual
Page 26
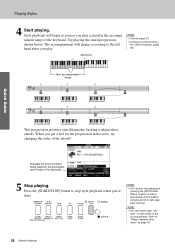
...appropriate ending pattern will play and then style playback will stop style playback when you play a chord in the accompaniment range of the keyboard. Refer to the accompaniment. The accompaniment will begin as soon as you get a feel for the progression in the score, try changing...to "Pattern Variation (Sections)" on page 76. 26 Owner's Manual Quick Guide Indicates the chord currently being played in the accompaniment range of the keyboard. 5 Stop playing. Press the [START/STOP] button to the lefthand notes you 're done. Style playback will change according to stop . When...
...appropriate ending pattern will play and then style playback will stop style playback when you play a chord in the accompaniment range of the keyboard. Refer to the accompaniment. The accompaniment will begin as soon as you get a feel for the progression in the score, try changing...to "Pattern Variation (Sections)" on page 76. 26 Owner's Manual Quick Guide Indicates the chord currently being played in the accompaniment range of the keyboard. 5 Stop playing. Press the [START/STOP] button to the lefthand notes you 're done. Style playback will change according to stop . When...
Owner's Manual
Page 27
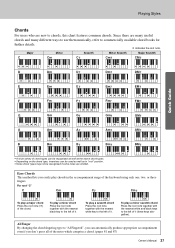
... together with the nearest black key to the left of the chord. AI Finger By changing the chord fingering type to the left of the keyboard using only one, two, or three fingers. For root "C" C Cm C7 Cm7 To play a seventh chord Press the root note together with the nearest white...
... together with the nearest black key to the left of the chord. AI Finger By changing the chord fingering type to the left of the keyboard using only one, two, or three fingers. For root "C" C Cm C7 Cm7 To play a seventh chord Press the root note together with the nearest white...
Owner's Manual
Page 34
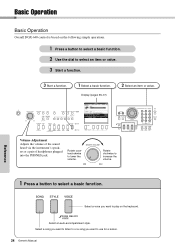
Basic Operation Reference Basic Operation Overall DGX-640 control is based on the keyboard. Reference Volume Adjustment Adjusts the volume of the sound heard via the instrument's speakers or a pair of headphones plugged into the PHONES jack. Select a voice ...
Basic Operation Reference Basic Operation Overall DGX-640 control is based on the keyboard. Reference Volume Adjustment Adjusts the volume of the sound heard via the instrument's speakers or a pair of headphones plugged into the PHONES jack. Select a voice ...


