Data List
Page 14
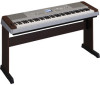
... mit derselben Alternate Note Number (*1 ... 4) können nicht gleichzeitig gespielt werden. (Diese Stimmen sind dazu gedacht, wechselweise gespielt zu werden.) Voice No. MSB/LSB/PC Keyboard MIDI Key Note# Note Note# Note Off 25 C# 0 13 C# -1 26 D 0 14 D -1 27 D# 0 15 D# -1 28 E 0 16 E -1 29 F 0 17 F -1 30 F# 0 18 F# -1 31 G 0 19 G -1 32 G# 0 20 G# -1 33 A 0 21...; Each percussion voice uses one note. • The MIDI Note # and Note are designed to be played simultaneously. (They are actually one octave lower than keyboard Note # and Note.
... mit derselben Alternate Note Number (*1 ... 4) können nicht gleichzeitig gespielt werden. (Diese Stimmen sind dazu gedacht, wechselweise gespielt zu werden.) Voice No. MSB/LSB/PC Keyboard MIDI Key Note# Note Note# Note Off 25 C# 0 13 C# -1 26 D 0 14 D -1 27 D# 0 15 D# -1 28 E 0 16 E -1 29 F 0 17 F -1 30 F# 0 18 F# -1 31 G 0 19 G -1 32 G# 0 20 G# -1 33 A 0 21...; Each percussion voice uses one note. • The MIDI Note # and Note are designed to be played simultaneously. (They are actually one octave lower than keyboard Note # and Note.
Data List
Page 15
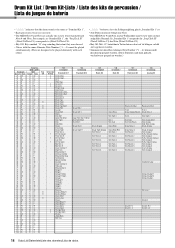
... nota (*1 ... 4) no pueden tocarse simultáneamente. (Están diseñados para tocarse alternativamente el uno con el otro.) Voice No. MSB/LSB/PC Keyboard MIDI Key Note# Note Note# Note Off 25 C# 0 13 C# -1 26 D 0 14 D -1 27 D# 0 15 D# -1 28 E 0 16 E -1 29 F 0 17 F -1 30 F# 0 18 F# -1 31 G 0 19 G -1 32 G# 0 20 G# -1 33 A 0 21...
... nota (*1 ... 4) no pueden tocarse simultáneamente. (Están diseñados para tocarse alternativamente el uno con el otro.) Voice No. MSB/LSB/PC Keyboard MIDI Key Note# Note Note# Note Off 25 C# 0 13 C# -1 26 D 0 14 D -1 27 D# 0 15 D# -1 28 E 0 16 E -1 29 F 0 17 F -1 30 F# 0 18 F# -1 31 G 0 19 G -1 32 G# 0 20 G# -1 33 A 0 21...
Owner's Manual
Page 1
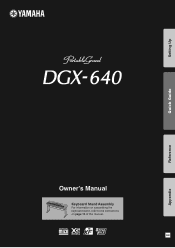
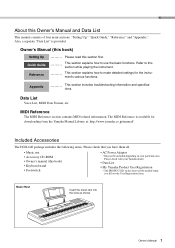
Setting Up Quick Guide Reference Appendix Owner's Manual Keyboard Stand Assembly For information on assembling the keyboard stand, refer to the instructions on page 10 of this manual. EN
Setting Up Quick Guide Reference Appendix Owner's Manual Keyboard Stand Assembly For information on assembling the keyboard stand, refer to the instructions on page 10 of this manual. EN

Owner's Manual
Page 5
... license to use others' copyrights. If water is left, the wooden parts may collect on the instrument, since this might discolor the panel or keyboard. • When cleaning the instrument, use a soft, dry cloth. Any unauthorized use of such programs and contents outside of copyright has legal ... panel disfiguration or damage to the internal components. • Do not place vinyl, plastic or rubber objects on the surface of the instrument. Yamaha cannot be exactly the same as the original. • This device is capable of using the instrument for a long time, make sure you...
... license to use others' copyrights. If water is left, the wooden parts may collect on the instrument, since this might discolor the panel or keyboard. • When cleaning the instrument, use a soft, dry cloth. Any unauthorized use of such programs and contents outside of copyright has legal ... panel disfiguration or damage to the internal components. • Do not place vinyl, plastic or rubber objects on the surface of the instrument. Yamaha cannot be exactly the same as the original. • This device is capable of using the instrument for a long time, make sure you...
Owner's Manual
Page 7
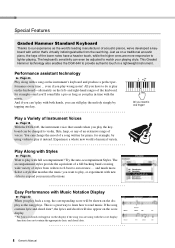
... playing the instrument. This section explains how to make detailed settings for downloading from the Yamaha Manual Library at: http://www.yamaha.co.jp/manual/ Included Accessories The DGX-640 package includes the following items. Please check that you fill out the User Registration form....The MIDI Reference section contains MIDI related information. Please check with your Yamaha dealer. • Data List • My Yamaha Product User Registration * The PRODUCT ID on your particular area. About this book) • Keyboard stand • Footswitch • AC Power Adaptor * May not...
... playing the instrument. This section explains how to make detailed settings for downloading from the Yamaha Manual Library at: http://www.yamaha.co.jp/manual/ Included Accessories The DGX-640 package includes the following items. Please check that you fill out the User Registration form....The MIDI Reference section contains MIDI related information. Please check with your Yamaha dealer. • Data List • My Yamaha Product User Registration * The PRODUCT ID on your particular area. About this book) • Keyboard stand • Footswitch • AC Power Adaptor * May not...
Owner's Manual
Page 8
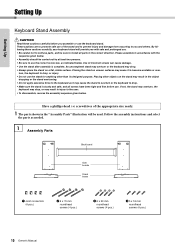
...of voices. Just as you can be changed to violin, flute, harp, or any of an extensive range of Instrument Voices Page 18 With the DGX-640, the instrument voice that 's virtually indistinguishable from waltzes to 8-beat to play in a lightweight instrument. All you play back a song, the ... of a song written for piano, for example-and you can change the mood of the keyboard, for example, by tapping one finger! Try the auto-accompaniment Styles. This Graded Hammer technology also enables the DGX-640 to read music. You can 't play with the music. And if you 'll sound ...
...of voices. Just as you can be changed to violin, flute, harp, or any of an extensive range of Instrument Voices Page 18 With the DGX-640, the instrument voice that 's virtually indistinguishable from waltzes to 8-beat to play in a lightweight instrument. All you play back a song, the ... of a song written for piano, for example-and you can change the mood of the keyboard, for example, by tapping one finger! Try the auto-accompaniment Styles. This Graded Hammer technology also enables the DGX-640 to read music. You can 't play with the music. And if you 'll sound ...

Owner's Manual
Page 9
Contents Setting Up Quick Guide About this Owner's Manual and Data List 7 Included Accessories 7 Special Features 8 Setting Up Setting Up 10 Keyboard Stand Assembly 10 Power Requirements 13 Connecting Headphones (PHONES/OUTPUT Jack) .....13 Connecting a Footswitch (SUSTAIN Jack 13 Connecting a Pedal Unit (... the Split Point 80 Play a Style with Chords but No Rhythm (Stop Accompaniment 80 AI Fingered 81 Playing Styles Using the Entire Keyboard 81 Looking Up Chords Using the Chord Dictionary 82 Song Settings 83 Changing the tempo of the Song 83 Song Volume 83 A-B Repeat...
Contents Setting Up Quick Guide About this Owner's Manual and Data List 7 Included Accessories 7 Special Features 8 Setting Up Setting Up 10 Keyboard Stand Assembly 10 Power Requirements 13 Connecting Headphones (PHONES/OUTPUT Jack) .....13 Connecting a Footswitch (SUSTAIN Jack 13 Connecting a Pedal Unit (... the Split Point 80 Play a Style with Chords but No Rhythm (Stop Accompaniment 80 AI Fingered 81 Playing Styles Using the Entire Keyboard 81 Looking Up Chords Using the Chord Dictionary 82 Song Settings 83 Changing the tempo of the Song 83 Song Volume 83 A-B Repeat...
Owner's Manual
Page 10
... other than its designed purpose. By following these cautions carefully before use. If not, the stand may overturn, the keyboard may drop, or may cause the stand to overturn or the keyboard to drop. • Make sure the stand is complete. Follow the assembly instructions and select the parts as indicated ... after assembly is sturdy and safe, and all parts in the object dropping or the stand overturning. • Do not apply excessive force to the keyboard as it to drop, or injury. • Do not use the stand for anything other objects on the stand may drop. • Always place ...
... other than its designed purpose. By following these cautions carefully before use. If not, the stand may overturn, the keyboard may drop, or may cause the stand to overturn or the keyboard to drop. • Make sure the stand is complete. Follow the assembly instructions and select the parts as indicated ... after assembly is sturdy and safe, and all parts in the object dropping or the stand overturning. • Do not apply excessive force to the keyboard as it to drop, or injury. • Do not use the stand for anything other objects on the stand may drop. • Always place ...
Owner's Manual
Page 12
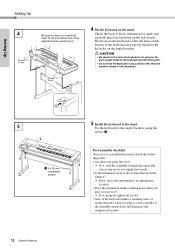
... If so, properly tighten all screws. • Also, if the keyboard makes a creaking noise or seems unsteady when you play it or move the keyboard so that the holes on the bottom of the keyboard are properly aligned with the holes on the angle brackets. CAUTION • Be careful... an appropriate location. • Does the instrument make a rattling noise when you might have made. • Is the instrument clear of the keyboard when positioning it , refer carefully to the assembly instructions and diagrams and retighten all screws. Setting Up Setting Up 4 At least 10 cm Be...
... If so, properly tighten all screws. • Also, if the keyboard makes a creaking noise or seems unsteady when you play it or move the keyboard so that the holes on the bottom of the keyboard are properly aligned with the holes on the angle brackets. CAUTION • Be careful... an appropriate location. • Does the instrument make a rattling noise when you might have made. • Is the instrument clear of the keyboard when positioning it , refer carefully to the assembly instructions and diagrams and retighten all screws. Setting Up Setting Up 4 At least 10 cm Be...
Owner's Manual
Page 13
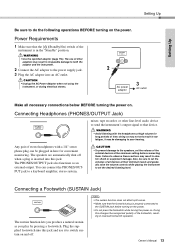
... that the footswitch plug is properly connected to your hearing. WARNING • Avoid listening with a 1/4" stereo phone plug can connect the PHONES/OUTPUT jack to a keyboard amplifier, stereo system, CAUTION • To prevent damage to the speakers, set the volume of the external devices at their minimum levels and gradually raise...
... that the footswitch plug is properly connected to your hearing. WARNING • Avoid listening with a 1/4" stereo phone plug can connect the PHONES/OUTPUT jack to a keyboard amplifier, stereo system, CAUTION • To prevent damage to the speakers, set the volume of the external devices at their minimum levels and gradually raise...

Owner's Manual
Page 14
... A "half-pedal" effect lets you use the damper pedal to sustain a chord, for connecting an optional LP-7A pedal unit. Setting Up Keyboard LP-7A (optional) Stand Pedal Unit Functions The optional pedal unit has three foot pedals that are already playing when it possible to create partial... sustain effects, depending on an acoustic piano. ing the pedal. The pedal unit does not affect the split voice when the keyboard is pressed, notes sustain longer. Releasing the pedal immediately stops (damps) any sustained notes. The soft pedal will sustain as long as a ...
... A "half-pedal" effect lets you use the damper pedal to sustain a chord, for connecting an optional LP-7A pedal unit. Setting Up Keyboard LP-7A (optional) Stand Pedal Unit Functions The optional pedal unit has three foot pedals that are already playing when it possible to create partial... sustain effects, depending on an acoustic piano. ing the pedal. The pedal unit does not affect the split voice when the keyboard is pressed, notes sustain longer. Releasing the pedal immediately stops (damps) any sustained notes. The soft pedal will sustain as long as a ...
Owner's Manual
Page 18
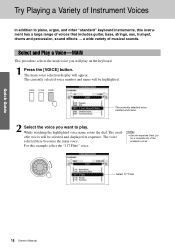
... voice number and name will be highlighted. Quick Guide Try Playing a Variety of Instrument Voices Quick Guide In addition to play on the keyboard. 1 Press the [VOICE] button. The available voices will be selected and displayed in sequence. NOTE • See the separate Data List ...18 Owner's Manual Select and Play a Voice-MAIN This procedure selects the main voice you want to piano, organ, and other "standard" keyboard instruments, this example select the "117 Flute" voice. The voice selected here becomes the main voice. The main voice selection display will play ...
... voice number and name will be highlighted. Quick Guide Try Playing a Variety of Instrument Voices Quick Guide In addition to play on the keyboard. 1 Press the [VOICE] button. The available voices will be selected and displayed in sequence. NOTE • See the separate Data List ...18 Owner's Manual Select and Play a Voice-MAIN This procedure selects the main voice you want to piano, organ, and other "standard" keyboard instruments, this example select the "117 Flute" voice. The voice selected here becomes the main voice. The main voice selection display will play ...
Owner's Manual
Page 19
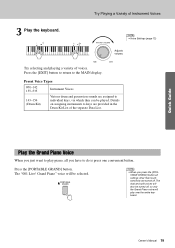
NOTE • When you press the [PORTABLE GRAND] button all you just want to play over the entire keyboard. Try selecting and playing a variety of Instrument Voices 3 Play the keyboard. Play the Grand Piano Voice When you have to keys are turned off , so only the Grand Piano voice will also be turned...
NOTE • When you press the [PORTABLE GRAND] button all you just want to play over the entire keyboard. Try selecting and playing a variety of Instrument Voices 3 Play the keyboard. Play the Grand Piano Voice When you have to keys are turned off , so only the Grand Piano voice will also be turned...
Owner's Manual
Page 20
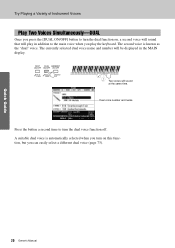
... off. A suitable dual voice is known as the "dual" voice. Two voices will be displayed in addition to the main voice when you play the keyboard. Quick Guide Try Playing a Variety of Instrument Voices Play Two Voices Simultaneously-DUAL Once you press the [DUAL ON/OFF] button to turn the dual...
... off. A suitable dual voice is known as the "dual" voice. Two voices will be displayed in addition to the main voice when you play the keyboard. Quick Guide Try Playing a Variety of Instrument Voices Play Two Voices Simultaneously-DUAL Once you press the [DUAL ON/OFF] button to turn the dual...
Owner's Manual
Page 21
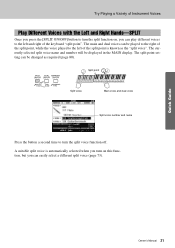
.... The split point setting can be played to the right of the split point, while the voice played to the left and right of the keyboard "split point". The currently selected split voice name and number will be displayed in the MAIN display. A suitable split voice is known as required (page...
.... The split point setting can be played to the right of the split point, while the voice played to the left and right of the keyboard "split point". The currently selected split voice name and number will be displayed in the MAIN display. A suitable split voice is known as required (page...
Owner's Manual
Page 24
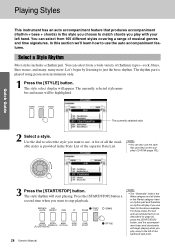
... an auto accompaniment feature that produces accompaniment (rhythm + bass + chords) in the style you choose to match chords you play with your left of the keyboard split point.
... an auto accompaniment feature that produces accompaniment (rhythm + bass + chords) in the style you choose to match chords you play with your left of the keyboard split point.
Owner's Manual
Page 25
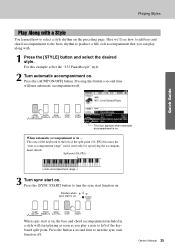
.... When sync start is on, the bass and chord accompaniment included in a style will turn the sync start function on ... The area of the keyboard to turn automatic accompaniment off . Press the [SYNC START] button to the left of the split point (54: F#2) becomes the "auto accompaniment range"... and is on . Press the button a second time to left of the keyboard split point. Split point (54: F#2) Auto accompaniment range 3 Turn sync start playing as soon as you can play a note to turn the sync ...
.... When sync start is on, the bass and chord accompaniment included in a style will turn the sync start function on ... The area of the keyboard to turn automatic accompaniment off . Press the [SYNC START] button to the left of the split point (54: F#2) becomes the "auto accompaniment range"... and is on . Press the button a second time to left of the keyboard split point. Split point (54: F#2) Auto accompaniment range 3 Turn sync start playing as soon as you can play a note to turn the sync ...
Owner's Manual
Page 26
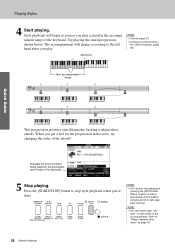
...8226; You can also stop . Refer to stop style playback when you get a feel for the progression in the accompaniment range of the keyboard. The accompaniment will stop playing by pressing the [INTRO/ENDING/rit.] button so that an appropriate ending pattern will play and then style ... You can switch style "sec- Style playback will begin as soon as you play a chord in the score, try changing the order of the keyboard. 5 Stop playing. Quick Guide Indicates the chord currently being played in the accompaniment range of the chords! Playing Styles 4 Start playing. tions" ...
...8226; You can also stop . Refer to stop style playback when you get a feel for the progression in the accompaniment range of the keyboard. The accompaniment will stop playing by pressing the [INTRO/ENDING/rit.] button so that an appropriate ending pattern will play and then style ... You can switch style "sec- Style playback will begin as soon as you play a chord in the score, try changing the order of the keyboard. 5 Stop playing. Quick Guide Indicates the chord currently being played in the accompaniment range of the chords! Playing Styles 4 Start playing. tions" ...
Owner's Manual
Page 27
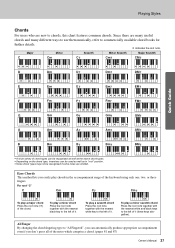
... note together with the nearest white key to the left of it . AI Finger By changing the chord fingering type to the left of the keyboard using only one, two, or three fingers.
... note together with the nearest white key to the left of it . AI Finger By changing the chord fingering type to the left of the keyboard using only one, two, or three fingers.
Owner's Manual
Page 34
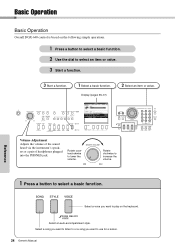
... select a basic function. 2 Use the dial to select an item or value. 3 Start a function. 3 Start a function. 1 Select a basic function. Basic Operation Reference Basic Operation Overall DGX-640 control is based on the keyboard. Select an auto-accompaniment style. Display (pages 36-37) 2 Select an item or value.
... select a basic function. 2 Use the dial to select an item or value. 3 Start a function. 3 Start a function. 1 Select a basic function. Basic Operation Reference Basic Operation Overall DGX-640 control is based on the keyboard. Select an auto-accompaniment style. Display (pages 36-37) 2 Select an item or value.


