Data List
Page 14
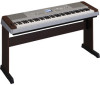
... in "Standard Kit 1", the "Seq Click H" (Note# 36/Note C1) corresponds to be played simultaneously. (They are actually one octave lower than keyboard Note # and Note. MSB/LSB/PC Keyboard MIDI Key Note# Note Note# Note Off 25 C# 0 13 C# -1 26 D 0 14 D -1 27 D# 0 15 D# -1 28 E 0 16 E -1 29 F 0 17 F -1 30 F# 0 18 F# -1 31 G 0 19 G -1 32...
... in "Standard Kit 1", the "Seq Click H" (Note# 36/Note C1) corresponds to be played simultaneously. (They are actually one octave lower than keyboard Note # and Note. MSB/LSB/PC Keyboard MIDI Key Note# Note Note# Note Off 25 C# 0 13 C# -1 26 D 0 14 D -1 27 D# 0 15 D# -1 28 E 0 16 E -1 29 F 0 17 F -1 30 F# 0 18 F# -1 31 G 0 19 G -1 32...
Data List
Page 15
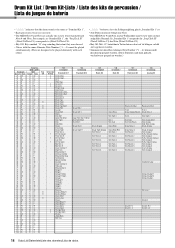
... nota (*1 ... 4) no pueden tocarse simultáneamente. (Están diseñados para tocarse alternativamente el uno con el otro.) Voice No. MSB/LSB/PC Keyboard MIDI Key Note# Note Note# Note Off 25 C# 0 13 C# -1 26 D 0 14 D -1 27 D# 0 15 D# -1 28 E 0 16 E -1 29 F 0 17 F -1 30 F# 0 18 F# -1 31 G 0 19 G -1 32 G# 0 20 G# -1 33 A 0 21...
... nota (*1 ... 4) no pueden tocarse simultáneamente. (Están diseñados para tocarse alternativamente el uno con el otro.) Voice No. MSB/LSB/PC Keyboard MIDI Key Note# Note Note# Note Off 25 C# 0 13 C# -1 26 D 0 14 D -1 27 D# 0 15 D# -1 28 E 0 16 E -1 29 F 0 17 F -1 30 F# 0 18 F# -1 31 G 0 19 G -1 32 G# 0 20 G# -1 33 A 0 21...
Owner's Manual
Page 1
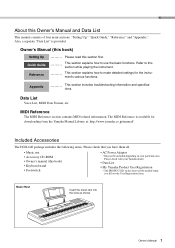
Setting Up Quick Guide Reference Appendix Owner's Manual Keyboard Stand Assembly For information on assembling the keyboard stand, refer to the instructions on page 10 of this manual. EN
Setting Up Quick Guide Reference Appendix Owner's Manual Keyboard Stand Assembly For information on assembling the keyboard stand, refer to the instructions on page 10 of this manual. EN

Owner's Manual
Page 5
...Handling and Maintenance • Do not use is not in which it has license to use others' copyrights. Always turn the power off. Yamaha cannot be held responsible for damage caused by optimizing them back precisely as their respective companies. (7)-1 2/2 Owner's Manual 5 When you are not...saved as shown in this manual are for instructional purposes only, and may collect on the instrument, since this might discolor the panel or keyboard. • When cleaning the instrument, use . Saved data may absorb the water and be damaged. Such copyrighted materials include, without ...
...Handling and Maintenance • Do not use is not in which it has license to use others' copyrights. Always turn the power off. Yamaha cannot be held responsible for damage caused by optimizing them back precisely as their respective companies. (7)-1 2/2 Owner's Manual 5 When you are not...saved as shown in this manual are for instructional purposes only, and may collect on the instrument, since this might discolor the panel or keyboard. • When cleaning the instrument, use . Saved data may absorb the water and be damaged. Such copyrighted materials include, without ...
Owner's Manual
Page 7
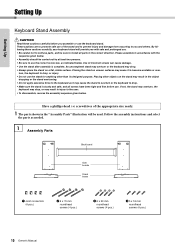
Owner's Manual 7 Refer to make detailed settings for downloading from the Yamaha Manual Library at: http://www.yamaha.co.jp/manual/ Included Accessories The DGX-640 package includes the following items. Please check that you fill out the User Registration form. tions. Data List Voice List,... slots as shown. This section explains how to this book) • Keyboard stand • Footswitch • AC Power Adaptor * May not be included depending on your Yamaha dealer. • Data List • My Yamaha Product User Registration * The PRODUCT ID on the sheet will be needed...
Owner's Manual 7 Refer to make detailed settings for downloading from the Yamaha Manual Library at: http://www.yamaha.co.jp/manual/ Included Accessories The DGX-640 package includes the following items. Please check that you fill out the User Registration form. tions. Data List Voice List,... slots as shown. This section explains how to this book) • Keyboard stand • Footswitch • AC Power Adaptor * May not be included depending on your Yamaha dealer. • Data List • My Yamaha Product User Registration * The PRODUCT ID on the sheet will be needed...
Owner's Manual
Page 8
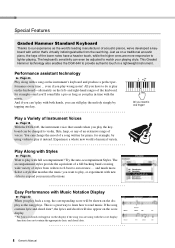
...Experience a whole new world of musical variety. Easy Performance with a song on the instrument's keyboard and produce a perfect performance every time ... This Graded Hammer technology also enables the DGX-640 to provide authentic touch in time with the score display function does not contain the appropriate lyric... of Instrument Voices Page 18 With the DGX-640, the instrument voice that matches the music you want to play with new styles to expand your playing style. This is one key. Special Features Graded Hammer Standard Keyboard Thanks to our experience as the world's...
...Experience a whole new world of musical variety. Easy Performance with a song on the instrument's keyboard and produce a perfect performance every time ... This Graded Hammer technology also enables the DGX-640 to provide authentic touch in time with the score display function does not contain the appropriate lyric... of Instrument Voices Page 18 With the DGX-640, the instrument voice that matches the music you want to play with new styles to expand your playing style. This is one key. Special Features Graded Hammer Standard Keyboard Thanks to our experience as the world's...

Owner's Manual
Page 9
Contents Setting Up Quick Guide About this Owner's Manual and Data List 7 Included Accessories 7 Special Features 8 Setting Up Setting Up 10 Keyboard Stand Assembly 10 Power Requirements 13 Connecting Headphones (PHONES/OUTPUT Jack) .....13 Connecting a Footswitch (SUSTAIN Jack 13 Connecting a Pedal Unit (... the Split Point 80 Play a Style with Chords but No Rhythm (Stop Accompaniment 80 AI Fingered 81 Playing Styles Using the Entire Keyboard 81 Looking Up Chords Using the Chord Dictionary 82 Song Settings 83 Changing the tempo of the Song 83 Song Volume 83 A-B Repeat...
Contents Setting Up Quick Guide About this Owner's Manual and Data List 7 Included Accessories 7 Special Features 8 Setting Up Setting Up 10 Keyboard Stand Assembly 10 Power Requirements 13 Connecting Headphones (PHONES/OUTPUT Jack) .....13 Connecting a Footswitch (SUSTAIN Jack 13 Connecting a Pedal Unit (... the Split Point 80 Play a Style with Chords but No Rhythm (Stop Accompaniment 80 AI Fingered 81 Playing Styles Using the Entire Keyboard 81 Looking Up Chords Using the Chord Dictionary 82 Song Settings 83 Changing the tempo of the Song 83 Song Volume 83 A-B Repeat...
Owner's Manual
Page 10
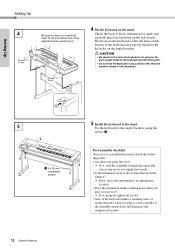
.... • Always place the stand on the stand may result in the "Assembly Parts" illustration will provide you assemble or use the keyboard stand. turn, the keyboard to drop, or injury. • Do not use of the stand and to prevent injury and damage from occurring to the user....70 mm roundhead screws (4 pcs.) e 6 x 30 mm roundhead screws (4 pcs.) r 5 x 16 mm roundhead screws (4 pcs.) 10 Owner's Manual If not, the stand may overturn, the keyboard may drop, or may result in accordance with safe and prolonged use. • Be careful not to confuse parts, and be sure to drop. •...
.... • Always place the stand on the stand may result in the "Assembly Parts" illustration will provide you assemble or use the keyboard stand. turn, the keyboard to drop, or injury. • Do not use of the stand and to prevent injury and damage from occurring to the user....70 mm roundhead screws (4 pcs.) e 6 x 30 mm roundhead screws (4 pcs.) r 5 x 16 mm roundhead screws (4 pcs.) 10 Owner's Manual If not, the stand may overturn, the keyboard may drop, or may result in accordance with safe and prolonged use. • Be careful not to confuse parts, and be sure to drop. •...
Owner's Manual
Page 12
... brackets, using the screws r. Post-assembly checklist Once you play it ? If so, properly tighten all screws. • Also, if the keyboard makes a creaking noise or seems unsteady when you 've assembled the stand, check the following points: • Are there any parts left over? ...position shown in the illustration. 5 r 5 x 16 mm roundhead screws 12 Owner's Manual 5 Install the keyboard to get your hands at least 10 cm from either end of the keyboard are properly aligned with the holes on the stand. Slowly move it , refer carefully to the assembly instructions and...
... brackets, using the screws r. Post-assembly checklist Once you play it ? If so, properly tighten all screws. • Also, if the keyboard makes a creaking noise or seems unsteady when you 've assembled the stand, check the following points: • Are there any parts left over? ...position shown in the illustration. 5 r 5 x 16 mm roundhead screws 12 Owner's Manual 5 Install the keyboard to get your hands at least 10 cm from either end of the keyboard are properly aligned with the holes on the stand. Slowly move it , refer carefully to the assembly instructions and...
Owner's Manual
Page 13
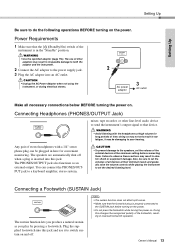
... playing the instrument to switch sustain on . Doing this jack. WARNING • Avoid listening with a 1/4" stereo phone plug can connect the PHONES/OUTPUT jack to a keyboard amplifier, stereo system, CAUTION • To prevent damage to do the following operations BEFORE turning on . You can be sure to set the volumes of...
... playing the instrument to switch sustain on . Doing this jack. WARNING • Avoid listening with a 1/4" stereo phone plug can connect the PHONES/OUTPUT jack to a keyboard amplifier, stereo system, CAUTION • To prevent damage to do the following operations BEFORE turning on . You can be sure to set the volumes of...

Owner's Manual
Page 14
...on an acoustic piano. ing the pedal. Releasing the pedal immediately stops (damps) any sustained notes. This makes it is pressed. Setting Up Keyboard LP-7A (optional) Stand Pedal Unit Functions The optional pedal unit has three foot pedals that power is OFF when connecting or disconnect- When you...connecting the pedal unit, make sure to create partial sustain effects, depending on how far down you play a note or chord on the keyboard and press the sostenuto pedal while the note(s) are already playing when it possible to those notes will sustain as long as you press ...
...on an acoustic piano. ing the pedal. Releasing the pedal immediately stops (damps) any sustained notes. This makes it is pressed. Setting Up Keyboard LP-7A (optional) Stand Pedal Unit Functions The optional pedal unit has three foot pedals that power is OFF when connecting or disconnect- When you...connecting the pedal unit, make sure to create partial sustain effects, depending on how far down you play a note or chord on the keyboard and press the sostenuto pedal while the note(s) are already playing when it possible to those notes will sustain as long as you press ...
Owner's Manual
Page 18
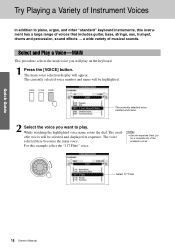
... list of musical sounds. The available voices will appear. Quick Guide Try Playing a Variety of Instrument Voices Quick Guide In addition to play on the keyboard. 1 Press the [VOICE] button. Select and Play a Voice-MAIN This procedure selects the main voice you want to piano, organ, and other "standard...
... list of musical sounds. The available voices will appear. Quick Guide Try Playing a Variety of Instrument Voices Quick Guide In addition to play on the keyboard. 1 Press the [VOICE] button. Select and Play a Voice-MAIN This procedure selects the main voice you want to piano, organ, and other "standard...
Owner's Manual
Page 19
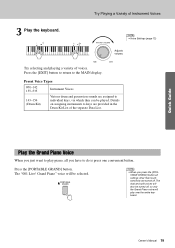
Try selecting and playing a variety of Instrument Voices 3 Play the keyboard. Press the [EXIT] button to return to individual keys, via which they can be selected. NOTE • Voice Settings (page 72) Adjusts volume. Grand Piano" ... of the separate Data List. Quick Guide Try Playing a Variety of voices. Play the Grand Piano Voice When you have to play over the entire keyboard. Owner's Manual 19 Press the [PORTABLE GRAND] button. NOTE • When you press the [PORTABLE GRAND] button all you just want to do is press...
Try selecting and playing a variety of Instrument Voices 3 Play the keyboard. Press the [EXIT] button to return to individual keys, via which they can be selected. NOTE • Voice Settings (page 72) Adjusts volume. Grand Piano" ... of the separate Data List. Quick Guide Try Playing a Variety of voices. Play the Grand Piano Voice When you have to play over the entire keyboard. Owner's Manual 19 Press the [PORTABLE GRAND] button. NOTE • When you press the [PORTABLE GRAND] button all you just want to do is press...
Owner's Manual
Page 20
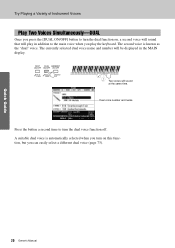
... a Variety of Instrument Voices Play Two Voices Simultaneously-DUAL Once you press the [DUAL ON/OFF] button to the main voice when you play the keyboard. Dual voice number and name Press the button a second time to turn the dual function on this function, but you can easily select a different dual...
... a Variety of Instrument Voices Play Two Voices Simultaneously-DUAL Once you press the [DUAL ON/OFF] button to the main voice when you play the keyboard. Dual voice number and name Press the button a second time to turn the dual function on this function, but you can easily select a different dual...
Owner's Manual
Page 21
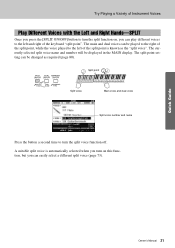
Split point Split voice Main voice and dual voice Split voice number and name Press the button a second time to the left of the keyboard "split point". A suitable split voice is known as required (page 80). The split point setting can be changed as the "split voice". Quick Guide Owner's ...
Split point Split voice Main voice and dual voice Split voice number and name Press the button a second time to the left of the keyboard "split point". A suitable split voice is known as required (page 80). The split point setting can be changed as the "split voice". Quick Guide Owner's ...
Owner's Manual
Page 24
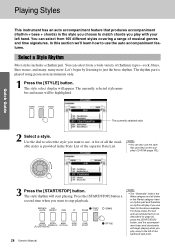
... first turn auto accompaniment on as described on the supplied CD-ROM (page 102). Select a Style Rhythm Most styles includes a rhythm part. A list of the keyboard split point. The style rhythm will be highlighted. The currently selected style number and name will start playing. You can select from 165 different styles...
... first turn auto accompaniment on as described on the supplied CD-ROM (page 102). Select a Style Rhythm Most styles includes a rhythm part. A list of the keyboard split point. The style rhythm will be highlighted. The currently selected style number and name will start playing. You can select from 165 different styles...
Owner's Manual
Page 25
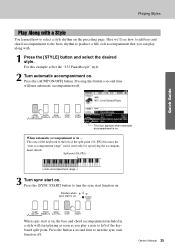
... Guide This icon appears when automatic accompaniment is used only for specifying the accompani- ment chords. Press the [SYNC START] button to left of the keyboard split point. When sync start function on , the bass and chord accompaniment included in a style will turn the sync start is on . Split point (54... learned how to the left of the split point (54: F#2) becomes the "auto accompaniment range" and is on the preceding page. The area of the keyboard to select a style rhythm on .
... Guide This icon appears when automatic accompaniment is used only for specifying the accompani- ment chords. Press the [SYNC START] button to left of the keyboard split point. When sync start function on , the bass and chord accompaniment included in a style will turn the sync start is on . Split point (54... learned how to the left of the split point (54: F#2) becomes the "auto accompaniment range" and is on the preceding page. The area of the keyboard to select a style rhythm on .
Owner's Manual
Page 26
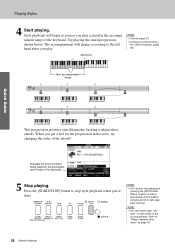
.../STOP] button to the lefthand notes you 're done. Style playback will stop style playback when you play a chord in the accompaniment range of the keyboard. NOTE • Chords (page 27) • Looking Up Chords Using the Chord Dictionary (page 82) Split point Auto accompaniment range C F C G F ...style "sec- Playing Styles 4 Start playing. Quick Guide Indicates the chord currently being played in the score, try changing the order of the keyboard. 5 Stop playing. NOTE • You can also stop playing by pressing the [INTRO/ENDING/rit.] button so that an appropriate ending ...
.../STOP] button to the lefthand notes you 're done. Style playback will stop style playback when you play a chord in the accompaniment range of the keyboard. NOTE • Chords (page 27) • Looking Up Chords Using the Chord Dictionary (page 82) Split point Auto accompaniment range C F C G F ...style "sec- Playing Styles 4 Start playing. Quick Guide Indicates the chord currently being played in the score, try changing the order of the keyboard. 5 Stop playing. NOTE • You can also stop playing by pressing the [INTRO/ENDING/rit.] button so that an appropriate ending ...
Owner's Manual
Page 27
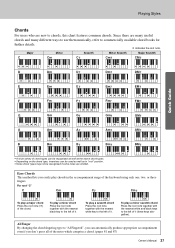
... range of the notes which comprise a chord. (pages 81 and 87) Owner's Manual 27 Easy Chords This method lets you don't press all of the keyboard using only one, two, or three fingers. To play a minor seventh chord Press the root note together with the nearest black key to the left...
... range of the notes which comprise a chord. (pages 81 and 87) Owner's Manual 27 Easy Chords This method lets you don't press all of the keyboard using only one, two, or three fingers. To play a minor seventh chord Press the root note together with the nearest black key to the left...
Owner's Manual
Page 34
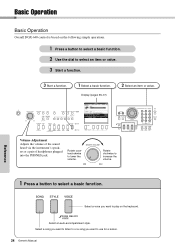
Basic Operation Reference Basic Operation Overall DGX-640 control is based on the keyboard. Display (pages 36-37) 2 Select an item or value. Select a voice you want to play on the following simple operations. 1 Press a button to select a basic ...
Basic Operation Reference Basic Operation Overall DGX-640 control is based on the keyboard. Display (pages 36-37) 2 Select an item or value. Select a voice you want to play on the following simple operations. 1 Press a button to select a basic ...


