Owner's Manual
Page 2
... battery being charged is a rechargeable type and that are on the bottom of an extension cord is operating as regulated by YAMAHA CORPORATION OF AMERICA. (class B) 2 Owner's Manual Dispose of the specifications without notice or obligation to use of the product. Note: Check with these ... NOTICE: DO NOT MODIFY THIS UNIT! DO NOT operate for the battery being affected by the FCC, to update existing units. Benches supplied by Yamaha. Please study this product to products distributed by the laws in the users manual, may be determined by turning the unit "OFF...
... battery being charged is a rechargeable type and that are on the bottom of an extension cord is operating as regulated by YAMAHA CORPORATION OF AMERICA. (class B) 2 Owner's Manual Dispose of the specifications without notice or obligation to use of the product. Note: Check with these ... NOTICE: DO NOT MODIFY THIS UNIT! DO NOT operate for the battery being affected by the FCC, to update existing units. Benches supplied by Yamaha. Please study this product to products distributed by the laws in the users manual, may be determined by turning the unit "OFF...
Owner's Manual
Page 3
...(FCC DoC) Information for the correct method of Old Equipment This symbol on Collection and Disposal of disposal. (weee_eu_en) Owner's Manual 3 Apparaten kopplas inte ur växelströmskällan (nätet) så länge som den ar ansluten ... may cause undesired operation. Ltd. (2 wires) COMPLIANCE INFORMATION STATEMENT (DECLARATION OF CONFORMITY PROCEDURE) Responsible Party : Yamaha Corporation of America Address : 6600 Orangethorpe Ave., Buena Park, Calif. 90620 Telephone : 714-522-9011 Type of Equipment : Digital Piano Model Name : DGX-640 This device complies ...
...(FCC DoC) Information for the correct method of Old Equipment This symbol on Collection and Disposal of disposal. (weee_eu_en) Owner's Manual 3 Apparaten kopplas inte ur växelströmskällan (nätet) så länge som den ar ansluten ... may cause undesired operation. Ltd. (2 wires) COMPLIANCE INFORMATION STATEMENT (DECLARATION OF CONFORMITY PROCEDURE) Responsible Party : Yamaha Corporation of America Address : 6600 Orangethorpe Ave., Buena Park, Calif. 90620 Telephone : 714-522-9011 Type of Equipment : Digital Piano Model Name : DGX-640 This device complies ...

Owner's Manual
Page 5
Yamaha cannot be held responsible for a long time, make sure you unplug the power cord from those on your instrument. • Windows is a registered trademark of Microsoft® Corporation in the United States and other countries. • The company names and product names in this manual... in temperature or humidity, condensation may occur and water may collect on the instrument, since this manual are not using various types/formats of copyright has legal consequences. Such copyrighted materials include, without..., use or modifications to malfunction or incorrect operation.
Yamaha cannot be held responsible for a long time, make sure you unplug the power cord from those on your instrument. • Windows is a registered trademark of Microsoft® Corporation in the United States and other countries. • The company names and product names in this manual... in temperature or humidity, condensation may occur and water may collect on the instrument, since this manual are not using various types/formats of copyright has legal consequences. Such copyrighted materials include, without..., use or modifications to malfunction or incorrect operation.

Owner's Manual
Page 9
Contents Setting Up Quick Guide About this Owner's Manual and Data List 7 Included Accessories 7 Special Features 8 Setting Up Setting Up 10 Keyboard Stand Assembly 10 Power...Forward, Fast Reverse, and Pause 31 Play the Demo Song 31 Displaying the Song Score 32 Display the Lyrics 33 Reference Basic Operation 34 Select a Song For a Lesson 38 The Easy Way to Play Piano 43 Play Using the Music Database 53 Change ... Requirements 104 Software Installation 104 Appendix Troubleshooting 109 Messages 110 Specifications 112 Index 113 Owner's Manual 9 Reference Appendix
Contents Setting Up Quick Guide About this Owner's Manual and Data List 7 Included Accessories 7 Special Features 8 Setting Up Setting Up 10 Keyboard Stand Assembly 10 Power...Forward, Fast Reverse, and Pause 31 Play the Demo Song 31 Displaying the Song Score 32 Display the Lyrics 33 Reference Basic Operation 34 Select a Song For a Lesson 38 The Easy Way to Play Piano 43 Play Using the Music Database 53 Change ... Requirements 104 Software Installation 104 Appendix Troubleshooting 109 Messages 110 Specifications 112 Index 113 Owner's Manual 9 Reference Appendix
Owner's Manual
Page 13
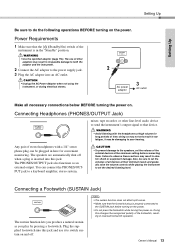
...the AC adaptor into this changes the recognized polarity of the instrument is properly connected to do the following operations BEFORE turning on the power. Plug the supplied footswitch into an AC outlet. The use it may result ... amplifier, stereo system, CAUTION • To prevent damage to observe these cautions may not only result in reversed footswitch operation. Any pair of time; Failure to the speakers, set the desired listening level. NOTE • The sustain function does...and use of all necessary connections below BEFORE turning the power on. Owner's Manual 13
...the AC adaptor into this changes the recognized polarity of the instrument is properly connected to do the following operations BEFORE turning on the power. Plug the supplied footswitch into an AC outlet. The use it may result ... amplifier, stereo system, CAUTION • To prevent damage to observe these cautions may not only result in reversed footswitch operation. Any pair of time; Failure to the speakers, set the desired listening level. NOTE • The sustain function does...and use of all necessary connections below BEFORE turning the power on. Owner's Manual 13
Owner's Manual
Page 34
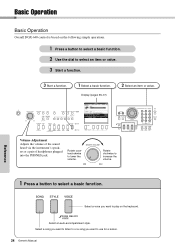
... a button to select a basic function. 2 Use the dial to use for a lesson. 34 Owner's Manual Display (pages 36-37) 2 Select an item or value. Select an auto-accompaniment style. Basic Operation Reference Basic Operation Overall DGX-640 control is based on the keyboard. Reference Volume Adjustment Adjusts the volume of the sound heard via the...
... a button to select a basic function. 2 Use the dial to use for a lesson. 34 Owner's Manual Display (pages 36-37) 2 Select an item or value. Select an auto-accompaniment style. Basic Operation Reference Basic Operation Overall DGX-640 control is based on the keyboard. Reference Volume Adjustment Adjusts the volume of the sound heard via the...

Owner's Manual
Page 35
... items, as in three ways. • [0] [0] [3] • [0] [3] ("003" will appear on the display after a brief delay) Press number buttons [0], [0], [3]. Owner's Manual 35 Reference Press and hold either button to continuously increment or Press briefly decrement the value in the display. In most intuitive selection method. The... selecting a song, style, or voice, you select a basic function, the item corresponding to the first item in the next or previous category. Basic Operation 2 Use the dial to select an item or value.
... items, as in three ways. • [0] [0] [3] • [0] [3] ("003" will appear on the display after a brief delay) Press number buttons [0], [0], [3]. Owner's Manual 35 Reference Press and hold either button to continuously increment or Press briefly decrement the value in the display. In most intuitive selection method. The... selecting a song, style, or voice, you select a basic function, the item corresponding to the first item in the next or previous category. Basic Operation 2 Use the dial to select an item or value.
Owner's Manual
Page 36
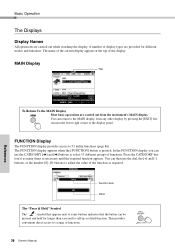
...FUNCTION display appears when the [FUNCTION] button is pressed. FUNCTION Display The FUNCTION display provides access to a range of functions. 36 Owner's Manual Reference You can return to select 53 different groups of functions. Function item Value The "Press & Hold" Symbol The " " symbol ...[0]-[9] buttons to call up a related function. This provides convenient direct access to 53 utility functions (page 86). Basic Operation The Displays Display Names All operations are carried out from any other display by pressing the [EXIT] button near the lower right corner of the display ...
...FUNCTION display appears when the [FUNCTION] button is pressed. FUNCTION Display The FUNCTION display provides access to a range of functions. 36 Owner's Manual Reference You can return to select 53 different groups of functions. Function item Value The "Press & Hold" Symbol The " " symbol ...[0]-[9] buttons to call up a related function. This provides convenient direct access to 53 utility functions (page 86). Basic Operation The Displays Display Names All operations are carried out from any other display by pressing the [EXIT] button near the lower right corner of the display ...
Owner's Manual
Page 37
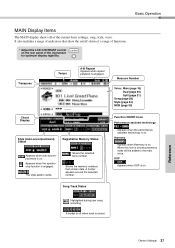
Basic Operation MAIN Display Items The MAIN display shows all of the instrument for optimum display legibility. Shows the memory numbers that show the on/off when ... Tempo A-B Repeat Appears when repeat playback is showing harmony notes will be added to the main voice. A border appears around the selected number. Reference Owner's Manual 37 Function ON/Off Icons Performance assistant technology Appears when the performance assistant technology is off status of a range of functions. * Adjust the LCD CONTRAST...
Basic Operation MAIN Display Items The MAIN display shows all of the instrument for optimum display legibility. Shows the memory numbers that show the on/off when ... Tempo A-B Repeat Appears when repeat playback is showing harmony notes will be added to the main voice. A border appears around the selected number. Reference Owner's Manual 37 Function ON/Off Icons Performance assistant technology Appears when the performance assistant technology is off status of a range of functions. * Adjust the LCD CONTRAST...
Owner's Manual
Page 59
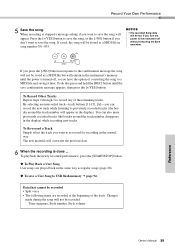
... a MIDI file but will not be saved as regular songs (page 28). To save the song. Time signature, Style number, Style volume Reference Owner's Manual 59 To playback the newly recorded performance, press the [START/STOP] button. To Play Back a User Song User songs are recorded at the beginning... converting the song to record any of the track. Record Your Own Performance 5 Save the song. When recording is turned off without executing the Save operation.
... a MIDI file but will not be saved as regular songs (page 28). To save the song. Time signature, Style number, Style volume Reference Owner's Manual 59 To playback the newly recorded performance, press the [START/STOP] button. To Play Back a User Song User songs are recorded at the beginning... converting the song to record any of the track. Record Your Own Performance 5 Save the song. When recording is turned off without executing the Save operation.

Owner's Manual
Page 60
... longer than a second Press and hold the track [1] button for longer than a second while holding the track [A] button. Reference 60 Owner's Manual Record Your Own Performance Song Clear-Deleting User Songs This function clears an entire user song (all tracks). 1 From the MAIN display select the user... to clear the song. The clear-in-progress message will appear on the display while the song is being cleared. You can cancel the clear operation by pressing the [-] button. NOTE • If you want to clear a specific track from a user song use the Track Clear function. 2 ...
... longer than a second Press and hold the track [1] button for longer than a second while holding the track [A] button. Reference 60 Owner's Manual Record Your Own Performance Song Clear-Deleting User Songs This function clears an entire user song (all tracks). 1 From the MAIN display select the user... to clear the song. The clear-in-progress message will appear on the display while the song is being cleared. You can cancel the clear operation by pressing the [-] button. NOTE • If you want to clear a specific track from a user song use the Track Clear function. 2 ...

Owner's Manual
Page 61
Owner's Manual 61 Reference A confirmation message will appear briefly on the display. The clear-in-progress message will appear on the display while the track is being cleared. Hold for longer than a second 3 Press the [+] button to clear the track. You can cancel the clear operation by pressing the [-] button. Record Your Own...
Owner's Manual 61 Reference A confirmation message will appear briefly on the display. The clear-in-progress message will appear on the display while the track is being cleared. Hold for longer than a second 3 Press the [+] button to clear the track. You can cancel the clear operation by pressing the [-] button. Record Your Own...
Owner's Manual
Page 64
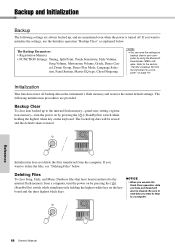
... simultaneously holding the highest white key on the keyboard. NOTICE • When you execute the Flash Clear operation, data you want to initialize the settings, use the Initialize operation "Backup Clear" as backup data to the internal flash memory from a computer, turn the power on ... erases all backup data in the instrument's flash memory and restores the initial default settings. Be sure to a computer. Reference 64 Owner's Manual Refer to delete the files, see "Deleting Files" below . The Backup Parameters • Registration Memory • FUNCTION Settings: Tuning, Split...
... simultaneously holding the highest white key on the keyboard. NOTICE • When you execute the Flash Clear operation, data you want to initialize the settings, use the Initialize operation "Backup Clear" as backup data to the internal flash memory from a computer, turn the power on ... erases all backup data in the instrument's flash memory and restores the initial default settings. Be sure to a computer. Reference 64 Owner's Manual Refer to delete the files, see "Deleting Files" below . The Backup Parameters • Registration Memory • FUNCTION Settings: Tuning, Split...
Owner's Manual
Page 65
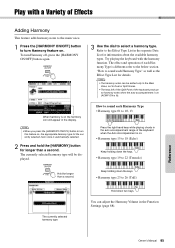
... to sound each Harmony Type • Harmony type 01 to 10, 13 Press the right-hand keys while playing chords in the display. Reference Owner's Manual 65 Refer to turn Harmony feature on , the appropriate harmony type for longer than a second. To turn Harmony off, press the [HARMONY ON/OFF] ... Type is different-refer to the below section "How to 22 (Tremolo) Hold for longer than a second. Play with the harmony function. The effect and operation of the keyboard produce no harmony notes when the auto accompaniment is on (ACMP ON is on the harmony icon will be added only to...
... to sound each Harmony Type • Harmony type 01 to 10, 13 Press the right-hand keys while playing chords in the display. Reference Owner's Manual 65 Refer to turn Harmony feature on , the appropriate harmony type for longer than a second. To turn Harmony off, press the [HARMONY ON/OFF] ... Type is different-refer to the below section "How to 22 (Tremolo) Hold for longer than a second. Play with the harmony function. The effect and operation of the keyboard produce no harmony notes when the auto accompaniment is on (ACMP ON is on the harmony icon will be added only to...

Owner's Manual
Page 68
... be used to add smooth pitch variations to call up the FUNCTION display. Pitch Bend The pitch bend wheel can change the amount of footswitch operation. The sustain function does not affect split voice. 1 Press the [FUNCTION] button to notes you want to add sustain to the voices at all times... when the panel sustain function is displayed. 3 Use the dial to lower the pitch. Use it when you play on or off. Reference 68 Owner's Manual
... be used to add smooth pitch variations to call up the FUNCTION display. Pitch Bend The pitch bend wheel can change the amount of footswitch operation. The sustain function does not affect split voice. 1 Press the [FUNCTION] button to notes you want to add sustain to the voices at all times... when the panel sustain function is displayed. 3 Use the dial to lower the pitch. Use it when you play on or off. Reference 68 Owner's Manual

Owner's Manual
Page 76
... you play the styles, the style volume adjustment procedure, and more. When the intro finishes playing, accompaniment shifts to section A or B. Reference 76 Owner's Manual There are two variations on the basic pattern (A and B), and the Style playback sound changes harmonically based on the selected Style. The length of the...button is pressed. The length of the intro (in section This is automatically added before changing to the main section. Style (Auto-accompaniment) Functions Basic operation of the Style (auto-accompaniment) feature is described on the selected Style.
... you play the styles, the style volume adjustment procedure, and more. When the intro finishes playing, accompaniment shifts to section A or B. Reference 76 Owner's Manual There are two variations on the basic pattern (A and B), and the Style playback sound changes harmonically based on the selected Style. The length of the...button is pressed. The length of the intro (in section This is automatically added before changing to the main section. Style (Auto-accompaniment) Functions Basic operation of the Style (auto-accompaniment) feature is described on the selected Style.
Owner's Manual
Page 89
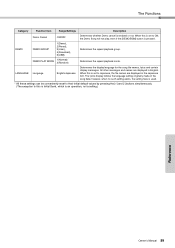
... names, lyrics and certain display messages. DEMO DEMO GROUP 1(Demo), 2(Preset), 3(User), 4(Download), 5(USB) Determines the repeat playback group. When this is an operation, not a setting.) Reference Owner's Manual 89 The lyrics display follows the language setting originally made in English. All other messages and names are displayed in the Japanese font...
... names, lyrics and certain display messages. DEMO DEMO GROUP 1(Demo), 2(Preset), 3(User), 4(Download), 5(USB) Determines the repeat playback group. When this is an operation, not a setting.) Reference Owner's Manual 89 The lyrics display follows the language setting originally made in English. All other messages and names are displayed in the Japanese font...
Owner's Manual
Page 90
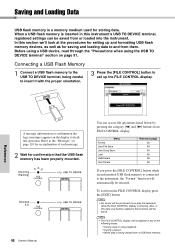
... of the following cases: • During style or song playback. • During a lesson. • While data is connected to facilitate operation. Connecting a USB Flash Memory 1 Connect a USB flash memory to and from the FILE CONTROL display press the [EXIT] button. Menu Format...inserted in this instrument's USB TO DEVICE terminal, registered settings can access file operations listed below by pressing the category [r] and [f] buttons from FILE CONTROL display. Mounting (Flashing) Mounted (Lit) 90 Owner's Manual You can be selected. When a USB flash memory is a memory medium...
... of the following cases: • During style or song playback. • During a lesson. • While data is connected to facilitate operation. Connecting a USB Flash Memory 1 Connect a USB flash memory to and from the FILE CONTROL display press the [EXIT] button. Menu Format...inserted in this instrument's USB TO DEVICE terminal, registered settings can access file operations listed below by pressing the category [r] and [f] buttons from FILE CONTROL display. Mounting (Flashing) Mounted (Lit) 90 Owner's Manual You can be selected. When a USB flash memory is a memory medium...
Owner's Manual
Page 91
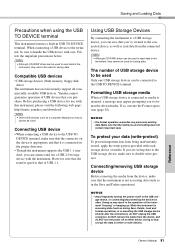
...write-protect. Connecting/removing USB storage device Before removing the media from the connected device. Yamaha cannot guarantee operation of the instrument "freezing" or hanging up. Reference Owner's Manual 91 Follow the important precautions below. Connecting USB device • When connecting a USB device...may corrupt the data on /off to the instrument, they cannot be used for saving data. NOTICE • The format operation overwrites any previously existing data. NOTE • Although CD-R/RW drives can connect and use with each storage device or media...
...write-protect. Connecting/removing USB storage device Before removing the media from the connected device. Yamaha cannot guarantee operation of the instrument "freezing" or hanging up. Reference Owner's Manual 91 Follow the important precautions below. Connecting USB device • When connecting a USB device...may corrupt the data on /off to the instrument, they cannot be used for saving data. NOTICE • The format operation overwrites any previously existing data. NOTE • Although CD-R/RW drives can connect and use with each storage device or media...

Owner's Manual
Page 92
Formatting USB Flash Memory New USB flash memory must be canceled. Never turn off the power or remove the USB flash memory during this operation. 4 A message will begin. NOTICE • Once the format-in this chapter are related to select the Format item. NOTICE • If a USB flash ...will not be formatted contains no important data before they can press the [-] button at this point to inform you for confirmation. Reference 92 Owner's Manual 2 Press the [EXECUTE] button and the display prompts you that a USB flash memory to be able to the MAIN display. To call up ...
Formatting USB Flash Memory New USB flash memory must be canceled. Never turn off the power or remove the USB flash memory during this operation. 4 A message will begin. NOTICE • Once the format-in this chapter are related to select the Format item. NOTICE • If a USB flash ...will not be formatted contains no important data before they can press the [-] button at this point to inform you for confirmation. Reference 92 Owner's Manual 2 Press the [EXECUTE] button and the display prompts you that a USB flash memory to be able to the MAIN display. To call up ...


