Data List
Page 24
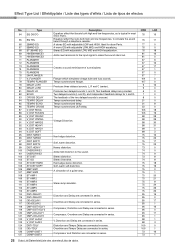
.... Soft, warm distortion. Compressor, Overdrive and Delay are connected in series. Distortion and Delay are connected in series. Adds mild distortion to make the sound stand out. Compressor, Distortion and Delay are connected in series. Type 64 EQ DISCO 65 EQ TEL 66 2BAND EQ 67 3BAND EQ 68 ST 3BAND...
.... Soft, warm distortion. Compressor, Overdrive and Delay are connected in series. Distortion and Delay are connected in series. Adds mild distortion to make the sound stand out. Compressor, Distortion and Delay are connected in series. Type 64 EQ DISCO 65 EQ TEL 66 2BAND EQ 67 3BAND EQ 68 ST 3BAND...
Owner's Manual
Page 1
EN Setting Up Quick Guide Reference Appendix Owner's Manual Keyboard Stand Assembly For information on assembling the keyboard stand, refer to the instructions on page 10 of this manual.
EN Setting Up Quick Guide Reference Appendix Owner's Manual Keyboard Stand Assembly For information on assembling the keyboard stand, refer to the instructions on page 10 of this manual.
Owner's Manual
Page 2
... smaller the AWG number, the larger the current handling capacity. This product should consult an audiologist. a cart, rack, or stand that are designed to how a function or effect works (when the unit is uncomfortable. SPECIFICATIONS SUBJECT TO CHANGE: The information ...plate is unable to use "household" type batteries. IMPORTANT NOTICE: DO NOT MODIFY THIS UNIT! Modifications not expressly approved by Yamaha. IMPORTANT: When connecting this product to follow instructions could cause permanent hearing loss. Follow all batteries away from children. Failure ...
... smaller the AWG number, the larger the current handling capacity. This product should consult an audiologist. a cart, rack, or stand that are designed to how a function or effect works (when the unit is uncomfortable. SPECIFICATIONS SUBJECT TO CHANGE: The information ...plate is unable to use "household" type batteries. IMPORTANT NOTICE: DO NOT MODIFY THIS UNIT! Modifications not expressly approved by Yamaha. IMPORTANT: When connecting this product to follow instructions could cause permanent hearing loss. Follow all batteries away from children. Failure ...
Owner's Manual
Page 4
...from the outlet when the instrument is not to be malfunctioning, discontinue use the instrument/device or headphones for future reference. Pulling by qualified Yamaha service personnel. Failure to avoid the possibility of all connected cables. • When setting up the product, make sure to unplug the ...or malfunction occurs, immediately turn off the power switch and disconnect the plug from the wall AC outlet. • Use only the stand specified for a long time, make sure that the AC outlet you notice any way. When you are using a multiple-connector. When attaching the...
...from the outlet when the instrument is not to be malfunctioning, discontinue use the instrument/device or headphones for future reference. Pulling by qualified Yamaha service personnel. Failure to avoid the possibility of all connected cables. • When setting up the product, make sure to unplug the ...or malfunction occurs, immediately turn off the power switch and disconnect the plug from the wall AC outlet. • Use only the stand specified for a long time, make sure that the AC outlet you notice any way. When you are using a multiple-connector. When attaching the...
Owner's Manual
Page 7
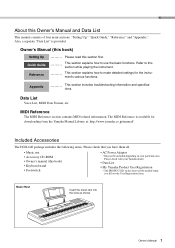
.... • Data List • My Yamaha Product User Registration * The PRODUCT ID on your particular area. About this section first. Refer to this book) • Keyboard stand • Footswitch • AC Power Adaptor * May not be included depending on the sheet will be needed when ... MIDI Reference is provided. This section explains how to make detailed settings for downloading from the Yamaha Manual Library at: http://www.yamaha.co.jp/manual/ Included Accessories The DGX-640 package includes the following items. Please check that you fill out the User Registration form. Data...
.... • Data List • My Yamaha Product User Registration * The PRODUCT ID on your particular area. About this section first. Refer to this book) • Keyboard stand • Footswitch • AC Power Adaptor * May not be included depending on the sheet will be needed when ... MIDI Reference is provided. This section explains how to make detailed settings for downloading from the Yamaha Manual Library at: http://www.yamaha.co.jp/manual/ Included Accessories The DGX-640 package includes the following items. Please check that you fill out the User Registration form. Data...

Owner's Manual
Page 9
Contents Setting Up Quick Guide About this Owner's Manual and Data List 7 Included Accessories 7 Special Features 8 Setting Up Setting Up 10 Keyboard Stand Assembly 10 Power Requirements 13 Connecting Headphones (PHONES/OUTPUT Jack) .....13 Connecting a Footswitch (SUSTAIN Jack 13 Connecting a Pedal Unit (PEDAL UNIT jack 14 Connecting to a ...
Contents Setting Up Quick Guide About this Owner's Manual and Data List 7 Included Accessories 7 Special Features 8 Setting Up Setting Up 10 Keyboard Stand Assembly 10 Power Requirements 13 Connecting Headphones (PHONES/OUTPUT Jack) .....13 Connecting a Footswitch (SUSTAIN Jack 13 Connecting a Pedal Unit (PEDAL UNIT jack 14 Connecting to a ...
Owner's Manual
Page 10
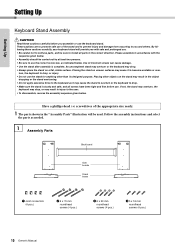
...confuse parts, and be sure to use . Use of the appropriate size ready. 1 The parts shown in the correct direction. Placing the stand on a flat, stable surface. By following these cautions carefully before use the correct screw size, as indicated below . Placing other than its... To disassemble, reverse the assembly sequence given below . Have a phillips-head (+) screwdriver of incorrect screws can cause damage. • Use the stand after assembly is sturdy and safe, and all parts in the "Assembly Parts" illustration will provide you with the sequence given below. • ...
...confuse parts, and be sure to use . Use of the appropriate size ready. 1 The parts shown in the correct direction. Placing the stand on a flat, stable surface. By following these cautions carefully before use the correct screw size, as indicated below . Placing other than its... To disassemble, reverse the assembly sequence given below . Have a phillips-head (+) screwdriver of incorrect screws can cause damage. • Use the stand after assembly is sturdy and safe, and all parts in the "Assembly Parts" illustration will provide you with the sequence given below. • ...

Owner's Manual
Page 11
... the non-colored surface is facing down. Insert the joint connectors q into the side boards as shown. Attach the "L" (Left) and "R" (Right) stand bases to the bottom of the stand bases. If you have trouble fastening the screws, use a screwdriver to the instructions provided with the screw holes on the upper surfaces... drop the back board or touch the sharp metal fittings. Refer to rotate the joint connectors so that the connector holes are marked on the stand bases. 3 Attach the back board.
... the non-colored surface is facing down. Insert the joint connectors q into the side boards as shown. Attach the "L" (Left) and "R" (Right) stand bases to the bottom of the stand bases. If you have trouble fastening the screws, use a screwdriver to the instructions provided with the screw holes on the upper surfaces... drop the back board or touch the sharp metal fittings. Refer to rotate the joint connectors so that the connector holes are marked on the stand bases. 3 Attach the back board.
Owner's Manual
Page 12
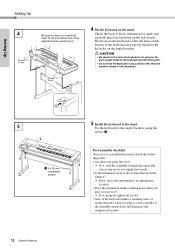
... the keyboard are properly aligned with the holes on the side boards. Post-assembly checklist Once you've assembled the stand, check the following points: • Are there any parts left over? If so, read the assembly...rattling noise when you play it . At least 10 cm 4 Put the keyboard on the stand. Setting Up Setting Up 4 At least 10 cm Be sure to place your fingers caught between the keyboard and the... stand parts. • Do not hold the keyboard in any errors you might have made. • ...
... the keyboard are properly aligned with the holes on the side boards. Post-assembly checklist Once you've assembled the stand, check the following points: • Are there any parts left over? If so, read the assembly...rattling noise when you play it . At least 10 cm 4 Put the keyboard on the stand. Setting Up Setting Up 4 At least 10 cm Be sure to place your fingers caught between the keyboard and the... stand parts. • Do not hold the keyboard in any errors you might have made. • ...

Owner's Manual
Page 14
... the pedal have a longer sustain. ing the pedal. This makes it is pressed, notes sustain longer. Setting Up Keyboard LP-7A (optional) Stand Pedal Unit Functions The optional pedal unit has three foot pedals that power is in the same way as you press the sostenuto pedal here... to those notes will not affect notes that are already playing when it possible to create partial sustain effects, depending on the supplied keyboard stand. Soft (Left) Pedal The soft pedal reduces the volume and slightly changes the timbre of expressive effects similar to also assemble the unit ...
... the pedal have a longer sustain. ing the pedal. This makes it is pressed, notes sustain longer. Setting Up Keyboard LP-7A (optional) Stand Pedal Unit Functions The optional pedal unit has three foot pedals that power is in the same way as you press the sostenuto pedal here... to those notes will not affect notes that are already playing when it possible to create partial sustain effects, depending on the supplied keyboard stand. Soft (Left) Pedal The soft pedal reduces the volume and slightly changes the timbre of expressive effects similar to also assemble the unit ...

Owner's Manual
Page 112
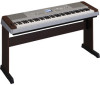
... Supply • Adaptor: Users within U.S or Europe: PA-150 or an equivalent recommended by Yamaha Others: PA-5D, PA-150 or an equivalent Dimensions (W x D x H) • 1,397 x 445 x 146 mm (55" x 17-1/2" x 5-3/4") with keyboard stand: 1,399 x 445 x 761 mm (55-1/16" x 17-1/2" x 29-15/16") ...• Data List • Music Rest • Accessory CD-ROM • Keyboard Stand • Owner's Manual • Footswitch • My Yamaha Product User Registration * The PRODUCT ID on your Yamaha dealer. 112 Owner's Manual Appendix Optional Accessories • AC Power Adaptor: Users within ...
... Supply • Adaptor: Users within U.S or Europe: PA-150 or an equivalent recommended by Yamaha Others: PA-5D, PA-150 or an equivalent Dimensions (W x D x H) • 1,397 x 445 x 146 mm (55" x 17-1/2" x 5-3/4") with keyboard stand: 1,399 x 445 x 761 mm (55-1/16" x 17-1/2" x 29-15/16") ...• Data List • Music Rest • Accessory CD-ROM • Keyboard Stand • Owner's Manual • Footswitch • My Yamaha Product User Registration * The PRODUCT ID on your Yamaha dealer. 112 Owner's Manual Appendix Optional Accessories • AC Power Adaptor: Users within ...

