Owner's Manual
Page 1
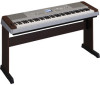
Setting Up Quick Guide Reference Appendix Owner's Manual Keyboard Stand Assembly For information on assembling the keyboard stand, refer to the instructions on page 10 of this manual. EN
Setting Up Quick Guide Reference Appendix Owner's Manual Keyboard Stand Assembly For information on assembling the keyboard stand, refer to the instructions on page 10 of this manual. EN
Owner's Manual
Page 2
... to comply with other uses are designed for seating only. We sincerely believe that are not covered by YAMAHA CORPORATION OF AMERICA. (class B) 2 Owner's Manual If your dealer before damage occurs. This product, when installed as designed) are on , trip over, or roll anything over power or connecting cords of ...
... to comply with other uses are designed for seating only. We sincerely believe that are not covered by YAMAHA CORPORATION OF AMERICA. (class B) 2 Owner's Manual If your dealer before damage occurs. This product, when installed as designed) are on , trip over, or roll anything over power or connecting cords of ...
Owner's Manual
Page 3
... by Yamaha Music U.K. Making sure that neither core is suspected. * This applies only to the terminal which is marked with general household waste. See user manual instructions if interference to radio reception is connected to the earth terminal of disposal. (weee_eu_en) Owner's Manual 3 By...this product may not correspond with your purchase to products distributed by YAMAHA CORPORATION OF AMERICA. (FCC DoC) Information for Users on Collection and Disposal of Equipment : Digital Piano Model Name : DGX-640 This device complies with the letter N or coloured BLACK. For...
... by Yamaha Music U.K. Making sure that neither core is suspected. * This applies only to the terminal which is marked with general household waste. See user manual instructions if interference to radio reception is connected to the earth terminal of disposal. (weee_eu_en) Owner's Manual 3 By...this product may not correspond with your purchase to products distributed by YAMAHA CORPORATION OF AMERICA. (FCC DoC) Information for Users on Collection and Disposal of Equipment : Digital Piano Model Name : DGX-640 This device complies with the letter N or coloured BLACK. For...
Owner's Manual
Page 4
...the instrument or overheating. • Check the electric plug periodically and remove any hearing loss or ringing in the ears, consult a physician. 4 Owner's Manual (7)-1 1/2 WARNING Always follow the basic precautions listed below to avoid the possibility of time, or during use the provided screws only. If it...not excessively bend or otherwise damage the cord, place heavy objects on it, or place it in the instrument falling over it inspected by Yamaha service personnel. • The power cord or plug becomes frayed or damaged. • It emits unusual smells or smoke. • ...
...the instrument or overheating. • Check the electric plug periodically and remove any hearing loss or ringing in the ears, consult a physician. 4 Owner's Manual (7)-1 1/2 WARNING Always follow the basic precautions listed below to avoid the possibility of time, or during use the provided screws only. If it...not excessively bend or otherwise damage the cord, place heavy objects on it, or place it in the instrument falling over it inspected by Yamaha service personnel. • The power cord or plug becomes frayed or damaged. • It emits unusual smells or smoke. • ...

Owner's Manual
Page 5
... the instrument in the "Standby" position, electricity is lost due to a USB storage device/or other external device such as their respective companies. (7)-1 2/2 Owner's Manual 5 Even when the [ ](Standby/On) switch is not permitted under relevant laws. Any violation of personal use is in the vicinity of a TV, ... or other external device such as the original. • This device is left, the wooden parts may be lost or destroyed. Yamaha cannot be held responsible for your personal use. • This product incorporates and bundles computer programs and contents in which...
... the instrument in the "Standby" position, electricity is lost due to a USB storage device/or other external device such as their respective companies. (7)-1 2/2 Owner's Manual 5 Even when the [ ](Standby/On) switch is not permitted under relevant laws. Any violation of personal use is in the vicinity of a TV, ... or other external device such as the original. • This device is left, the wooden parts may be lost or destroyed. Yamaha cannot be held responsible for your personal use. • This product incorporates and bundles computer programs and contents in which...
Owner's Manual
Page 6
...accurately played by any GM-compatible tone generator, regardless of Yamaha's high-quality XG tone generation format. The GM mark is affixed to the MIDI standard which uses a unique conversion system to the reduced set of chord types. 6 Owner's Manual The instrument is capable of displaying lyrics when an XF...System Level. However, keep in mind that any XG song data using an XGlite tone generator. STYLE FILE The Style File Format is Yamaha's original style file format which ensures that some songs may play back any GM-compatible music data can play back differently compared to ...
...accurately played by any GM-compatible tone generator, regardless of Yamaha's high-quality XG tone generation format. The GM mark is affixed to the MIDI standard which uses a unique conversion system to the reduced set of chord types. 6 Owner's Manual The instrument is capable of displaying lyrics when an XF...System Level. However, keep in mind that any XG song data using an XGlite tone generator. STYLE FILE The Style File Format is Yamaha's original style file format which ensures that some songs may play back any GM-compatible music data can play back differently compared to ...
Owner's Manual
Page 7
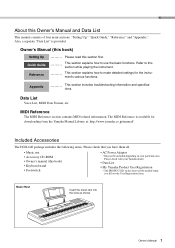
... section explains how to make detailed settings for downloading from the Yamaha Manual Library at: http://www.yamaha.co.jp/manual/ Included Accessories The DGX-640 package includes the following items. Please check that you fill out the User Registration form. The MIDI Reference is provided. Owner's Manual 7 Refer to use the basic functions. tions. Please check with...
... section explains how to make detailed settings for downloading from the Yamaha Manual Library at: http://www.yamaha.co.jp/manual/ Included Accessories The DGX-640 package includes the following items. Please check that you fill out the User Registration form. The MIDI Reference is provided. Owner's Manual 7 Refer to use the basic functions. tions. Please check with...
Owner's Manual
Page 8
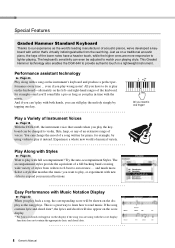
... of the lower notes have to read music. Just as on the left- Play a Variety of Instrument Voices Page 18 With the DGX-640, the instrument voice that matches the music you play on the keyboard-alternately on a traditional acoustic piano, the keys of styles from ...you play , or experiment with the music. Easy Performance with the score display function does not contain the appropriate lyric and chord data. 8 Owner's Manual and much more responsive to lighter playing. and right-hand ranges of voices. Experience a whole new world of musical variety. This Graded Hammer...
... of the lower notes have to read music. Just as on the left- Play a Variety of Instrument Voices Page 18 With the DGX-640, the instrument voice that matches the music you play on the keyboard-alternately on a traditional acoustic piano, the keys of styles from ...you play , or experiment with the music. Easy Performance with the score display function does not contain the appropriate lyric and chord data. 8 Owner's Manual and much more responsive to lighter playing. and right-hand ranges of voices. Experience a whole new world of musical variety. This Graded Hammer...

Owner's Manual
Page 9
Contents Setting Up Quick Guide About this Owner's Manual and Data List 7 Included Accessories 7 Special Features 8 Setting Up Setting Up 10 Keyboard Stand Assembly 10 Power Requirements 13 Connecting Headphones (PHONES/OUTPUT Jack) .....13 ... Notices about the CD-ROM 102 CD-ROM Contents 103 System Requirements 104 Software Installation 104 Appendix Troubleshooting 109 Messages 110 Specifications 112 Index 113 Owner's Manual 9 Reference Appendix
Contents Setting Up Quick Guide About this Owner's Manual and Data List 7 Included Accessories 7 Special Features 8 Setting Up Setting Up 10 Keyboard Stand Assembly 10 Power Requirements 13 Connecting Headphones (PHONES/OUTPUT Jack) .....13 ... Notices about the CD-ROM 102 CD-ROM Contents 103 System Requirements 104 Software Installation 104 Appendix Troubleshooting 109 Messages 110 Specifications 112 Index 113 Owner's Manual 9 Reference Appendix
Owner's Manual
Page 10
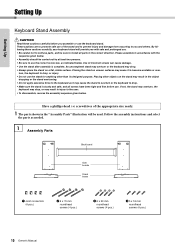
... Back board Side boards Stand bases q Joint connectors (4 pcs.) w 6 x 70 mm roundhead screws (4 pcs.) e 6 x 30 mm roundhead screws (4 pcs.) r 5 x 16 mm roundhead screws (4 pcs.) 10 Owner's Manual turn, the keyboard to drop, or injury. • Do not use the stand for anything other objects on uneven surfaces may result in injury to...
... Back board Side boards Stand bases q Joint connectors (4 pcs.) w 6 x 70 mm roundhead screws (4 pcs.) e 6 x 30 mm roundhead screws (4 pcs.) r 5 x 16 mm roundhead screws (4 pcs.) 10 Owner's Manual turn, the keyboard to drop, or injury. • Do not use the stand for anything other objects on uneven surfaces may result in injury to...

Owner's Manual
Page 11
... see the screw head on the boards. Attach the "L" (Left) and "R" (Right) stand bases to drop the back board or touch the sharp metal fittings. Owner's Manual 11 CAUTION • Be careful not to the bottom of the stand bases. Insert the joint connectors q into the side boards as shown. The joint...
... see the screw head on the boards. Attach the "L" (Left) and "R" (Right) stand bases to drop the back board or touch the sharp metal fittings. Owner's Manual 11 CAUTION • Be careful not to the bottom of the stand bases. Insert the joint connectors q into the side boards as shown. The joint...
Owner's Manual
Page 12
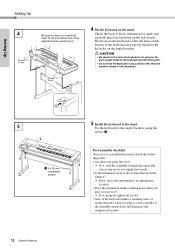
... you might have made. • Is the instrument clear of doors and other than the position shown in the illustration. 5 r 5 x 16 mm roundhead screws 12 Owner's Manual 5 Install the keyboard to the stand. Slowly move it? If so, properly tighten all screws. Check the back-to the angle brackets, using the...
... you might have made. • Is the instrument clear of doors and other than the position shown in the illustration. 5 r 5 x 16 mm roundhead screws 12 Owner's Manual 5 Install the keyboard to the stand. Slowly move it? If so, properly tighten all screws. Check the back-to the angle brackets, using the...
Owner's Manual
Page 13
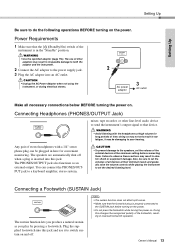
... of all necessary connections below BEFORE turning the power on and off when a plug is properly connected to do the following operations BEFORE turning on . Owner's Manual 13 Setting Up Setting Up Be sure to the SUSTAIN jack before connecting them. WARNING • Use the specified adaptor (page 112). CAUTION • Unplug...
... of all necessary connections below BEFORE turning the power on and off when a plug is properly connected to do the following operations BEFORE turning on . Owner's Manual 13 Setting Up Setting Up Be sure to the SUSTAIN jack before connecting them. WARNING • Use the specified adaptor (page 112). CAUTION • Unplug...

Owner's Manual
Page 14
... soft pedal will not be sustained. When you use the damper pedal to those notes will sustain as long as you hold the pedal. 14 Owner's Manual A "half-pedal" effect lets you press the sostenuto pedal here while holding the note, the note will sustain as long as if the damper pedal...
... soft pedal will not be sustained. When you use the damper pedal to those notes will sustain as long as you hold the pedal. 14 Owner's Manual A "half-pedal" effect lets you press the sostenuto pedal here while holding the note, the note will sustain as long as if the damper pedal...
Owner's Manual
Page 15
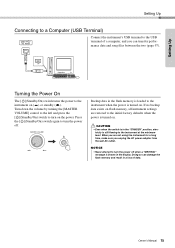
... and song files between the two (page 97). When you are restored to the initial factory defaults when the power is turned on the power. Owner's Manual 15 CAUTION • Even when the switch is still flowing to the instrument at the minimum level. message is shown in the "STANDBY" position, electricity...
... and song files between the two (page 97). When you are restored to the initial factory defaults when the power is turned on the power. Owner's Manual 15 CAUTION • Even when the switch is still flowing to the instrument at the minimum level. message is shown in the "STANDBY" position, electricity...
Owner's Manual
Page 16
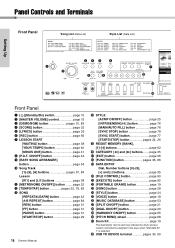
...] button page 42 [A-B REPEAT] button page 84 [REW] button page 31 [FF] button page 31 [PAUSE] button page 31 [START/STOP] button page 29 16 Owner's Manual !4 STYLE [ACMP ON/OFF] button page 25 [INTRO/ENDING/rit.] button page 76 [MAIN/AUTO FILL] button page 76 [SYNC STOP] button page 78 [SYNC...
...] button page 42 [A-B REPEAT] button page 84 [REW] button page 31 [FF] button page 31 [PAUSE] button page 31 [START/STOP] button page 29 16 Owner's Manual !4 STYLE [ACMP ON/OFF] button page 25 [INTRO/ENDING/rit.] button page 76 [MAIN/AUTO FILL] button page 76 [SYNC STOP] button page 78 [SYNC...

Owner's Manual
Page 17
Setting Up Display (page 36) Voice List (Data List) Panel Controls and Terminals Music Database List (Data List) !9 !6 !7 !8 @2 @3 @4 @5 @6 @0 #2 @1 @7 @8 @9 #0 #1 Rear Panel #3 #4 #5 #6 #7 #8 Rear Panel #3 CONTRAST knob page 37 #4 USB TO HOST terminal page 97 #5 SUSTAIN jack page 13 #6 PEDAL UNIT jack page 14 #7 PHONES/OUTPUT jack page 13 #8 DC IN jack page 13 Owner's Manual 17
Setting Up Display (page 36) Voice List (Data List) Panel Controls and Terminals Music Database List (Data List) !9 !6 !7 !8 @2 @3 @4 @5 @6 @0 #2 @1 @7 @8 @9 #0 #1 Rear Panel #3 #4 #5 #6 #7 #8 Rear Panel #3 CONTRAST knob page 37 #4 USB TO HOST terminal page 97 #5 SUSTAIN jack page 13 #6 PEDAL UNIT jack page 14 #7 PHONES/OUTPUT jack page 13 #8 DC IN jack page 13 Owner's Manual 17
Owner's Manual
Page 18
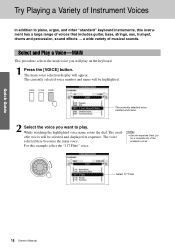
... "117 Flute" voice. The currently selected voice number and name will be highlighted. The voice selected here becomes the main voice. Select 117 Flute 18 Owner's Manual The currently selected voice number and name 2 Select the voice you will appear.
... "117 Flute" voice. The currently selected voice number and name will be highlighted. The voice selected here becomes the main voice. Select 117 Flute 18 Owner's Manual The currently selected voice number and name 2 Select the voice you will appear.
Owner's Manual
Page 19
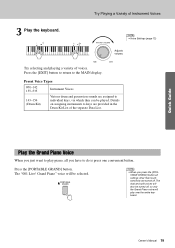
... voices. Details on assigning instruments to the MAIN display. Play the Grand Piano Voice When you just want to do is press one convenient button. Owner's Manual 19 Grand Piano" voice will also be played.
... voices. Details on assigning instruments to the MAIN display. Play the Grand Piano Voice When you just want to do is press one convenient button. Owner's Manual 19 Grand Piano" voice will also be played.
Owner's Manual
Page 20
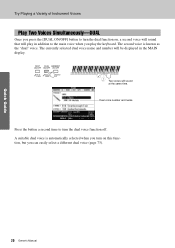
... press the [DUAL ON/OFF] button to turn the dual function on this function, but you can easily select a different dual voice (page 73). 20 Owner's Manual
... press the [DUAL ON/OFF] button to turn the dual function on this function, but you can easily select a different dual voice (page 73). 20 Owner's Manual


