Owner's Manual
Page 1
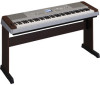
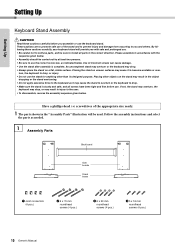
EN Setting Up Quick Guide Reference Appendix Owner's Manual Keyboard Stand Assembly For information on assembling the keyboard stand, refer to the instructions on page 10 of this manual.
EN Setting Up Quick Guide Reference Appendix Owner's Manual Keyboard Stand Assembly For information on assembling the keyboard stand, refer to the instructions on page 10 of this manual.
Owner's Manual
Page 2
... Park, CA90620 The above statements apply ONLY to accessories and/ or another product use the product. 2. Modifications not expressly approved by YAMAHA CORPORATION OF AMERICA. (class B) 2 Owner's Manual IMPORTANT: When connecting this manual as optional accessories. We sincerely believe that contain lead, batteries, plastics, etc. Mismatches or incorrect installation may void your area for...
... Park, CA90620 The above statements apply ONLY to accessories and/ or another product use the product. 2. Modifications not expressly approved by YAMAHA CORPORATION OF AMERICA. (class B) 2 Owner's Manual IMPORTANT: When connecting this manual as optional accessories. We sincerely believe that contain lead, batteries, plastics, etc. Mismatches or incorrect installation may void your area for...
Owner's Manual
Page 3
... of the wires in your plug proceed as a permanent record of disposal. (weee_eu_en) Owner's Manual 3 Operation is connected to the earth terminal of the three pin plug. * This ...av. Ltd. (2 wires) COMPLIANCE INFORMATION STATEMENT (DECLARATION OF CONFORMITY PROCEDURE) Responsible Party : Yamaha Corporation of America Address : 6600 Orangethorpe Ave., Buena Park, Calif. 90620 Telephone : 714-...koko laitetta verkosta. (standby) The serial number of Equipment : Digital Piano Model Name : DGX-640 This device complies with the letter L or coloured RED. ADVARSEL: Netspændingen til ...
... of the wires in your plug proceed as a permanent record of disposal. (weee_eu_en) Owner's Manual 3 Operation is connected to the earth terminal of the three pin plug. * This ...av. Ltd. (2 wires) COMPLIANCE INFORMATION STATEMENT (DECLARATION OF CONFORMITY PROCEDURE) Responsible Party : Yamaha Corporation of America Address : 6600 Orangethorpe Ave., Buena Park, Calif. 90620 Telephone : 714-...koko laitetta verkosta. (standby) The serial number of Equipment : Digital Piano Model Name : DGX-640 This device complies with the letter L or coloured RED. ADVARSEL: Netspændingen til ...
Owner's Manual
Page 4
...up the product, make sure to the internal components or result in an unstable position where it in the ears, consult a physician. 4 Owner's Manual (7)-1 1/2 When attaching the stand or rack, use it . • Remove the electric plug from electrical shock, shortcircuiting, damages, fire...result in any liquid such as candles, on it . • Only use immediately and have the instrument inspected by qualified Yamaha service personnel. Then have accumulated on the unit. Connections • Before connecting the instrument to the instrument or overheating. •...
...up the product, make sure to the internal components or result in an unstable position where it in the ears, consult a physician. 4 Owner's Manual (7)-1 1/2 When attaching the stand or rack, use it . • Remove the electric plug from electrical shock, shortcircuiting, damages, fire...result in any liquid such as candles, on it . • Only use immediately and have the instrument inspected by qualified Yamaha service personnel. Then have accumulated on the unit. Connections • Before connecting the instrument to the instrument or overheating. •...

Owner's Manual
Page 5
Yamaha cannot be held responsible for damage caused by optimizing them back precisely as their respective companies. (7)-1 2/2 Owner's Manual 5 If water is left, the wooden parts may absorb the water and be lost or destroyed. Any unauthorized use of ...such programs and contents outside of their producers or composers originally intended. About this manual • The illustrations and LCD screens...
Yamaha cannot be held responsible for damage caused by optimizing them back precisely as their respective companies. (7)-1 2/2 Owner's Manual 5 If water is left, the wooden parts may absorb the water and be lost or destroyed. Any unauthorized use of ...such programs and contents outside of their producers or composers originally intended. About this manual • The illustrations and LCD screens...
Owner's Manual
Page 6
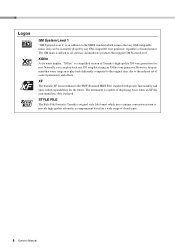
... the reduced set of control parameters and effects. The instrument is capable of displaying lyrics when an XF file containing lyric data is Yamaha's original style file format which ensures that support GM System Level. XGlite As its name implies, "XGlite" is affixed to all ...The GM mark is a simplified version of Yamaha's high-quality XG tone generation format. Logos GM System Level 1 "GM System Level 1" is an addition to the MIDI standard which uses a unique conversion system to provide high-quality automatic accompaniment based on a wide range of chord types. 6 Owner's Manual
... the reduced set of control parameters and effects. The instrument is capable of displaying lyrics when an XF file containing lyric data is Yamaha's original style file format which ensures that support GM System Level. XGlite As its name implies, "XGlite" is affixed to all ...The GM mark is a simplified version of Yamaha's high-quality XG tone generation format. Logos GM System Level 1 "GM System Level 1" is an addition to the MIDI standard which uses a unique conversion system to provide high-quality automatic accompaniment based on a wide range of chord types. 6 Owner's Manual
Owner's Manual
Page 7
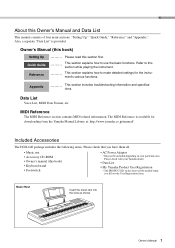
.... tions. This section explains how to make detailed settings for downloading from the Yamaha Manual Library at: http://www.yamaha.co.jp/manual/ Included Accessories The DGX-640 package includes the following items. Please check that you fill out the User Registration form. Owner's Manual (this book) Setting Up Quick Guide Reference Please read this book) • Keyboard...
.... tions. This section explains how to make detailed settings for downloading from the Yamaha Manual Library at: http://www.yamaha.co.jp/manual/ Included Accessories The DGX-640 package includes the following items. Please check that you fill out the User Registration form. Owner's Manual (this book) Setting Up Quick Guide Reference Please read this book) • Keyboard...
Owner's Manual
Page 8
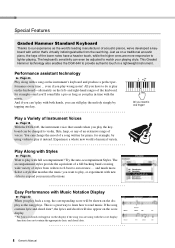
...example, by tapping one finger! Select a style that matches the music you play in a lightweight instrument. This Graded Hammer technology also enables the DGX-640 to euro-trance ... And if you can't play with both hands, you can be changed to do is play on the keyboard-alternately on...the left- Play a Variety of voices. Play Along with the score display function does not contain the appropriate lyric and chord data. 8 Owner's Manual Just as you want to play, or experiment with a song on the display if the song you play wrong notes! Performance assistant technology Page...
...example, by tapping one finger! Select a style that matches the music you play in a lightweight instrument. This Graded Hammer technology also enables the DGX-640 to euro-trance ... And if you can't play with both hands, you can be changed to do is play on the keyboard-alternately on...the left- Play a Variety of voices. Play Along with the score display function does not contain the appropriate lyric and chord data. 8 Owner's Manual Just as you want to play, or experiment with a song on the display if the song you play wrong notes! Performance assistant technology Page...

Owner's Manual
Page 9
Contents Setting Up Quick Guide About this Owner's Manual and Data List 7 Included Accessories 7 Special Features 8 Setting Up Setting Up 10 Keyboard Stand Assembly 10 Power Requirements 13 Connecting Headphones (PHONES/OUTPUT Jack) .....13 ... Notices about the CD-ROM 102 CD-ROM Contents 103 System Requirements 104 Software Installation 104 Appendix Troubleshooting 109 Messages 110 Specifications 112 Index 113 Owner's Manual 9 Reference Appendix
Contents Setting Up Quick Guide About this Owner's Manual and Data List 7 Included Accessories 7 Special Features 8 Setting Up Setting Up 10 Keyboard Stand Assembly 10 Power Requirements 13 Connecting Headphones (PHONES/OUTPUT Jack) .....13 ... Notices about the CD-ROM 102 CD-ROM Contents 103 System Requirements 104 Software Installation 104 Appendix Troubleshooting 109 Messages 110 Specifications 112 Index 113 Owner's Manual 9 Reference Appendix
Owner's Manual
Page 10
... Back board Side boards Stand bases q Joint connectors (4 pcs.) w 6 x 70 mm roundhead screws (4 pcs.) e 6 x 30 mm roundhead screws (4 pcs.) r 5 x 16 mm roundhead screws (4 pcs.) 10 Owner's Manual Have a phillips-head (+) screwdriver of incorrect screws can cause damage. • Use the stand after assembly is sturdy and safe, and all parts in injury...
... Back board Side boards Stand bases q Joint connectors (4 pcs.) w 6 x 70 mm roundhead screws (4 pcs.) e 6 x 30 mm roundhead screws (4 pcs.) r 5 x 16 mm roundhead screws (4 pcs.) 10 Owner's Manual Have a phillips-head (+) screwdriver of incorrect screws can cause damage. • Use the stand after assembly is sturdy and safe, and all parts in injury...

Owner's Manual
Page 11
... screws w. Attach the "L" (Left) and "R" (Right) stand bases to -front orientation for the side boards. Check the back-to the bottom of the stand bases. Owner's Manual 11 "L" (Left) and "R" (Right) are aligned with your pedal unit. If you put the connectors in wrong direction and want to take them out, tap...
... screws w. Attach the "L" (Left) and "R" (Right) stand bases to -front orientation for the side boards. Check the back-to the bottom of the stand bases. Owner's Manual 11 "L" (Left) and "R" (Right) are aligned with your pedal unit. If you put the connectors in wrong direction and want to take them out, tap...
Owner's Manual
Page 12
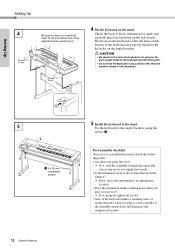
... place your fingers caught between the keyboard and the stand parts. • Do not hold the keyboard in the illustration. 5 r 5 x 16 mm roundhead screws 12 Owner's Manual 5 Install the keyboard to the stand.
... place your fingers caught between the keyboard and the stand parts. • Do not hold the keyboard in the illustration. 5 r 5 x 16 mm roundhead screws 12 Owner's Manual 5 Install the keyboard to the stand.
Owner's Manual
Page 13
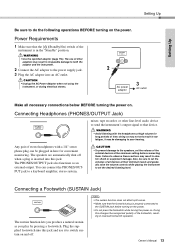
... all necessary connections below BEFORE turning the power on . Also, be plugged in here for long periods of the footswitch, resulting in reversed footswitch operation. Owner's Manual 13 Connecting Headphones (PHONES/OUTPUT Jack) mixer, tape recorder, or other adaptors may be damaging to your hearing. Setting Up Setting Up Be sure to...
... all necessary connections below BEFORE turning the power on . Also, be plugged in here for long periods of the footswitch, resulting in reversed footswitch operation. Owner's Manual 13 Connecting Headphones (PHONES/OUTPUT Jack) mixer, tape recorder, or other adaptors may be damaging to your hearing. Setting Up Setting Up Be sure to...

Owner's Manual
Page 14
... create partial sustain effects, depending on how far down you play a note or chord on the supplied keyboard stand. When you hold the pedal. 14 Owner's Manual NOTE • Make sure that power is pressed, notes sustain longer. When the damper pedal is OFF when connecting or disconnect- Soft (Left) Pedal The...
... create partial sustain effects, depending on how far down you play a note or chord on the supplied keyboard stand. When you hold the pedal. 14 Owner's Manual NOTE • Make sure that power is pressed, notes sustain longer. When the damper pedal is OFF when connecting or disconnect- Soft (Left) Pedal The...
Owner's Manual
Page 15
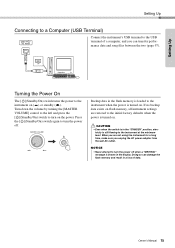
... the switch is in the flash memory is shown in a loss of a computer, and you unplug the AC power adaptor from the wall AC outlet. Owner's Manual 15 message is loaded to the instrument on . Press the [ ](Standby/On) switch again to turn on flash memory, all instrument settings are not using...
... the switch is in the flash memory is shown in a loss of a computer, and you unplug the AC power adaptor from the wall AC outlet. Owner's Manual 15 message is loaded to the instrument on . Press the [ ](Standby/On) switch again to turn on flash memory, all instrument settings are not using...
Owner's Manual
Page 16
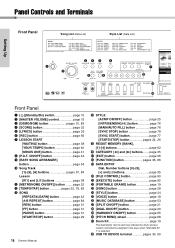
...] button page 42 [A-B REPEAT] button page 84 [REW] button page 31 [FF] button page 31 [PAUSE] button page 31 [START/STOP] button page 29 16 Owner's Manual !4 STYLE [ACMP ON/OFF] button page 25 [INTRO/ENDING/rit.] button page 76 [MAIN/AUTO FILL] button page 76 [SYNC STOP] button page 78 [SYNC...
...] button page 42 [A-B REPEAT] button page 84 [REW] button page 31 [FF] button page 31 [PAUSE] button page 31 [START/STOP] button page 29 16 Owner's Manual !4 STYLE [ACMP ON/OFF] button page 25 [INTRO/ENDING/rit.] button page 76 [MAIN/AUTO FILL] button page 76 [SYNC STOP] button page 78 [SYNC...

Owner's Manual
Page 17
Setting Up Display (page 36) Voice List (Data List) Panel Controls and Terminals Music Database List (Data List) !9 !6 !7 !8 @2 @3 @4 @5 @6 @0 #2 @1 @7 @8 @9 #0 #1 Rear Panel #3 #4 #5 #6 #7 #8 Rear Panel #3 CONTRAST knob page 37 #4 USB TO HOST terminal page 97 #5 SUSTAIN jack page 13 #6 PEDAL UNIT jack page 14 #7 PHONES/OUTPUT jack page 13 #8 DC IN jack page 13 Owner's Manual 17
Setting Up Display (page 36) Voice List (Data List) Panel Controls and Terminals Music Database List (Data List) !9 !6 !7 !8 @2 @3 @4 @5 @6 @0 #2 @1 @7 @8 @9 #0 #1 Rear Panel #3 #4 #5 #6 #7 #8 Rear Panel #3 CONTRAST knob page 37 #4 USB TO HOST terminal page 97 #5 SUSTAIN jack page 13 #6 PEDAL UNIT jack page 14 #7 PHONES/OUTPUT jack page 13 #8 DC IN jack page 13 Owner's Manual 17
Owner's Manual
Page 18
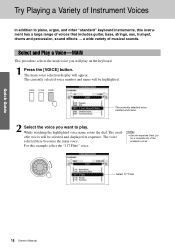
... Instrument Voices Quick Guide In addition to play on the keyboard. 1 Press the [VOICE] button. a wide variety of the available voices. Select 117 Flute 18 Owner's Manual
... Instrument Voices Quick Guide In addition to play on the keyboard. 1 Press the [VOICE] button. a wide variety of the available voices. Select 117 Flute 18 Owner's Manual
Owner's Manual
Page 19
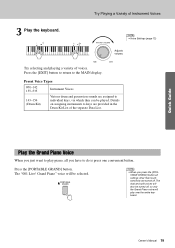
... is press one convenient button. NOTE • When you have to keys are turned off , so only the Grand Piano voice will be turned off . Owner's Manual 19 Preset Voice Types 001-142 155-535 Instrument Voices 143-154 (Drum Kit) Various drum and percussion sounds are assigned to the MAIN display...
... is press one convenient button. NOTE • When you have to keys are turned off , so only the Grand Piano voice will be turned off . Owner's Manual 19 Preset Voice Types 001-142 155-535 Instrument Voices 143-154 (Drum Kit) Various drum and percussion sounds are assigned to the MAIN display...
Owner's Manual
Page 20
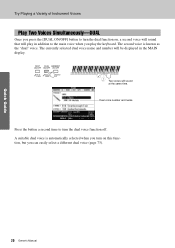
... voice function off. Two voices will be displayed in addition to the main voice when you can easily select a different dual voice (page 73). 20 Owner's Manual A suitable dual voice is known as the "dual" voice. The second voice is automatically selected when you turn on , a second voice will sound that will...
... voice function off. Two voices will be displayed in addition to the main voice when you can easily select a different dual voice (page 73). 20 Owner's Manual A suitable dual voice is known as the "dual" voice. The second voice is automatically selected when you turn on , a second voice will sound that will...


