Data List
Page 4
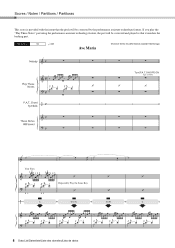
ON/OFF] ON Type =CHORD Your Turn. Scores / Noten / Partitions / Partituras This score is provided with the intent that it matches the backing part. Repeatedly Play the Same Key. 4 Data List/Datenliste/Liste des données/Lista de datos Song No. 10 q =61 Ave Maria (Function Demo for performance assistant technology) Turn [P.A.T. If you play the "Play These Notes" part using the performance assistant technology feature, the part will be corrected and played so that the pitch will be corrected by the performance assistant technology feature.
ON/OFF] ON Type =CHORD Your Turn. Scores / Noten / Partitions / Partituras This score is provided with the intent that it matches the backing part. Repeatedly Play the Same Key. 4 Data List/Datenliste/Liste des données/Lista de datos Song No. 10 q =61 Ave Maria (Function Demo for performance assistant technology) Turn [P.A.T. If you play the "Play These Notes" part using the performance assistant technology feature, the part will be corrected and played so that the pitch will be corrected by the performance assistant technology feature.
Data List
Page 6
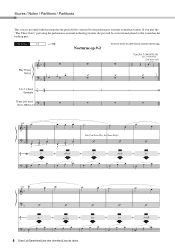
ON/OFF] ON Type =CHORD/FREE 6 Data List/Datenliste/Liste des données/Lista de datos Scores / Noten / Partitions / Partituras This score is provided with the intent that the pitch will be corrected by the performance assistant technology feature. Song No. 11 q =108 Nocturne op.9-2 (Function Demo for performance assistant technology) Turn [P.A.T. If you play the "Play These Notes" part using the performance assistant technology feature, the part will be corrected and played so that it matches the backing part.
ON/OFF] ON Type =CHORD/FREE 6 Data List/Datenliste/Liste des données/Lista de datos Scores / Noten / Partitions / Partituras This score is provided with the intent that the pitch will be corrected by the performance assistant technology feature. Song No. 11 q =108 Nocturne op.9-2 (Function Demo for performance assistant technology) Turn [P.A.T. If you play the "Play These Notes" part using the performance assistant technology feature, the part will be corrected and played so that it matches the backing part.
Data List
Page 24
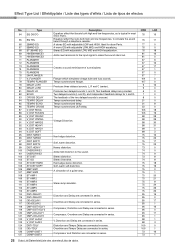
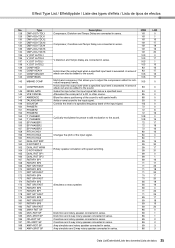
... are connected in series. The feedback of the two delayed sounds is typical in series. Two delayed sounds (L and R), and independent feedback delays for drum Parts. Tempo synchronized delay. A simulation of a jet airplane. A mono EQ with adjustable LOW, MID, and HIGH equalizing. Flanger which simulates vintage tube and fuzz sounds. Soft...
... are connected in series. The feedback of the two delayed sounds is typical in series. Two delayed sounds (L and R), and independent feedback delays for drum Parts. Tempo synchronized delay. A simulation of a jet airplane. A mono EQ with adjustable LOW, MID, and HIGH equalizing. Flanger which simulates vintage tube and fuzz sounds. Soft...
Data List
Page 25
Holds down the output level when a specified input level is exceeded. Multi-band compressor that allows you to the input signal. Attenuates the vocal part of the input signal. Adds a vowel sound to adjust the compression effect for individual frequency bands. Cyclically modulates the phase to add modulation to the ...
Holds down the output level when a specified input level is exceeded. Multi-band compressor that allows you to the input signal. Attenuates the vocal part of the input signal. Adds a vowel sound to adjust the compression effect for individual frequency bands. Cyclically modulates the phase to add modulation to the ...
Owner's Manual
Page 2
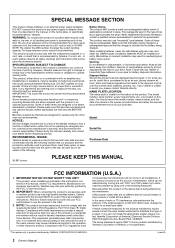
...) circuits or install AC line filter/s. DO NOT connect this manual, meets FCC requirements. Benches supplied by YAMAHA CORPORATION OF AMERICA. (class B) 2 Owner's Manual This product, either this product is found in FCC Regulations, Part 15 for some reason its subsidiaries. * This applies only to accessories and/ or another product use "household...
...) circuits or install AC line filter/s. DO NOT connect this manual, meets FCC requirements. Benches supplied by YAMAHA CORPORATION OF AMERICA. (class B) 2 Owner's Manual This product, either this product is found in FCC Regulations, Part 15 for some reason its subsidiaries. * This applies only to accessories and/ or another product use "household...
Owner's Manual
Page 3
...) COMPLIANCE INFORMATION STATEMENT (DECLARATION OF CONFORMITY PROCEDURE) Responsible Party : Yamaha Corporation of America Address : 6600 Orangethorpe Ave., Buena Park, Calif. 90620 Telephone : 714-522-9011 Type of Equipment : Digital Piano Model Name : DGX-640 This device complies with the coloured makings identifying the terminals in the... and electronic products should note this serial number in the space provided below and retain this product may not correspond with Part 15 of sale where you purchased the items. [For business users in your plug proceed as a permanent record of ...
...) COMPLIANCE INFORMATION STATEMENT (DECLARATION OF CONFORMITY PROCEDURE) Responsible Party : Yamaha Corporation of America Address : 6600 Orangethorpe Ave., Buena Park, Calif. 90620 Telephone : 714-522-9011 Type of Equipment : Digital Piano Model Name : DGX-640 This device complies with the coloured makings identifying the terminals in the... and electronic products should note this serial number in the space provided below and retain this product may not correspond with Part 15 of sale where you purchased the items. [For business users in your plug proceed as a permanent record of ...
Owner's Manual
Page 4
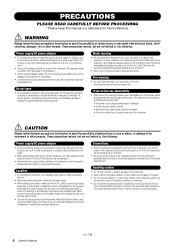
...at the minimum level. Then have accumulated on the buttons, switches or connectors. • Do not use excessive force on it inspected by Yamaha service personnel. • The power cord or plug becomes frayed or damaged. • It emits unusual smells or smoke. • Some...; Only use the provided screws only. Do not open • This instrument contains no user-serviceable parts. If you notice any openings. Then have the device inspected by qualified Yamaha service personnel. These precautions include, but are not limited to unplug the power cord from the outlet....
...at the minimum level. Then have accumulated on the buttons, switches or connectors. • Do not use excessive force on it inspected by Yamaha service personnel. • The power cord or plug becomes frayed or damaged. • It emits unusual smells or smoke. • Some...; Only use the provided screws only. Do not open • This instrument contains no user-serviceable parts. If you notice any openings. Then have the device inspected by qualified Yamaha service personnel. These precautions include, but are not limited to unplug the power cord from the outlet....

Owner's Manual
Page 5
...using the instrument for instructional purposes only, and may be damaged. Always turn the power off when the instrument is left, the wooden parts may generate noise. • Do not expose the instrument to excessive dust or vibrations, or extreme cold or heat (such as ...About copyrights • Copying of music data by improper use . • This product incorporates and bundles computer programs and contents in which Yamaha owns copyrights or with the device in use paint thinners, solvents, cleaning fluids, or chemical-impregnated wiping cloths. • During extreme changes ...
...using the instrument for instructional purposes only, and may be damaged. Always turn the power off when the instrument is left, the wooden parts may generate noise. • Do not expose the instrument to excessive dust or vibrations, or extreme cold or heat (such as ...About copyrights • Copying of music data by improper use . • This product incorporates and bundles computer programs and contents in which Yamaha owns copyrights or with the device in use paint thinners, solvents, cleaning fluids, or chemical-impregnated wiping cloths. • During extreme changes ...
Owner's Manual
Page 10
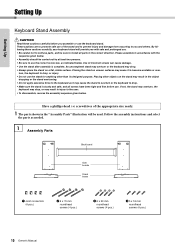
...keyboard stand. Placing the stand on a flat, stable surface. Have a phillips-head (+) screwdriver of the appropriate size ready. 1 The parts shown in injury to use . By following these cautions carefully before use the correct screw size, as indicated below . Please assemble in... may cause it may result in the object dropping or the stand overturning. • Do not apply excessive force to the keyboard as needed. 1 Assembly Parts Back board Side boards Stand bases q Joint connectors (4 pcs.) w 6 x 70 mm roundhead screws (4 pcs.) e 6 x 30 mm roundhead screws (4 pcs.) r...
...keyboard stand. Placing the stand on a flat, stable surface. Have a phillips-head (+) screwdriver of the appropriate size ready. 1 The parts shown in injury to use . By following these cautions carefully before use the correct screw size, as indicated below . Please assemble in... may cause it may result in the object dropping or the stand overturning. • Do not apply excessive force to the keyboard as needed. 1 Assembly Parts Back board Side boards Stand bases q Joint connectors (4 pcs.) w 6 x 70 mm roundhead screws (4 pcs.) e 6 x 30 mm roundhead screws (4 pcs.) r...
Owner's Manual
Page 12
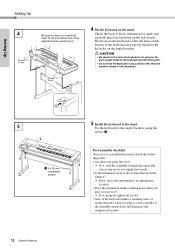
Setting Up Setting Up 4 At least 10 cm Be sure to place your fingers caught between the keyboard and the stand parts. • Do not hold the keyboard in the illustration. 5 r 5 x 16 mm roundhead screws 12 Owner's Manual 5 Install the keyboard to an appropriate location. ...and carefully place the keyboard on the stand. Post-assembly checklist Once you've assembled the stand, check the following points: • Are there any parts left over? If so, read the assembly instructions again and correct any position other movable fixtures? If not, move the instrument...
Setting Up Setting Up 4 At least 10 cm Be sure to place your fingers caught between the keyboard and the stand parts. • Do not hold the keyboard in the illustration. 5 r 5 x 16 mm roundhead screws 12 Owner's Manual 5 Install the keyboard to an appropriate location. ...and carefully place the keyboard on the stand. Post-assembly checklist Once you've assembled the stand, check the following points: • Are there any parts left over? If so, read the assembly instructions again and correct any position other movable fixtures? If not, move the instrument...
Owner's Manual
Page 24
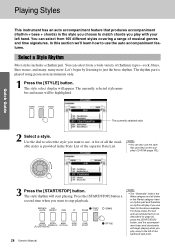
... signatures. The style rhythm will be highlighted. The currently selected style 2 Select a style. A list of all styles in the Pianist category have no rhythm part and therefore no rhythm will appear. For these styles first turn auto accompaniment on as described on the supplied CD-ROM (page 102). You can.... Let's begin by listening to use the style files provided on page 25, press the [START/STOP] button, and the accompaniment bass and chord parts will begin playing when you play a key to the left hand. Use the dial to select the style you use . The style select display will...
... signatures. The style rhythm will be highlighted. The currently selected style 2 Select a style. A list of all styles in the Pianist category have no rhythm part and therefore no rhythm will appear. For these styles first turn auto accompaniment on as described on the supplied CD-ROM (page 102). You can.... Let's begin by listening to use the style files provided on page 25, press the [START/STOP] button, and the accompaniment bass and chord parts will begin playing when you play a key to the left hand. Use the dial to select the style you use . The style select display will...
Owner's Manual
Page 38
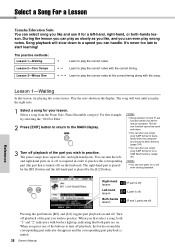
...Song numbers 10 and 11 are function demos for a left-hand, right-hand, or both parts are off playback of the buttons to turn the leftand right-hand parts on the keyboard. Select a Song For a Lesson Yamaha Education Suite You can select song you wish to practice. During the lesson you can play... wrong notes. The lesson function cannot be used with the song. When you can handle. Song playback will wait until you press one of the part you can even play as...
...Song numbers 10 and 11 are function demos for a left-hand, right-hand, or both parts are off playback of the buttons to turn the leftand right-hand parts on the keyboard. Select a Song For a Lesson Yamaha Education Suite You can select song you wish to practice. During the lesson you can play... wrong notes. The lesson function cannot be used with the song. When you can handle. Song playback will wait until you press one of the part you can even play as...

Owner's Manual
Page 40
... you are playing at the correct timing. The song will increase until eventually you'll be playing at your own pace. 1 Select the song and part you want to practice (steps 1 and 3 on page 38). 2 Start Lesson 2. The triangular marker will appear in the score display, and will begin automatically when...
... you are playing at the correct timing. The song will increase until eventually you'll be playing at your own pace. 1 Select the song and part you want to practice (steps 1 and 3 on page 38). 2 Start Lesson 2. The triangular marker will appear in the score display, and will begin automatically when...

Owner's Manual
Page 41
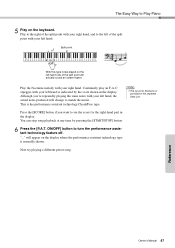
...'s where you have chosen to play . Press the [Minus One] button to the song. Play along while listening to the song. 1 Select the song and part you want to practice (steps 1 and 3 on page 38). 2 Start Lesson 3. Song playback will play at any time by pressing the [START/STOP] button. The... 3 Stop the Lesson mode. The song will begin automatically when Lesson 3 is selected. You can stop the Lesson mode at the normal tempo, minus the part you can perfect your technique. Play along while listening to start Lesson 3. Owner's Manual 41 Reference
...'s where you have chosen to play . Press the [Minus One] button to the song. Play along while listening to the song. 1 Select the song and part you want to practice (steps 1 and 3 on page 38). 2 Start Lesson 3. Song playback will play at any time by pressing the [START/STOP] button. The... 3 Stop the Lesson mode. The song will begin automatically when Lesson 3 is selected. You can stop the Lesson mode at the normal tempo, minus the part you can perfect your technique. Play along while listening to start Lesson 3. Owner's Manual 41 Reference
Owner's Manual
Page 47
NOTE • The score for the right-hand part in the display. ON/OFF] button to Play Piano 5 Play on the keyboard. Next try playing a different preset song. Continually play an F-A-C arpeggio with your ...
NOTE • The score for the right-hand part in the display. ON/OFF] button to Play Piano 5 Play on the keyboard. Next try playing a different preset song. Continually play an F-A-C arpeggio with your ...

Owner's Manual
Page 57
... will be recorded individually. SONG MEMORY (Track) [1]-[5] .. Next, press the [A] button while holding the [REC] button. Record the melody parts. SONG MEMORY (Track) [A]........ Records the style pattern and chord parts. Melody Chords Specify track(s) and record NOTE • Up to approximately 30,000 notes can be recorded for recording. •...
... will be recorded individually. SONG MEMORY (Track) [1]-[5] .. Next, press the [A] button while holding the [REC] button. Record the melody parts. SONG MEMORY (Track) [A]........ Records the style pattern and chord parts. Melody Chords Specify track(s) and record NOTE • Up to approximately 30,000 notes can be recorded for recording. •...

Owner's Manual
Page 58
... [1]-[5] you want to record a melody track, be sure to turn the style track [A] off. Select button [1]-[3] if you want to record only the rhythm (percussion) part, press the [START/STOP] button to 001 and the recorded track numbers in the display will start recording by pressing the [START/STOP] or [REC...
... [1]-[5] you want to record a melody track, be sure to turn the style track [A] off. Select button [1]-[3] if you want to record only the rhythm (percussion) part, press the [START/STOP] button to 001 and the recorded track numbers in the display will start recording by pressing the [START/STOP] or [REC...

Owner's Manual
Page 76
... the basic pattern (A and B), and the Style playback sound changes harmonically based on the selected Style. ENDING section This is used for playing the main part of the Song. The length of the ending (in measures) differs depending on the chords you can play with your left hand. MAIN section This...
... the basic pattern (A and B), and the Style playback sound changes harmonically based on the selected Style. ENDING section This is used for playing the main part of the Song. The length of the ending (in measures) differs depending on the chords you can play with your left hand. MAIN section This...

Owner's Manual
Page 84
Muting Independent Song Tracks Each "track" of a song plays a different part of the section you can change a song's melody voice to any time by pressing the [A-B REPEAT] button. NOTE • Repeat start and end points cannot ... the end point-for repeat playback. As you select different melody voices, only the melody voice changes while the song will now play the muted part on the keyboard yourself, or simply mute tracks other voice you want to . The VOICE SELECT (MELODY R or MELODY L) display will appear so you want...
Muting Independent Song Tracks Each "track" of a song plays a different part of the section you can change a song's melody voice to any time by pressing the [A-B REPEAT] button. NOTE • Repeat start and end points cannot ... the end point-for repeat playback. As you select different melody voices, only the melody voice changes while the song will now play the muted part on the keyboard yourself, or simply mute tracks other voice you want to . The VOICE SELECT (MELODY R or MELODY L) display will appear so you want...
Owner's Manual
Page 88
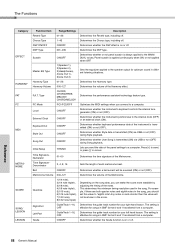
... . Type PC Mode Local External Clock Keyboard Out Style Out Song Out Initial Setup Time Signature Numerator Time Signature Denominator Bell Metronome Volume Quantize Right-Part Left-Part Grade Range/Settings 01-36 1-45 ON/OFF 001-239 ON/OFF 1(Speaker 1), 2(Speaker 2), 3(Headphones), 4(Line Out 1), 5(Line Out 2) 01-26 000-127 CHORD...
... . Type PC Mode Local External Clock Keyboard Out Style Out Song Out Initial Setup Time Signature Numerator Time Signature Denominator Bell Metronome Volume Quantize Right-Part Left-Part Grade Range/Settings 01-36 1-45 ON/OFF 001-239 ON/OFF 1(Speaker 1), 2(Speaker 2), 3(Headphones), 4(Line Out 1), 5(Line Out 2) 01-26 000-127 CHORD...


