Data List
Page 14
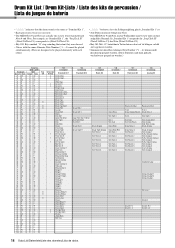
...Kit 1", the "Seq Click H" (Note# 36/Note C1) corresponds to be played simultaneously. (They are actually one octave lower than keyboard Note # and Note. Beispiel: In „Standard Kit 1" entspricht die „Seq Click H" (Note# 36/Note C1) der Note... mit derselben Alternate Note Number (*1 ... 4) können nicht gleichzeitig gespielt werden. (Diese Stimmen sind dazu gedacht, wechselweise gespielt zu werden.) Voice No. MSB/LSB/PC Keyboard MIDI Key Note# Note Note# Note Off 25 C# 0 13 C# -1 26 D 0 14 D -1 27 D# 0 15 D# -1 28 E 0 16 E -1 29 F 0 17 F -1 30 F# 0 18 F# -1 ...
...Kit 1", the "Seq Click H" (Note# 36/Note C1) corresponds to be played simultaneously. (They are actually one octave lower than keyboard Note # and Note. Beispiel: In „Standard Kit 1" entspricht die „Seq Click H" (Note# 36/Note C1) der Note... mit derselben Alternate Note Number (*1 ... 4) können nicht gleichzeitig gespielt werden. (Diese Stimmen sind dazu gedacht, wechselweise gespielt zu werden.) Voice No. MSB/LSB/PC Keyboard MIDI Key Note# Note Note# Note Off 25 C# 0 13 C# -1 26 D 0 14 D -1 27 D# 0 15 D# -1 28 E 0 16 E -1 29 F 0 17 F -1 30 F# 0 18 F# -1 ...
Data List
Page 15
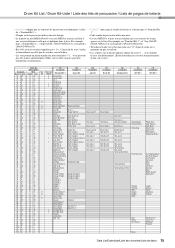
MSB/LSB/PC Keyboard MIDI Key Note# Note Note# Note Off 25 C# 0 13 C# -1 26 D 0 14 D -1 27 D# 0 15 D# -1 28 E 0 16 E -1 29 F 0 17 F -1 30 F# 0 18 F# -1 31 G 0 19 G -1 32 G# 0 20 G# -1 33 A 0 21 A -1 ...
MSB/LSB/PC Keyboard MIDI Key Note# Note Note# Note Off 25 C# 0 13 C# -1 26 D 0 14 D -1 27 D# 0 15 D# -1 28 E 0 16 E -1 29 F 0 17 F -1 30 F# 0 18 F# -1 31 G 0 19 G -1 32 G# 0 20 G# -1 33 A 0 21 A -1 ...
Owner's Manual
Page 1
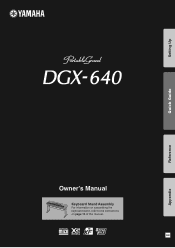
Setting Up Quick Guide Reference Appendix Owner's Manual Keyboard Stand Assembly For information on assembling the keyboard stand, refer to the instructions on page 10 of this manual. EN
Setting Up Quick Guide Reference Appendix Owner's Manual Keyboard Stand Assembly For information on assembling the keyboard stand, refer to the instructions on page 10 of this manual. EN

Owner's Manual
Page 5
...) switch is in the internal memory even if you unplug the power cord from those on the instrument, since this might discolor the panel or keyboard. • When cleaning the instrument, use a soft, dry cloth. When you save your important data onto two USB storage devices/or other ... contents in this device may appear somewhat different from the wall AC outlet. Make sure to wipe any water off immediately with respect to which Yamaha owns copyrights or with a soft cloth. - Saving data • Some data items (page 64) are automatically saved as the original. •...
...) switch is in the internal memory even if you unplug the power cord from those on the instrument, since this might discolor the panel or keyboard. • When cleaning the instrument, use a soft, dry cloth. When you save your important data onto two USB storage devices/or other ... contents in this device may appear somewhat different from the wall AC outlet. Make sure to wipe any water off immediately with respect to which Yamaha owns copyrights or with a soft cloth. - Saving data • Some data items (page 64) are automatically saved as the original. •...
Owner's Manual
Page 7
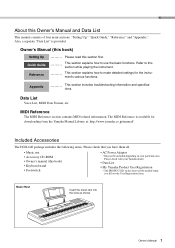
...into the slots as shown. This section explains how to make detailed settings for downloading from the Yamaha Manual Library at: http://www.yamaha.co.jp/manual/ Included Accessories The DGX-640 package includes the following items. Please check that you fill out the User Registration form. ment's... playing the instrument. Refer to use the basic functions. Also, a separate "Data List" is available for the instru- About this book) • Keyboard stand • Footswitch • AC Power Adaptor * May not be needed when you have them all. • Music rest • Accessory CD...
...into the slots as shown. This section explains how to make detailed settings for downloading from the Yamaha Manual Library at: http://www.yamaha.co.jp/manual/ Included Accessories The DGX-640 package includes the following items. Please check that you fill out the User Registration form. ment's... playing the instrument. Refer to use the basic functions. Also, a separate "Data List" is available for the instru- About this book) • Keyboard stand • Footswitch • AC Power Adaptor * May not be needed when you have them all. • Music rest • Accessory CD...
Owner's Manual
Page 8
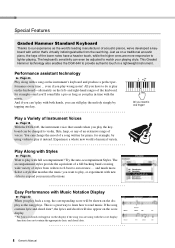
... euro-trance ... All you are more . Play a Variety of Instrument Voices Page 18 With the DGX-640, the instrument voice that matches the music you want to play, or experiment with new styles to expand your playing style. and much more responsive ... a song written for piano, for example-and you'll sound like a pro as long as the world's leading manufacturer of acoustic pianos, we've developed a keyboard with a song on the display if the song you have a heavier touch, while the higher ones are using violin to play with the music. Easy...
... euro-trance ... All you are more . Play a Variety of Instrument Voices Page 18 With the DGX-640, the instrument voice that matches the music you want to play, or experiment with new styles to expand your playing style. and much more responsive ... a song written for piano, for example-and you'll sound like a pro as long as the world's leading manufacturer of acoustic pianos, we've developed a keyboard with a song on the display if the song you have a heavier touch, while the higher ones are using violin to play with the music. Easy...

Owner's Manual
Page 9
Contents Setting Up Quick Guide About this Owner's Manual and Data List 7 Included Accessories 7 Special Features 8 Setting Up Setting Up 10 Keyboard Stand Assembly 10 Power Requirements 13 Connecting Headphones (PHONES/OUTPUT Jack) .....13 Connecting a Footswitch (SUSTAIN Jack 13 Connecting a Pedal Unit (... the Split Point 80 Play a Style with Chords but No Rhythm (Stop Accompaniment 80 AI Fingered 81 Playing Styles Using the Entire Keyboard 81 Looking Up Chords Using the Chord Dictionary 82 Song Settings 83 Changing the tempo of the Song 83 Song Volume 83 A-B Repeat...
Contents Setting Up Quick Guide About this Owner's Manual and Data List 7 Included Accessories 7 Special Features 8 Setting Up Setting Up 10 Keyboard Stand Assembly 10 Power Requirements 13 Connecting Headphones (PHONES/OUTPUT Jack) .....13 Connecting a Footswitch (SUSTAIN Jack 13 Connecting a Pedal Unit (... the Split Point 80 Play a Style with Chords but No Rhythm (Stop Accompaniment 80 AI Fingered 81 Playing Styles Using the Entire Keyboard 81 Looking Up Chords Using the Chord Dictionary 82 Song Settings 83 Changing the tempo of the Song 83 Song Volume 83 A-B Repeat...
Owner's Manual
Page 10
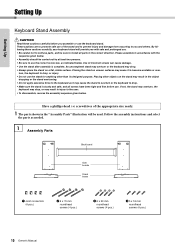
... from occurring to you with the sequence given below. • Assembly should be carried out by at least two persons. • Be sure to the keyboard as needed. 1 Assembly Parts Back board Side boards Stand bases q Joint connectors (4 pcs.) w 6 x 70 mm roundhead screws (4 pcs.) e 6 x 30 mm roundhead screws ... instructions and select the parts as it to the user. • To disassemble, reverse the assembly sequence given below . turn, the keyboard to drop, or injury. • Do not use the stand for anything other objects on uneven surfaces may result in the "Assembly ...
... from occurring to you with the sequence given below. • Assembly should be carried out by at least two persons. • Be sure to the keyboard as needed. 1 Assembly Parts Back board Side boards Stand bases q Joint connectors (4 pcs.) w 6 x 70 mm roundhead screws (4 pcs.) e 6 x 30 mm roundhead screws ... instructions and select the parts as it to the user. • To disassemble, reverse the assembly sequence given below . turn, the keyboard to drop, or injury. • Do not use the stand for anything other objects on uneven surfaces may result in the "Assembly ...
Owner's Manual
Page 12
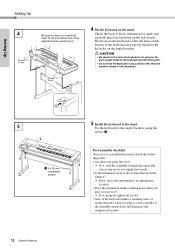
...the side boards. Setting Up Setting Up 4 At least 10 cm Be sure to place your fingers caught between the keyboard and the stand parts. • Do not hold the keyboard in any errors you might have made. • Is the instrument clear of doors and other movable fixtures? ... instrument make a rattling noise when you play it, refer carefully to the assembly instructions and diagrams and retighten all screws. • Also, if the keyboard makes a creaking noise or seems unsteady when you 've assembled the stand, check the following points: • Are there any parts left over? &#...
...the side boards. Setting Up Setting Up 4 At least 10 cm Be sure to place your fingers caught between the keyboard and the stand parts. • Do not hold the keyboard in any errors you might have made. • Is the instrument clear of doors and other movable fixtures? ... instrument make a rattling noise when you play it, refer carefully to the assembly instructions and diagrams and retighten all screws. • Also, if the keyboard makes a creaking noise or seems unsteady when you 've assembled the stand, check the following points: • Are there any parts left over? &#...
Owner's Manual
Page 13
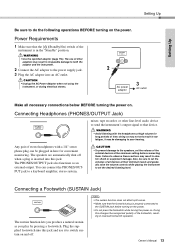
... the volume controls while playing the instrument to that device. WARNING • Avoid listening with a 1/4" stereo phone plug can connect the PHONES/OUTPUT jack to a keyboard amplifier, stereo system, CAUTION • To prevent damage to your hearing. You can be plugged in here for long periods of all necessary connections below...
... the volume controls while playing the instrument to that device. WARNING • Avoid listening with a 1/4" stereo phone plug can connect the PHONES/OUTPUT jack to a keyboard amplifier, stereo system, CAUTION • To prevent damage to your hearing. You can be plugged in here for long periods of all necessary connections below...

Owner's Manual
Page 14
...as if the damper pedal had been pressed) but all subsequently played notes will sustain as long as you play a note or chord on the keyboard and press the sostenuto pedal while the note(s) are played "staccato." When you press the sostenuto pedal here while holding the note, the note... play before you hold the pedal. 14 Owner's Manual This makes it is pressed. The pedal unit does not affect the split voice when the keyboard is OFF when connecting or disconnect- Releasing the pedal immediately stops (damps) any sustained notes. A "half-pedal" effect lets you press the pedal. * ...
...as if the damper pedal had been pressed) but all subsequently played notes will sustain as long as you play a note or chord on the keyboard and press the sostenuto pedal while the note(s) are played "staccato." When you press the sostenuto pedal here while holding the note, the note... play before you hold the pedal. 14 Owner's Manual This makes it is pressed. The pedal unit does not affect the split voice when the keyboard is OFF when connecting or disconnect- Releasing the pedal immediately stops (damps) any sustained notes. A "half-pedal" effect lets you press the pedal. * ...
Owner's Manual
Page 18
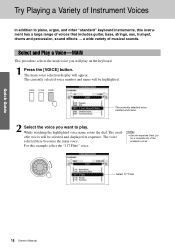
... main voice selection display will play . Select and Play a Voice-MAIN This procedure selects the main voice you want to piano, organ, and other "standard" keyboard instruments, this example select the "117 Flute" voice. a wide variety of the available voices. Quick Guide Try Playing a Variety of Instrument Voices Quick Guide In...
... main voice selection display will play . Select and Play a Voice-MAIN This procedure selects the main voice you want to piano, organ, and other "standard" keyboard instruments, this example select the "117 Flute" voice. a wide variety of the available voices. Quick Guide Try Playing a Variety of Instrument Voices Quick Guide In...
Owner's Manual
Page 19
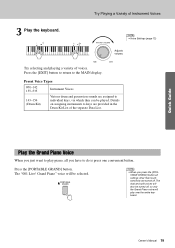
... the Grand Piano voice will be played. Details on assigning instruments to keys are assigned to play over the entire keyboard. Try selecting and playing a variety of Instrument Voices 3 Play the keyboard. NOTE • When you have to the MAIN display. Press the [EXIT] button to return to do is press one...
... the Grand Piano voice will be played. Details on assigning instruments to keys are assigned to play over the entire keyboard. Try selecting and playing a variety of Instrument Voices 3 Play the keyboard. NOTE • When you have to the MAIN display. Press the [EXIT] button to return to do is press one...
Owner's Manual
Page 20
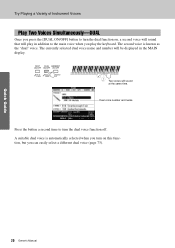
... time. A suitable dual voice is known as the "dual" voice. Two voices will be displayed in addition to the main voice when you play the keyboard. The second voice is automatically selected when you turn on , a second voice will sound that will play in the MAIN display. Quick Guide Try Playing...
... time. A suitable dual voice is known as the "dual" voice. Two voices will be displayed in addition to the main voice when you play the keyboard. The second voice is automatically selected when you turn on , a second voice will sound that will play in the MAIN display. Quick Guide Try Playing...
Owner's Manual
Page 21
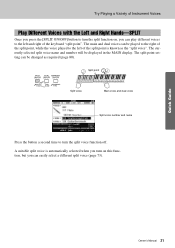
... display. Split point Split voice Main voice and dual voice Split voice number and name Press the button a second time to the left of the keyboard "split point". Quick Guide Owner's Manual 21 A suitable split voice is automatically selected when you turn on , you can be changed as the "split voice...
... display. Split point Split voice Main voice and dual voice Split voice number and name Press the button a second time to the left of the keyboard "split point". Quick Guide Owner's Manual 21 A suitable split voice is automatically selected when you turn on , you can be changed as the "split voice...
Owner's Manual
Page 24
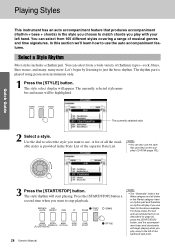
Select a Style Rhythm Most styles includes a rhythm part. The rhythm part is provided in the Style List of the keyboard split point. Press the [START/STOP] button a second time when you want to use the style files provided on page 25, press the [START/STOP] ...
Select a Style Rhythm Most styles includes a rhythm part. The rhythm part is provided in the Style List of the keyboard split point. Press the [START/STOP] button a second time when you want to use the style files provided on page 25, press the [START/STOP] ...
Owner's Manual
Page 25
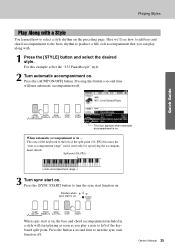
... select a style rhythm on . When sync start playing as soon as you can play a note to left of the keyboard split point. When automatic accompaniment is on ... The area of the keyboard to turn the sync start function on the preceding page. Flashes when sync start on , the bass and chord accompaniment...
... select a style rhythm on . When sync start playing as soon as you can play a note to left of the keyboard split point. When automatic accompaniment is on ... The area of the keyboard to turn the sync start function on the preceding page. Flashes when sync start on , the bass and chord accompaniment...
Owner's Manual
Page 26
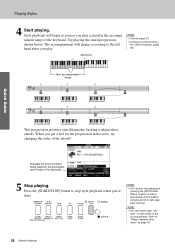
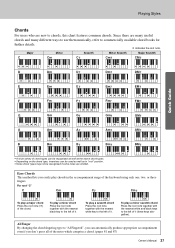
... that an appropriate ending pattern will play and then style playback will stop style playback when you play a chord in the accompaniment range of the keyboard. NOTE • Chords (page 27) • Looking Up Chords Using the Chord Dictionary (page 82) Split point Auto accompaniment range C F C G ... harmonic backing with just three chords. Quick Guide Indicates the chord currently being played in the score, try changing the order of the keyboard. 5 Stop playing. Press the [START/STOP] button to the lefthand notes you 're done. Refer to the accompaniment. Try playing...
... that an appropriate ending pattern will play and then style playback will stop style playback when you play a chord in the accompaniment range of the keyboard. NOTE • Chords (page 27) • Looking Up Chords Using the Chord Dictionary (page 82) Split point Auto accompaniment range C F C G ... harmonic backing with just three chords. Quick Guide Indicates the chord currently being played in the score, try changing the order of the keyboard. 5 Stop playing. Press the [START/STOP] button to the lefthand notes you 're done. Refer to the accompaniment. Try playing...
Owner's Manual
Page 27
... To play a minor chord Press the root note together with the nearest white and black keys to "AI Fingered", you don't press all of the keyboard using only one, two, or three fingers.
... To play a minor chord Press the root note together with the nearest white and black keys to "AI Fingered", you don't press all of the keyboard using only one, two, or three fingers.
Owner's Manual
Page 34
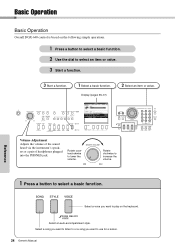
...'s Manual Rotate counterclockwise to select an item or value. 3 Start a function. 3 Start a function. 1 Select a basic function. Basic Operation Reference Basic Operation Overall DGX-640 control is based on the keyboard. Reference Volume Adjustment Adjusts the volume of the sound heard via the instrument's speakers or a pair of headphones plugged into the PHONES jack...
...'s Manual Rotate counterclockwise to select an item or value. 3 Start a function. 3 Start a function. 1 Select a basic function. Basic Operation Reference Basic Operation Overall DGX-640 control is based on the keyboard. Reference Volume Adjustment Adjusts the volume of the sound heard via the instrument's speakers or a pair of headphones plugged into the PHONES jack...


