
English Manual
Page 1
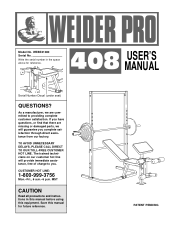
... this equipment. Write the serial number in this manual before using this manual for reference. MST CAUTION Read all precautions and instructions in the space above for future reference. If you . TO AVOID UNNECESSARY DELAYS, PLEASE CALL DIRECT TO OUR TOLL-FREE CUSTOMER HOT LINE. USER'S MANUAL PATENT PENDING Model No. WEBE21080 Serial No. Serial Number Decal (under seat) QUESTIONS? The trained technicians on our customer hot...
... this equipment. Write the serial number in this manual before using this manual for reference. MST CAUTION Read all precautions and instructions in the space above for future reference. If you . TO AVOID UNNECESSARY DELAYS, PLEASE CALL DIRECT TO OUR TOLL-FREE CUSTOMER HOT LINE. USER'S MANUAL PATENT PENDING Model No. WEBE21080 Serial No. Serial Number Decal (under seat) QUESTIONS? The trained technicians on our customer hot...
English Manual
Page 2
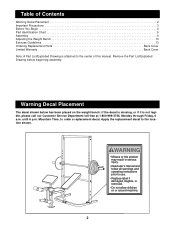
... operating instructions prior to use. • Replace label if damaged, illegible, or removed. • Do not allow children on the weight bench. Warning Decal Placement The decal shown below has been placed on or around machine. 2 Table of Contents Warning Decal Placement 2 Important Precautions 3 Before You Begin 4 Part Identification Chart 5 Assembly 6 Adjusting the Weight Bench 10 Exercise Guidelines 13 Ordering Replacement Parts Back Cover Limited Warranty Back Cover Note: A Part List/Exploded...
... operating instructions prior to use. • Replace label if damaged, illegible, or removed. • Do not allow children on the weight bench. Warning Decal Placement The decal shown below has been placed on or around machine. 2 Table of Contents Warning Decal Placement 2 Important Precautions 3 Before You Begin 4 Part Identification Chart 5 Assembly 6 Adjusting the Weight Bench 10 Exercise Guidelines 13 Ordering Replacement Parts Back Cover Limited Warranty Back Cover Note: A Part List/Exploded...
English Manual
Page 3
... adjustment holes in the uprights and that all instructions in place on the leg lever when performing squat exercises to support a maximum of 560 pounds, including the user, a barbell and weights. Do not place more than 150 pounds on the seat when the backrest is designed to balance the bench (see page 11). Cover the floor beneath the weight bench for home use . 19. Always set...
... adjustment holes in the uprights and that all instructions in place on the leg lever when performing squat exercises to support a maximum of 560 pounds, including the user, a barbell and weights. Do not place more than 150 pounds on the seat when the backrest is designed to balance the bench (see page 11). Cover the floor beneath the weight bench for home use . 19. Always set...
English Manual
Page 4
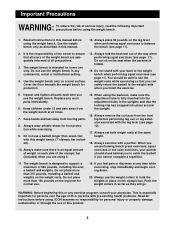
... achieve the specific results you for selecting the versatile WEIDER® PRO 408 Weight Bench. If you , please note the product model number and serial number before using the WEIDER® PRO 408 Weight Bench. Whether your benefit, read this manual). Mountain Time (excluding holidays). For your goal is WEBE21080. Before You Begin Thank you want. Upright Weight Collar Weights Adjustment Tube Backrest Seat Top Frame Weight Rests Olympic Bar Curl Pad Leg Lever Weight Tube 4
... achieve the specific results you for selecting the versatile WEIDER® PRO 408 Weight Bench. If you , please note the product model number and serial number before using the WEIDER® PRO 408 Weight Bench. Whether your benefit, read this manual). Mountain Time (excluding holidays). For your goal is WEBE21080. Before You Begin Thank you want. Upright Weight Collar Weights Adjustment Tube Backrest Seat Top Frame Weight Rests Olympic Bar Curl Pad Leg Lever Weight Tube 4
English Manual
Page 5
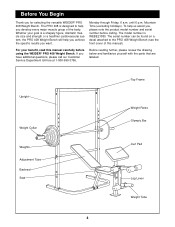
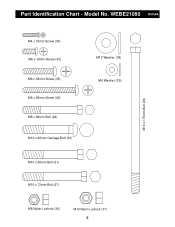
WEBE21080 R0798A M10 x 175mm Bolt (29) M4 x 19mm Screw (34) M6 x 16mm Screw (33) M6 x 38mm Screw (35) M6 x 65mm Screw (32) M8 x 68mm Bolt (28) M10 x 62mm Carriage Bolt (30) M10 Washer (38) M6 Washer (39) M10 x 68mm Bolt (31) M10 x 72mm Bolt (27) M8 Nylon Locknut (36) M10 Nylon Locknut (37) 5 Model No. Part Identification Chart -
WEBE21080 R0798A M10 x 175mm Bolt (29) M4 x 19mm Screw (34) M6 x 16mm Screw (33) M6 x 38mm Screw (35) M6 x 65mm Screw (32) M8 x 68mm Bolt (28) M10 x 62mm Carriage Bolt (30) M10 Washer (38) M6 Washer (39) M10 x 68mm Bolt (31) M10 x 72mm Bolt (27) M8 Nylon Locknut (36) M10 Nylon Locknut (37) 5 Model No. Part Identification Chart -
English Manual
Page 6
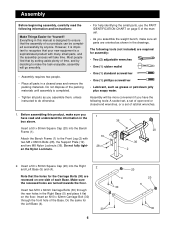
... parts, use the PART IDENTIFICATION CHART on the floor. However, it flat on page 5 of ratchet wrenches. 1. Insert a 50 x 50mm Square Cap (20) into the Bench Frame (1). Attach the Bench Frame (1) to recognize that the assembly of the Base. Do the same for Yourself! Make sure the recessed holes are turned towards the floor. Before assembling this manual is completed. • Tighten...
... parts, use the PART IDENTIFICATION CHART on the floor. However, it flat on page 5 of ratchet wrenches. 1. Insert a 50 x 50mm Square Cap (20) into the Bench Frame (1). Attach the Bench Frame (1) to recognize that the assembly of the Base. Do the same for Yourself! Make sure the recessed holes are turned towards the floor. Before assembling this manual is completed. • Tighten...
English Manual
Page 7
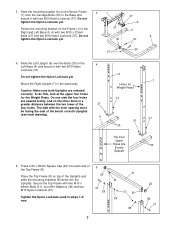
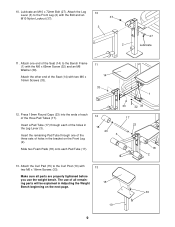
... is a greater distance between the two lower of the 37 four holes. Caution: Make sure both Uprights (see inset drawing). 4 6 7 Holes for the Weight Rests. Place the Top Frame (8) on top of the Uprights and slide the mounting brackets (B) down into each end of the bench on the Frame ...spacing must be facing the seat of the Top Frame (8). 3. Slide the Left Upright (6) over the Bolts (30) in the Base and secure it with two M10 Nylon Locknuts (37). Mount the Right Upright (7) in steps 1-5 now. 5 20 31 38 7 8 B 37 B 38 38 20 38 31 Tighten the Nylon Locknuts used...
... is a greater distance between the two lower of the 37 four holes. Caution: Make sure both Uprights (see inset drawing). 4 6 7 Holes for the Weight Rests. Place the Top Frame (8) on top of the Uprights and slide the mounting brackets (B) down into each end of the bench on the Frame ...spacing must be facing the seat of the Top Frame (8). 3. Slide the Left Upright (6) over the Bolts (30) in the Base and secure it with two M10 Nylon Locknuts (37). Mount the Right Upright (7) in steps 1-5 now. 5 20 31 38 7 8 B 37 B 38 38 20 38 31 Tighten the Nylon Locknuts used...
English Manual
Page 8
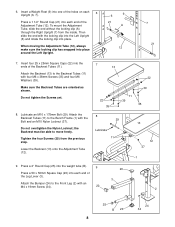
... Washers (39). Attach the Backrest (13) to the Bench Frame (1) with an M4 x 19mm Screw (34). 20 2 25 B 20 24 34 8 Lower the Backrest (13) onto the Adjustment Tube (12). 8 29 Lubricate 11 13 12 37 1 9. To mount the Adjustment Tube, slide the end without the locking clip (A) through the Right Upright (7) from the previous step. Attach the Backrest Tubes...
... Washers (39). Attach the Backrest (13) to the Bench Frame (1) with an M4 x 19mm Screw (34). 20 2 25 B 20 24 34 8 Lower the Backrest (13) onto the Adjustment Tube (12). 8 29 Lubricate 11 13 12 37 1 9. To mount the Adjustment Tube, slide the end without the locking clip (A) through the Right Upright (7) from the previous step. Attach the Backrest Tubes...
English Manual
Page 9
...Seat (14) to the Front Leg (2) with the M6 x 65mm Screw (32) and an M6 Washer (39). The use the weight bench. Attach the Leg 10 Lever (3) to the Bench Frame (1) with the Bolt and an M10 Nylon Locknut (37). 37 3 2 27 Lubricate 11. Make sure all parts are properly tightened before you use of the Seat...ing parts will be explained in the bracket on the next page. 33 10 9 Press 19mm Round Caps (23) into the ends of each of holes in Adjusting the Weight 15 Bench beginning on the Front Leg (2). Lubricate an M10 x 72mm Bolt (27). Attach one of the three sets of...
...Seat (14) to the Front Leg (2) with the M6 x 65mm Screw (32) and an M6 Washer (39). The use the weight bench. Attach the Leg 10 Lever (3) to the Bench Frame (1) with the Bolt and an M10 Nylon Locknut (37). 37 3 2 27 Lubricate 11. Make sure all parts are properly tightened before you use of the Seat...ing parts will be explained in the bracket on the next page. 33 10 9 Press 19mm Round Caps (23) into the ends of each of holes in Adjusting the Weight 15 Bench beginning on the Front Leg (2). Lubricate an M10 x 72mm Bolt (27). Attach one of the three sets of...
English Manual
Page 10
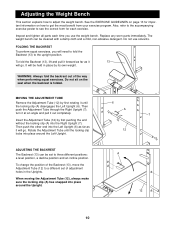
Adjusting the Weight Bench This section explains how to the upright position. Also, refer to the accompanying exercise poster to see the correct form for important information on the seat when the backrest is folded. Replace any worn parts immediately. The weight bench can be set of the way when performing squat exercises. To fold the Backrest (13), lift and pull it forward as far as it...
Adjusting the Weight Bench This section explains how to the upright position. Also, refer to the accompanying exercise poster to see the correct form for important information on the seat when the backrest is folded. Replace any worn parts immediately. The weight bench can be set of the way when performing squat exercises. To fold the Backrest (13), lift and pull it forward as far as it...
English Manual
Page 11
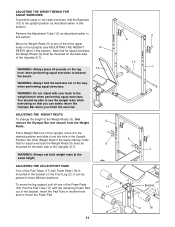
... the Weight Rests. ADJUSTING THE WEIGHT BENCH FOR SQUAT EXERCISES To perform squat or toe raise exercises, fold the Backrest (13) to see ADJUSTING THE WEIGHT 6 RESTS later in this section). Remove the Adjustment Tube (12) as described earlier in this section. Note that for squat exercises the Weight Rests (9) must be able to the upright position as described earlier in this section). ADJUSTING THE LEG SUPPORT...
... the Weight Rests. ADJUSTING THE WEIGHT BENCH FOR SQUAT EXERCISES To perform squat or toe raise exercises, fold the Backrest (13) to see ADJUSTING THE WEIGHT 6 RESTS later in this section). Remove the Adjustment Tube (12) as described earlier in this section. Note that for squat exercises the Weight Rests (9) must be able to the upright position as described earlier in this section). ADJUSTING THE LEG SUPPORT...
English Manual
Page 12
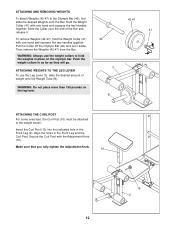
... the Collar off the Olympic Bar (40) and put it . 42-47 41 To remove Weights (42-47), hold the weights in the Front Leg and the Curl Post. Push the weight collars in the Front Leg (2). Make sure that you fully tighten the Adjustment Knob. 10 16 2 12 ATTACHING AND REMOVING WEIGHTS To attach Weights (42-47) to the weight bench. Insert the Curl Post (10...
... the Collar off the Olympic Bar (40) and put it . 42-47 41 To remove Weights (42-47), hold the weights in the Front Leg and the Curl Post. Push the weight collars in the Front Leg (2). Make sure that you fully tighten the Adjustment Knob. 10 16 2 12 ATTACHING AND REMOVING WEIGHTS To attach Weights (42-47) to the weight bench. Insert the Curl Post (10...
English Manual
Page 13
... warm up prepares your body for each exercise and moving only the appropriate parts of repetitions in each workout with 5 to their capacity. WARMING UP Begin each set " is the highest. This requires moving through the full range of motion for more sets rather than by pushing them close to 10 minutes of weight training and aerobic exer- formed (A "repetition" is right...
... warm up prepares your body for each exercise and moving only the appropriate parts of repetitions in each workout with 5 to their capacity. WARMING UP Begin each set " is the highest. This requires moving through the full range of motion for more sets rather than by pushing them close to 10 minutes of weight training and aerobic exer- formed (A "repetition" is right...
English Manual
Page 14
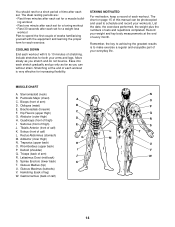
... calf) N O P Q R S T U V W 14 Gastrocnemius (back of arm) J R. Record your weight and key body measurements at the end of thigh) I Q. Remember, the key to schedule and record your workouts. Spinae Erectors (lower back) K T. Pectoralis Major (chest) A C. Brachioradials (forearm) F. Rhomboideus (upper back) P. Hamstring (back of sets and repetitions completed. List the date, the exercises performed, the weight plus the numbers of leg) W. Obliques (waist) B E. Quadriceps (front of...
... calf) N O P Q R S T U V W 14 Gastrocnemius (back of arm) J R. Record your weight and key body measurements at the end of thigh) I Q. Remember, the key to schedule and record your workouts. Spinae Erectors (lower back) K T. Pectoralis Major (chest) A C. Brachioradials (forearm) F. Rhomboideus (upper back) P. Hamstring (back of sets and repetitions completed. List the date, the exercises performed, the weight plus the numbers of leg) W. Obliques (waist) B E. Quadriceps (front of...

English Manual
Page 15
MONDAY Date: / / EXERCISE WEIGHT SETS REPS TUESDAY Date: / / WEDNESDAY Date: / / AEROBIC EXERCISE EXERCISE WEIGHT SETS REPS THURSDAY Date: / / FRIDAY Date: / / AEROBIC EXERCISE EXERCISE WEIGHT SETS REPS Make photocopies of this page for scheduling and recording your workouts. 15
MONDAY Date: / / EXERCISE WEIGHT SETS REPS TUESDAY Date: / / WEDNESDAY Date: / / AEROBIC EXERCISE EXERCISE WEIGHT SETS REPS THURSDAY Date: / / FRIDAY Date: / / AEROBIC EXERCISE EXERCISE WEIGHT SETS REPS Make photocopies of this page for scheduling and recording your workouts. 15
English Manual
Page 16
... you. No other warranty beyond that specifically set forth herein. Some states do not allow the exclusion or limitation of incidental or consequential damages. until 6 p.m. The MODEL NUMBER of the product (WEIDER® PRO 408 Weight Bench). 3. Ordering Replacement Parts To order replacement parts, simply call our Customer Service Department toll-free at the center of this manual). The warranty extended hereunder is in connection with the use or performance of...
... you. No other warranty beyond that specifically set forth herein. Some states do not allow the exclusion or limitation of incidental or consequential damages. until 6 p.m. The MODEL NUMBER of the product (WEIDER® PRO 408 Weight Bench). 3. Ordering Replacement Parts To order replacement parts, simply call our Customer Service Department toll-free at the center of this manual). The warranty extended hereunder is in connection with the use or performance of...
English Manual
Page 17
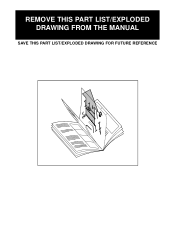
REMOVE THIS PART LIST/EXPLODED DRAWING FROM THE MANUAL SAVE THIS PART LIST/EXPLODED DRAWING FOR FUTURE REFERENCE 81
REMOVE THIS PART LIST/EXPLODED DRAWING FROM THE MANUAL SAVE THIS PART LIST/EXPLODED DRAWING FOR FUTURE REFERENCE 81
English Manual
Page 18
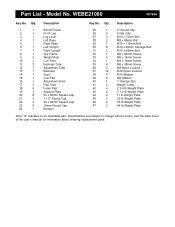
... 1 Description Bench Frame Front Leg Leg Lever Left Base Right Base Left Upright Right Upright Top Frame Weight Rest Curl Post Backrest Tube Adjustment Tube Backrest Seat Curl Pad Adjustment Knob Pad Tube Foam Pad Support Plate 50 x 50mm Square Cap 1 1/2" Round Cap 25 x 25mm Square Cap 19mm Round Cap Bumper Key No. See the back cover of the user's manual for information about ordering replacement parts. Qty...
... 1 Description Bench Frame Front Leg Leg Lever Left Base Right Base Left Upright Right Upright Top Frame Weight Rest Curl Post Backrest Tube Adjustment Tube Backrest Seat Curl Pad Adjustment Knob Pad Tube Foam Pad Support Plate 50 x 50mm Square Cap 1 1/2" Round Cap 25 x 25mm Square Cap 19mm Round Cap Bumper Key No. See the back cover of the user's manual for information about ordering replacement parts. Qty...

English Manual
Page 19
41 40 26 26 46 15 47 33 42 18 23 43 44 45 18 23 17 17 23 20 18 23 20 37 19 28 18 24 34 3 33 10 16 27 2 18 17 25 23 20 23 18 21 12 13 20 38 8 31 38 37 21 22 29 22 14 11 39 37 35 39 35 36 1 33 36 33 39 32 37 20 37 27 9 6 37 37 20 4 30 5 30 37 38 9 37 20 38 31 7 37 20 30 R0798A Exploded Drawing - WEBE21080 Model No.
41 40 26 26 46 15 47 33 42 18 23 43 44 45 18 23 17 17 23 20 18 23 20 37 19 28 18 24 34 3 33 10 16 27 2 18 17 25 23 20 23 18 21 12 13 20 38 8 31 38 37 21 22 29 22 14 11 39 37 35 39 35 36 1 33 36 33 39 32 37 20 37 27 9 6 37 37 20 4 30 5 30 37 38 9 37 20 38 31 7 37 20 30 R0798A Exploded Drawing - WEBE21080 Model No.


