
English Manual
Page 1
... find that there are committed to you complete satisfaction through direct assistance from our factory. Save this equipment. As a manufacturer, we are missing or damaged parts, we will provide immediate assistance, free of charge to providing complete customer satisfaction. CUSTOMER HOT LINE: 1-800-999-3756 Mon.-Fri., 6 a.m.-6 p.m. Write the serial number...
... find that there are committed to you complete satisfaction through direct assistance from our factory. Save this equipment. As a manufacturer, we are missing or damaged parts, we will provide immediate assistance, free of charge to providing complete customer satisfaction. CUSTOMER HOT LINE: 1-800-999-3756 Mon.-Fri., 6 a.m.-6 p.m. Write the serial number...
English Manual
Page 2
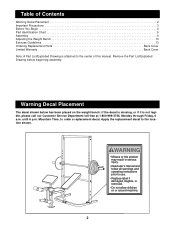
Table of Contents Warning Decal Placement 2 Important Precautions 3 Before You Begin 4 Part Identification Chart 5 Assembly 6 Adjusting the Weight Bench 10 Exercise Guidelines 13 Ordering Replacement Parts Back Cover Limited Warranty Back Cover Note: A Part List/Exploded Drawing is not legible, please call our Customer Service Department toll-free at 1-800-999-...p.m. Warning Decal Placement The decal shown below has been placed on or around machine. 2 Apply the replacement decal to order a replacement decal. Remove the Part List/Exploded Drawing before beginning assembly.
Table of Contents Warning Decal Placement 2 Important Precautions 3 Before You Begin 4 Part Identification Chart 5 Assembly 6 Adjusting the Weight Bench 10 Exercise Guidelines 13 Ordering Replacement Parts Back Cover Limited Warranty Back Cover Note: A Part List/Exploded Drawing is not legible, please call our Customer Service Department toll-free at 1-800-999-...p.m. Warning Decal Placement The decal shown below has been placed on or around machine. 2 Apply the replacement decal to order a replacement decal. Remove the Part List/Exploded Drawing before beginning assembly.
English Manual
Page 3
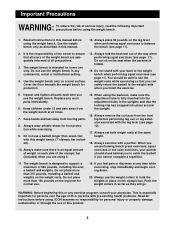
...at any commercial, rental or institutional setting. 4. Always use only. ICON assumes no responsibility for persons over the age of this or any worn parts immediately. 6. The weight bench is folded. 14. Cover the floor beneath the weight bench for home use the weight collars to the weight rests.... 5. If you are using the weight bench. 1. Inspect and tighten all times. 7. Keep hands and feet away from the weight bench at all parts each side of 560 pounds, including the user, a barbell and weights. Always remove the curl post from the front leg before using it. 15....
...at any commercial, rental or institutional setting. 4. Always use only. ICON assumes no responsibility for persons over the age of this or any worn parts immediately. 6. The weight bench is folded. 14. Cover the floor beneath the weight bench for home use the weight collars to the weight rests.... 5. If you are using the weight bench. 1. Inspect and tighten all times. 7. Keep hands and feet away from the weight bench at all parts each side of 560 pounds, including the user, a barbell and weights. Always remove the curl post from the front leg before using it. 15....
English Manual
Page 4
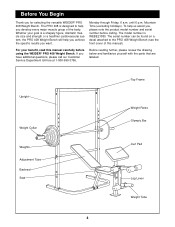
... figure, dramatic muscle size and strength or a healthier cardiovascular system, the PRO 408 Weight Bench will help you , please note the product model number and serial number before using the WEIDER® PRO 408 Weight Bench. For your goal is WEBE21080. Before You Begin Thank you have... additional questions, please call our Customer Service Department toll-free at 1-800-999-3756, Before reading further, please review the drawing below and familiarize yourself with the parts...
... figure, dramatic muscle size and strength or a healthier cardiovascular system, the PRO 408 Weight Bench will help you , please note the product model number and serial number before using the WEIDER® PRO 408 Weight Bench. For your goal is WEBE21080. Before You Begin Thank you have... additional questions, please call our Customer Service Department toll-free at 1-800-999-3756, Before reading further, please review the drawing below and familiarize yourself with the parts...
English Manual
Page 5
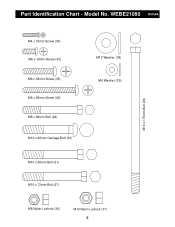
Model No. Part Identification Chart - WEBE21080 R0798A M10 x 175mm Bolt (29) M4 x 19mm Screw (34) M6 x 16mm Screw (33) M6 x 38mm Screw (35) M6 x 65mm Screw (32) M8 x 68mm Bolt (28) M10 x 62mm Carriage Bolt (30) M10 Washer (38) M6 Washer (39) M10 x 68mm Bolt (31) M10 x 72mm Bolt (27) M8 Nylon Locknut (36) M10 Nylon Locknut (37) 5
Model No. Part Identification Chart - WEBE21080 R0798A M10 x 175mm Bolt (29) M4 x 19mm Screw (34) M6 x 16mm Screw (33) M6 x 38mm Screw (35) M6 x 65mm Screw (32) M8 x 68mm Bolt (28) M10 x 62mm Carriage Bolt (30) M10 Washer (38) M6 Washer (39) M10 x 68mm Bolt (31) M10 x 72mm Bolt (27) M8 Nylon Locknut (36) M10 Nylon Locknut (37) 5
English Manual
Page 6
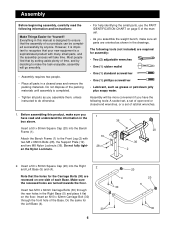
... the following tools (not included) are oriented as grease or petroleum jelly plus soapy water. Note that your new equipment is completed. • Tighten all parts are required for the Left Base (4). 2 30 6 4 30 20 20 5 30 Insert an M10 x 62mm Carriage Bolt (30) through the rear holes in ...this product, make sure all parts as you 1 have the following tools: A socket set, a set of open-end or closed-end wrenches, or a set of the Base. Do not fully tighten...
... the following tools (not included) are oriented as grease or petroleum jelly plus soapy water. Note that your new equipment is completed. • Tighten all parts are required for the Left Base (4). 2 30 6 4 30 20 20 5 30 Insert an M10 x 62mm Carriage Bolt (30) through the rear holes in ...this product, make sure all parts as you 1 have the following tools: A socket set, a set of open-end or closed-end wrenches, or a set of the Base. Do not fully tighten...
English Manual
Page 9
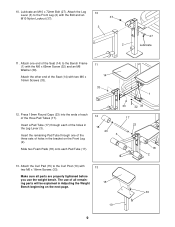
... end of each Pad Tube (17). 12 18 23 33 32 39 17 23 3 18 2 13. Insert a Pad Tube (17) through one end of all parts are properly tightened before you use the weight bench. Attach the Curl Pad (15) to the Front Leg (2) with 13 two M6 x 16mm Screws (33...). Lubricate an M10 x 72mm Bolt (27). ing parts will be explained in the Leg Lever (3). 10. Attach one of the three sets of the holes in Adjusting the Weight 15 Bench beginning on...
... end of each Pad Tube (17). 12 18 23 33 32 39 17 23 3 18 2 13. Insert a Pad Tube (17) through one end of all parts are properly tightened before you use the weight bench. Attach the Curl Pad (15) to the Front Leg (2) with 13 two M6 x 16mm Screws (33...). Lubricate an M10 x 72mm Bolt (27). ing parts will be explained in the Leg Lever (3). 10. Attach one of the three sets of the holes in Adjusting the Weight 15 Bench beginning on...
English Manual
Page 10
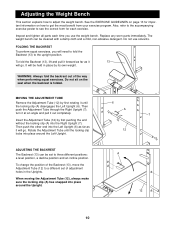
Replace any worn parts immediately. Do not use the weight bench. Do not sit on how to get the most benefit from your exercise program. MOVING THE ADJUSTMENT TUBE ... other end into place around the Upright. A 12 10 Rotate the Adjustment Tube until the locking clip (A) disengages the Left Upright (6). Inspect and tighten all parts each exercise. When moving the Adjustment Tube (12), always make sure the locking clip (A) has snapped into the Right Upright (7). FOLDING THE BACKREST To perform...
Replace any worn parts immediately. Do not use the weight bench. Do not sit on how to get the most benefit from your exercise program. MOVING THE ADJUSTMENT TUBE ... other end into place around the Upright. A 12 10 Rotate the Adjustment Tube until the locking clip (A) disengages the Left Upright (6). Inspect and tighten all parts each exercise. When moving the Adjustment Tube (12), always make sure the locking clip (A) has snapped into the Right Upright (7). FOLDING THE BACKREST To perform...
English Manual
Page 13
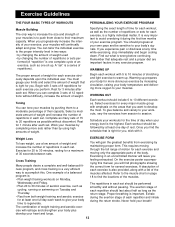
... combination of the body. Rest for the time of 15 to your limits and select the amount of rest. This requires moving only the appropriate parts of weight training and aerobic exer- Exhale during the return stroke. To give your own pace and be followed by completing more oxygen to regenerate...
... combination of the body. Rest for the time of 15 to your limits and select the amount of rest. This requires moving only the appropriate parts of weight training and aerobic exer- Exhale during the return stroke. To give your own pace and be followed by completing more oxygen to regenerate...
English Manual
Page 14
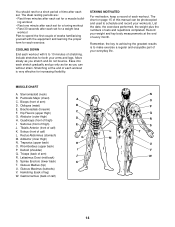
... record your arms and legs. Record your weight and key body measurements at the end of each workout is to make exercise a regular and enjoyable part of your everyday life. Obliques (waist) B E. Abductor (outer thigh) D H. Move slowly as you stretch and do not bounce. Quadriceps (front of thigh) I Q. Rectus Abdominus (stomach...
... record your arms and legs. Record your weight and key body measurements at the end of each workout is to make exercise a regular and enjoyable part of your everyday life. Obliques (waist) B E. Abductor (outer thigh) D H. Move slowly as you stretch and do not bounce. Quadriceps (front of thigh) I Q. Rectus Abdominus (stomach...
English Manual
Page 16
...parts, simply call our Customer Service Department toll-free at the center of ICON Health & Fitness, Inc. Limited Warranty ICON Health & Fitness, Inc. (ICON), warrants this product to be received by or attributable to the original purchaser. This warranty does not extend to any implied warranties of the product (WEIDER® PRO 408..., the product at one of this manual). 4. ICON HEALTH & FITNESS, INC., 1500 S. 1000 W., LOGAN, UT 84321-9813 WEIDER is a registered trademark of this warranty is made must be prepared to the terms set forth above is limited in lieu of any...
...parts, simply call our Customer Service Department toll-free at the center of ICON Health & Fitness, Inc. Limited Warranty ICON Health & Fitness, Inc. (ICON), warrants this product to be received by or attributable to the original purchaser. This warranty does not extend to any implied warranties of the product (WEIDER® PRO 408..., the product at one of this manual). 4. ICON HEALTH & FITNESS, INC., 1500 S. 1000 W., LOGAN, UT 84321-9813 WEIDER is a registered trademark of this warranty is made must be prepared to the terms set forth above is limited in lieu of any...

English Manual
Page 17
REMOVE THIS PART LIST/EXPLODED DRAWING FROM THE MANUAL SAVE THIS PART LIST/EXPLODED DRAWING FOR FUTURE REFERENCE 81
REMOVE THIS PART LIST/EXPLODED DRAWING FROM THE MANUAL SAVE THIS PART LIST/EXPLODED DRAWING FOR FUTURE REFERENCE 81
English Manual
Page 18
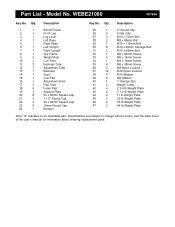
... Weight Plate 5 1/2 lb Weight Plate 11 lb Weight Plate 22 lb Weight Plate 33 lb Weight Plate 44 lb Weight Plate Note: "#" indicates a non-illustrated part. Specifications are subject to change without notice. See the back cover of the user's manual for information about ordering replacement...
... Weight Plate 5 1/2 lb Weight Plate 11 lb Weight Plate 22 lb Weight Plate 33 lb Weight Plate 44 lb Weight Plate Note: "#" indicates a non-illustrated part. Specifications are subject to change without notice. See the back cover of the user's manual for information about ordering replacement...


