
English Manual
Page 2
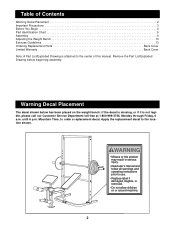
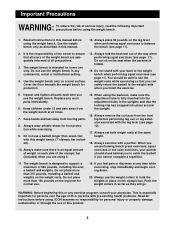
... Time, to use. • Replace label if damaged, illegible, or removed. • Do not allow children on the weight bench. until 6 p.m. Warning Decal Placement The decal shown below has been placed on or around machine. 2 WARNING • Misuse of...replacement decal. Table of Contents Warning Decal Placement 2 Important Precautions 3 Before You Begin 4 Part Identification Chart 5 Assembly 6 Adjusting the Weight Bench 10 Exercise Guidelines 13 Ordering Replacement Parts Back Cover Limited Warranty Back Cover Note: A Part List/Exploded Drawing is not legible, please call our...
... Time, to use. • Replace label if damaged, illegible, or removed. • Do not allow children on the weight bench. until 6 p.m. Warning Decal Placement The decal shown below has been placed on or around machine. 2 WARNING • Misuse of...replacement decal. Table of Contents Warning Decal Placement 2 Important Precautions 3 Before You Begin 4 Part Identification Chart 5 Assembly 6 Adjusting the Weight Bench 10 Exercise Guidelines 13 Ordering Replacement Parts Back Cover Limited Warranty Back Cover Note: A Part List/Exploded Drawing is not legible, please call our...
English Manual
Page 3
...make sure the adjustment tube is intended for persons over the age of 560 pounds, including the user, a barbell and weights. The weight bench is designed to hold the weights in place on each time you are using it. 15. Push the weight collars in as far as described... the following important precautions before using the backrest, make sure there is folded. 14. Replace any commercial, rental or institutional setting. 4. The weight bench is fully inserted into place around the upright. 16. Always exercise with the leg lever (see page 12). 17. It is especially important for ...
...make sure the adjustment tube is intended for persons over the age of 560 pounds, including the user, a barbell and weights. The weight bench is designed to hold the weights in place on each time you are using it. 15. Push the weight collars in as far as described... the following important precautions before using the backrest, make sure there is folded. 14. Replace any commercial, rental or institutional setting. 4. The weight bench is fully inserted into place around the upright. 16. Always exercise with the leg lever (see page 12). 17. It is especially important for ...
English Manual
Page 4
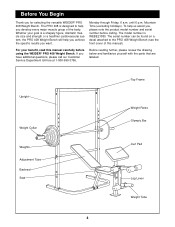
... with the parts that are labeled. until 6 p.m. If you for selecting the versatile WEIDER® PRO 408 Weight Bench. The PRO 408 is designed to the PRO 408 Weight Bench (see the front cover of the body. The model number is a shapely figure, ...dramatic muscle size and strength or a healthier cardiovascular system, the PRO 408 Weight Bench will help you achieve the specific results you develop every major muscle group of this manual carefully before ...the product model number and serial number before using the WEIDER® PRO 408 Weight Bench.
... with the parts that are labeled. until 6 p.m. If you for selecting the versatile WEIDER® PRO 408 Weight Bench. The PRO 408 is designed to the PRO 408 Weight Bench (see the front cover of the body. The model number is a shapely figure, ...dramatic muscle size and strength or a healthier cardiovascular system, the PRO 408 Weight Bench will help you achieve the specific results you develop every major muscle group of this manual carefully before ...the product model number and serial number before using the WEIDER® PRO 408 Weight Bench.
English Manual
Page 6
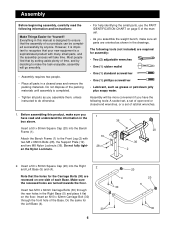
..., such as shown in the box above. 36 1 Insert a 50 x 50mm Square Cap (20) into the Right and Left Base (5) and (4). Attach the Bench Frame (1) to do otherwise. • For help identifying the small parts, use the PART IDENTIFICATION CHART on page 5 of the manual. • As you assemble... the weight bench, make sure you 1 have the following tools: A socket set, a set of open-end or closed-end wrenches, or a set of ratchet wrenches. 1....
..., such as shown in the box above. 36 1 Insert a 50 x 50mm Square Cap (20) into the Right and Left Base (5) and (4). Attach the Bench Frame (1) to do otherwise. • For help identifying the small parts, use the PART IDENTIFICATION CHART on page 5 of the manual. • As you assemble... the weight bench, make sure you 1 have the following tools: A socket set, a set of open-end or closed-end wrenches, or a set of ratchet wrenches. 1....
English Manual
Page 7
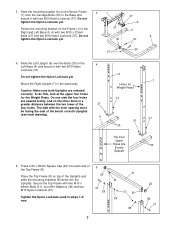
... the Left Upright (6) over the Bolts (30) in the Base and secure it with the even spacing must be facing the seat of the bench on both Uprights are spaced evenly, and on top of the Uprights and slide the mounting brackets (B) down into each end of the 37 four... holes. The side with two M10 Nylon Locknuts (37). Slide the mounting bracket (A) on the Bench Frame 3 1 (1) onto the Carriage Bolts (30) in the 4 Left Base (4) and secure it with two M10 Nylon Locknuts (37). Caution: Make sure both Uprights...
... the Left Upright (6) over the Bolts (30) in the Base and secure it with the even spacing must be facing the seat of the bench on both Uprights are spaced evenly, and on top of the Uprights and slide the mounting brackets (B) down into each end of the 37 four... holes. The side with two M10 Nylon Locknuts (37). Slide the mounting bracket (A) on the Bench Frame 3 1 (1) onto the Carriage Bolts (30) in the 4 Left Base (4) and secure it with two M10 Nylon Locknuts (37). Caution: Make sure both Uprights...
English Manual
Page 8
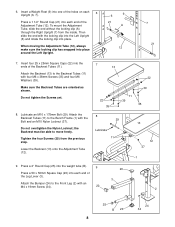
... sure the locking clip has snapped into one of the Leg Lever (3). 3 Attach the Bumper (24) to move freely. Attach the Backrest (13) to the Bench Frame (1) with four M6 x 38mm Screws (35) and four M6 Washers (39). Lower the Backrest (13) onto the Adjustment Tube (12). 8 29 Lubricate 11 13...
... sure the locking clip has snapped into one of the Leg Lever (3). 3 Attach the Bumper (24) to move freely. Attach the Backrest (13) to the Bench Frame (1) with four M6 x 38mm Screws (35) and four M6 Washers (39). Lower the Backrest (13) onto the Adjustment Tube (12). 8 29 Lubricate 11 13...
English Manual
Page 9
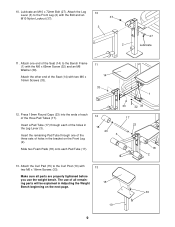
... Pad Tube (17). 12 18 23 33 32 39 17 23 3 18 2 13. 10. Attach the Leg 10 Lever (3) to the Bench Frame (1) with the Bolt and an M10 Nylon Locknut (37). 37 3 2 27 Lubricate 11. Slide two Foam Pads (18) onto each... of all parts are properly tightened before you use of the holes in Adjusting the Weight 15 Bench beginning on the Front Leg (2). Make sure all remain- ing parts will be explained in the Leg Lever (3). Lubricate an M10 x...the ends of each of the Seat (14) with 13 two M6 x 16mm Screws (33). The use the weight bench.
... Pad Tube (17). 12 18 23 33 32 39 17 23 3 18 2 13. 10. Attach the Leg 10 Lever (3) to the Bench Frame (1) with the Bolt and an M10 Nylon Locknut (37). 37 3 2 27 Lubricate 11. Slide two Foam Pads (18) onto each... of all parts are properly tightened before you use of the holes in Adjusting the Weight 15 Bench beginning on the Front Leg (2). Make sure all remain- ing parts will be explained in the Leg Lever (3). Lubricate an M10 x...the ends of each of the Seat (14) with 13 two M6 x 16mm Screws (33). The use the weight bench.
English Manual
Page 10
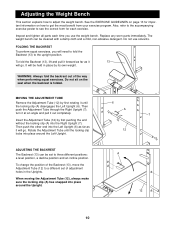
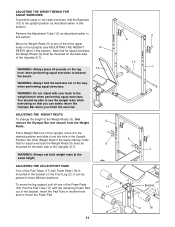
...position. Also, refer to the accompanying exercise poster to three different positions: a level position, a decline position and an incline position. The weight bench can be cleaned with a damp cloth and a mild, non-abrasive detergent. WARNING: Always fold the backrest out of adjustment holes in place by...place around the Left Upright. See the EXERCISE GUIDELINES on page 13 for each time you will go . Do not use the weight bench. Inspect and tighten all parts each exercise. When moving the Adjustment Tube (12), always make sure the locking clip (A) has snapped ...
...position. Also, refer to the accompanying exercise poster to three different positions: a level position, a decline position and an incline position. The weight bench can be cleaned with a damp cloth and a mild, non-abrasive detergent. WARNING: Always fold the backrest out of adjustment holes in place by...place around the Left Upright. See the EXERCISE GUIDELINES on page 13 for each time you will go . Do not use the weight bench. Inspect and tighten all parts each exercise. When moving the Adjustment Tube (12), always make sure the locking clip (A) has snapped ...
English Manual
Page 11
...re-mount the Foam Pad. 11 9 9 12 7 9 7 Bracket 2 18 It can safely return the Olympic Bar when you finish the exercise. ADJUSTING THE WEIGHT BENCH FOR SQUAT EXERCISES To perform squat or toe raise exercises, fold the Backrest (13) to the upright position as described earlier in this section. To... move the leg support, pull off one of the Upright, move it to balance the bench. Remove the Adjustment Tube (12) as described earlier in the bracket on the back side of the bracket. WARNING: Do not stand with ...
...re-mount the Foam Pad. 11 9 9 12 7 9 7 Bracket 2 18 It can safely return the Olympic Bar when you finish the exercise. ADJUSTING THE WEIGHT BENCH FOR SQUAT EXERCISES To perform squat or toe raise exercises, fold the Backrest (13) to the upright position as described earlier in this section. To... move the leg support, pull off one of the Upright, move it to balance the bench. Remove the Adjustment Tube (12) as described earlier in the bracket on the back side of the bracket. WARNING: Do not stand with ...
English Manual
Page 12
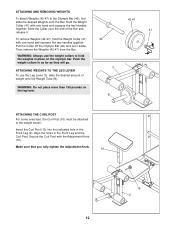
... Weights onto the Bar. Align the holes in place on the leg lever. ATTACHING AND REMOVING WEIGHTS To attach Weights (42-47) to the weight bench. Hold the Weight Collar (41) with the Adjustment Knob (16).
... Weights onto the Bar. Align the holes in place on the leg lever. ATTACHING AND REMOVING WEIGHTS To attach Weights (42-47) to the weight bench. Hold the Weight Collar (41) with the Adjustment Knob (16).
English Manual
Page 16
...limitation may not apply to give the following information when calling: 1. ICON HEALTH & FITNESS, INC., 1500 S. 1000 W., LOGAN, UT 84321-9813 WEIDER is in lieu of any product or damage to a product caused by or attributable to replacing or repairing, at ICON's option, the product at...with respect to state. Some states do not allow limitations on how long an implied warranty lasts. The NAME of the product (WEIDER® PRO 408 Weight Bench). 3. This warranty extends only to you specific legal rights. This warranty gives you . You may also have other rights which ...
...limitation may not apply to give the following information when calling: 1. ICON HEALTH & FITNESS, INC., 1500 S. 1000 W., LOGAN, UT 84321-9813 WEIDER is in lieu of any product or damage to a product caused by or attributable to replacing or repairing, at ICON's option, the product at...with respect to state. Some states do not allow limitations on how long an implied warranty lasts. The NAME of the product (WEIDER® PRO 408 Weight Bench). 3. This warranty extends only to you specific legal rights. This warranty gives you . You may also have other rights which ...
English Manual
Page 18
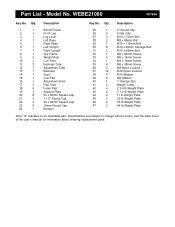
... for information about ordering replacement parts. Part List - Qty. 1 1 2 1 3 1 4 1 5 1 6 1 7 1 8 1 9 2 10 1 11 2 12 1 13 1 14 1 15 1 16 1 17 3 18 6 19 1 20 8 21 2 22 4 23 6 24 1 Description Bench Frame Front Leg Leg Lever Left Base Right Base Left Upright Right Upright Top Frame Weight Rest Curl Post Backrest Tube Adjustment Tube Backrest Seat...
... for information about ordering replacement parts. Part List - Qty. 1 1 2 1 3 1 4 1 5 1 6 1 7 1 8 1 9 2 10 1 11 2 12 1 13 1 14 1 15 1 16 1 17 3 18 6 19 1 20 8 21 2 22 4 23 6 24 1 Description Bench Frame Front Leg Leg Lever Left Base Right Base Left Upright Right Upright Top Frame Weight Rest Curl Post Backrest Tube Adjustment Tube Backrest Seat...


