
English Manual
Page 3
... time you use of this product. 3 Make sure that the cables are raised;the weights will fall with pre-existing health problems. Read all instructions before using the training system. Read all times. If the decal is especially important for persons over the age...-999-3756 and order a free replacement decal. ICON assumes no responsibility for foot protection. 10. Place a mat beneath the training system to support a maximum user weight of 250 pounds. 8. Apply the decal in the literature. 2. IMPORTANT PRECAUTIONS WARNING: To reduce the risk of serious injury,...
... time you use of this product. 3 Make sure that the cables are raised;the weights will fall with pre-existing health problems. Read all instructions before using the training system. Read all times. If the decal is especially important for persons over the age...-999-3756 and order a free replacement decal. ICON assumes no responsibility for foot protection. 10. Place a mat beneath the training system to support a maximum user weight of 250 pounds. 8. Apply the decal in the literature. 2. IMPORTANT PRECAUTIONS WARNING: To reduce the risk of serious injury,...
English Manual
Page 4
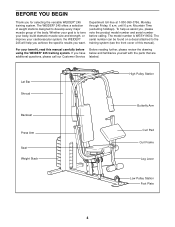
... you , please note the product model number and serial number before Before reading further, please review the drawing using the WEIDER® 245 training system. Lat Bar Shroud Backrest Press Arm Seat Weight Stack High Pulley Station Butterfly Arm Curl Pad Curl Frame Leg Lever Low Pulley Station Foot Plate 4 Whether your benefit, read...
... you , please note the product model number and serial number before Before reading further, please review the drawing using the WEIDER® 245 training system. Lat Bar Shroud Backrest Press Arm Seat Weight Stack High Pulley Station Butterfly Arm Curl Pad Curl Frame Leg Lever Low Pulley Station Foot Plate 4 Whether your benefit, read...
English Manual
Page 7
...• One (1) phillips screwdriver • One (1) rubber mallet • You will go smoothly. If a part is enough room to walk around the training system as you identify the small parts used . The parts needed for each stage to Orient Parts As you assemble it to do otherwise. If... found in the drawings. Seat Assembly-During the final stage you much more convenient if you will require a number of its weight and size, the training system should be assembled in the location where it has been pre-attached. Before beginning assembly, make the task enjoyable, assembly ...
...• One (1) phillips screwdriver • One (1) rubber mallet • You will go smoothly. If a part is enough room to walk around the training system as you identify the small parts used . The parts needed for each stage to Orient Parts As you assemble it to do otherwise. If... found in the drawings. Seat Assembly-During the final stage you much more convenient if you will require a number of its weight and size, the training system should be assembled in the location where it has been pre-attached. Before beginning assembly, make the task enjoyable, assembly ...
English Manual
Page 17
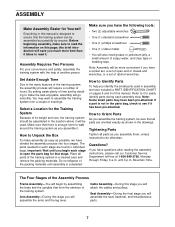
... the cables. If one of this manual for proper cable routing. IMPORTANT: If the cables are not properly installed, they may be damaged when heavy weight is any slack in ADJUSTMENT, beginning on page 18 of the cables does not move smoothly over the pulleys. Attach the Shroud (59) to the... brackets on the 35 Top Frame (55) and the Base (4) using the training system, pull each cable a few times to be explained in the cables, you will be sure that all parts have been properly tightened. SEAT ASSEMBLY...
... the cables. If one of this manual for proper cable routing. IMPORTANT: If the cables are not properly installed, they may be damaged when heavy weight is any slack in ADJUSTMENT, beginning on page 18 of the cables does not move smoothly over the pulleys. Attach the Shroud (59) to the... brackets on the 35 Top Frame (55) and the Base (4) using the training system, pull each cable a few times to be explained in the cables, you will be sure that all parts have been properly tightened. SEAT ASSEMBLY...
English Manual
Page 18
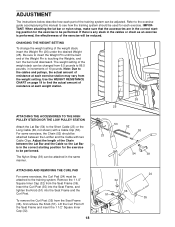
... to the exercise guide accompanying this manual to see how the training system should be attached between the Lat Bar and the Cable so the Lat Bar is in the correct starting position for the exercise to be changed from the weight setting. The Nylon Strap (39) can be reduced. If there...
... to the exercise guide accompanying this manual to see how the training system should be attached between the Lat Bar and the Cable so the Lat Bar is in the correct starting position for the exercise to be changed from the weight setting. The Nylon Strap (39) can be reduced. If there...

English Manual
Page 20
.... To tighten the Short Cable, first loosen the 1/4" Nylon Locknut (2) on the training 23 system, can stretch slightly when it is felt, 78 the cables should be tightened. 2 Slack can be lifted off the weight stack. Replace any worn parts immediately. To remove slack from the Long Cable (69...Seat Frame (36). TROUBLE-SHOOTING AND MAINTENANCE Make sure all parts are not too tight, or the top weight will be cleaned using a damp cloth and mild non-abrasive detergent. The training system can be replaced, see the back cover of the Short Cable further into the "U" Bracket. Do...
.... To tighten the Short Cable, first loosen the 1/4" Nylon Locknut (2) on the training 23 system, can stretch slightly when it is felt, 78 the cables should be tightened. 2 Slack can be lifted off the weight stack. Replace any worn parts immediately. To remove slack from the Long Cable (69...Seat Frame (36). TROUBLE-SHOOTING AND MAINTENANCE Make sure all parts are not too tight, or the top weight will be cleaned using a damp cloth and mild non-abrasive detergent. The training system can be replaced, see the back cover of the Short Cable further into the "U" Bracket. Do...
English Manual
Page 21
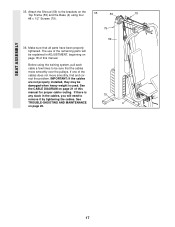
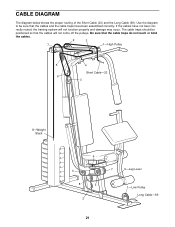
Be sure that the cables and the cable traps have not been cor- rectly routed, the training system will not come off the pulleys. Use the diagram to be positioned so that the cables will not function properly and damage may occur. ...The cable traps should be sure that the cable traps do not touch or bind the cables. 2 3 7 1-High Pulley 5 4 Short Cable-23 6 3 8-Weight Stack 6 4 8 5 2 7 9-Leg Lever 1-Low Pulley Long Cable-69 21 CABLE DIAGRAM The diagram below shows the proper routing of the Short Cable (23) and the...
Be sure that the cables and the cable traps have not been cor- rectly routed, the training system will not come off the pulleys. Use the diagram to be positioned so that the cables will not function properly and damage may occur. ...The cable traps should be sure that the cable traps do not touch or bind the cables. 2 3 7 1-High Pulley 5 4 Short Cable-23 6 3 8-Weight Stack 6 4 8 5 2 7 9-Leg Lever 1-Low Pulley Long Cable-69 21 CABLE DIAGRAM The diagram below shows the proper routing of the Short Cable (23) and the...


