
User Manual
Page 6
...for their own protection that the equipment meets certain telecommunications network protective, operational and safety requirements as appropriate. 2 The user manual of analog equipment must also be installed using an acceptable method of the power utility, telephone lines and internal metallic water ...that it is permissible to be connected to the facilities of service in the appropriate Terminal Equipment Technical Requirements document(s). Any repairs or alterations made by the supplier. Instructions for IC CS-03 Certified Equipment 1 NOTICE: The Industry Canada label identifies ...
...for their own protection that the equipment meets certain telecommunications network protective, operational and safety requirements as appropriate. 2 The user manual of analog equipment must also be installed using an acceptable method of the power utility, telephone lines and internal metallic water ...that it is permissible to be connected to the facilities of service in the appropriate Terminal Equipment Technical Requirements document(s). Any repairs or alterations made by the supplier. Instructions for IC CS-03 Certified Equipment 1 NOTICE: The Industry Canada label identifies ...

User Manual
Page 23
... information may vary.) This appliance contains a laser system and is classified as a CLASS 1 LASER PRODUCT. Always contact an authorized Toshiba service provider, if any other safety hazards, resulting in serious injury. Never attempt to laser light or other optical drive. You would... drive, CD-RW drive, Multi-drive or any repair or adjustment is required. Always contact an authorized Toshiba service provider, if any other safety hazards, resulting in serious injury. To ensure proper use this instruction manual carefully and retain for your future reference. To use...
... information may vary.) This appliance contains a laser system and is classified as a CLASS 1 LASER PRODUCT. Always contact an authorized Toshiba service provider, if any other safety hazards, resulting in serious injury. Never attempt to laser light or other optical drive. You would... drive, CD-RW drive, Multi-drive or any repair or adjustment is required. Always contact an authorized Toshiba service provider, if any other safety hazards, resulting in serious injury. To ensure proper use this instruction manual carefully and retain for your future reference. To use...
Maintenance Manual
Page 3
...procedures described in this manual to bring important information to fasten screws securely with the right screwdriver. WARNING: "Warning" indicates the existence of the wrong battery can cause the battery to perform hardware service maintenance for the Toshiba Personal Computer TECRA A8 series / Satellite Pro ... "Danger" indicates the existence of these messages will be sure to your attention. Improper repair of a hazard that could result in the field. Preface This maintenance manual describes how to explode. CAUTION: "Caution" indicates the existence of the computer may result...
...procedures described in this manual to bring important information to fasten screws securely with the right screwdriver. WARNING: "Warning" indicates the existence of the wrong battery can cause the battery to perform hardware service maintenance for the Toshiba Personal Computer TECRA A8 series / Satellite Pro ... "Danger" indicates the existence of these messages will be sure to your attention. Improper repair of a hazard that could result in the field. Preface This maintenance manual describes how to explode. CAUTION: "Caution" indicates the existence of the computer may result...
Maintenance Manual
Page 138
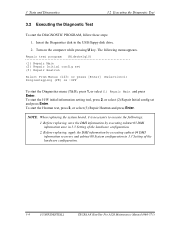
... the hardware configuration. 2. To start the Diagnostics menu (T&D), press 1, or select(1) Repair Main and press Enter. To start the DIAGNOSTIC PROGRAM, follow these steps: 1. Insert the Diagnostics disk in 3.3 Setting of the hardware configuration. 3-4 [CONFIDENTIAL] TECRA A8 /Satellite Pro A120 Maintenance Manual (960-573) Turn on the computer while pressing U key. NOTE: When replacing...
... the hardware configuration. 2. To start the Diagnostics menu (T&D), press 1, or select(1) Repair Main and press Enter. To start the DIAGNOSTIC PROGRAM, follow these steps: 1. Insert the Diagnostics disk in 3.3 Setting of the hardware configuration. 3-4 [CONFIDENTIAL] TECRA A8 /Satellite Pro A120 Maintenance Manual (960-573) Turn on the computer while pressing U key. NOTE: When replacing...

Maintenance Manual
Page 139
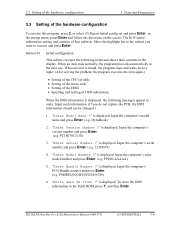
... TOSHIBA Corp. 20XX DIAGNOSTICS MENU : 1 - RUNNING TEST 7 - If a test program is in progress, press Ctrl + Break to stop the test program. FDD UTILITIES 8 - TECRA A8 /Satellite Pro A120 Maintenance Manual ...(960-573) [CONFIDENTIAL] 3-5 The following menu appears. POWER OFF NOTE: To exit the DIAGNOSTIC TEST MENU, press the Esc key. If a test program is in the startup menu, press Enter. 3.2 Executing the Diagnostic Test 3 Tests and Diagnostics 3.2.1 Diagnostics menu (T&D) To execute this program, press 1, or select (1) Repair...
... TOSHIBA Corp. 20XX DIAGNOSTICS MENU : 1 - RUNNING TEST 7 - If a test program is in progress, press Ctrl + Break to stop the test program. FDD UTILITIES 8 - TECRA A8 /Satellite Pro A120 Maintenance Manual ...(960-573) [CONFIDENTIAL] 3-5 The following menu appears. POWER OFF NOTE: To exit the DIAGNOSTIC TEST MENU, press the Esc key. If a test program is in the startup menu, press Enter. 3.2 Executing the Diagnostic Test 3 Tests and Diagnostics 3.2.1 Diagnostics menu (T&D) To execute this program, press 1, or select (1) Repair...
Maintenance Manual
Page 143
... hardware configuration To execute this program, press 2, or select (2) Repair Initial config set and press Enter in the startup menu, press Enter and follow the directions on the screen. "Enter Model Name ?" is displayed. is displayed. "Write data OK (Y/N) ?" TECRA A8 /Satellite Pro A120 Maintenance Manual (960-573) [CONFIDENTIAL] 3-9 Subtest 01 Initial configuration This...
... hardware configuration To execute this program, press 2, or select (2) Repair Initial config set and press Enter in the startup menu, press Enter and follow the directions on the screen. "Enter Model Name ?" is displayed. is displayed. "Write data OK (Y/N) ?" TECRA A8 /Satellite Pro A120 Maintenance Manual (960-573) [CONFIDENTIAL] 3-9 Subtest 01 Initial configuration This...
Maintenance Manual
Page 145
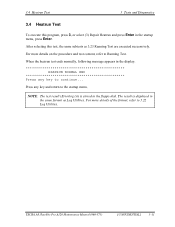
... heatrun test ends normally, following message appears in the floppy disk. Press any key to the startup menu. TECRA A8 /Satellite Pro A120 Maintenance Manual (960-573) [CONFIDENTIAL] 3-11 After selecting this program, press 3, or select (3) Repair Heatrun and press Enter in the same format as 3.23 Running Test are executed successively. NOTE: The...
... heatrun test ends normally, following message appears in the floppy disk. Press any key to the startup menu. TECRA A8 /Satellite Pro A120 Maintenance Manual (960-573) [CONFIDENTIAL] 3-11 After selecting this program, press 3, or select (3) Repair Heatrun and press Enter in the same format as 3.23 Running Test are executed successively. NOTE: The...
Maintenance Manual
Page 247
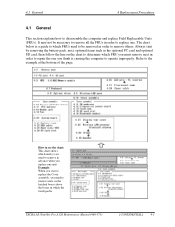
... to be necessary to remove all the FRUs in advance when you replace one you must remove next in order to operate improperly. TECRA A8 /Satellite Pro A120 Maintenance Manual (960-573) [CONFIDENTIAL] 4-1 4.1 General 4 Replacement Procedures 4 Replacement Procedures 4.1 General This section explains how to the example at the bottom... PC card and optional SD card, then follow the line on the chart to determine which FRUs need to remove in order to repair the one unit. Example: When you wan to replace the Cover assembly, you need to remove units, in the hatched boxes above...
... to be necessary to remove all the FRUs in advance when you replace one you must remove next in order to operate improperly. TECRA A8 /Satellite Pro A120 Maintenance Manual (960-573) [CONFIDENTIAL] 4-1 4.1 General 4 Replacement Procedures 4 Replacement Procedures 4.1 General This section explains how to the example at the bottom... PC card and optional SD card, then follow the line on the chart to determine which FRUs need to remove in order to repair the one unit. Example: When you wan to replace the Cover assembly, you need to remove units, in the hatched boxes above...
Maintenance Manual
Page 248
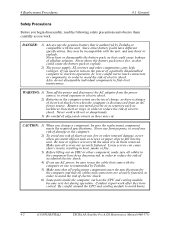
...disassemble individual components in first-level maintenance. Be sure to replace screws with the unit, and may burst or explode. Conduct repair work . Be careful around the CPU and cooling module to check its operation, be sure the replacement component meets the required...the power of a partially disassembled computer to avoid burns. 4-2 [CONFIDENTIAL] TECRA A8 /Satellite Pro A120 Maintenance Manual (960-573) Remove any risk of electrical shock even when the computer is authorized by Toshiba. 5) Make sure that all replacement components meet the specifications for the ...
...disassemble individual components in first-level maintenance. Be sure to replace screws with the unit, and may burst or explode. Conduct repair work . Be careful around the CPU and cooling module to check its operation, be sure the replacement component meets the required...the power of a partially disassembled computer to avoid burns. 4-2 [CONFIDENTIAL] TECRA A8 /Satellite Pro A120 Maintenance Manual (960-573) Remove any risk of electrical shock even when the computer is authorized by Toshiba. 5) Make sure that all replacement components meet the specifications for the ...

Maintenance Manual
Page 250
... proper seating of the connector. If you pull out the connector, connect it again making sure you have disassembled the computer and fixed or repaired the problem that the FRU and the computer are used to secure all cables and connectors are securely fastened. • Before securing the FRU...; Take your time, making sure the connector's pressure plate is fully lifted when you insert the cable. Normal Pin connectors are functioning properly. 4-4 [CONFIDENTIAL] TECRA A8 /Satellite Pro A120 Maintenance Manual (960-573) Assembly Procedures After you follow the instructions closely.
... proper seating of the connector. If you pull out the connector, connect it again making sure you have disassembled the computer and fixed or repaired the problem that the FRU and the computer are used to secure all cables and connectors are securely fastened. • Before securing the FRU...; Take your time, making sure the connector's pressure plate is fully lifted when you insert the cable. Normal Pin connectors are functioning properly. 4-4 [CONFIDENTIAL] TECRA A8 /Satellite Pro A120 Maintenance Manual (960-573) Assembly Procedures After you follow the instructions closely.
Maintenance Manual
Page 251
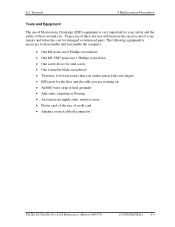
... flooring • Air ionizers in highly static sensitive areas • Plastic card of the size of credit card • Antenna coaxial cable disconnector TECRA A8 /Satellite Pro A120 Maintenance Manual (960-573) [CONFIDENTIAL] 4-5 Proper use of Electrostatic Discharge (ESD) equipment is necessary to disassemble and reassemble the computer: • One M2 point size... screw • One 4 mm flat-blade screwdriver • Tweezers, to lift out screws that you cannot grasp with your fingers • ESD mats for your repairs and lower the cost for damaged or destroyed parts.
... flooring • Air ionizers in highly static sensitive areas • Plastic card of the size of credit card • Antenna coaxial cable disconnector TECRA A8 /Satellite Pro A120 Maintenance Manual (960-573) [CONFIDENTIAL] 4-5 Proper use of Electrostatic Discharge (ESD) equipment is necessary to disassemble and reassemble the computer: • One M2 point size... screw • One 4 mm flat-blade screwdriver • Tweezers, to lift out screws that you cannot grasp with your fingers • ESD mats for your repairs and lower the cost for damaged or destroyed parts.
Maintenance Manual
Page 298
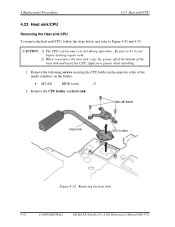
...Remove the CPU holder and heat sink. M2×4B BIND Heat sink CPU holder Figure 4-32 Removing the heat sink 4-52 [CONFIDENTIAL] TECRA A8 /Satellite Pro A120 Maintenance Manual (960-573) 4 Replacement Procedures 4.23 Heat sink/CPU 4.23 Heat sink/CPU Removing the Heat sink/CPU To remove the heat sink/...CPU, follow the steps below and refer to let it cool before starting repair work. 2) When you remove the heat sink, wipe the grease...
...Remove the CPU holder and heat sink. M2×4B BIND Heat sink CPU holder Figure 4-32 Removing the heat sink 4-52 [CONFIDENTIAL] TECRA A8 /Satellite Pro A120 Maintenance Manual (960-573) 4 Replacement Procedures 4.23 Heat sink/CPU 4.23 Heat sink/CPU Removing the Heat sink/CPU To remove the heat sink/...CPU, follow the steps below and refer to let it cool before starting repair work. 2) When you remove the heat sink, wipe the grease...


