
User Manual
Page 71
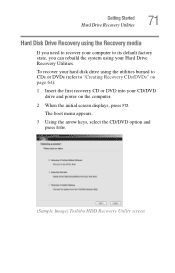
The boot menu appears. 3 Using the arrow keys, select the CD/DVD option and press Enter. (Sample Image) Toshiba HDD Recovery Utility screen To recover your hard disk drive using your CD/DVD drive and power on page 64): 1 Insert the first recovery CD ...
The boot menu appears. 3 Using the arrow keys, select the CD/DVD option and press Enter. (Sample Image) Toshiba HDD Recovery Utility screen To recover your hard disk drive using your CD/DVD drive and power on page 64): 1 Insert the first recovery CD ...
User Manual
Page 178
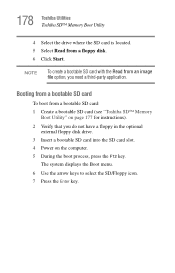
... key. The system displays the Boot menu. 6 Use the arrow keys to select the SD/Floppy icon. 7 Press the Enter key. NOTE To create a bootable SD card with the Read from a bootable SD card: 1 Create a bootable SD card (see "Toshiba SD™ Memory Boot Utility" on page 177 for... instructions). 2 Verify that you need a third-party application. 178 Toshiba Utilities Toshiba SD™ Memory Boot Utility 4 Select the drive where the SD card is located. 5 Select Read ...
... key. The system displays the Boot menu. 6 Use the arrow keys to select the SD/Floppy icon. 7 Press the Enter key. NOTE To create a bootable SD card with the Read from a bootable SD card: 1 Create a bootable SD card (see "Toshiba SD™ Memory Boot Utility" on page 177 for... instructions). 2 Verify that you need a third-party application. 178 Toshiba Utilities Toshiba SD™ Memory Boot Utility 4 Select the drive where the SD card is located. 5 Select Read ...
User Manual
Page 210
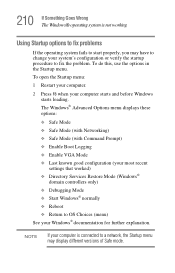
...display different versions of Safe mode. The Windows® Advanced Options menu displays these options: ❖ Safe Mode ❖ Safe Mode (with Networking) ❖ Safe Mode (with Command Prompt) ❖ Enable Boot Logging ❖ Enable VGA Mode ❖ Last known good configuration ...(your Windows® documentation for further explanation. 210 If Something Goes Wrong The Windows® operating system is connected to OS Choices (menu) See your most recent settings that...
...display different versions of Safe mode. The Windows® Advanced Options menu displays these options: ❖ Safe Mode ❖ Safe Mode (with Networking) ❖ Safe Mode (with Command Prompt) ❖ Enable Boot Logging ❖ Enable VGA Mode ❖ Last known good configuration ...(your Windows® documentation for further explanation. 210 If Something Goes Wrong The Windows® operating system is connected to OS Choices (menu) See your most recent settings that...
Maintenance Manual
Page 72
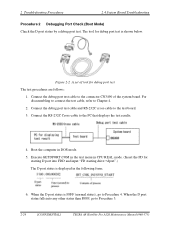
... For disassembling to connect the test cable, refer to Procedure 3. 2-24 [CONFIDENTIAL] TECRA A8 /Satellite Pro A120 Maintenance Manual (960-573) 2 Troubleshooting Procedures 2.4 System Board Troubleshooting Procedure 2 Debugging Port Check (Boot Mode) Check the D port status by a debug port test. Figure 2-2 A... set of the system board. Execute GETDPORT.COM in the text menu in CPU REAL mode. (Insert the FD for starting drive...
... For disassembling to connect the test cable, refer to Procedure 3. 2-24 [CONFIDENTIAL] TECRA A8 /Satellite Pro A120 Maintenance Manual (960-573) 2 Troubleshooting Procedures 2.4 System Board Troubleshooting Procedure 2 Debugging Port Check (Boot Mode) Check the D port status by a debug port test. Figure 2-2 A... set of the system board. Execute GETDPORT.COM in the text menu in CPU REAL mode. (Insert the FD for starting drive...

Maintenance Manual
Page 184
... by FORMAT command of DOS. 2. Select 6 from the DIAGNOSTIC MENU and press Enter, the following tests in sequence: 1. Serial wrap around test (Y/N) ? To terminate the program, press Ctrl + Break. 3-50 [CONFIDENTIAL] TECRA A8 /Satellite Pro A120 Maintenance Manual (960-573) ODD test (subtest... Running Test 3.23.1 Function Description This function automatically executes the following messages for the FDD test. 3.23.2 Operations NOTE: After booting up the Running test, pull out the test program and insert a floppy disk which has been formatted by FORMAT command of DOS...
... by FORMAT command of DOS. 2. Select 6 from the DIAGNOSTIC MENU and press Enter, the following tests in sequence: 1. Serial wrap around test (Y/N) ? To terminate the program, press Ctrl + Break. 3-50 [CONFIDENTIAL] TECRA A8 /Satellite Pro A120 Maintenance Manual (960-573) ODD test (subtest... Running Test 3.23.1 Function Description This function automatically executes the following messages for the FDD test. 3.23.2 Operations NOTE: After booting up the Running test, pull out the test program and insert a floppy disk which has been formatted by FORMAT command of DOS...

Maintenance Manual
Page 191
...Micon Version = VX.XX * - X Math CO-Processor * - TECRA A8 /Satellite Pro A120 Maintenance Manual (960-573) [CONFIDENTIAL] 3-57 3.25 System Configuration 3 Tests and Diagnostics 3.25.2 Operations Select 8 from the DIAGNOSTIC MENU and press Enter. Then, the following system configuration appears in the display...= XXXX-YY-ZZ, XX:YY:ZZ] Press Enter to return to the DIAGNOSTIC MENU. X USB Floppy Disk Drive(s) Track = XX Head = XX, Sector = XX * - System Configuration Display : Ver X.XX [Machine Name ???] * - BOOT ROM Version = VX.XX * - X Hard Disk Drive(s) #1 Sectors = XXXXX...
...Micon Version = VX.XX * - X Math CO-Processor * - TECRA A8 /Satellite Pro A120 Maintenance Manual (960-573) [CONFIDENTIAL] 3-57 3.25 System Configuration 3 Tests and Diagnostics 3.25.2 Operations Select 8 from the DIAGNOSTIC MENU and press Enter. Then, the following system configuration appears in the display...= XXXX-YY-ZZ, XX:YY:ZZ] Press Enter to return to the DIAGNOSTIC MENU. X USB Floppy Disk Drive(s) Track = XX Head = XX, Sector = XX * - System Configuration Display : Ver X.XX [Machine Name ???] * - BOOT ROM Version = VX.XX * - X Hard Disk Drive(s) #1 Sectors = XXXXX...

Maintenance Manual
Page 193
... 1,440 (1K) C: Installed Device=RAMDRIVE Please input the following message is started. input m and press Enter. * * * Atheros MB4x/MB5x/MB6x Maintenance T&D Menu * * * * s : Atheros MB4x DUT mode * * * * Please exchange FD for MB4x DUT media * * * * h : Atheros MB5x DUT...Boot the computer by MB4x Responder media. 2) The Responder T&D is the RAM drive name. Please exchange FD for "MB6x setup media 1" Press any Key to the RAM drive is requested. The file copy from the FD to continue . . . Change the FD with "MB6x setup media 1" and press Enter. TECRA A8...
... 1,440 (1K) C: Installed Device=RAMDRIVE Please input the following message is started. input m and press Enter. * * * Atheros MB4x/MB5x/MB6x Maintenance T&D Menu * * * * s : Atheros MB4x DUT mode * * * * Please exchange FD for MB4x DUT media * * * * h : Atheros MB5x DUT...Boot the computer by MB4x Responder media. 2) The Responder T&D is the RAM drive name. Please exchange FD for "MB6x setup media 1" Press any Key to the RAM drive is requested. The file copy from the FD to continue . . . Change the FD with "MB6x setup media 1" and press Enter. TECRA A8...

Maintenance Manual
Page 194
...Please input the ( s / h / r / m ) key and push the "Enter" key : 2) The RAM drive name which has been set at booting is displayed and command input is requested. "mb6x X" > mb6x c [Enter] 3) The following command. Change the FD with "MB6x setup media 1" and press ...1" Press any Key to continue . . . 3-60 [CONFIDENTIAL] TECRA A8 /Satellite Pro A120 Maintenance Manual (960-573) Input mb6x X and press Enter. Press r. The file copy from the FD to start the computer of X is started . * * * Atheros MB6x DUT mode Maintenance T&D Menu * * * * d : DUT mode * * * *...
...Please input the ( s / h / r / m ) key and push the "Enter" key : 2) The RAM drive name which has been set at booting is displayed and command input is requested. "mb6x X" > mb6x c [Enter] 3) The following command. Change the FD with "MB6x setup media 1" and press ...1" Press any Key to continue . . . 3-60 [CONFIDENTIAL] TECRA A8 /Satellite Pro A120 Maintenance Manual (960-573) Input mb6x X and press Enter. Press r. The file copy from the FD to start the computer of X is started . * * * Atheros MB6x DUT mode Maintenance T&D Menu * * * * d : DUT mode * * * *...


