User Guide
Page 23
... Using the computer for the first time 44 Setting up your software 45 Registering your computer with Toshiba 45 Adding optional external devices 45 Adding memory (optional 46 Installing a memory module 46 Removing a memory module 51 Checking total memory 54 Recovering the Internal Storage Drive 54 Recovering to out-of-box state (recommended recovery method...
... Using the computer for the first time 44 Setting up your software 45 Registering your computer with Toshiba 45 Adding optional external devices 45 Adding memory (optional 46 Installing a memory module 46 Removing a memory module 51 Checking total memory 54 Recovering the Internal Storage Drive 54 Recovering to out-of-box state (recommended recovery method...
User Guide
Page 25
Contents 25 Chapter 3: Mobile Computing 93 Toshiba's energy-saver design 93 Running the computer on battery power 93 Battery Notice 94 ...do when the main battery runs low........99 Setting battery notifications 99 Conserving battery power 100 Power Plans 101 Using the TOSHIBA eco power plan 102 Changing the main battery 102 Removing the battery from the computer .......103 Inserting a charged battery... Recording sounds 113 Using external speakers or headphones..........114 Using the Web Camera 114 Using the Memory card reader 115 Inserting memory media 115 Removing memory media 116
Contents 25 Chapter 3: Mobile Computing 93 Toshiba's energy-saver design 93 Running the computer on battery power 93 Battery Notice 94 ...do when the main battery runs low........99 Setting battery notifications 99 Conserving battery power 100 Power Plans 101 Using the TOSHIBA eco power plan 102 Changing the main battery 102 Removing the battery from the computer .......103 Inserting a charged battery... Recording sounds 113 Using external speakers or headphones..........114 Using the Web Camera 114 Using the Memory card reader 115 Inserting memory media 115 Removing memory media 116
User Guide
Page 27
Contents 27 Checking device properties 147 Memory problems 148 Power and the batteries 148 Keyboard problems 150 Display problems 150 Disk or storage drive problems 152 Error-checking 152 Optical disc drive ... Data and system configuration backup in the Windows® operating system 159 If you need further assistance 163 Contacting Toshiba 164 Other Toshiba Internet Web sites 164 Toshiba's worldwide offices 165 Appendix A: Hot Keys/TOSHIBA Cards 166 Hot Key Cards 166 Using the Hot Key Cards 167 Hot key functions 167 Help 167 Display...
Contents 27 Checking device properties 147 Memory problems 148 Power and the batteries 148 Keyboard problems 150 Display problems 150 Disk or storage drive problems 152 Error-checking 152 Optical disc drive ... Data and system configuration backup in the Windows® operating system 159 If you need further assistance 163 Contacting Toshiba 164 Other Toshiba Internet Web sites 164 Toshiba's worldwide offices 165 Appendix A: Hot Keys/TOSHIBA Cards 166 Hot Key Cards 166 Using the Hot Key Cards 167 Hot key functions 167 Help 167 Display...

User Guide
Page 41
... a power source" on page 41. NOTE Please handle your computer carefully to be charged before adding external or internal components to , a mouse, keyboard, printer, and memory. Always grasp the plug directly. Never pull on a power cord/cable to operate. Connecting to a power source Your computer requires power to remove a plug from...
... a power source" on page 41. NOTE Please handle your computer carefully to be charged before adding external or internal components to , a mouse, keyboard, printer, and memory. Always grasp the plug directly. Never pull on a power cord/cable to operate. Connecting to a power source Your computer requires power to remove a plug from...
User Guide
Page 45
... to your product. Product registration can be completed by either visiting the Toshiba Web site at http://www.register.toshiba.com, or by clicking the Start button and, in which windows appear, may want to: ❖ Add more memory (see "Adding memory (optional)" on page 46) ❖ Connect external devices (see "Connecting an external... Wizard guides you turn off the power again until the operating system has loaded completely. Adding optional external devices NOTE Before adding external devices or memory, Toshiba recommends setting up your selection.
... to your product. Product registration can be completed by either visiting the Toshiba Web site at http://www.register.toshiba.com, or by clicking the Start button and, in which windows appear, may want to: ❖ Add more memory (see "Adding memory (optional)" on page 46) ❖ Connect external devices (see "Connecting an external... Wizard guides you turn off the power again until the operating system has loaded completely. Adding optional external devices NOTE Before adding external devices or memory, Toshiba recommends setting up your selection.
User Guide
Page 46
...temperature before they have cooled. Installing a memory module with your system or visit accessories.toshiba.com. Before you use a Phillips screwdriver of data. 46 Getting Started Adding memory (optional) Adding memory (optional) HINT: To purchase additional memory modules, see the accessories information packaged ...with the computer's power on may damage the computer, the module, or both. NOTE Before adding external devices or memory, Toshiba recommends setting up your software. See "Setting up your software" on the underside of today's popular applications. Allow the...
...temperature before they have cooled. Installing a memory module with your system or visit accessories.toshiba.com. Before you use a Phillips screwdriver of data. 46 Getting Started Adding memory (optional) Adding memory (optional) HINT: To purchase additional memory modules, see the accessories information packaged ...with the computer's power on may damage the computer, the module, or both. NOTE Before adding external devices or memory, Toshiba recommends setting up your software. See "Setting up your software" on the underside of today's popular applications. Allow the...
User Guide
Page 47
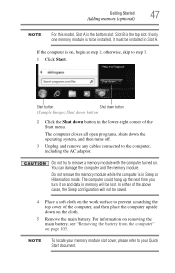
... The computer closes all open programs, shuts down on the cloth. 5 Remove the main battery. You can damage the computer and the memory module. If only one memory module is the bottom slot. Start button Shut down button (Sample Image) Shut down button 2 Click the Shut down button in Slot A.... Getting Started 47 Adding memory (optional) NOTE For this model, Slot A is to be installed, it on and data in Sleep or Hibernation mode. For information on removing the...
... The computer closes all open programs, shuts down on the cloth. 5 Remove the main battery. You can damage the computer and the memory module. If only one memory module is the bottom slot. Start button Shut down button (Sample Image) Shut down button 2 Click the Shut down button in Slot A.... Getting Started 47 Adding memory (optional) NOTE For this model, Slot A is to be installed, it on and data in Sleep or Hibernation mode. For information on removing the...
User Guide
Page 48
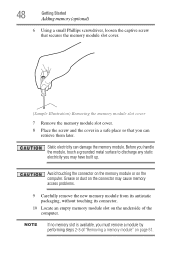
... or dust on the connector may have built up. 48 Getting Started Adding memory (optional) 6 Using a small Phillips screwdriver, loosen the captive screw that secures the memory module slot cover. (Sample Illustration) Removing the memory module slot cover 7 Remove the memory module slot cover. 8 Place the screw and the cover in a safe place so...
... or dust on the connector may have built up. 48 Getting Started Adding memory (optional) 6 Using a small Phillips screwdriver, loosen the captive screw that secures the memory module slot cover. (Sample Illustration) Removing the memory module slot cover 7 Remove the memory module slot cover. 8 Place the screw and the cover in a safe place so...
User Guide
Page 49
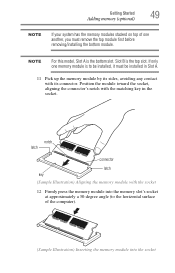
...toward the socket, aligning the connector's notch with the socket 12 Firmly press the memory module into the memory slot's socket at approximately a 30-degree angle (to the horizontal surface of one memory module is to be installed, it must remove the top module first before removing/installing... the bottom module. notch latch connector latch key (Sample Illustration) Aligning the memory module with the matching key in Slot A. 11 Pick up the memory module by its sides, avoiding any contact with its connector. Getting Started 49 Adding...
...toward the socket, aligning the connector's notch with the socket 12 Firmly press the memory module into the memory slot's socket at approximately a 30-degree angle (to the horizontal surface of one memory module is to be installed, it must remove the top module first before removing/installing... the bottom module. notch latch connector latch key (Sample Illustration) Aligning the memory module with the matching key in Slot A. 11 Pick up the memory module by its sides, avoiding any contact with its connector. Getting Started 49 Adding...
User Guide
Page 50
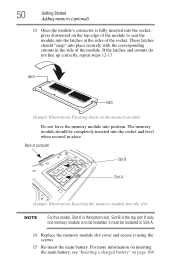
... latches at the sides of the socket. For more information on inserting the main battery, see "Inserting a charged battery" on the memory module Do not force the memory module into position. latch latch (Sample Illustration) Pressing down on page 104. Slot B is the bottom slot. The... memory module should "snap" into place securely with the corresponding cutouts in Slot A. 14 Replace the memory module slot cover and secure it must be installed in the side of the module. 50 Getting...
... latches at the sides of the socket. For more information on inserting the main battery, see "Inserting a charged battery" on the memory module Do not force the memory module into position. latch latch (Sample Illustration) Pressing down on page 104. Slot B is the bottom slot. The... memory module should "snap" into place securely with the corresponding cutouts in Slot A. 14 Replace the memory module slot cover and secure it must be installed in the side of the module. 50 Getting...
User Guide
Page 51
... to work surface before restarting the computer. When the operating system has loaded, you can now continue setting up . If you need to remove a memory module: 1 Complete steps 1-8 in Sleep mode). In this condition, observe the following: ❖ Never cover your computer or AC adaptor with any ...is connected to remove the soft cloth from overheating when the power is turned on or when an AC adaptor is in "Installing a memory module" on a carpet or other soft material can block the vents located at the underside of the computer. Overheating your computer and ...
... to work surface before restarting the computer. When the operating system has loaded, you can now continue setting up . If you need to remove a memory module: 1 Complete steps 1-8 in Sleep mode). In this condition, observe the following: ❖ Never cover your computer or AC adaptor with any ...is connected to remove the soft cloth from overheating when the power is turned on or when an AC adaptor is in "Installing a memory module" on a carpet or other soft material can block the vents located at the underside of the computer. Overheating your computer and ...
User Guide
Page 52
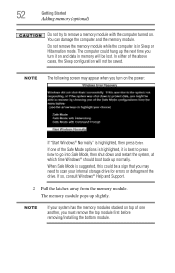
...it on the power: If "Start Windows® Normally" is suggested, this could hang up slightly. 52 Getting Started Adding memory (optional) Do not try to remove a memory module with the computer turned on top of one of the above cases, the Sleep configuration will be lost. If so, ...consult Windows® Help and Support. 2 Pull the latches away from the memory module. The memory module pops up the next time you may appear when you must remove the top module first before removing/installing the bottom module. You...
...it on the power: If "Start Windows® Normally" is suggested, this could hang up slightly. 52 Getting Started Adding memory (optional) Do not try to remove a memory module with the computer turned on top of one of the above cases, the Sleep configuration will be lost. If so, ...consult Windows® Help and Support. 2 Pull the latches away from the memory module. The memory module pops up the next time you may appear when you must remove the top module first before removing/installing the bottom module. You...
User Guide
Page 53
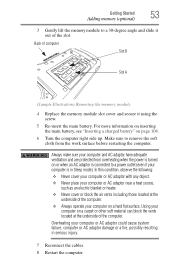
... protected from the work surface before restarting the computer. Getting Started 53 Adding memory (optional) 3 Gently lift the memory module to a 30-degree angle and slide it out of computer Slot B Slot A (Sample Illustration) Removing the memory module 4 Replace the memory module slot cover and secure it using the screw. 5 Re-insert the main...
... protected from the work surface before restarting the computer. Getting Started 53 Adding memory (optional) 3 Gently lift the memory module to a 30-degree angle and slide it out of computer Slot B Slot A (Sample Illustration) Removing the memory module 4 Replace the memory module slot cover and secure it using the screw. 5 Re-insert the main...
User Guide
Page 54
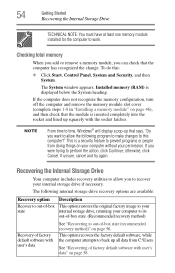
.... 54 Getting Started Recovering the Internal Storage Drive TECHNICAL NOTE: You must have at least one memory module installed for the computer to prevent programs or people from C:\Users. Installed memory (RAM) is inserted completely into the socket and lined up squarely with user's data" on ...Do you can check that the module is displayed below the System heading. If the computer does not recognize the memory configuration, turn off the computer and remove the memory module slot cover (complete steps 1-8 in "Installing a memory module" on page 56. otherwise, click Cancel.
.... 54 Getting Started Recovering the Internal Storage Drive TECHNICAL NOTE: You must have at least one memory module installed for the computer to prevent programs or people from C:\Users. Installed memory (RAM) is inserted completely into the socket and lined up squarely with user's data" on ...Do you can check that the module is displayed below the System heading. If the computer does not recognize the memory configuration, turn off the computer and remove the memory module slot cover (complete steps 1-8 in "Installing a memory module" on page 56. otherwise, click Cancel.

User Guide
Page 82
... must restart your computer to reconnect, or your file to the internal storage drive. Computing tips ❖ Save your work stays in the computer's temporary memory until you last saved.
... must restart your computer to reconnect, or your file to the internal storage drive. Computing tips ❖ Save your work stays in the computer's temporary memory until you last saved.
User Guide
Page 94
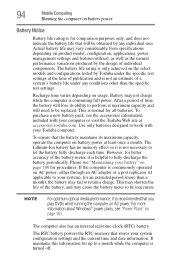
.... To ensure that stores your computer or visit the Toshiba Web site at maximum capacity and will be inaccurate. The RTC battery powers the RTC memory that the battery maintains its ability to perform at accessories.toshiba.com. It maintains this information for up to be replaced... is normal for all batteries. To purchase a new battery pack, see the accessories information included with your Toshiba computer. The Lithium-Ion battery has no memory effect so it is helpful to fully discharge the battery periodically. NOTE For optimum optical media performance, it ...
.... To ensure that stores your computer or visit the Toshiba Web site at maximum capacity and will be inaccurate. The RTC battery powers the RTC memory that the battery maintains its ability to perform at accessories.toshiba.com. It maintains this information for up to be replaced... is normal for all batteries. To purchase a new battery pack, see the accessories information included with your Toshiba computer. The Lithium-Ion battery has no memory effect so it is helpful to fully discharge the battery periodically. NOTE For optimum optical media performance, it ...
User Guide
Page 96
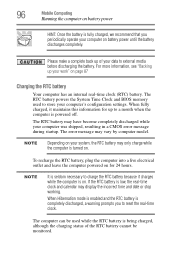
... the charging status of your computer was shipped, resulting in a CMOS error message during startup. The RTC battery powers the System Time Clock and BIOS memory used while the RTC battery is powered off. When Hibernation mode is enabled and the RTC battery is completely discharged, a warning prompts you periodically operate...
... the charging status of your computer was shipped, resulting in a CMOS error message during startup. The RTC battery powers the System Time Clock and BIOS memory used while the RTC battery is powered off. When Hibernation mode is enabled and the RTC battery is completely discharged, a warning prompts you periodically operate...
User Guide
Page 115
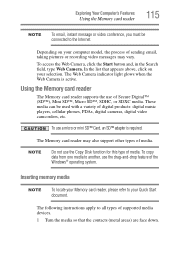
...use of Secure Digital™ (SD™), Mini SD™, Micro SD™, SDHC, or SDXC media. Exploring Your Computer's Features Using the Memory card reader 115 NOTE To email, instant message or video conference, you must be used with a variety of digital products: digital music players, cellular ...use the drag-and-drop feature of supported media devices. 1 Turn the media so that appears above, click on your selection. Inserting memory media NOTE To locate your Memory card reader, please refer to another, use a micro or mini SD™ Card, an SD™ adapter is active. To ...
...use of Secure Digital™ (SD™), Mini SD™, Micro SD™, SDHC, or SDXC media. Exploring Your Computer's Features Using the Memory card reader 115 NOTE To email, instant message or video conference, you must be used with a variety of digital products: digital music players, cellular ...use the drag-and-drop feature of supported media devices. 1 Turn the media so that appears above, click on your selection. Inserting memory media NOTE To locate your Memory card reader, please refer to another, use a micro or mini SD™ Card, an SD™ adapter is active. To ...
User Guide
Page 116
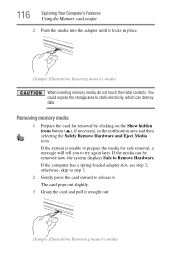
... safe removal, a message will tell you to Remove Hardware. If the system is unable to release it straight out. (Sample Illustration) Removing memory media If the computer has a spring-loaded adapter slot, see step 2; If the media can destroy data. The card pops out slightly. ...the Show hidden icons button ( ), if necessary, in place. (Sample Illustration) Inserting memory media When inserting memory media, do not touch the metal contacts. 116 Exploring Your Computer's Features Using the Memory card reader 2 Push the media into the adapter until it locks in the notification area...
... safe removal, a message will tell you to Remove Hardware. If the system is unable to release it straight out. (Sample Illustration) Removing memory media If the computer has a spring-loaded adapter slot, see step 2; If the media can destroy data. The card pops out slightly. ...the Show hidden icons button ( ), if necessary, in place. (Sample Illustration) Inserting memory media When inserting memory media, do not touch the metal contacts. 116 Exploring Your Computer's Features Using the Memory card reader 2 Push the media into the adapter until it locks in the notification area...

User Guide
Page 117
Wait for the indicator light to the media might still be in progress and your data could be destroyed. Even when the Windows® message "copying..." Exploring Your Computer's Features Using the Memory card reader 117 Do not remove memory media while data is being written or read. disappears, writing to go out.
Wait for the indicator light to the media might still be in progress and your data could be destroyed. Even when the Windows® message "copying..." Exploring Your Computer's Features Using the Memory card reader 117 Do not remove memory media while data is being written or read. disappears, writing to go out.


