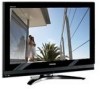
Owner's Manual - English
Page 2
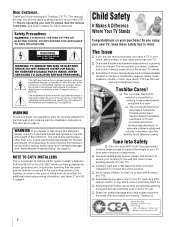
... on dressers, bookcases, shelves, desks, audio speakers, chests, or carts. a The home theater entertainment experience is a reminder to call the CATV system installer's attention to secure your TV (and other than one TV. As you have more than a UL Listed wall bracket appropriate for the size and weight of the U.S. Thank you for wall mounting this Toshiba LCD TV. The exclamation point within the product...
... on dressers, bookcases, shelves, desks, audio speakers, chests, or carts. a The home theater entertainment experience is a reminder to call the CATV system installer's attention to secure your TV (and other than one TV. As you have more than a UL Listed wall bracket appropriate for the size and weight of the U.S. Thank you for wall mounting this Toshiba LCD TV. The exclamation point within the product...
Owner's Manual - English
Page 4
... for the television, avoid locations where the screen may be exposed to clean the LCD screen, follow this product can accidentally touch overhead power lines. For disposal or recycling information, contact your TV from lightning and power surges, always unplug the power cord and disconnect the antenna from the TV if you have the TV serviced: • Ask the service technician to use only replacement parts specified by...
... for the television, avoid locations where the screen may be exposed to clean the LCD screen, follow this product can accidentally touch overhead power lines. For disposal or recycling information, contact your TV from lightning and power surges, always unplug the power cord and disconnect the antenna from the TV if you have the TV serviced: • Ask the service technician to use only replacement parts specified by...
Owner's Manual - English
Page 7
... 24 Remote control codes 25 Chapter 4: Menu layout and navigation 27 Main menu layout 27 Setup/Installation menu layout 28 Navigating the menu system 28 Chapter 5: Setting up your TV 29 Selecting the menu language 29 Configuring the antenna input source for the ANT terminal 29 Programming channels into the TV's channel memory . . . . 30 Programming channels automatically 30 Manually adding and deleting channels in the channel memory 30 Labeling channels 31 Setting the HDMI™ audio mode 32 Viewing the digital signal...
... 24 Remote control codes 25 Chapter 4: Menu layout and navigation 27 Main menu layout 27 Setup/Installation menu layout 28 Navigating the menu system 28 Chapter 5: Setting up your TV 29 Selecting the menu language 29 Configuring the antenna input source for the ANT terminal 29 Programming channels into the TV's channel memory . . . . 30 Programming channels automatically 30 Manually adding and deleting channels in the channel memory 30 Labeling channels 31 Setting the HDMI™ audio mode 32 Viewing the digital signal...
Owner's Manual - English
Page 8
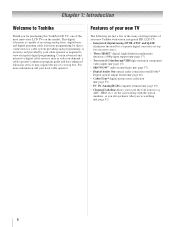
... video-on the screen along with Dolby® Digital optical output format (- ABC, HBO, etc.) on -demand, a cable operator's enhanced program guide and data-enhanced television services may require the use of receiving analog basic, digital basic and digital premium cable television programming by your local cable operator. Chapter 1: Introduction Welcome to a cable system providing such programming. page 19). • Channel Labeling allows you 're watching (- For more information call your cable operator is capable of a set -top box...
... video-on the screen along with Dolby® Digital optical output format (- ABC, HBO, etc.) on -demand, a cable operator's enhanced program guide and data-enhanced television services may require the use of receiving analog basic, digital basic and digital premium cable television programming by your local cable operator. Chapter 1: Introduction Welcome to a cable system providing such programming. page 19). • Channel Labeling allows you 're watching (- For more information call your cable operator is capable of a set -top box...
Owner's Manual - English
Page 9
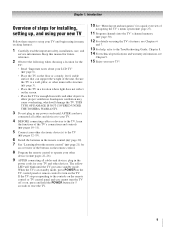
... connecting all cables and devices, plug in standby mode, press POWER on the remote control or TV control panel and you have connected all cables and devices to your other devices. Secure the TV to allow proper ventilation. page 21) for your TV and other electronic device(s) to the Troubleshooting Guide, Chapter 8. 14 For technical specifications and warranty information, see Chapters 6 and 7. 13 For help, refer to the TV (- If the TV...
... connecting all cables and devices, plug in standby mode, press POWER on the remote control or TV control panel and you have connected all cables and devices to your other devices. Secure the TV to allow proper ventilation. page 21) for your TV and other electronic device(s) to the Troubleshooting Guide, Chapter 8. 14 For technical specifications and warranty information, see Chapters 6 and 7. 13 For help, refer to the TV (- If the TV...
Owner's Manual - English
Page 11
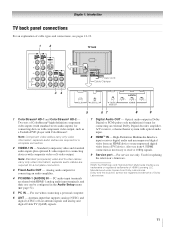
... in Dolby Digital or PCM (pulse-code modulation) format for a complete connection. 3 Fixed Audio OUT - Analog audio outputs for connecting devices with optical audio input. 8 HDMI™ IN - High-Definition Multimedia Interface input receives digital audio and uncompressed digital video from an HDMI device or uncompressed digital video from Dolby Laboratories. Antenna input that supports analog (NTSC) and digital (ATSC) off-air antenna signals and analog and digital Cable TV (QAM) signals. 7 Digital Audio OUT - Note: Component video cables carry only video information; Note...
... in Dolby Digital or PCM (pulse-code modulation) format for a complete connection. 3 Fixed Audio OUT - Analog audio outputs for connecting devices with optical audio input. 8 HDMI™ IN - High-Definition Multimedia Interface input receives digital audio and uncompressed digital video from an HDMI device or uncompressed digital video from Dolby Laboratories. Antenna input that supports analog (NTSC) and digital (ATSC) off-air antenna signals and analog and digital Cable TV (QAM) signals. 7 Digital Audio OUT - Note: Component video cables carry only video information; Note...
Owner's Manual - English
Page 12
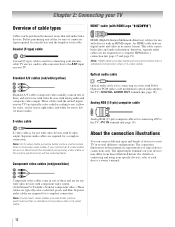
...) audio. Separate audio cables are typically color-coded according to use with devices with S-video output. Optical audio cable Optical audio cable is for connecting receivers with Dolby Digital or PCM (pulse-code modulation) optical audio input to the TV's PC IN terminal (- Analog RGB (15-pin) computer cable S-video cable Analog RGB (15-pin) computer cable is for connecting a PC to the TV's DIGITAL AUDIO OUT terminal (- Note: An S-video cable provides better picture performance than a standard (composite) video or S-video cable. Component video cables (red/green...
...) audio. Separate audio cables are typically color-coded according to use with devices with S-video output. Optical audio cable Optical audio cable is for connecting receivers with Dolby Digital or PCM (pulse-code modulation) optical audio input to the TV's PC IN terminal (- Analog RGB (15-pin) computer cable S-video cable Analog RGB (15-pin) computer cable is for connecting a PC to the TV's DIGITAL AUDIO OUT terminal (- Note: An S-video cable provides better picture performance than a standard (composite) video or S-video cable. Component video cables (red/green...

Owner's Manual - English
Page 14
... of television programs, videotapes, DVDs, and other materials is set to change channels. Do not connect both types of the United States and other devices, see Chapter 3. Note: When you use the remote control to program or access certain features on the TV to TV You will provide better picture performance than a standard (composite) video cable. Chapter 2: Connecting your VCR's audio out terminal using the white audio cable only. TV upper back panel TV lower back panel From Cable TV Cable box...
... of television programs, videotapes, DVDs, and other materials is set to change channels. Do not connect both types of the United States and other devices, see Chapter 3. Note: When you use the remote control to program or access certain features on the TV to TV You will provide better picture performance than a standard (composite) video cable. Chapter 2: Connecting your VCR's audio out terminal using the white audio cable only. TV upper back panel TV lower back panel From Cable TV Cable box...
Owner's Manual - English
Page 19
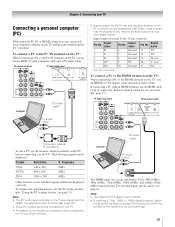
... Other formats or non-standard signals will not be displayed: Format Resolution V. Computer PC audio cable PC audio output The HDMI input can be displayed correctly. • To display the optimum picture, use a PC, set the monitor output resolution on the TV and hear the sound from the TV's speakers. TV upper back panel TV lower back panel PC audio output Conversion adapter (if necessary) • To use the PC setting feature (- Chapter 2: Connecting your computer's display on the PC before connecting it to the TV. Signal...
... Other formats or non-standard signals will not be displayed: Format Resolution V. Computer PC audio cable PC audio output The HDMI input can be displayed correctly. • To display the optimum picture, use a PC, set the monitor output resolution on the TV and hear the sound from the TV's speakers. TV upper back panel TV lower back panel PC audio output Conversion adapter (if necessary) • To use the PC setting feature (- Chapter 2: Connecting your computer's display on the PC before connecting it to the TV. Signal...
Owner's Manual - English
Page 27
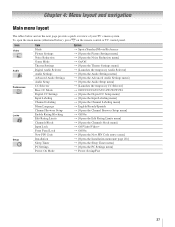
...Video Audio Preferences Locks Setup Item Mode Picture Settings Noise Reduction Game Mode Theater Settings Digital Audio Selector Audio Settings Advanced Audio Settings Audio Setup CC Selector Base CC Mode Digital CC Settings Input Labeling Channel Labeling Menu Language Channel Browser Setup Enable Rating Blocking Edit Rating Limits Channels Block Input Lock Front Panel Lock New PIN Code Installation Sleep Timer PC Settings Power-On Mode Option S Sports/Standard/Movie/Preference S [Opens the Picture Settings menu] S [Opens the Noise Reduction menu] S On/Off S [Opens the Theater Settings menu...
...Video Audio Preferences Locks Setup Item Mode Picture Settings Noise Reduction Game Mode Theater Settings Digital Audio Selector Audio Settings Advanced Audio Settings Audio Setup CC Selector Base CC Mode Digital CC Settings Input Labeling Channel Labeling Menu Language Channel Browser Setup Enable Rating Blocking Edit Rating Limits Channels Block Input Lock Front Panel Lock New PIN Code Installation Sleep Timer PC Settings Power-On Mode Option S Sports/Standard/Movie/Preference S [Opens the Picture Settings menu] S [Opens the Noise Reduction menu] S On/Off S [Opens the Theater Settings menu...
Owner's Manual - English
Page 28
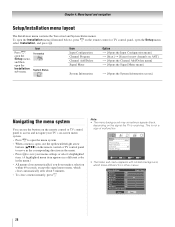
... Y, open the Setup menu, and then open , use the buttons on the remote control or TV control panel to access and navigate your TV's on-screen menu system. • Press Y to save your menu settings or select a highlighted item. (A highlighted menu item appears in a different color in the menu.) • All menus close a menu instantly, press O. Picture Settings Contrast 100 Back Light 100 DynaLight Brightness 50 Color 50 Tint 0 Sharpness 50 Advanced Picture Settings Reset Mode: Sports On...
... Y, open the Setup menu, and then open , use the buttons on the remote control or TV control panel to access and navigate your TV's on-screen menu system. • Press Y to save your menu settings or select a highlighted item. (A highlighted menu item appears in a different color in the menu.) • All menus close a menu instantly, press O. Picture Settings Contrast 100 Back Light 100 DynaLight Brightness 50 Color 50 Tint 0 Sharpness 50 Advanced Picture Settings Reset Mode: Sports On...

Owner's Manual - English
Page 30
... Timer PC Settings Power-On Mode Power-Saving 4 (A new set of Channels Found - 73 Scanning Digital Channels Found Channel - 118 Abort The TV will automatically cycle through the channels, the message "Scanning channels, please wait" appears (as shown above). 5 To cancel channel programming, press O on the remote control (or highlight Abort in the channel memory, you must use the Channel Number buttons on the remote control. • Programming channels when the antenna input is configured for Antenna. Installation Terrestrial Input Configuration Channel Program Channel Add/Delete Signal...
... Timer PC Settings Power-On Mode Power-Saving 4 (A new set of Channels Found - 73 Scanning Digital Channels Found Channel - 118 Abort The TV will automatically cycle through the channels, the message "Scanning channels, please wait" appears (as shown above). 5 To cancel channel programming, press O on the remote control (or highlight Abort in the channel memory, you must use the Channel Number buttons on the remote control. • Programming channels when the antenna input is configured for Antenna. Installation Terrestrial Input Configuration Channel Program Channel Add/Delete Signal...

Owner's Manual - English
Page 32
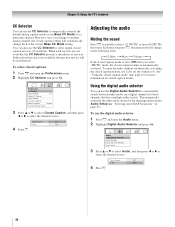
... change channels. Press CH UP/DOWN to change channels. Audio Setup PC Audio HDMI 1 Audio MTS Language Optical Output Format Dolby Digital Dynamic Range Control Reset No Auto Stereo English Dolby Digital Compressed Done Note: Because the PC and HDMI-1 inputs share the same set the HDMI audio mode: 1 Press Y and open the Audio menu. 2 Highlight Audio Setup and press T. 3 Press B or b to select HDMI 1 Audio and then press C or c to select the HDMI 1 audio mode (Auto, Digital, or Analog). (Auto is the recommended mode.) See "Connecting an HDMI...
... change channels. Press CH UP/DOWN to change channels. Audio Setup PC Audio HDMI 1 Audio MTS Language Optical Output Format Dolby Digital Dynamic Range Control Reset No Auto Stereo English Dolby Digital Compressed Done Note: Because the PC and HDMI-1 inputs share the same set the HDMI audio mode: 1 Press Y and open the Audio menu. 2 Highlight Audio Setup and press T. 3 Press B or b to select HDMI 1 Audio and then press C or c to select the HDMI 1 audio mode (Auto, Digital, or Analog). (Auto is the recommended mode.) See "Connecting an HDMI...
Owner's Manual - English
Page 38
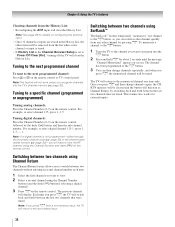
... programmed channel: Press < or , on the remote control. For example, to a specific channel (programmed or unprogrammed) Tuning analog channels: Press the Channel Number (0-9) on the remote control or TV control panel. Switching between the last two channels that are stored in the Channel Browser Setup is not programmed-either through the automatic channel scan (- To memorize a channel to the R button: 1 Tune the TV to the channel you want to "Power Off Clear (On)," turning off the TV will function as Channel...
... programmed channel: Press < or , on the remote control. For example, to a specific channel (programmed or unprogrammed) Tuning analog channels: Press the Channel Number (0-9) on the remote control or TV control panel. Switching between the last two channels that are stored in the Channel Browser Setup is not programmed-either through the automatic channel scan (- To memorize a channel to the R button: 1 Tune the TV to the channel you want to "Power Off Clear (On)," turning off the TV will function as Channel...
Owner's Manual - English
Page 44
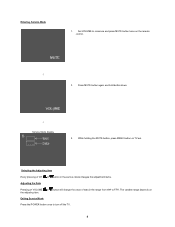
... next best service will automatically change back to the current Base CC Mode setting. See "Using the closed caption modes. "Selecting stereo/SAP broadcasts" on closed caption mode" (- Chapter 6: Using the TV's features CC Selector You can use the CC Selector to temporarily override the default analog caption mode (set in the following order: 1/2 Mute Mute Volume If the closed caption mode is set the volume to partially reduce (1/2 MUTE) or turn off (MUTE) the sound. You can use the Digital Audio...
... next best service will automatically change back to the current Base CC Mode setting. See "Using the closed caption modes. "Selecting stereo/SAP broadcasts" on closed caption mode" (- Chapter 6: Using the TV's features CC Selector You can use the CC Selector to temporarily override the default analog caption mode (set in the following order: 1/2 Mute Mute Volume If the closed caption mode is set the volume to partially reduce (1/2 MUTE) or turn off (MUTE) the sound. You can use the Digital Audio...
Owner's Manual - English
Page 58
... plug the power cord in, the yellow LED will change to the next video input source and display the Input Selection window. 58 Cannot view external signals or channel 3 or 4 • If you notice this phenomenon only on certain TV channels, please contact your TV's problem is set -top box, etc.) try the control panel buttons. page 22). • Do not connect both a standard video cable and an S-video cable to Off (- television broadcasts, video games, DVDs), you select that the sound and picture...
... plug the power cord in, the yellow LED will change to the next video input source and display the Input Selection window. 58 Cannot view external signals or channel 3 or 4 • If you notice this phenomenon only on certain TV channels, please contact your TV's problem is set -top box, etc.) try the control panel buttons. page 22). • Do not connect both a standard video cable and an S-video cable to Off (- television broadcasts, video games, DVDs), you select that the sound and picture...

Owner's Manual - English
Page 62
... your LCD Television online at no cost to you or to damage to the LCD Television or parts caused by fires, misuse, accident, Acts of God (such as lightning or fluctuations in materials or workmanship for set installation, setup, adjustment of customer controls, and installation or repair of antenna systems are your home at www.tacp.toshiba.com/service as soon as follows: all of the operating instructions...
... your LCD Television online at no cost to you or to damage to the LCD Television or parts caused by fires, misuse, accident, Acts of God (such as lightning or fluctuations in materials or workmanship for set installation, setup, adjustment of customer controls, and installation or repair of antenna systems are your home at www.tacp.toshiba.com/service as soon as follows: all of the operating instructions...
Owner's Manual - English
Page 63
... Warranty for LCD Televisions Toshiba of original retail purchase. Limited One (1) Year Warranty on the type of the Television; Limited Warranty for Commercial Units TCL warrants Televisions that are used for any commercial or business purposes as set installation, setup, adjustment of customer controls, and installation or repair of Remedy TO THE EXTENT NOT PRECLUDED BY LAW, ALL OTHER EXPRESS AND IMPLIED WARRANTIES, CONDITIONS AND REPRESENTATIONS FOR THIS TELEVISION...
... Warranty for LCD Televisions Toshiba of original retail purchase. Limited One (1) Year Warranty on the type of the Television; Limited Warranty for Commercial Units TCL warrants Televisions that are used for any commercial or business purposes as set installation, setup, adjustment of customer controls, and installation or repair of Remedy TO THE EXTENT NOT PRECLUDED BY LAW, ALL OTHER EXPRESS AND IMPLIED WARRANTIES, CONDITIONS AND REPRESENTATIONS FOR THIS TELEVISION...

Owner's Manual - English
Page 65
... lock 51 Unlocking programs temporarily 50 Video inputs, locking 50 Locks menu 47 M MPEG noise reduction 56 MTS feature 45 MUTE button 44 O Optical audio cable 12 Optical audio output format 46 P PC Audio 52 PC connection 19 PC settings 51 Picture adjustment 42 Picture mode 42 Picture quality 42 Picture scroll 40 Picture size selection 39 POWER button 10, 21 Power-On Mode 34 R RECALL button 53 Remote control Battery installation 20 Device code table 25 Effective range 20 Functional key chart 23 Learning about the buttons .......21 Programming 24 Reset Factory Defaults...
... lock 51 Unlocking programs temporarily 50 Video inputs, locking 50 Locks menu 47 M MPEG noise reduction 56 MTS feature 45 MUTE button 44 O Optical audio cable 12 Optical audio output format 46 P PC Audio 52 PC connection 19 PC settings 51 Picture adjustment 42 Picture mode 42 Picture quality 42 Picture scroll 40 Picture size selection 39 POWER button 10, 21 Power-On Mode 34 R RECALL button 53 Remote control Battery installation 20 Device code table 25 Effective range 20 Functional key chart 23 Learning about the buttons .......21 Programming 24 Reset Factory Defaults...
Service Manual
Page 6
...; Service Mode display 3. Exiting Service Mode Press the POWER button once to FFH. Entering Service Mode 1. While holding the MUTE button, press MENU button on the adjusting item. Selecting the Adjusting Item Every pressing of CH or button in the service mode changes the adjustment items. Adjusting the Data Pressing of VOLUME or button will change the value of data in the range from 00H to turn off the TV. 5 The variable range depends on TV set. Set VOLUME...
...; Service Mode display 3. Exiting Service Mode Press the POWER button once to FFH. Entering Service Mode 1. While holding the MUTE button, press MENU button on the adjusting item. Selecting the Adjusting Item Every pressing of CH or button in the service mode changes the adjustment items. Adjusting the Data Pressing of VOLUME or button will change the value of data in the range from 00H to turn off the TV. 5 The variable range depends on TV set. Set VOLUME...


