Printable Spec Sheet
Page 2
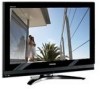
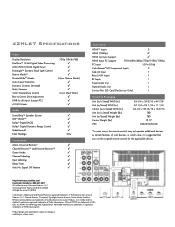
... which case, it is suggested that you use the original remote control for all inputs (except PC) 4:3 HD Mode 720p (1366x768 6 (inc. http://www.tacp.toshiba.com Customer Solutions: 800.631.3811 © Toshiba America Consumer Products, L.L.C. 82 Totowa Road, Wayne, NJ 07470 (2007). 42HL67 Specifications Video Display Resolution PixelPure™ 14 bit Digital Video...
... which case, it is suggested that you use the original remote control for all inputs (except PC) 4:3 HD Mode 720p (1366x768 6 (inc. http://www.tacp.toshiba.com Customer Solutions: 800.631.3811 © Toshiba America Consumer Products, L.L.C. 82 Totowa Road, Wayne, NJ 07470 (2007). 42HL67 Specifications Video Display Resolution PixelPure™ 14 bit Digital Video...
Owner's Manual - English
Page 2
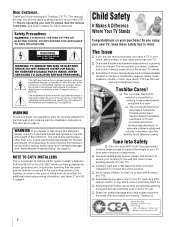
...as a VCR, remote control, or toy) that the cable ground shall be connected to the point of the U.S. a Share our safety message about television safety. Before operating your LCD TV, please read and understand the other enclosed instructions for the size and weight of TV and consumer electronics furniture... you have more than a UL Listed wall bracket appropriate for proper use a UL Listed wall bracket appropriate for wall mounting this Toshiba LCD TV. Safety Precautions WARNING: TO REDUCE THE RISK OF FIRE OR ELECTRIC SHOCK, DO NOT EXPOSE THIS APPLIANCE TO RAIN OR MOISTURE. ...
...as a VCR, remote control, or toy) that the cable ground shall be connected to the point of the U.S. a Share our safety message about television safety. Before operating your LCD TV, please read and understand the other enclosed instructions for the size and weight of TV and consumer electronics furniture... you have more than a UL Listed wall bracket appropriate for proper use a UL Listed wall bracket appropriate for wall mounting this Toshiba LCD TV. Safety Precautions WARNING: TO REDUCE THE RISK OF FIRE OR ELECTRIC SHOCK, DO NOT EXPOSE THIS APPLIANCE TO RAIN OR MOISTURE. ...
Owner's Manual - English
Page 7
...to Toshiba 8 Features of your new TV 8 Overview of steps for installing, setting up, and using your new TV 9 TV front and side panel controls and connections 10 TV back panel connections 11 Chapter 2: Connecting your TV ...remote control 21 Using the remote control to control your other devices . . . . 22 Remote Control functional key chart 23 Programming the remote control to control your other devices 24 Remote control codes 25 Chapter 4: Menu layout and navigation 27 Main menu layout 27 Setup/Installation menu layout 28 Navigating the menu system 28 Chapter 5: Setting up your TV...
...to Toshiba 8 Features of your new TV 8 Overview of steps for installing, setting up, and using your new TV 9 TV front and side panel controls and connections 10 TV back panel connections 11 Chapter 2: Connecting your TV ...remote control 21 Using the remote control to control your other devices . . . . 22 Remote Control functional key chart 23 Programming the remote control to control your other devices 24 Remote control codes 25 Chapter 4: Menu layout and navigation 27 Main menu layout 27 Setup/Installation menu layout 28 Navigating the menu system 28 Chapter 5: Setting up your TV...
Owner's Manual - English
Page 9
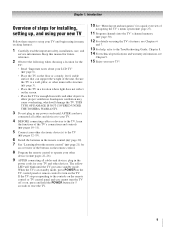
... care, and service information. The yellow LED will damage the TV. page 20). 7 See "Learning about your LCD TV" (- Chapter 1: Introduction Overview of steps for an overview of the buttons on the remote control. 8 Program the remote control to operate your other device(s) (- pages 12-19). 6 ... proper ventilation. page 3). • Place the TV in the power cords for the TV: • Read "Important notes about the remote control" (- THIS TYPE OF DAMAGE IS NOT COVERED UNDER THE TOSHIBA WARRANTY. 3 Do not plug in the remote control (- pages 22-26). 9 AFTER connecting all...
... care, and service information. The yellow LED will damage the TV. page 20). 7 See "Learning about your LCD TV" (- Chapter 1: Introduction Overview of steps for an overview of the buttons on the remote control. 8 Program the remote control to operate your other device(s) (- pages 12-19). 6 ... proper ventilation. page 3). • Place the TV in the power cords for the TV: • Read "Important notes about the remote control" (- THIS TYPE OF DAMAGE IS NOT COVERED UNDER THE TOSHIBA WARRANTY. 3 Do not plug in the remote control (- pages 22-26). 9 AFTER connecting all...

Owner's Manual - English
Page 10
Chapter 1: Introduction TV front and side panel controls and connections Model 42HL67 is used in this remote sensor (- TV top TV front POWER Right side panel 4 8 5 9 6 7 10 Control panel 3 1 2 1 Green and Yellow LEDs Green = Power indicator Yellow = Power-On Mode indicator (- "Remote control effective range" on -screen menu. 8 CHANNEL Bb - When a menu is on-screen, these buttons change the source...
Chapter 1: Introduction TV front and side panel controls and connections Model 42HL67 is used in this remote sensor (- TV top TV front POWER Right side panel 4 8 5 9 6 7 10 Control panel 3 1 2 1 Green and Yellow LEDs Green = Power indicator Yellow = Power-On Mode indicator (- "Remote control effective range" on -screen menu. 8 CHANNEL Bb - When a menu is on-screen, these buttons change the source...
Owner's Manual - English
Page 13
... or Cable signal: Select the ANT video input source on the remote control (- To program the TV remote control to civil and criminal liability. 13 Select the VIDEO 1 video input source on the TV.* * To select the video input source, press INPUT on the TV.* To view the VCR: Turn ON the VCR. page 21).... If you to operate other countries, and may subject you have a mono VCR, connect L/MONO on the TV to TV You will be unacceptable. - For better picture performance, if your VCR's audio out terminal using the white audio cable only. Chapter 2: Connecting your...
... or Cable signal: Select the ANT video input source on the remote control (- To program the TV remote control to civil and criminal liability. 13 Select the VIDEO 1 video input source on the TV.* * To select the video input source, press INPUT on the TV.* To view the VCR: Turn ON the VCR. page 21).... If you to operate other countries, and may subject you have a mono VCR, connect L/MONO on the TV to TV You will be unacceptable. - For better picture performance, if your VCR's audio out terminal using the white audio cable only. Chapter 2: Connecting your...

Owner's Manual - English
Page 14
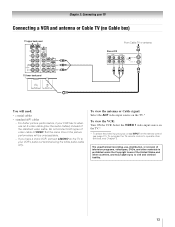
... or the picture performance will need: • coaxial cables • S-video cable - To program the TV remote control to change channels. Select the ANT video input source on the remote control (- page 21). TV upper back panel TV lower back panel From Cable TV Cable box IN CH 3 CH 4 OUT stereo VCR VIDEO AUDIO L R IN CH 3 CH 4 OUT...
... or the picture performance will need: • coaxial cables • S-video cable - To program the TV remote control to change channels. Select the ANT video input source on the remote control (- page 21). TV upper back panel TV lower back panel From Cable TV Cable box IN CH 3 CH 4 OUT stereo VCR VIDEO AUDIO L R IN CH 3 CH 4 OUT...
Owner's Manual - English
Page 15
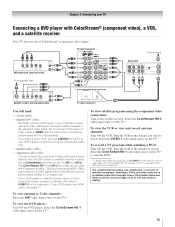
... VCR or view and record antenna channels: Turn ON the VCR. Select the ColorStream HD-1 video input source on the satellite receiver. To program the TV remote control to civil and criminal liability. 15 For better picture performance, if your DVD player or satellite receiver does not have a mono VCR, connect L/MONO on... • standard A/V cables - The ColorStream HD-1 and HD-2 terminals can connect the component video cables (plus the audio cables) instead of ColorStream terminals on the TV (HD-1 or HD-2). Select the ColorStream HD-2 video input source on the remote control (-
... VCR or view and record antenna channels: Turn ON the VCR. Select the ColorStream HD-1 video input source on the satellite receiver. To program the TV remote control to civil and criminal liability. 15 For better picture performance, if your DVD player or satellite receiver does not have a mono VCR, connect L/MONO on... • standard A/V cables - The ColorStream HD-1 and HD-2 terminals can connect the component video cables (plus the audio cables) instead of ColorStream terminals on the TV (HD-1 or HD-2). Select the ColorStream HD-2 video input source on the remote control (-

Owner's Manual - English
Page 16
... the TV remote control to VIDEO 1 on the TV back instead of the VIDEO 2 on the remote control (- For better picture performance, if your TV Connecting a camcorder You will need: • standard A/V cables - Camcorder VIDEO AUDIO OUT L R VIDEO 2 inputs on TV right side panel To view the camcorder video: Select the VIDEO 2 video input source on the TV.* * To...
... the TV remote control to VIDEO 1 on the TV back instead of the VIDEO 2 on the remote control (- For better picture performance, if your TV Connecting a camcorder You will need: • standard A/V cables - Camcorder VIDEO AUDIO OUT L R VIDEO 2 inputs on TV right side panel To view the camcorder video: Select the VIDEO 2 video input source on the TV.* * To...

Owner's Manual - English
Page 17
...60Hz) signal formats. For proper operation, it is recommended that you will need a Category 2 cable. page 32). To program the TV remote control to the HDMI input, see page 19. Separate analog audio cables are not required (see illustration). - Separate analog audio cables are ... you follow these procedures: • When turning on your electronic components, turn on the remote control (- Conventional HDMI/DVI cable may not operate properly with the TV. The recommended length is designed to the HDMI input The HDMI input on your electronic components...
...60Hz) signal formats. For proper operation, it is recommended that you will need a Category 2 cable. page 32). To program the TV remote control to the HDMI input, see page 19. Separate analog audio cables are not required (see illustration). - Separate analog audio cables are ... you follow these procedures: • When turning on your electronic components, turn on the remote control (- Conventional HDMI/DVI cable may not operate properly with the TV. The recommended length is designed to the HDMI input The HDMI input on your electronic components...

Owner's Manual - English
Page 18
... from Dolby Laboratories. Audio Setup PC Audio HDMI 1 Audio MTS Language Optical Output Format Dolby Digital Dynamic Range Control Reset No Auto Stereo English Dolby Digital Compressed Done To control the audio: 1 Turn on the TV's remote control and open the Audio menu. 3 Highlight Audio Setup and press T. Chapter 2: Connecting your device (- THIS DAMAGE IS...
... from Dolby Laboratories. Audio Setup PC Audio HDMI 1 Audio MTS Language Optical Output Format Dolby Digital Dynamic Range Control Reset No Auto Stereo English Dolby Digital Compressed Done To control the audio: 1 Turn on the TV's remote control and open the Audio menu. 3 Highlight Audio Setup and press T. Chapter 2: Connecting your device (- THIS DAMAGE IS...
Owner's Manual - English
Page 20
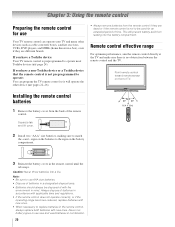
...; When necessary to use AAA size batteries. • Dispose of time. If you have a Toshiba device: Your TV remote control is not preprogrammed to the signs on front of the remote control. signs on the batteries to operate: You can operate your TV and many other device (- Squeeze tab and lift cover. 2 Install two "AAA" size batteries...
...; When necessary to use AAA size batteries. • Dispose of time. If you have a Toshiba device: Your TV remote control is not preprogrammed to the signs on front of the remote control. signs on the batteries to operate: You can operate your TV and many other device (- Squeeze tab and lift cover. 2 Install two "AAA" size batteries...
Owner's Manual - English
Page 21
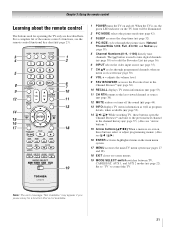
...a function that is on, the green LED indicator on the TV front will be illuminated. 2 PIC MODE selects the picture mode (- page 22). Chapter 3: Using the remote control Learning about the remote control The buttons used to control the TV. The = button is on -screen menus. 19 MODE SELECT...42). 3 SLEEP accesses the sleep timer (- page 52). 4 PIC SIZE cycles through programmed channels when no menu is on and off the sound (- Note: The error message "Not Available" may appear if you press a key for operating the TV only are described here. For a complete list of the remote control...
...a function that is on, the green LED indicator on the TV front will be illuminated. 2 PIC MODE selects the picture mode (- page 22). Chapter 3: Using the remote control Learning about the remote control The buttons used to control the TV. The = button is on -screen menus. 19 MODE SELECT...42). 3 SLEEP accesses the sleep timer (- page 52). 4 PIC SIZE cycles through programmed channels when no menu is on and off the sound (- Note: The error message "Not Available" may appear if you press a key for operating the TV only are described here. For a complete list of the remote control...
Owner's Manual - English
Page 22
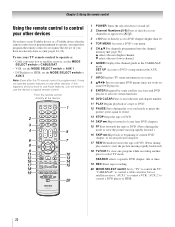
...switch Set to "TV" to control a cable converter box or satellite receiver; If this happens and you wish to use those features, you will need to use your other devices If you have a non-Toshiba device or a Toshiba device that the remote control is programmed, it ...may not operate certain features on any other devices. To use the device's original remote control. page 38): B selects the next higher channel. Chapter 3: Using the remote control Using the remote control to control your TV remote control to operate a: • Cable converter box or satellite receiver, set the MODE SELECT...
...switch Set to "TV" to control a cable converter box or satellite receiver; If this happens and you wish to use those features, you will need to use your other devices If you have a non-Toshiba device or a Toshiba device that the remote control is programmed, it ...may not operate certain features on any other devices. To use the device's original remote control. page 38): B selects the next higher channel. Chapter 3: Using the remote control Using the remote control to control your TV remote control to operate a: • Cable converter box or satellite receiver, set the MODE SELECT...

Owner's Manual - English
Page 23
...) Power s TV s TV s TV Digit 1-9 Digit 0 +10 s TV Top Menu s TV Setup s TV --s TV DVD Return Display Enter Menu up/down --- REMOTE CONTROL KEY Toshiba TV CABLE SAT (satellite) POWER SLEEP PIC SIZE PIC MODE Power Sleep timer Picture size PIC MODE Power s TV s TV s TV Power s TV s TV s TV 1-9 Digit 1-9 Digit 1-9 Digit 1-9 0 Digit 0 Digit 0 Digit 0 100/-/+10 INPUT - (sub CH) TV/Video select --s TV - (sub CH) s TV FAV BROWSER...
...) Power s TV s TV s TV Digit 1-9 Digit 0 +10 s TV Top Menu s TV Setup s TV --s TV DVD Return Display Enter Menu up/down --- REMOTE CONTROL KEY Toshiba TV CABLE SAT (satellite) POWER SLEEP PIC SIZE PIC MODE Power Sleep timer Picture size PIC MODE Power s TV s TV s TV Power s TV s TV s TV 1-9 Digit 1-9 Digit 1-9 Digit 1-9 0 Digit 0 Digit 0 Digit 0 100/-/+10 INPUT - (sub CH) TV/Video select --s TV - (sub CH) s TV FAV BROWSER...
Owner's Manual - English
Page 24
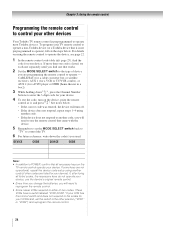
...Toshiba TV remote control is preprogrammed to operate most Toshiba devices. If, after trying all necessary keys on using the remote control to operate the device, see page 22. 1 In the remote control code table (- For details on the TV remote control operate your device. Chapter 3: Using the remote control Programming the remote control to control...addition to POWER, confirm that all listed codes, the necessary keys do not operate your TV remote control to operate a non-Toshiba device (or a Toshiba device that came with the device. 5 Remember to set the switch to the other ...
...Toshiba TV remote control is preprogrammed to operate most Toshiba devices. If, after trying all necessary keys on using the remote control to operate the device, see page 22. 1 In the remote control code table (- For details on the TV remote control operate your device. Chapter 3: Using the remote control Programming the remote control to control...addition to POWER, confirm that all listed codes, the necessary keys do not operate your TV remote control to operate a non-Toshiba device (or a Toshiba device that came with the device. 5 Remember to set the switch to the other ...

Owner's Manual - English
Page 25
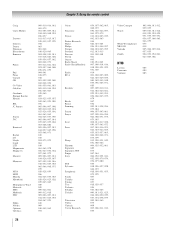
... NAD Nakamichi Norcent Onkyo Oritron Panasonic Philips Pioneer Proscan Qwestar RCA Sampo Samsung Sansui Sanyo Sharp Sherwood Sony Sylvania Teac Technics Techwood Toshiba Yamaha Zenith 019 020 021 022, 023, 024, 025 026, 027 028 027 001, 029, 030 087 031 005,...005 (continued) 25 If this happens, use a code that is not recognized by the TV remote control. S. Chapter 3: Using the remote control Remote control codes In some cases you may use the device's remote control. Cable converter box ABC Archer Cableview Century Citizen Contec Diamond GE Gemini Hamlin Hitachi Jasco Motorola/...
... NAD Nakamichi Norcent Onkyo Oritron Panasonic Philips Pioneer Proscan Qwestar RCA Sampo Samsung Sansui Sanyo Sharp Sherwood Sony Sylvania Teac Technics Techwood Toshiba Yamaha Zenith 019 020 021 022, 023, 024, 025 026, 027 028 027 001, 029, 030 087 031 005,...005 (continued) 25 If this happens, use a code that is not recognized by the TV remote control. S. Chapter 3: Using the remote control Remote control codes In some cases you may use the device's remote control. Cable converter box ABC Archer Cableview Century Citizen Contec Diamond GE Gemini Hamlin Hitachi Jasco Motorola/...
Owner's Manual - English
Page 26
Chapter 3: Using the remote control Craig Curtis Mathes Daewoo Daytron Denon Dimensia Electrohome Emerson Fisher Fuji Funai Garrard GE Go Video Goldstar Gradiente Harman Kardon Hitachi JBL JC Penney Jensen ... RCA Realistic Ricoh Runco Samsung Sansui Sanyo Scott Sears Sharp Shintom Signature Signature 2000 Singer Sony STS Sylvania Symphonic Tandy Tashiko Tatung Teac Technics Teknika Toshiba Totevision Unitec Unitech Vector Research 054, 057, 062, 065, 068, 072 036, 045, 046, 057, 061, 072, 079 012, 024, 025, 035, 042, 053, 063...
Chapter 3: Using the remote control Craig Curtis Mathes Daewoo Daytron Denon Dimensia Electrohome Emerson Fisher Fuji Funai Garrard GE Go Video Goldstar Gradiente Harman Kardon Hitachi JBL JC Penney Jensen ... RCA Realistic Ricoh Runco Samsung Sansui Sanyo Scott Sears Sharp Shintom Signature Signature 2000 Singer Sony STS Sylvania Symphonic Tandy Tashiko Tatung Teac Technics Teknika Toshiba Totevision Unitec Unitech Vector Research 054, 057, 062, 065, 068, 072 036, 045, 046, 057, 061, 072, 079 012, 024, 025, 035, 042, 053, 063...
Owner's Manual - English
Page 27
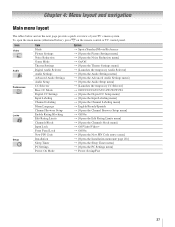
To open the main menus (illustrated below and on the remote control or TV control panel. Icon Video Audio Preferences Locks Setup Item Mode Picture Settings Noise Reduction Game Mode Theater Settings Digital Audio Selector Audio Settings Advanced Audio Settings ...] S Power-Saving/Fast 27 Chapter 4: Menu layout and navigation Main menu layout The tables below ), press Y on the next page provide a quick overview of your TV's menu system.
To open the main menus (illustrated below and on the remote control or TV control panel. Icon Video Audio Preferences Locks Setup Item Mode Picture Settings Noise Reduction Game Mode Theater Settings Digital Audio Selector Audio Settings Advanced Audio Settings ...] S Power-Saving/Fast 27 Chapter 4: Menu layout and navigation Main menu layout The tables below ), press Y on the next page provide a quick overview of your TV's menu system.
Owner's Manual - English
Page 28
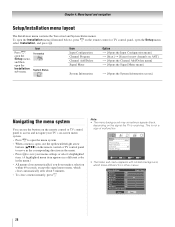
... the System Information screen] Navigating the menu system You can use the up/down/left/right arrow buttons (BbC c) on the remote control or TV control panel to move in the corresponding direction in the menu.) • All menus close a menu instantly, press O. Chapter 4: ... menu (illustrated below), press Y on -screen menu system. • Press Y to save your TV's on the remote control or TV control panel, open , use the buttons on the remote control or TV control panel to access and navigate your menu settings or select a highlighted item. (A highlighted menu item appears...
... the System Information screen] Navigating the menu system You can use the up/down/left/right arrow buttons (BbC c) on the remote control or TV control panel to move in the corresponding direction in the menu.) • All menus close a menu instantly, press O. Chapter 4: ... menu (illustrated below), press Y on -screen menu system. • Press Y to save your TV's on the remote control or TV control panel, open , use the buttons on the remote control or TV control panel to access and navigate your menu settings or select a highlighted item. (A highlighted menu item appears...


