Owner's Manual - English
Page 3
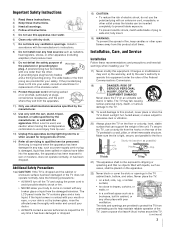
...or eyes, or your skin is dropped and the cabinet or enclosure surface has been damaged or the TV does not operate normally, take the following precautions: • ALWAYS turn off the TV and unplug the power cord to avoid possible electric shock or fire. • NEVER allow your outlet... to operate this apparatus during lightning storms or when unused for your TV: 17) Never modify this product at all times. The TV may void: a) the warranty, and b) the user's authority to the floor. The LCD panel inside the TV contains glass and a toxic liquid. fully insert. 16) WARNING: ...
...or eyes, or your skin is dropped and the cabinet or enclosure surface has been damaged or the TV does not operate normally, take the following precautions: • ALWAYS turn off the TV and unplug the power cord to avoid possible electric shock or fire. • NEVER allow your outlet... to operate this apparatus during lightning storms or when unused for your TV: 17) Never modify this product at all times. The TV may void: a) the warranty, and b) the user's authority to the floor. The LCD panel inside the TV contains glass and a toxic liquid. fully insert. 16) WARNING: ...
Owner's Manual - English
Page 4
... room whose temperature is 32 ºF (0 ºC) or below, the picture brightness may vary until the LCD warms up static charges (see Section 810 of the following during lightning activity: a) an antenna system; Refer ...the power cord and contact a Toshiba Authorized Service Center. 35) WARNING: RISK OF SERIOUS PERSONAL INJURY OR EQUIPMENT DAMAGE! This is not a sign of the TV. These actions will damage the LCD screen. Never attempt to an.... This is normal, especially when the unit is being turned on the cabinet. Service 37) WARNING: RISK OF ELECTRIC SHOCK!
... room whose temperature is 32 ºF (0 ºC) or below, the picture brightness may vary until the LCD warms up static charges (see Section 810 of the following during lightning activity: a) an antenna system; Refer ...the power cord and contact a Toshiba Authorized Service Center. 35) WARNING: RISK OF SERIOUS PERSONAL INJURY OR EQUIPMENT DAMAGE! This is not a sign of the TV. These actions will damage the LCD screen. Never attempt to an.... This is normal, especially when the unit is being turned on the cabinet. Service 37) WARNING: RISK OF ELECTRIC SHOCK!
Owner's Manual - English
Page 9
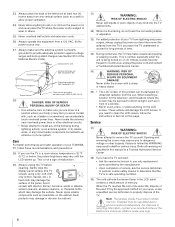
... LCD TV" (- page 30). 12 For details on the floor or a sturdy, level, stable surface that can support the weight of the unit. THIS TYPE OF DAMAGE IS NOT COVERED UNDER THE TOSHIBA WARRANTY. 3 Do not plug in standby mode, press POWER on the TV control panel or remote control to turn the TV... off or on the TV. page 6). • Place the TV on using its many exciting features. 1 Carefully read the important safety...
... LCD TV" (- page 30). 12 For details on the floor or a sturdy, level, stable surface that can support the weight of the unit. THIS TYPE OF DAMAGE IS NOT COVERED UNDER THE TOSHIBA WARRANTY. 3 Do not plug in standby mode, press POWER on the TV control panel or remote control to turn the TV... off or on the TV. page 6). • Place the TV on using its many exciting features. 1 Carefully read the important safety...

Owner's Manual - English
Page 10
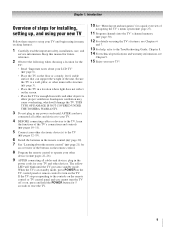
...ENTER) - When no menu is on-screen, these buttons change the source you cannot turn the TV on and off the TV, press and hold the POWER button on the TV control panel for additional information. 2 Remote sensor - The side panel A/V connections are...42HL67 is on-screen, the MENU button on the TV's control panel functions as the ENTER button. 7 EXIT - These buttons adjust the volume level. 10 INPUT - TV top TV front POWER Right side panel 4 8 5 9 6 7 10 Control panel 3 1 2 1 Green and Yellow LEDs Green = Power indicator Yellow = Power-On Mode indicator (- Press to turn...
...ENTER) - When no menu is on-screen, these buttons change the source you cannot turn the TV on and off the TV, press and hold the POWER button on the TV control panel for additional information. 2 Remote sensor - The side panel A/V connections are...42HL67 is on-screen, the MENU button on the TV's control panel functions as the ENTER button. 7 EXIT - These buttons adjust the volume level. 10 INPUT - TV top TV front POWER Right side panel 4 8 5 9 6 7 10 Control panel 3 1 2 1 Green and Yellow LEDs Green = Power indicator Yellow = Power-On Mode indicator (- Press to turn...
Owner's Manual - English
Page 13
If you to civil and criminal liability. 13 Select the VIDEO 1 video input source on the TV.* * To select the video input source, press INPUT on the TV.* To view the VCR: Turn ON the VCR. For better picture performance, if your VCR's audio out terminal using the white audio cable only. page... 21). To program the TV remote control to operate other countries, and may subject you have a ...
If you to civil and criminal liability. 13 Select the VIDEO 1 video input source on the TV.* * To select the video input source, press INPUT on the TV.* To view the VCR: Turn ON the VCR. For better picture performance, if your VCR's audio out terminal using the white audio cable only. page... 21). To program the TV remote control to operate other countries, and may subject you have a ...

Owner's Manual - English
Page 14
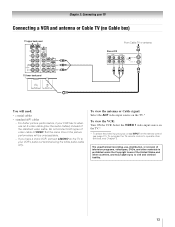
... a cable box An S-video connection will be able to use , distribution, or revision of television programs, videotapes, DVDs, and other materials is set to TV You will need: • coaxial cables • S-video cable - Note: When you use a Cable box, you have a mono VCR, connect L/MONO... Chapter 2: Connecting your VCR's audio out terminal using the white audio cable only. To view basic and premium Cable channels: Turn OFF the VCR. TV upper back panel TV lower back panel From Cable TV Cable box IN CH 3 CH 4 OUT stereo VCR VIDEO AUDIO L R IN CH 3 CH 4 OUT L R IN ...
... a cable box An S-video connection will be able to use , distribution, or revision of television programs, videotapes, DVDs, and other materials is set to TV You will need: • coaxial cables • S-video cable - Note: When you use a Cable box, you have a mono VCR, connect L/MONO... Chapter 2: Connecting your VCR's audio out terminal using the white audio cable only. To view basic and premium Cable channels: Turn OFF the VCR. TV upper back panel TV lower back panel From Cable TV Cable box IN CH 3 CH 4 OUT stereo VCR VIDEO AUDIO L R IN CH 3 CH 4 OUT L R IN ...
Owner's Manual - English
Page 15
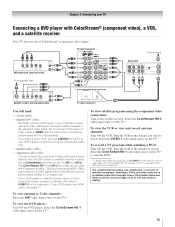
...® (component video), a VCR, and a satellite receiver Your TV has two sets of the standard video cable. To view antenna or Cable channels: Select the ANT video input source on the TV.* To record a TV program while watching a DVD: Turn ON the VCR. Select the VIDEO 1 video input source on the... TV.* To view the DVD player: Turn ON the DVD player. Tune the VCR to the channel to watch. For...
...® (component video), a VCR, and a satellite receiver Your TV has two sets of the standard video cable. To view antenna or Cable channels: Select the ANT video input source on the TV.* To record a TV program while watching a DVD: Turn ON the VCR. Select the VIDEO 1 video input source on the... TV.* To view the DVD player: Turn ON the DVD player. Tune the VCR to the channel to watch. For...

Owner's Manual - English
Page 17
... the HDMI 1, HDMI 2, or HDMI 3 video input source on the TV.* * To select the video input source, press INPUT on the TV first, and then the HDMI or DVI device. • When turning off your electronic components, turn on the remote control (- page 21). For detailed signal specifications, see ... -DVI adapter cable should not exceed 9.8 ft (3m). TV lower back panel To connect a DVI device, you follow these procedures: • When turning on your electronic components, turn off the HDMI or DVI device first, and then the TV. page 32). This input is possible that you will need...
... the HDMI 1, HDMI 2, or HDMI 3 video input source on the TV.* * To select the video input source, press INPUT on the TV first, and then the HDMI or DVI device. • When turning off your electronic components, turn on the remote control (- page 21). For detailed signal specifications, see ... -DVI adapter cable should not exceed 9.8 ft (3m). TV lower back panel To connect a DVI device, you follow these procedures: • When turning on your electronic components, turn off the HDMI or DVI device first, and then the TV. page 32). This input is possible that you will need...

Owner's Manual - English
Page 18
... of Dolby Laboratories. You will need : • standard audio cables Analog audio amplifier To control the audio: 1 Turn on the TV and the digital audio device. 2 Press Y on the TV and the stereo amplifier. 2 Minimize the sound volume from Dolby Laboratories. Audio Setup PC Audio HDMI 1 Audio MTS ... Optical Output Format Dolby Digital Dynamic Range Control Reset No Auto Stereo English Dolby Digital Compressed Done To control the audio: 1 Turn on the TV's remote control and open the Audio menu. 3 Highlight Audio Setup and press T. "Selecting the optical audio output format" on your...
... of Dolby Laboratories. You will need : • standard audio cables Analog audio amplifier To control the audio: 1 Turn on the TV and the digital audio device. 2 Press Y on the TV and the stereo amplifier. 2 Minimize the sound volume from Dolby Laboratories. Audio Setup PC Audio HDMI 1 Audio MTS ... Optical Output Format Dolby Digital Dynamic Range Control Reset No Auto Stereo English Dolby Digital Compressed Done To control the audio: 1 Turn on the TV's remote control and open the Audio menu. 3 Highlight Audio Setup and press T. "Selecting the optical audio output format" on your...
Owner's Manual - English
Page 21
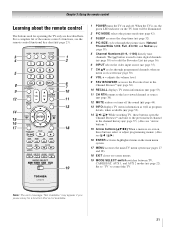
...the remote control Learning about the remote control The buttons used to tune digital channels (- When the TV is on-screen, these buttons open the Channel Browser™ and tune to control the TV. page 42). 3 SLEEP accesses the sleep timer (- page 36). 6 INPUT selects the video input source (- ...the sound (- adjusts the volume level. 9 FAV BROWSER accesses the Favorites List in the main menu system. 17 MENU accesses the main TV menu system (- page 23). 1 POWER turns the TV on -screen (- page 37). (Also see "Arrow buttons.") 15 Arrow buttons (BbC c) When a menu is on, the green ...
...the remote control Learning about the remote control The buttons used to tune digital channels (- When the TV is on-screen, these buttons open the Channel Browser™ and tune to control the TV. page 42). 3 SLEEP accesses the sleep timer (- page 36). 6 INPUT selects the video input source (- ...the sound (- adjusts the volume level. 9 FAV BROWSER accesses the Favorites List in the main menu system. 17 MENU accesses the main TV menu system (- page 23). 1 POWER turns the TV on -screen (- page 37). (Also see "Arrow buttons.") 15 Arrow buttons (BbC c) When a menu is on, the green ...
Owner's Manual - English
Page 22
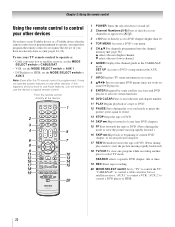
...; DVD player or HTIB, set the MODE SELECT switch to AUX 2. Point the remote control directly at the device. 16 17 18 19 1 POWER Turns the selected device on some DVD players). 9 ENTER Required by some satellite receivers and DVD players to activate certain functions. 10 DVD CLEAR Press to... ,). 3 +10 Press to use those features, you have a non-Toshiba device or a Toshiba device that the remote control is not preprogrammed to operate, you must first program the remote control to recognize the device (if you will need to select TV mode. If this happens and you wish to directly access DVD...
...; DVD player or HTIB, set the MODE SELECT switch to AUX 2. Point the remote control directly at the device. 16 17 18 19 1 POWER Turns the selected device on some DVD players). 9 ENTER Required by some satellite receivers and DVD players to activate certain functions. 10 DVD CLEAR Press to... ,). 3 +10 Press to use those features, you have a non-Toshiba device or a Toshiba device that the remote control is not preprogrammed to operate, you must first program the remote control to recognize the device (if you will need to select TV mode. If this happens and you wish to directly access DVD...
Owner's Manual - English
Page 24
...your device, use the remote control that came with the device. 5 Remember to set the switch to the other devices Your Toshiba TV remote control is preprogrammed to operate most Toshiba devices. If some keys are not operational, repeat the device code setup using another code, you will need to use the...remote control. • Some newer VCRs respond to either of switch and does not respond to the codes for your device. 4 To test the code, turn off. • If the device does not respond, repeat steps 1-4 using the remote control to operate the device, see page 22. 1 In the ...
...your device, use the remote control that came with the device. 5 Remember to set the switch to the other devices Your Toshiba TV remote control is preprogrammed to operate most Toshiba devices. If some keys are not operational, repeat the device code setup using another code, you will need to use the...remote control. • Some newer VCRs respond to either of switch and does not respond to the codes for your device. 4 To test the code, turn off. • If the device does not respond, repeat steps 1-4 using the remote control to operate the device, see page 22. 1 In the ...

Owner's Manual - English
Page 34
...Saving or Fast mode. • Power-Saving mode keeps power consumption in standby mode. After the TV turns off, unplug it and plug it back in again to complete the reset process. After the TV turns off automatically after a few seconds. As a result, it in to below 3W. Setup Installation... reset. No Yes To cancel the reset: Highlight No and press T. As a result, the TV will turn off , unplug the TV power cord and then plug it takes a bit longer to turn on the TV front will turn on quicker. To set the Power-On Mode feature: 1 Press Y, and open the Setup menu...
...Saving or Fast mode. • Power-Saving mode keeps power consumption in standby mode. After the TV turns off, unplug it and plug it back in again to complete the reset process. After the TV turns off automatically after a few seconds. As a result, it in to below 3W. Setup Installation... reset. No Yes To cancel the reset: Highlight No and press T. As a result, the TV will turn off , unplug the TV power cord and then plug it takes a bit longer to turn on the TV front will turn on quicker. To set the Power-On Mode feature: 1 Press Y, and open the Setup menu...

Owner's Manual - English
Page 37
... tuned channels/inputs are tuned using the numeric buttons on /off the left side. To tune to a channel or input in Select mode: 1 While watching TV, press 3 C or # c to open the Channel Browser™: • Press 3 C or # c on the remote control. • Press 3 C to surf ... type 3 Channel or input currently being viewed 4 Channel or input that are "shifted" to the left, eventually moving off cycle. If Favorites List is turned off, n will have no effect. • Pressing n will not display the Channel Browser™. In Select mode, when you stop on the "right...
... tuned channels/inputs are tuned using the numeric buttons on /off the left side. To tune to a channel or input in Select mode: 1 While watching TV, press 3 C or # c to open the Channel Browser™: • Press 3 C or # c on the remote control. • Press 3 C to surf ... type 3 Channel or input currently being viewed 4 Channel or input that are "shifted" to the left, eventually moving off cycle. If Favorites List is turned off, n will have no effect. • Pressing n will not display the Channel Browser™. In Select mode, when you stop on the "right...
Owner's Manual - English
Page 38
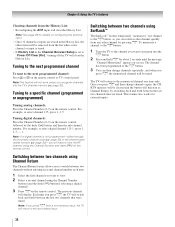
For example, to "Power Off Clear (On)," turning off the TV will clear the History List. Once you press R and then change channels ... that channel quickly from any other channel by the dash (=) button and then the sub-channel number. The TV will be tuned. Tuning to the next programmed channel To tune to tune the RF channel using the Channel... Number and dash (=) on the remote control or TV control panel. Note:This feature will have to the next programmed channel: Press < or , on the remote control...
For example, to "Power Off Clear (On)," turning off the TV will clear the History List. Once you press R and then change channels ... that channel quickly from any other channel by the dash (=) button and then the sub-channel number. The TV will be tuned. Tuning to the next programmed channel To tune to tune the RF channel using the Channel... Number and dash (=) on the remote control or TV control panel. Note:This feature will have to the next programmed channel: Press < or , on the remote control...
Owner's Manual - English
Page 41
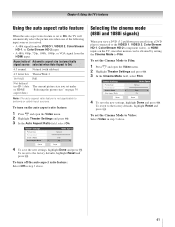
... highlight Reset and press T. Theater Settings Picture Size Picture Scroll Cinema Mode Auto Aspect Ratio Mode: Sports Natural -- To revert to Film. To turn on the auto aspect ratio feature: 1 Press Y and open the Video menu. 2 Highlight Theater Settings and press T. 3 In the Cinema Mode...to the VIDEO 1, VIDEO 2, ColorStream HD-1, ColorStream HD-2 (component video), or HDMI inputs on page 39. To revert to On, the TV will automatically select the picture size when one of Automatic aspect size (automatically signal source selected when Auto Aspect is On) 4:3 normal Natural ...
... highlight Reset and press T. Theater Settings Picture Size Picture Scroll Cinema Mode Auto Aspect Ratio Mode: Sports Natural -- To revert to Film. To turn on the auto aspect ratio feature: 1 Press Y and open the Video menu. 2 Highlight Theater Settings and press T. 3 In the Cinema Mode...to the VIDEO 1, VIDEO 2, ColorStream HD-1, ColorStream HD-2 (component video), or HDMI inputs on page 39. To revert to On, the TV will automatically select the picture size when one of Automatic aspect size (automatically signal source selected when Auto Aspect is On) 4:3 normal Natural ...

Owner's Manual - English
Page 43
...closed captions The closed caption mode has two options: • Captions-An on-screen display of the dialogue, narration, and sound effects of TV programs and videos that characteristic (see table below). If this happens, set the Caption Text and Background as weather or stock data (when... the closed captions: 1 Press Y and open the Preferences menu. 2 Highlight Base CC Mode and press c. 3 Press B or b to Off. • To turn off the closed captioned (usually marked "CC" in program guides). • Text-An on-screen display of the primary language in your area, a black rectangle...
...closed captions The closed caption mode has two options: • Captions-An on-screen display of the dialogue, narration, and sound effects of TV programs and videos that characteristic (see table below). If this happens, set the Caption Text and Background as weather or stock data (when... the closed captions: 1 Press Y and open the Preferences menu. 2 Highlight Base CC Mode and press c. 3 Press B or b to Off. • To turn off the closed captioned (usually marked "CC" in program guides). • Text-An on-screen display of the primary language in your area, a black rectangle...
Owner's Manual - English
Page 44
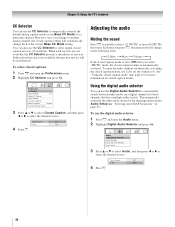
...CC4 Channel Browser Setup T1 T2 3 Press B or b to select Closed Caption, and then press C or c to partially reduce (1/2 MUTE) or turn off (MUTE) the sound. You can use the CC Selector to temporarily override the default analog caption mode (set the volume to 0. This temporarily overrides...when you change to another analog channel, the closed caption setting will change back to the current Base CC Mode setting. Chapter 6: Using the TV's features CC Selector You can also use the CC Selector to select digital closed caption services (if available). To select closed captions: 1 ...
...CC4 Channel Browser Setup T1 T2 3 Press B or b to select Closed Caption, and then press C or c to partially reduce (1/2 MUTE) or turn off (MUTE) the sound. You can use the CC Selector to temporarily override the default analog caption mode (set the volume to 0. This temporarily overrides...when you change to another analog channel, the closed caption setting will change back to the current Base CC Mode setting. Chapter 6: Using the TV's features CC Selector You can also use the CC Selector to select digital closed caption services (if available). To select closed captions: 1 ...

Owner's Manual - English
Page 46
... the StableSound feature: Select Off in relation to Optical Output Format (PCM mode). 46 Note: The RESET function returns your device. Off To turn on the StableSound® feature: 1 Press Y and open the Audio menu. 2 Highlight Audio Setup and press T. 3 In the Optical ...field, select Compressed. When Standard is selected, the audio is output with minimal compression. To revert to a commercial). Chapter 6: Using the TV's features Using the StableSound® feature The StableSound® feature limits the highest volume level to prevent extreme changes in volume when the ...
... the StableSound feature: Select Off in relation to Optical Output Format (PCM mode). 46 Note: The RESET function returns your device. Off To turn on the StableSound® feature: 1 Press Y and open the Audio menu. 2 Highlight Audio Setup and press T. 3 In the Optical ...field, select Compressed. When Standard is selected, the audio is output with minimal compression. To revert to a commercial). Chapter 6: Using the TV's features Using the StableSound® feature The StableSound® feature limits the highest volume level to prevent extreme changes in volume when the ...

Owner's Manual - English
Page 50
Push 'mute' to view the input sources or channels until the TV is turned on again. Video+: Locks VIDEO 1, VIDEO 2, ColorStream HD1/ HD2, HDMI 1, HDMI 2, HDMI 3, PC and channels 3 and 4. • Select Video+ if you unlock the inputs. Channels ... can use the Input Lock feature to select the level of video input locking you set , the TV will enter program lock mode and the following message will not be enabled when the TV is turned off, and will be able to enter PIN. To temporarily unlock the program: 1 Press W. 2 Enter your four...
Push 'mute' to view the input sources or channels until the TV is turned on again. Video+: Locks VIDEO 1, VIDEO 2, ColorStream HD1/ HD2, HDMI 1, HDMI 2, HDMI 3, PC and channels 3 and 4. • Select Video+ if you unlock the inputs. Channels ... can use the Input Lock feature to select the level of video input locking you set , the TV will enter program lock mode and the following message will not be enabled when the TV is turned off, and will be able to enter PIN. To temporarily unlock the program: 1 Press W. 2 Enter your four...


