Printable Spec Sheet
Page 1
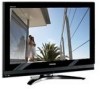
... system is capable of producing 4,096 levels of each video frame, and automatically adjusts the backlight intensity based on the image content. CineSpeed™ LCD panels have the best seat in low light environments. New gloss black cosmetics complement the set and incorporate the slim SoundStrip™ speaker system, for a smooth, natural-looking... in a deeper black level that of backlight intensity. This creates dynamic contrast up to 5X that increases detail and depth, even in the house. PRELIMINARY 42HL67 42" Diagonal REGZA® LCD TV PixelPure 3G™ -
... system is capable of producing 4,096 levels of each video frame, and automatically adjusts the backlight intensity based on the image content. CineSpeed™ LCD panels have the best seat in low light environments. New gloss black cosmetics complement the set and incorporate the slim SoundStrip™ speaker system, for a smooth, natural-looking... in a deeper black level that of backlight intensity. This creates dynamic contrast up to 5X that increases detail and depth, even in the house. PRELIMINARY 42HL67 42" Diagonal REGZA® LCD TV PixelPure 3G™ -
Owner's Manual - English
Page 7
...Toshiba 8 Features of your new TV 8 Overview of steps for installing, setting up, and using your new TV 9 TV front and side panel controls and connections 10 TV back panel connections 11 Chapter 2: Connecting your TV...TV (no Cable box 13 Connecting a VCR with S-video and a cable box 14 Connecting a DVD player with ColorStream® (component video...42 Selecting the picture mode 42 Adjusting the picture quality 42 Using the closed caption mode 43 Base closed captions 43 Digital CC Settings...settings feature 51 Setting the PC Audio 52 Setting the sleep timer 52 Displaying TV... settings ...
...Toshiba 8 Features of your new TV 8 Overview of steps for installing, setting up, and using your new TV 9 TV front and side panel controls and connections 10 TV back panel connections 11 Chapter 2: Connecting your TV...TV (no Cable box 13 Connecting a VCR with S-video and a cable box 14 Connecting a DVD player with ColorStream® (component video...42 Selecting the picture mode 42 Adjusting the picture quality 42 Using the closed caption mode 43 Base closed captions 43 Digital CC Settings...settings feature 51 Setting the PC Audio 52 Setting the sleep timer 52 Displaying TV... settings ...
Owner's Manual - English
Page 8
...8482; digital, high-definition multimedia interfaces 1080p input support (- ABC, HBO, etc.) on the market. Chapter 1: Introduction Welcome to Toshiba Thank you for a separate digital converter set -top box. page 55). • PC IN (Analog RGB) computer terminal (- page 15). • SRS WOW™ ... the need for purchasing this Toshiba LCD TV, one of ColorStream® HD high-resolution component video inputs (- Features of your new TV The following are just a few of the many exciting features of a set -top box (in most innovative LCD TVs on the screen along with Dolby...
...8482; digital, high-definition multimedia interfaces 1080p input support (- ABC, HBO, etc.) on the market. Chapter 1: Introduction Welcome to Toshiba Thank you for a separate digital converter set -top box. page 55). • PC IN (Analog RGB) computer terminal (- page 15). • SRS WOW™ ... the need for purchasing this Toshiba LCD TV, one of ColorStream® HD high-resolution component video inputs (- Features of your new TV The following are just a few of the many exciting features of a set -top box (in most innovative LCD TVs on the screen along with Dolby...
Owner's Manual - English
Page 11
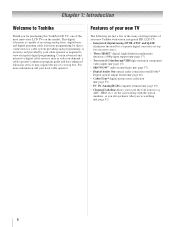
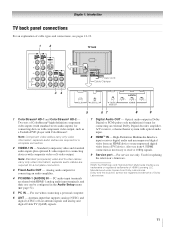
...8 HDMI™ IN - Antenna input that supports analog (NTSC) and digital (ATSC) off-air antenna signals and analog and digital Cable TV (QAM) signals. 7 Digital Audio OUT - HDMI connection is necessary to receive 1080p signals. 9 Service port - Optical audio output in the...video inputs for connecting devices with component video output, such as a Toshiba DVD player with composite video or S-video output. page 52). 5 PC IN - Dolby and the double-D symbol are trademarks or registered trademarks of HDMI Licensing LLC. Two sets of ColorStream® high-definition component video...
...8 HDMI™ IN - Antenna input that supports analog (NTSC) and digital (ATSC) off-air antenna signals and analog and digital Cable TV (QAM) signals. 7 Digital Audio OUT - HDMI connection is necessary to receive 1080p signals. 9 Service port - Optical audio output in the...video inputs for connecting devices with component video output, such as a Toshiba DVD player with composite video or S-video output. page 52). 5 PC IN - Dolby and the double-D symbol are trademarks or registered trademarks of HDMI Licensing LLC. Two sets of ColorStream® high-definition component video...
Owner's Manual - English
Page 12
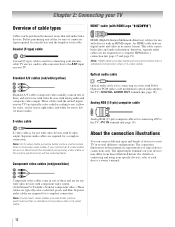
... A/V cables (composite video) usually come in sets of three, and are not required for a complete connection. This cable carries both video and audio information; Note: HDMI cable provides better picture performance than a standard (composite) video or S-video cable. 12 Component video cables (red/green/...18). If you connect an S-video cable, be sure to the TV's PC IN terminal (- Note: Component video cables provide better picture performance than a standard (composite) video or S-video cable. Coaxial (F-type) cable Coaxial (F-type) cable is Toshiba's brand of three and are ...
... A/V cables (composite video) usually come in sets of three, and are not required for a complete connection. This cable carries both video and audio information; Note: HDMI cable provides better picture performance than a standard (composite) video or S-video cable. 12 Component video cables (red/green/...18). If you connect an S-video cable, be sure to the TV's PC IN terminal (- Note: Component video cables provide better picture performance than a standard (composite) video or S-video cable. Coaxial (F-type) cable Coaxial (F-type) cable is Toshiba's brand of three and are ...

Owner's Manual - English
Page 14
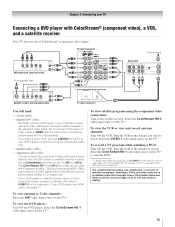
...United States and other countries, and may not be unacceptable. • standard audio cables - Select the VIDEO 1 video input source on the TV.* * To select the video input source, press INPUT on the TV. Do not connect both types of television programs, videotapes, DVDs, and other devices, see Chapter 3....audio cable only. TV upper back panel TV lower back panel From Cable TV Cable box IN CH 3 CH 4 OUT stereo VCR VIDEO AUDIO L R IN CH 3 CH 4 OUT L R IN from ANT OUT to change channels. To program the TV remote control to operate other materials is set to civil and ...
...United States and other countries, and may not be unacceptable. • standard audio cables - Select the VIDEO 1 video input source on the TV.* * To select the video input source, press INPUT on the TV. Do not connect both types of television programs, videotapes, DVDs, and other devices, see Chapter 3....audio cable only. TV upper back panel TV lower back panel From Cable TV Cable box IN CH 3 CH 4 OUT stereo VCR VIDEO AUDIO L R IN CH 3 CH 4 OUT L R IN from ANT OUT to change channels. To program the TV remote control to operate other materials is set to civil and ...
Owner's Manual - English
Page 15
...'s audio out terminal using the component video connections: Turn on the satellite receiver. TV upper back panel From antenna Y PB PR COMPONENT VIDEO S-VIDEO VIDEO OUT OUT DVD player with component video TV lower back panel You will be used with ColorStream® (component video), a VCR, and a satellite receiver Your TV has two sets of the United States and other...
...'s audio out terminal using the component video connections: Turn on the satellite receiver. TV upper back panel From antenna Y PB PR COMPONENT VIDEO S-VIDEO VIDEO OUT OUT DVD player with component video TV lower back panel You will be used with ColorStream® (component video), a VCR, and a satellite receiver Your TV has two sets of the United States and other...

Owner's Manual - English
Page 17
.../60Hz signal format, you will need: • one HDMI-to-DVI adapter cable (HDMI type A connector) per DVI device - See "Setting the HDMI™ audio mode" (- TV lower back panel To connect a DVI device, you will need a Category 2 cable. page 32). This input is 6.6 ft (2m)....8226; When turning on your electronic components, turn off your TV receives digital audio and uncompressed digital video from an HDMI source device, or uncompressed digital video from EIA/CEA-861-D-compliant[1] consumer electronic devices (such as a set-top box or DVD player with HDMI or DVI output). ...
.../60Hz signal format, you will need: • one HDMI-to-DVI adapter cable (HDMI type A connector) per DVI device - See "Setting the HDMI™ audio mode" (- TV lower back panel To connect a DVI device, you will need a Category 2 cable. page 32). This input is 6.6 ft (2m)....8226; When turning on your electronic components, turn off your TV receives digital audio and uncompressed digital video from an HDMI source device, or uncompressed digital video from EIA/CEA-861-D-compliant[1] consumer electronic devices (such as a set-top box or DVD player with HDMI or DVI output). ...
Owner's Manual - English
Page 19
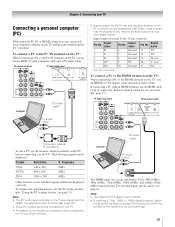
... a PC to the HDMI terminal on the TV: When connecting a PC to the PC IN terminal on the TV, use a PC, set the monitor output resolution on the TV and hear the sound from the TV's speakers. Separate analog cables are playing the DVD-Video, some scenes may be skipped or you can... watch your computer's display on the PC before connecting it to the TV. Frequency VGA 640...
... a PC to the HDMI terminal on the TV: When connecting a PC to the PC IN terminal on the TV, use a PC, set the monitor output resolution on the TV and hear the sound from the TV's speakers. Separate analog cables are playing the DVD-Video, some scenes may be skipped or you can... watch your computer's display on the PC before connecting it to the TV. Frequency VGA 640...
Owner's Manual - English
Page 21
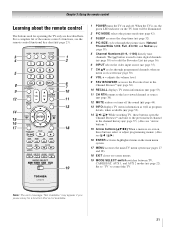
... -screen menus. 19 MODE SELECT switch switches between TV, CABLE/SAT, AUX 1, and AUX 2 modes (- page 36). 10 RECALL displays TV status information (- page 38). 12 MUTE reduces or turns off . page 42). 3 SLEEP accesses the sleep timer (- page 52). 4 PIC SIZE cycles through programmed channels when no menu ...27 and 28). 18 EXIT closes on and off the sound (- Set to "TV" to edit the Favorites List (- When the TV is on the TV front will be illuminated. 2 PIC MODE selects the picture mode (- page 36). 6 INPUT selects the video input source (- page 53). 11 CH RTN returns to tune ...
... -screen menus. 19 MODE SELECT switch switches between TV, CABLE/SAT, AUX 1, and AUX 2 modes (- page 36). 10 RECALL displays TV status information (- page 38). 12 MUTE reduces or turns off . page 42). 3 SLEEP accesses the sleep timer (- page 52). 4 PIC SIZE cycles through programmed channels when no menu ...27 and 28). 18 EXIT closes on and off the sound (- Set to "TV" to edit the Favorites List (- When the TV is on the TV front will be illuminated. 2 PIC MODE selects the picture mode (- page 36). 6 INPUT selects the video input source (- page 53). 11 CH RTN returns to tune ...

Owner's Manual - English
Page 23
REMOTE CONTROL KEY Toshiba TV CABLE SAT (satellite) POWER SLEEP PIC SIZE PIC MODE Power Sleep timer Picture size PIC MODE Power s TV s TV s TV Power s TV s TV s TV 1-9 Digit 1-9 Digit 1-9 Digit 1-9 0 Digit 0 Digit 0 Digit 0 100/-/+10 INPUT - (sub CH) TV/Video select --s TV - (sub CH) s TV FAV BROWSER/ TOP MENU MUTE FAV BROWSER DVD TOP Menu* Sound mute --s TV --s TV SET UP/GUIDE VOL + - Select...
REMOTE CONTROL KEY Toshiba TV CABLE SAT (satellite) POWER SLEEP PIC SIZE PIC MODE Power Sleep timer Picture size PIC MODE Power s TV s TV s TV Power s TV s TV s TV 1-9 Digit 1-9 Digit 1-9 Digit 1-9 0 Digit 0 Digit 0 Digit 0 100/-/+10 INPUT - (sub CH) TV/Video select --s TV - (sub CH) s TV FAV BROWSER/ TOP MENU MUTE FAV BROWSER DVD TOP Menu* Sound mute --s TV --s TV SET UP/GUIDE VOL + - Select...
Owner's Manual - English
Page 27
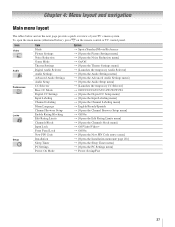
... below and on the remote control or TV control panel. page 28)] S [Opens the Sleep Timer menu] S [Opens the PC Settings menu] S Power-Saving/Fast 27 Icon Video Audio Preferences Locks Setup Item Mode Picture Settings Noise Reduction Game Mode Theater Settings Digital Audio Selector Audio Settings Advanced Audio Settings Audio Setup CC Selector Base CC Mode...
... below and on the remote control or TV control panel. page 28)] S [Opens the Sleep Timer menu] S [Opens the PC Settings menu] S Power-Saving/Fast 27 Icon Video Audio Preferences Locks Setup Item Mode Picture Settings Noise Reduction Game Mode Theater Settings Digital Audio Selector Audio Settings Advanced Audio Settings Audio Setup CC Selector Base CC Mode...
Owner's Manual - English
Page 28
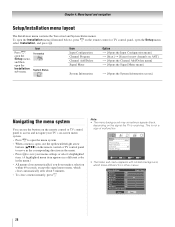
...] S [Opens the System Information screen] Navigating the menu system You can use the buttons on the remote control or TV control panel to access and navigate your TV's on-screen menu system. • Press Y to open the menu system. • When a menu is open .../Installation menu layout The Installation menu contains the Terrestrial and System Status menus. Video Mode Picture Settings Noise Reduction Game Mode Theater Settings Sports Off Navigate ENTER Select CH RTN Back EXIT Exit • The Video sub-menu appears with a black background, which closes automatically after about 5 ...
...] S [Opens the System Information screen] Navigating the menu system You can use the buttons on the remote control or TV control panel to access and navigate your TV's on-screen menu system. • Press Y to open the menu system. • When a menu is open .../Installation menu layout The Installation menu contains the Terrestrial and System Status menus. Video Mode Picture Settings Noise Reduction Game Mode Theater Settings Sports Off Navigate ENTER Select CH RTN Back EXIT Exit • The Video sub-menu appears with a black background, which closes automatically after about 5 ...
Owner's Manual - English
Page 35
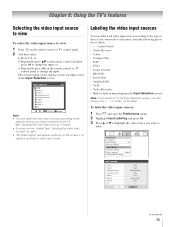
... 1 6 HDMI 2 7 HDMI 3 8 PC ANT 0 - 8 / INPUT to Select Navigate Note: • You can label the video input sources according to the specific devices you want to the TV (- Preferences CC Selector Off Base CC Mode Off CC1 Digital CC Settings CC2 Input Labeling CC3 Channel Labeling CC4 Menu Language English T1 Channel Browser Setup...
... 1 6 HDMI 2 7 HDMI 3 8 PC ANT 0 - 8 / INPUT to Select Navigate Note: • You can label the video input sources according to the specific devices you want to the TV (- Preferences CC Selector Off Base CC Mode Off CC1 Digital CC Settings CC2 Input Labeling CC3 Channel Labeling CC4 Menu Language English T1 Channel Browser Setup...

Owner's Manual - English
Page 36
... screen below ). • Keep a history of how you could label the inputs if you connected a VCR to VIDEO 1, Cable TV to VIDEO 2, a video recorder to ColorStream HD1, a DTV settop box to HDMI 1, a satellite/DSS set-top box to HDMI 2, and a DVD player to HDMI 3. To clear the input labels: 1 Press Y and...the contents of all of your inputs. • Keep a list of the Channel Browser™. Favorites Browser The Favorites Browser allows you to quickly set up a favorite channels/inputs list that input will be "grayed out" in the Channel Browser™ before you select one to tune). •...
... screen below ). • Keep a history of how you could label the inputs if you connected a VCR to VIDEO 1, Cable TV to VIDEO 2, a video recorder to ColorStream HD1, a DTV settop box to HDMI 1, a satellite/DSS set-top box to HDMI 2, and a DVD player to HDMI 3. To clear the input labels: 1 Press Y and...the contents of all of your inputs. • Keep a list of the Channel Browser™. Favorites Browser The Favorites Browser allows you to quickly set up a favorite channels/inputs list that input will be "grayed out" in the Channel Browser™ before you select one to tune). •...

Owner's Manual - English
Page 40
...TheaterWide® picture (TheaterWide 2 and 3 only) You can set the scroll settings: 1 Press Y and open the Video menu. 2 Highlight Theater Settings and press T. Video Mode Picture Settings Noise Reduction Game Mode Theater Settings Sports Off 3 In the Picture Size field, select either TheaterWide ...2 or TheaterWide 3 (you cannot scroll in black, or noisy. Chapter 6: Using the TV's features ...
...TheaterWide® picture (TheaterWide 2 and 3 only) You can set the scroll settings: 1 Press Y and open the Video menu. 2 Highlight Theater Settings and press T. Video Mode Picture Settings Noise Reduction Game Mode Theater Settings Sports Off 3 In the Picture Size field, select either TheaterWide ...2 or TheaterWide 3 (you cannot scroll in black, or noisy. Chapter 6: Using the TV's features ...
Owner's Manual - English
Page 41
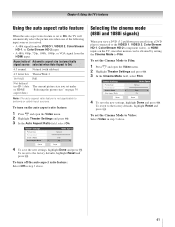
... 480i, 480p, 720p, 1080i, 1080p, or VGA signal from a DVD player connected to the VIDEO 1, VIDEO 2, ColorStream HD-1, ColorStream HD-2 (component video), or HDMI inputs on the TV, smoother motion can be obtained by setting the Cinema Mode to Film. To turn on page 39. To revert to the factory defaults,... highlight Reset and press T. Chapter 6: Using the TV's features Using the auto aspect...
... 480i, 480p, 720p, 1080i, 1080p, or VGA signal from a DVD player connected to the VIDEO 1, VIDEO 2, ColorStream HD-1, ColorStream HD-2 (component video), or HDMI inputs on the TV, smoother motion can be obtained by setting the Cinema Mode to Film. To turn on page 39. To revert to the factory defaults,... highlight Reset and press T. Chapter 6: Using the TV's features Using the auto aspect...
Owner's Manual - English
Page 42
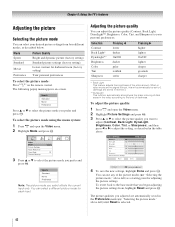
...and dynamic picture (factory setting) Standard picture settings (factory setting) Lower contrast for each input. Video Mode Picture Settings Noise Reduction Game Mode Theater Settings Sports Off 3 Press B or b to the level of darkness. When in video mode and no signal is selected. 42 You can select your ... left ) until Reset is input, this will automatically be set to 0. (Settings are automatically saved in the video according to select the picture mode you prefer and press T. Chapter 6: Using the TV's features Adjusting the picture Selecting the picture mode You can use...
...and dynamic picture (factory setting) Standard picture settings (factory setting) Lower contrast for each input. Video Mode Picture Settings Noise Reduction Game Mode Theater Settings Sports Off 3 Press B or b to the level of darkness. When in video mode and no signal is selected. 42 You can select your ... left ) until Reset is input, this will automatically be set to 0. (Settings are automatically saved in the video according to select the picture mode you prefer and press T. Chapter 6: Using the TV's features Adjusting the picture Selecting the picture mode You can use...

Owner's Manual - English
Page 43
...53 12 ROME 66 19 TOKYO 65 18 Current Weather Clear Cloudy Clear Cloudy Rain Note: If text is non-standard Digital CC Settings You can customize the closed caption display characteristics by individual stations). Caption Size Auto, Small, Standard, Large Caption Text Type Auto,...CC1, CC2, CC3, or CC4. (CC1 displays translation of the primary language in program guides). • Text-An on-screen display of TV programs and videos that characteristic (see table below). w/o Serif, Casual, Cursive, Small Capitals Caption Text Edge Auto, None, Raised, Depressed, Uniform, Left ...
...53 12 ROME 66 19 TOKYO 65 18 Current Weather Clear Cloudy Clear Cloudy Rain Note: If text is non-standard Digital CC Settings You can customize the closed caption display characteristics by individual stations). Caption Size Auto, Small, Standard, Large Caption Text Type Auto,...CC1, CC2, CC3, or CC4. (CC1 displays translation of the primary language in program guides). • Text-An on-screen display of TV programs and videos that characteristic (see table below). w/o Serif, Casual, Cursive, Small Capitals Caption Text Edge Auto, None, Raised, Depressed, Uniform, Left ...

Owner's Manual - English
Page 45
... Dolby Digital Dynamic Range Control No Auto Stereo English Dolby Digital Compressed Reset Done 4 To save the new settings, highlight Done and press T. However, occasionally there is no sound at all in VIDEO mode. To adjust the audio quality: 1 Press Y and open the Audio menu. 2 Highlight Audio Setup... and press T. To reset the settings to the factory defaults, highlight Reset and press T. MTS also can typically leave the TV in the right channel (depending on...
... Dolby Digital Dynamic Range Control No Auto Stereo English Dolby Digital Compressed Reset Done 4 To save the new settings, highlight Done and press T. However, occasionally there is no sound at all in VIDEO mode. To adjust the audio quality: 1 Press Y and open the Audio menu. 2 Highlight Audio Setup... and press T. To reset the settings to the factory defaults, highlight Reset and press T. MTS also can typically leave the TV in the right channel (depending on...


