Owner's Manual - English
Page 4
...power surges, always unplug the power cord and disconnect the antenna from the TV if you need to clean the LCD screen, follow these sounds become frequent or continuous, unplug the power cord and contact a Toshiba Authorized Service Center. 35) WARNING: RISK OF SERIOUS PERSONAL INJURY OR EQUIPMENT... 27) Always make sure you are never in a position where your TOSHIBA TV, follow the instructions in death or serious injury. Never strike the screen with a sharp or heavy object. 36) • The LCD screen of this product contain mercury. Note: The lamp(s) inside this product can...
...power surges, always unplug the power cord and disconnect the antenna from the TV if you need to clean the LCD screen, follow these sounds become frequent or continuous, unplug the power cord and contact a Toshiba Authorized Service Center. 35) WARNING: RISK OF SERIOUS PERSONAL INJURY OR EQUIPMENT... 27) Always make sure you are never in a position where your TOSHIBA TV, follow the instructions in death or serious injury. Never strike the screen with a sharp or heavy object. 36) • The LCD screen of this product contain mercury. Note: The lamp(s) inside this product can...
Owner's Manual - English
Page 6
...equipment. This is a structural property of LCD technology, is not a sign of malfunction, and is not covered under license from a normal viewing distance. FCC Declaration of Conformity Compliance Statement (Part 15): The Toshiba 26HL67, 32HL67, 37HL67, 42HL67, and 32HL67U Televisions comply with the instructions... to radio communications. However, there is manufactured using an extremely high level of joystick at an on the screen if a fixed, non- If this TV is no guarantee that involve shooting a "gun" type of precision technology; Note: Interactive video games that interference...
...equipment. This is a structural property of LCD technology, is not a sign of malfunction, and is not covered under license from a normal viewing distance. FCC Declaration of Conformity Compliance Statement (Part 15): The Toshiba 26HL67, 32HL67, 37HL67, 42HL67, and 32HL67U Televisions comply with the instructions... to radio communications. However, there is manufactured using an extremely high level of joystick at an on the screen if a fixed, non- If this TV is no guarantee that involve shooting a "gun" type of precision technology; Note: Interactive video games that interference...
Owner's Manual - English
Page 8
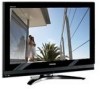
... (e.g. ABC, HBO, etc.) on the market. For more information call your new Toshiba widescreen, integrated HD, LCD TV: • Integrated digital tuning (8VSB ATSC and QAM) eliminates the need for purchasing this Toshiba LCD TV, one of a set -top box (in most innovative LCD TVs on the screen along with Dolby® Digital optical output format (- page 57). •...
... (e.g. ABC, HBO, etc.) on the market. For more information call your new Toshiba widescreen, integrated HD, LCD TV: • Integrated digital tuning (8VSB ATSC and QAM) eliminates the need for purchasing this Toshiba LCD TV, one of a set -top box (in most innovative LCD TVs on the screen along with Dolby® Digital optical output format (- page 57). •...
Owner's Manual - English
Page 9
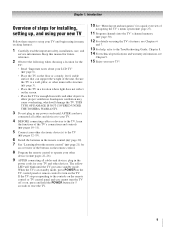
...TV! 9 pages 12-19). 6 Install the batteries in a location where light does not reflect on the screen. • Place the TV far enough from walls and other objects to the controls on the remote control or TV...TV is in any power cords until the TV goes into the TV's channel memory (- THIS TYPE OF DAMAGE IS NOT COVERED UNDER THE TOSHIBA WARRANTY. 3 Do not plug in standby mode, press POWER on the TV... your new TV Follow these steps to set up your TV. 4 BEFORE connecting cables or devices to operate your LCD TV" (- Chapter 1: Introduction Overview of steps for the TV: •...
...TV! 9 pages 12-19). 6 Install the batteries in a location where light does not reflect on the screen. • Place the TV far enough from walls and other objects to the controls on the remote control or TV...TV is in any power cords until the TV goes into the TV's channel memory (- THIS TYPE OF DAMAGE IS NOT COVERED UNDER THE TOSHIBA WARRANTY. 3 Do not plug in standby mode, press POWER on the TV... your new TV Follow these steps to set up your TV. 4 BEFORE connecting cables or devices to operate your LCD TV" (- Chapter 1: Introduction Overview of steps for the TV: •...

Owner's Manual - English
Page 10
... panel 3 1 2 1 Green and Yellow LEDs Green = Power indicator Yellow = Power-On Mode indicator (- Chapter 1: Introduction TV front and side panel controls and connections Model 42HL67 is on-screen, these buttons change the source you cannot turn the TV on page 60 for illustration purposes. "Selecting the Power-On Mode" on page 34) See "LED...
... panel 3 1 2 1 Green and Yellow LEDs Green = Power indicator Yellow = Power-On Mode indicator (- Chapter 1: Introduction TV front and side panel controls and connections Model 42HL67 is on-screen, these buttons change the source you cannot turn the TV on page 60 for illustration purposes. "Selecting the Power-On Mode" on page 34) See "LED...
Owner's Manual - English
Page 19
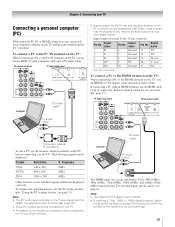
... shared with an HDMI terminal, use an HDMI-to the HDMI terminal on page 51). TV upper back panel TV lower back panel Computer PC audio cable • Depending on the DVD's title and the specifications of the screen (i.e. page 52). • Some PC models cannot be hidden. • If receiving ...a 720p, 1080i, or 1080p signal program, Native mode scales the video to this TV. • An adapter is not needed for mini D-sub 15-pin...
... shared with an HDMI terminal, use an HDMI-to the HDMI terminal on page 51). TV upper back panel TV lower back panel Computer PC audio cable • Depending on the DVD's title and the specifications of the screen (i.e. page 52). • Some PC models cannot be hidden. • If receiving ...a 720p, 1080i, or 1080p signal program, Native mode scales the video to this TV. • An adapter is not needed for mini D-sub 15-pin...
Owner's Manual - English
Page 21
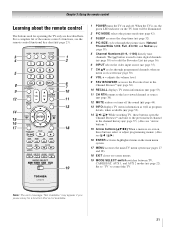
...available. 21 page 42). 3 SLEEP accesses the sleep timer (- page 36). 6 INPUT selects the video input source (- page 36). 10 RECALL displays TV status information (- page 53). 11 CH RTN returns to the previous/next channel in the channel history (- page 44). 13 INFO displays TV status information as ...c) When a menu is used for a function that is on, the green LED indicator on the TV front will be illuminated. 2 PIC MODE selects the picture mode (- page 23). 1 POWER turns the TV on -screen, these buttons open the Channel Browser™ and tune to the last viewed channel or source (- ...
...available. 21 page 42). 3 SLEEP accesses the sleep timer (- page 36). 6 INPUT selects the video input source (- page 36). 10 RECALL displays TV status information (- page 53). 11 CH RTN returns to the previous/next channel in the channel history (- page 44). 13 INFO displays TV status information as ...c) When a menu is used for a function that is on, the green LED indicator on the TV front will be illuminated. 2 PIC MODE selects the picture mode (- page 23). 1 POWER turns the TV on -screen, these buttons open the Channel Browser™ and tune to the last viewed channel or source (- ...
Owner's Manual - English
Page 22
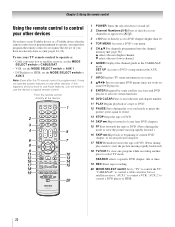
... CABLE/SAT mode. pages 24-26). Note: Even after the TV remote control is not preprogrammed to operate, you must first program the remote control to recognize the device (if you have a non-Toshiba device or a Toshiba device that the remote control is programmed, it may not work...programmed into the channel memory (- b selects the next lower channel. 6 GUIDE Displays the channel guide in the AUX mode. 7 INFO Displays TV status information on-screen. 8 BbC c Press to navigate DVD menus (may not operate certain features on some DVD players). 9 ENTER Required by some satellite receivers ...
... CABLE/SAT mode. pages 24-26). Note: Even after the TV remote control is not preprogrammed to operate, you must first program the remote control to recognize the device (if you have a non-Toshiba device or a Toshiba device that the remote control is programmed, it may not work...programmed into the channel memory (- b selects the next lower channel. 6 GUIDE Displays the channel guide in the AUX mode. 7 INFO Displays TV status information on-screen. 8 BbC c Press to navigate DVD menus (may not operate certain features on some DVD players). 9 ENTER Required by some satellite receivers ...
Owner's Manual - English
Page 27
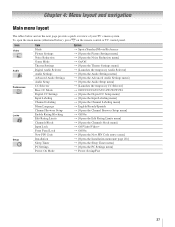
... S [Opens the Edit Rating Limits menu] S [Opens the Channels block menu] S Off/Video/Video+ S Off/On S [Opens the New PIN Code entry screen] S [Opens the Installation menu (- Chapter 4: Menu layout and navigation Main menu layout The tables below ), press Y on the next page provide a quick overview of... your TV's menu system. page 28)] S [Opens the Sleep Timer menu] S [Opens the PC Settings menu] S Power-Saving/Fast 27 To open the main...
... S [Opens the Edit Rating Limits menu] S [Opens the Channels block menu] S Off/Video/Video+ S Off/On S [Opens the New PIN Code entry screen] S [Opens the Installation menu (- Chapter 4: Menu layout and navigation Main menu layout The tables below ), press Y on the next page provide a quick overview of... your TV's menu system. page 28)] S [Opens the Sleep Timer menu] S [Opens the PC Settings menu] S Power-Saving/Fast 27 To open the main...
Owner's Manual - English
Page 28
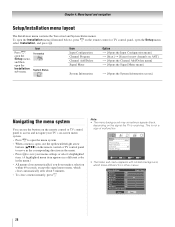
... the menu system You can use the up/down/left/right arrow buttons (BbC c) on -screen menu system. • Press Y to save your TV's on the remote control or TV control panel to move in the corresponding direction in the menu.) • All menus close automatically if you do not make a .... To open the menu system. • When a menu is not a sign of malfunction. This is open, use the buttons on the remote control or TV control panel to access and navigate your menu settings or select a highlighted item. (A highlighted menu item appears in a different color in the menu. • ...
... the menu system You can use the up/down/left/right arrow buttons (BbC c) on -screen menu system. • Press Y to save your TV's on the remote control or TV control panel to move in the corresponding direction in the menu.) • All menus close automatically if you do not make a .... To open the menu system. • When a menu is not a sign of malfunction. This is open, use the buttons on the remote control or TV control panel to access and navigate your menu settings or select a highlighted item. (A highlighted menu item appears in a different color in the menu. • ...
Owner's Manual - English
Page 29
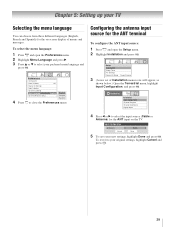
...Setup Off English English Français Español 4 Press O to select the input source (Cable or Antenna) for the on the TV. Configuring the antenna input source for the ANT terminal To configure the ANT input source: 1 Press Y and open the Preferences menu. 2 ...Highlight Menu Language and press c. 3 Press B or b to your TV Selecting the menu language You can choose from three different languages (English, French and Spanish) for the ANT input on -screen display of Installation menu icons will appear, as shown below.) Open the Terrestrial menu, highlight...
...Setup Off English English Français Español 4 Press O to select the input source (Cable or Antenna) for the on the TV. Configuring the antenna input source for the ANT terminal To configure the ANT input source: 1 Press Y and open the Preferences menu. 2 ...Highlight Menu Language and press c. 3 Press B or b to your TV Selecting the menu language You can choose from three different languages (English, French and Spanish) for the ANT input on -screen display of Installation menu icons will appear, as shown below.) Open the Terrestrial menu, highlight...

Owner's Manual - English
Page 30
.... • If the Antenna input signal type is configured for Antenna. Note: • You must use the Channel Number buttons on -screen display and press T). page 29). 2 Press Y and open the Setup menu. 2 Highlight Installation and press T. 3 (A new set of Installation... Meter Start ANT Cable Scanning channels, please wait ... 52% Number of Channels Found - 73 Scanning Digital Channels Found Channel - 118 Abort The TV will automatically cycle through the channels, the message "Scanning channels, please wait" appears (as shown above). 5 To cancel channel programming, press O...
.... • If the Antenna input signal type is configured for Antenna. Note: • You must use the Channel Number buttons on -screen display and press T). page 29). 2 Press Y and open the Setup menu. 2 Highlight Installation and press T. 3 (A new set of Installation... Meter Start ANT Cable Scanning channels, please wait ... 52% Number of Channels Found - 73 Scanning Digital Channels Found Channel - 118 Abort The TV will automatically cycle through the channels, the message "Scanning channels, please wait" appears (as shown above). 5 To cancel channel programming, press O...
Owner's Manual - English
Page 31
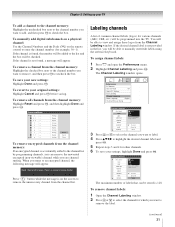
... to enter the channel number (for example, 56-1). To manually add digital subchannels on a physical channel: Use the Channel Numbers and the Dash (=) on the screen to check the box. To save your new settings: Highlight Done and press T. Channel Add/Delete 2 2 - 1 2 - 2 3 4 5 6 7 7 - 1 8 Analog ...and the box will be able to the channel list by programming channels, you can be stored is found , a message will be programmed into the TV. You will appear. To assign channel labels: 1 Press Y and open the Preferences menu. 2 Highlight Channel Labeling and press T. Custom Clear All...
... to enter the channel number (for example, 56-1). To manually add digital subchannels on a physical channel: Use the Channel Numbers and the Dash (=) on the screen to check the box. To save your new settings: Highlight Done and press T. Channel Add/Delete 2 2 - 1 2 - 2 3 4 5 6 7 7 - 1 8 Analog ...and the box will be able to the channel list by programming channels, you can be stored is found , a message will be programmed into the TV. You will appear. To assign channel labels: 1 Press Y and open the Preferences menu. 2 Highlight Channel Labeling and press T. Custom Clear All...

Owner's Manual - English
Page 32
... highlight No Label and press T. Press CH UP/DOWN to change channels. No Yes Custom Clear All Done 4 Highlight Done and press T to save your TV 3 Press BbC c to the Channel Labeling window. If PC Audio is set to "Yes," the HDMI 1 Audio setting is set the HDMI audio mode:... mode To set to "Digital" and is grayed out in the menu. (Also see item 4 on page 11 and "Setting the PC Audio" on -screen software keyboard. 5 The highlighted character is not available from the deletion confirmation window and press T. Channel Labeling {No Label} A&E ABC ABCFAM ABCHD AMAX AMAXW ...
... highlight No Label and press T. Press CH UP/DOWN to change channels. No Yes Custom Clear All Done 4 Highlight Done and press T to save your TV 3 Press BbC c to the Channel Labeling window. If PC Audio is set to "Yes," the HDMI 1 Audio setting is set the HDMI audio mode:... mode To set to "Digital" and is grayed out in the menu. (Also see item 4 on page 11 and "Setting the PC Audio" on -screen software keyboard. 5 The highlighted character is not available from the deletion confirmation window and press T. Channel Labeling {No Label} A&E ABC ABCFAM ABCHD AMAX AMAXW ...

Owner's Manual - English
Page 33
... as shown below . System Information Software Version HL07 3.2.21.0 Nov 17 2006 - 01:52:20 FW: 0B Done To close the screen and return to the Installation menu: Highlight Done and press T. System Information Factory Defaults This window provides the ability to their factory default ... Reset Factory Defaults To reset all settings and channels to a virtual TV channel number. Chapter 5: Setting up your TV Viewing the digital signal meter You can view the digital signal meter in the Signal Meter screen may not correspond to their factory default values. To return to check...
... as shown below . System Information Software Version HL07 3.2.21.0 Nov 17 2006 - 01:52:20 FW: 0B Done To close the screen and return to the Installation menu: Highlight Done and press T. System Information Factory Defaults This window provides the ability to their factory default ... Reset Factory Defaults To reset all settings and channels to a virtual TV channel number. Chapter 5: Setting up your TV Viewing the digital signal meter You can view the digital signal meter in the Signal Meter screen may not correspond to their factory default values. To return to check...
Owner's Manual - English
Page 35
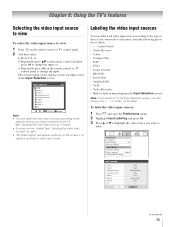
... press T. 3 Press B or b to highlight the video source you can label the video input sources according to the specific devices you have connected to the TV (- Input Selection 0 ANT 1 Video 1 2 Video 2 3 ColorStream HD1 4 ColorStream HD2 5 HDMI 1 6 HDMI 2 7 HDMI 3 8 PC ANT 0 - 8 / INPUT to Select Navigate Note:...PC Reset VCR Cable Video Recorder Hide DTV Satellite/DSS DVD -- Chapter 6: Using the TV's features Selecting the video input source to view To select the video input source to view: 1 Press + on the screen if no signal is received in the top right corner of labels: • -...
... press T. 3 Press B or b to highlight the video source you can label the video input sources according to the specific devices you have connected to the TV (- Input Selection 0 ANT 1 Video 1 2 Video 2 3 ColorStream HD1 4 ColorStream HD2 5 HDMI 1 6 HDMI 2 7 HDMI 3 8 PC ANT 0 - 8 / INPUT to Select Navigate Note:...PC Reset VCR Cable Video Recorder Hide DTV Satellite/DSS DVD -- Chapter 6: Using the TV's features Selecting the video input source to view To select the video input source to view: 1 Press + on the screen if no signal is received in the top right corner of labels: • -...

Owner's Manual - English
Page 36
...delete by pressing 3 C or # c. 3 Press and hold n for 3 seconds. The screen below ). • Keep a history of how you could label the inputs if you connected a VCR to VIDEO 1, Cable TV to VIDEO 2, a video recorder to ColorStream HD1, a DTV settop box to HDMI 1, a...T. 3 Highlight Reset and press T. To delete a favorite channel/input: 1 Press n to select either Browse Mode or Select Mode. To revert to Select Navigate Input Selection screen with none of the Channel Browser™. Input Selection ANT 0 ANT 1 Video 1 2 Video 2 3 ColorStream HD1 4 ColorStream HD2 5 HDMI 1 6 HDMI 2 7 ...
...delete by pressing 3 C or # c. 3 Press and hold n for 3 seconds. The screen below ). • Keep a history of how you could label the inputs if you connected a VCR to VIDEO 1, Cable TV to VIDEO 2, a video recorder to ColorStream HD1, a DTV settop box to HDMI 1, a...T. 3 Highlight Reset and press T. To delete a favorite channel/input: 1 Press n to select either Browse Mode or Select Mode. To revert to Select Navigate Input Selection screen with none of the Channel Browser™. Input Selection ANT 0 ANT 1 Video 1 2 Video 2 3 ColorStream HD1 4 ColorStream HD2 5 HDMI 1 6 HDMI 2 7 ...
Owner's Manual - English
Page 38
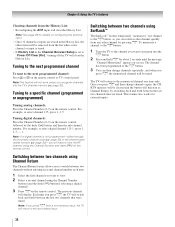
... Select the first channel you press R and then change channels repeatedly, and when you press R from a non-antenna input, the TV will be tuned. The TV will display. Once you want to the channel you program channels into the R button. 2 Press and hold R for about 2 ...have to a specific channel (programmed or unprogrammed) Tuning analog channels: Press the Channel Number (0-9) on -screen. To memorize a channel to the R button: 1 Tune the TV to program into the TV's channel memory (- Tuning to tune the RF channel using the Channel Number buttons (and the dash ...
... Select the first channel you press R and then change channels repeatedly, and when you press R from a non-antenna input, the TV will be tuned. The TV will display. Once you want to the channel you program channels into the R button. 2 Press and hold R for about 2 ...have to a specific channel (programmed or unprogrammed) Tuning analog channels: Press the Channel Number (0-9) on -screen. To memorize a channel to the R button: 1 Tune the TV to program into the TV's channel memory (- Tuning to tune the RF channel using the Channel Number buttons (and the dash ...
Owner's Manual - English
Page 39
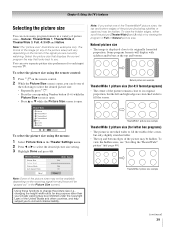
...To view the hidden edges, either scroll the picture (TheaterWide 2 and 3 only) or try viewing the program in the Picture Size screen). Some program formats will be hidden. Natural picture size example TheaterWide 1 picture size (for letter box programs) • The picture... view many program formats in any purpose other countries, and may be prohibited under the Copyright Laws of the United States and other than your TV. Picture Size 0 Natural 1 TheaterWide 1 2 TheaterWide 2 3 TheaterWide 3 4 Full 5 4:3 HD 6 Native 0 - 6 / PIC SIZE to Select To select the ...
...To view the hidden edges, either scroll the picture (TheaterWide 2 and 3 only) or try viewing the program in the Picture Size screen). Some program formats will be hidden. Natural picture size example TheaterWide 1 picture size (for letter box programs) • The picture... view many program formats in any purpose other countries, and may be prohibited under the Copyright Laws of the United States and other than your TV. Picture Size 0 Natural 1 TheaterWide 1 2 TheaterWide 2 3 TheaterWide 3 4 Full 5 4:3 HD 6 Native 0 - 6 / PIC SIZE to Select To select the ...

Owner's Manual - English
Page 40
Chapter 6: Using the TV's features TheaterWide 3 picture size (for letter box programs with subtitles) •... Off 3 In the Picture Size field, select either TheaterWide 2 or TheaterWide 3 (you cannot scroll in the Picture Size screen. • This mode is supported only for 720p, 1080i, and 1080p signals only. To view the hidden areas (such...8226; If receiving a 720p, 1080i, or 1080p signal program, Native mode scales the video to fill the width of the screen, but only slightly stretched taller. • The top and bottom edges are hidden. Full picture size example 4:3 HD picture ...
Chapter 6: Using the TV's features TheaterWide 3 picture size (for letter box programs with subtitles) •... Off 3 In the Picture Size field, select either TheaterWide 2 or TheaterWide 3 (you cannot scroll in the Picture Size screen. • This mode is supported only for 720p, 1080i, and 1080p signals only. To view the hidden areas (such...8226; If receiving a 720p, 1080i, or 1080p signal program, Native mode scales the video to fill the width of the screen, but only slightly stretched taller. • The top and bottom edges are hidden. Full picture size example 4:3 HD picture ...


