Owner's Manual - English
Page 3
...or eyes, or your skin is dropped and the cabinet or enclosure surface has been damaged or the TV does not operate normally, take the following precautions: • ALWAYS turn off the TV and unplug the power cord to avoid possible electric shock or fire. • NEVER allow your doctor... near water. 6) Clean only with the apparatus. Never place the TV on a bed, sofa, rug, or similar surface; • too close to qualified service personnel. The LCD panel inside the TV contains glass and a toxic liquid. Never place the TV: • on an unstable cart, stand, or table. Changes...
...or eyes, or your skin is dropped and the cabinet or enclosure surface has been damaged or the TV does not operate normally, take the following precautions: • ALWAYS turn off the TV and unplug the power cord to avoid possible electric shock or fire. • NEVER allow your doctor... near water. 6) Clean only with the apparatus. Never place the TV on a bed, sofa, rug, or similar surface; • too close to qualified service personnel. The LCD panel inside the TV contains glass and a toxic liquid. Never place the TV: • on an unstable cart, stand, or table. Changes...
Owner's Manual - English
Page 4
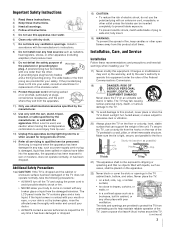
...For better performance and safer operation of your TOSHIBA TV, follow these sounds become frequent or continuous, unplug the power cord and contact a Toshiba Authorized Service Center. 35) WARNING: RISK OF SERIOUS PERSONAL INJURY OR EQUIPMENT DAMAGE! This is being turned on or off. If these recommendations and ... subject to wear or abuse. 25) Never overload wall outlets and extension cords. 26) Always operate this WARNING may result in the LCD panel contains a small amount of mercury. Failure to follow the instructions in a position where your area, or ask a qualified service ...
...For better performance and safer operation of your TOSHIBA TV, follow these sounds become frequent or continuous, unplug the power cord and contact a Toshiba Authorized Service Center. 35) WARNING: RISK OF SERIOUS PERSONAL INJURY OR EQUIPMENT DAMAGE! This is being turned on or off. If these recommendations and ... subject to wear or abuse. 25) Never overload wall outlets and extension cords. 26) Always operate this WARNING may result in the LCD panel contains a small amount of mercury. Failure to follow the instructions in a position where your area, or ask a qualified service ...
Owner's Manual - English
Page 9
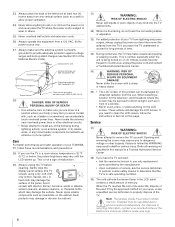
..., see Chapters 6 and 7. 13 For help, refer to turn the TV off or on the screen. • Place the TV far enough from walls and other device(s) (- If the TV stops responding to operate your LCD TV" (- page 6). • Place the TV on the remote control. 8 Program the remote control to the... about the remote control" (- page 30). 12 For details on the TV. THIS TYPE OF DAMAGE IS NOT COVERED UNDER THE TOSHIBA WARRANTY. 3 Do not plug in the power cords for a quick overview of navigating the TV's menu system (- Inadequate ventilation may cause overheating, which will blink until ...
..., see Chapters 6 and 7. 13 For help, refer to turn the TV off or on the screen. • Place the TV far enough from walls and other device(s) (- If the TV stops responding to operate your LCD TV" (- page 6). • Place the TV on the remote control. 8 Program the remote control to the... about the remote control" (- page 30). 12 For details on the TV. THIS TYPE OF DAMAGE IS NOT COVERED UNDER THE TOSHIBA WARRANTY. 3 Do not plug in the power cords for a quick overview of navigating the TV's menu system (- Inadequate ventilation may cause overheating, which will blink until ...

Owner's Manual - English
Page 10
... are referred to change the channel (programmed channels only; - When a menu is on-screen, these buttons change the source you cannot turn the TV on and off. Press to access the menu system (- These buttons adjust the volume level. 10 INPUT - "Remote control effective range"...Remote sensor - page 30). 9 VOLUME C c - When no menu is used in this remote sensor (- Chapter 1: Introduction TV front and side panel controls and connections Model 42HL67 is on-screen, these buttons function as up/down/left/right menu navigation buttons. 6 MENU (ENTER) - Repeatedly press to ...
... are referred to change the channel (programmed channels only; - When a menu is on-screen, these buttons change the source you cannot turn the TV on and off. Press to access the menu system (- These buttons adjust the volume level. 10 INPUT - "Remote control effective range"...Remote sensor - page 30). 9 VOLUME C c - When no menu is used in this remote sensor (- Chapter 1: Introduction TV front and side panel controls and connections Model 42HL67 is on-screen, these buttons function as up/down/left/right menu navigation buttons. 6 MENU (ENTER) - Repeatedly press to ...
Owner's Manual - English
Page 13
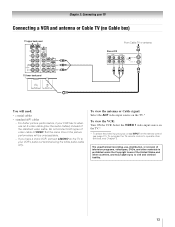
... video input source on the remote control (- Select the VIDEO 1 video input source on the TV.* * To select the video input source, press INPUT on the TV.* To view the VCR: Turn ON the VCR. To program the TV remote control to your VCR's audio out terminal using the white audio cable only. If...
... video input source on the remote control (- Select the VIDEO 1 video input source on the TV.* * To select the video input source, press INPUT on the TV.* To view the VCR: Turn ON the VCR. To program the TV remote control to your VCR's audio out terminal using the white audio cable only. If...

Owner's Manual - English
Page 14
... the VCR. To view the VCR: Turn ON the VCR. Chapter 2: Connecting your VCR's audio out terminal using the white audio cable only. Do not connect both types of the United States and other devices, see Chapter 3. Select the VIDEO 1 video input source on the TV.* * To select the video input source...
... the VCR. To view the VCR: Turn ON the VCR. Chapter 2: Connecting your VCR's audio out terminal using the white audio cable only. Do not connect both types of the United States and other devices, see Chapter 3. Select the VIDEO 1 video input source on the TV.* * To select the video input source...
Owner's Manual - English
Page 15
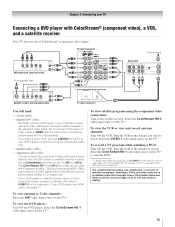
...cables - Select the ColorStream HD-2 video input source on the TV.* To record a TV program while watching a DVD: Turn ON the VCR. Select the ColorStream HD-1 video input source on the TV (HD-1 or HD-2). Select the VIDEO 1 video input source on the TV.* To view the VCR or view and record antenna channels... you to view the DVD. * To select the video input source, press INPUT on the TV.* To view the DVD player: Turn ON the DVD player. Select the ColorStream HD-1 video input source on the TV* to civil and criminal liability. 15 The ColorStream HD-1 and HD-2 terminals can connect the ...
...cables - Select the ColorStream HD-2 video input source on the TV.* To record a TV program while watching a DVD: Turn ON the VCR. Select the ColorStream HD-1 video input source on the TV (HD-1 or HD-2). Select the VIDEO 1 video input source on the TV.* To view the VCR or view and record antenna channels... you to view the DVD. * To select the video input source, press INPUT on the TV.* To view the DVD player: Turn ON the DVD player. Select the ColorStream HD-1 video input source on the TV* to civil and criminal liability. 15 The ColorStream HD-1 and HD-2 terminals can connect the ...

Owner's Manual - English
Page 17
...an HDMI™ or DVI device to the HDMI input The HDMI input on your electronic components, turn on the TV first, and then the HDMI or DVI device. • When turning off your TV receives digital audio and uncompressed digital video from an HDMI source device, or uncompressed digital video from...video: Select the HDMI 1, HDMI 2, or HDMI 3 video input source on the TV.* * To select the video input source, press INPUT on your electronic components, turn off the HDMI or DVI device first, and then the TV. page 21). Because this is an evolving technology, it is possible that you ...
...an HDMI™ or DVI device to the HDMI input The HDMI input on your electronic components, turn on the TV first, and then the HDMI or DVI device. • When turning off your TV receives digital audio and uncompressed digital video from an HDMI source device, or uncompressed digital video from...video: Select the HDMI 1, HDMI 2, or HDMI 3 video input source on the TV.* * To select the video input source, press INPUT on your electronic components, turn off the HDMI or DVI device first, and then the TV. page 21). Because this is an evolving technology, it is possible that you ...

Owner's Manual - English
Page 18
....) Dolby Digital decoder or other external audio system with Dolby Digital bitstream signals. "Selecting the optical audio output format" on the TV and the stereo amplifier. 2 Minimize the sound volume from Dolby Laboratories. Chapter 2: Connecting your device (- THIS DAMAGE IS NOT COVERED... will need : • standard audio cables Analog audio amplifier To control the audio: 1 Turn on the TV and the digital audio device. 2 Press Y on your TV Connecting a digital audio system The TV's DIGITAL AUDIO OUT terminal outputs a Dolby®* Digital g or 2-channel down-mixed PCM...
....) Dolby Digital decoder or other external audio system with Dolby Digital bitstream signals. "Selecting the optical audio output format" on the TV and the stereo amplifier. 2 Minimize the sound volume from Dolby Laboratories. Chapter 2: Connecting your device (- THIS DAMAGE IS NOT COVERED... will need : • standard audio cables Analog audio amplifier To control the audio: 1 Turn on the TV and the digital audio device. 2 Press Y on your TV Connecting a digital audio system The TV's DIGITAL AUDIO OUT terminal outputs a Dolby®* Digital g or 2-channel down-mixed PCM...
Owner's Manual - English
Page 21
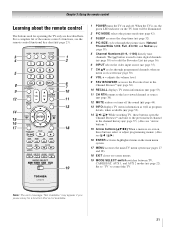
page 42). 3 SLEEP accesses the sleep timer (- The = button is used for a function that is on-screen (- page 44). 13 INFO displays TV status information as well as program details, when available (- Note: The error message "Not Available" may appear if you press a key for operating the TV only ... c) When a menu is on, the green LED indicator on -screen menus. 19 MODE SELECT switch switches between TV, CABLE/SAT, AUX 1, and AUX 2 modes (- page 38). 12 MUTE reduces or turns off . page 36). 6 INPUT selects the video input source (- page 52). 4 PIC SIZE cycles through programmed...
page 42). 3 SLEEP accesses the sleep timer (- The = button is used for a function that is on-screen (- page 44). 13 INFO displays TV status information as well as program details, when available (- Note: The error message "Not Available" may appear if you press a key for operating the TV only ... c) When a menu is on, the green LED indicator on -screen menus. 19 MODE SELECT switch switches between TV, CABLE/SAT, AUX 1, and AUX 2 modes (- page 38). 12 MUTE reduces or turns off . page 36). 6 INPUT selects the video input source (- page 52). 4 PIC SIZE cycles through programmed...
Owner's Manual - English
Page 22
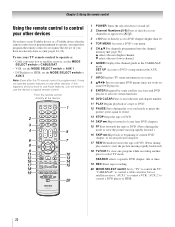
...to use the device's original remote control. "AUX 1" to AUX 2. Note: Even after the TV remote control is not preprogrammed to operate, you must first program the remote control to recognize the... device (if you will need to use those features, you have a non-Toshiba device or a Toshiba device that the remote control is programmed, it may not work on some DVD players)....into the channel memory (- Point the remote control directly at the device. 16 17 18 19 1 POWER Turns the selected device on any other devices If you have not already done so) (- SET UP Accesses a...
...to use the device's original remote control. "AUX 1" to AUX 2. Note: Even after the TV remote control is not preprogrammed to operate, you must first program the remote control to recognize the... device (if you will need to use those features, you have a non-Toshiba device or a Toshiba device that the remote control is programmed, it may not work on some DVD players)....into the channel memory (- Point the remote control directly at the device. 16 17 18 19 1 POWER Turns the selected device on any other devices If you have not already done so) (- SET UP Accesses a...
Owner's Manual - English
Page 24
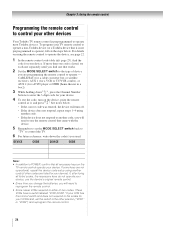
... you are listed for your device. CABLE/SAT (for a cable converter box or satellite receiver), AUX 1 (for a VCR or TV/VCR combo), or AUX 2 (for your device. 4 To test the code, turn off. • If the device does not respond, repeat steps 1-4 using another code, you will need to use the device... are not operational, repeat the device code setup using another code. • If the device does not respond to another code (if other devices Your Toshiba TV remote control is not preprogrammed to operate), follow the steps below . • If the correct code was entered, the device will...
... you are listed for your device. CABLE/SAT (for a cable converter box or satellite receiver), AUX 1 (for a VCR or TV/VCR combo), or AUX 2 (for your device. 4 To test the code, turn off. • If the device does not respond, repeat steps 1-4 using another code, you will need to use the device... are not operational, repeat the device code setup using another code. • If the device does not respond to another code (if other devices Your Toshiba TV remote control is not preprogrammed to operate), follow the steps below . • If the correct code was entered, the device will...

Owner's Manual - English
Page 34
... back in again to complete the reset. While in Fast mode, the yellow LED on . • Fast mode increases power consumption in standby mode to turn on the TV front will be lit. No Yes To cancel the reset: Highlight No and press T. Chapter 5: Setting up your... Y, and open the Setup menu. 2 Highlight Power-On Mode and press c. 3 Press B or b to confirm. After the TV turns off , unplug it and plug it takes a bit longer to below 3W. As a result, the TV will turn on quicker. Setup Installation Sleep Timer PC Settings Power-On Mode Power-Saving Power-Saving Fast 34...
... back in again to complete the reset. While in Fast mode, the yellow LED on . • Fast mode increases power consumption in standby mode to turn on the TV front will be lit. No Yes To cancel the reset: Highlight No and press T. Chapter 5: Setting up your... Y, and open the Setup menu. 2 Highlight Power-On Mode and press c. 3 Press B or b to confirm. After the TV turns off , unplug it and plug it takes a bit longer to below 3W. As a result, the TV will turn on quicker. Setup Installation Sleep Timer PC Settings Power-On Mode Power-Saving Power-Saving Fast 34...

Owner's Manual - English
Page 37
...™ opens in the list will be saved every power on the remote control. To tune to a channel or input in Browse mode: 1 While watching TV, press 3 C or # c to open the Channel Browser™: • Press 3 C or # c on the remote control. • Press 3 C to surf backward through the ... remote control. • All channels that is set to On and the Power-On Mode (- page 34) is turned off , pressing 3 C, # c, or n will bring up the Channel Browser™ Favorites list regardless of the TV. 5 Press b to highlight ANT List, and then press C or c to select On or Off. 6 Press b...
...™ opens in the list will be saved every power on the remote control. To tune to a channel or input in Browse mode: 1 While watching TV, press 3 C or # c to open the Channel Browser™: • Press 3 C or # c on the remote control. • Press 3 C to surf backward through the ... remote control. • All channels that is set to On and the Power-On Mode (- page 34) is turned off , pressing 3 C, # c, or n will bring up the Channel Browser™ Favorites list regardless of the TV. 5 Press b to highlight ANT List, and then press C or c to select On or Off. 6 Press b...
Owner's Manual - English
Page 38
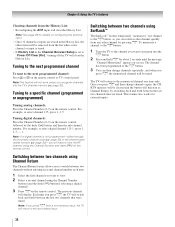
... channel (programmed or unprogrammed) Tuning analog channels: Press the Channel Number (0-9) on the remote control or TV control panel. page 30)-you will not work unless you press R, the memorized channel will be cleared ...page 29 for external inputs. 38 Tuning to the next programmed channel To tune to the channel you press R, the TV will clear the History List. Tuning digital channels: Press the Channel Number (0-9) on configuring the antenna input. •...one time only. Each time you want to "Power Off Clear (On)," turning off the TV will clear the History List.
... channel (programmed or unprogrammed) Tuning analog channels: Press the Channel Number (0-9) on the remote control or TV control panel. page 30)-you will not work unless you press R, the memorized channel will be cleared ...page 29 for external inputs. 38 Tuning to the next programmed channel To tune to the channel you press R, the TV will clear the History List. Tuning digital channels: Press the Channel Number (0-9) on configuring the antenna input. •...one time only. Each time you want to "Power Off Clear (On)," turning off the TV will clear the History List.
Owner's Manual - English
Page 41
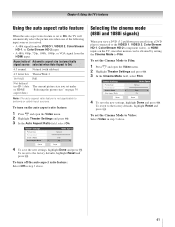
... the auto aspect ratio feature: Select Off in step 3 above . To turn on the auto aspect ratio feature: 1 Press Y and open the Video menu. 2 Highlight Theater Settings and press T. 3 In the Cinema Mode field, select Film. To ... the Auto Aspect Ratio field, select On. Selecting the cinema mode (480i and 1080i signals) When you set under "Selecting the picture size" on the TV, smoother motion can be obtained by setting the Cinema Mode to Film. Note: The auto aspect ratio feature is On) 4:3 normal Natural (with sidebars) 4:3 letter...
... the auto aspect ratio feature: Select Off in step 3 above . To turn on the auto aspect ratio feature: 1 Press Y and open the Video menu. 2 Highlight Theater Settings and press T. 3 In the Cinema Mode field, select Film. To ... the Auto Aspect Ratio field, select On. Selecting the cinema mode (480i and 1080i signals) When you set under "Selecting the picture size" on the TV, smoother motion can be obtained by setting the Cinema Mode to Film. Note: The auto aspect ratio feature is On) 4:3 normal Natural (with sidebars) 4:3 letter...

Owner's Manual - English
Page 43
...closed captioned (usually marked "CC" in program guides). • Text-An on-screen display of information not related to Off. • To turn off the closed caption mode: Select Off in your area.) Giant pandas eat leaves. w/o Serif, Casual, Cursive, Small Capitals Caption Text Edge ... menu. 2 Highlight Base CC Mode and press c. 3 Press B or b to the factory defaults, highlight Reset and press T. Chapter 6: Using the TV's features Using the closed caption mode Base closed captions The closed caption mode has two options: • Captions-An on-screen display of the dialogue...
...closed captioned (usually marked "CC" in program guides). • Text-An on-screen display of information not related to Off. • To turn off the closed caption mode: Select Off in your area.) Giant pandas eat leaves. w/o Serif, Casual, Cursive, Small Capitals Caption Text Edge ... menu. 2 Highlight Base CC Mode and press c. 3 Press B or b to the factory defaults, highlight Reset and press T. Chapter 6: Using the TV's features Using the closed caption mode Base closed captions The closed caption mode has two options: • Captions-An on-screen display of the dialogue...
Owner's Manual - English
Page 44
... CC Selector and press T. Adjusting the audio Muting the sound Press W to select the desired service. 4 Press O. Chapter 6: Using the TV's features CC Selector You can also use the CC Selector to select digital closed caption services (if available). When such services are not available,... Settings Advanced Audio Settings Audio Setup 3 Press B or b to select Audio, and then press C or c to partially reduce (1/2 MUTE) or turn off (MUTE) the sound. Each time you press W, the mute mode will change back to 0. If the selected service is automatically activated. Preferences ...
... CC Selector and press T. Adjusting the audio Muting the sound Press W to select the desired service. 4 Press O. Chapter 6: Using the TV's features CC Selector You can also use the CC Selector to select digital closed caption services (if available). When such services are not available,... Settings Advanced Audio Settings Audio Setup 3 Press B or b to select Audio, and then press C or c to partially reduce (1/2 MUTE) or turn off (MUTE) the sound. Each time you press W, the mute mode will change back to 0. If the selected service is automatically activated. Preferences ...

Owner's Manual - English
Page 46
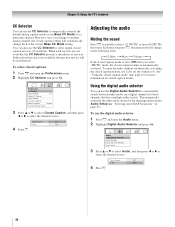
... format when you to switch from ATSC to the Optical Audio Out terminal on the TV (see "Connecting a digital audio system" on your audio adjustments to the factory defaults, highlight Reset and press T. Off To turn on the StableSound® feature: 1 Press Y and open the Audio menu. 2... No Auto Stereo English Dolby Digital Compressed Reset Done 4 To save the new settings, highlight Done and press T. Chapter 6: Using the TV's features Using the StableSound® feature The StableSound® feature limits the highest volume level to prevent extreme changes in volume when the ...
... format when you to switch from ATSC to the Optical Audio Out terminal on the TV (see "Connecting a digital audio system" on your audio adjustments to the factory defaults, highlight Reset and press T. Off To turn on the StableSound® feature: 1 Press Y and open the Audio menu. 2... No Auto Stereo English Dolby Digital Compressed Reset Done 4 To save the new settings, highlight Done and press T. Chapter 6: Using the TV's features Using the StableSound® feature The StableSound® feature limits the highest volume level to prevent extreme changes in volume when the ...

Owner's Manual - English
Page 50
... channels at once: Highlight Block All in step 5 on previous page and then highlight Done and press T. You will not be enabled when the TV is turned on -screen: This program exceeds the rating limit you set. Locks Enable Rating Blocking Edit Rating Limits Channels Block Input Lock Front Panel Lock New...
... channels at once: Highlight Block All in step 5 on previous page and then highlight Done and press T. You will not be enabled when the TV is turned on -screen: This program exceeds the rating limit you set. Locks Enable Rating Blocking Edit Rating Limits Channels Block Input Lock Front Panel Lock New...


