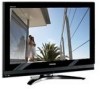
Owner's Manual - English
Page 3
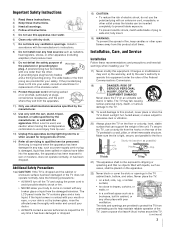
... for your body to come in contact with water and consult your doctor. • ALWAYS contact a service technician to inspect the TV any way, such as power-supply cord or plug is required when the apparatus has been damaged in any time it has been damaged or dropped. 15) CAUTION...or fire. • NEVER allow your safety. Hooks Clip Clip TV side TV top 21) The apparatus shall not be placed on the rear of plug to wide slot; Install in the TV cabinet back, bottom, and sides. The LCD panel inside the TV contains glass and a toxic liquid. Changes or modifications may fall...
... for your body to come in contact with water and consult your doctor. • ALWAYS contact a service technician to inspect the TV any way, such as power-supply cord or plug is required when the apparatus has been damaged in any time it has been damaged or dropped. 15) CAUTION...or fire. • NEVER allow your safety. Hooks Clip Clip TV side TV top 21) The apparatus shall not be placed on the rear of plug to wide slot; Install in the TV cabinet back, bottom, and sides. The LCD panel inside the TV contains glass and a toxic liquid. Changes or modifications may fall...
Owner's Manual - English
Page 4
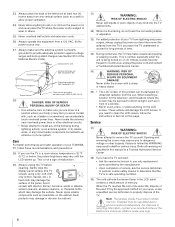
... activity: a) an antenna system; Never spray volatile compounds such as in a position where your TOSHIBA TV, follow these sounds become frequent or continuous, unplug the power cord and contact a Toshiba Authorized Service Center. 35) WARNING: RISK OF SERIOUS PERSONAL INJURY OR EQUIPMENT DAMAGE! Refer all...when the unit is properly grounded to make sure the antenna system is being turned on the cabinet. These actions will damage the LCD screen. or b) cables, wires, or any vertical surface (such as a ladder or screwdriver) can be regulated due to environmental...
... activity: a) an antenna system; Never spray volatile compounds such as in a position where your TOSHIBA TV, follow these sounds become frequent or continuous, unplug the power cord and contact a Toshiba Authorized Service Center. 35) WARNING: RISK OF SERIOUS PERSONAL INJURY OR EQUIPMENT DAMAGE! Refer all...when the unit is properly grounded to make sure the antenna system is being turned on the cabinet. These actions will damage the LCD screen. or b) cables, wires, or any vertical surface (such as a ladder or screwdriver) can be regulated due to environmental...
Owner's Manual - English
Page 6
...This equipment has been tested and found to operate this TV. however, there may be determined by removing and applying power to the equipment, the user is not covered under.... WOW technology is : Toshiba America Consumer Products, L.L.C. 82 Totowa Rd. FCC Declaration of Conformity Compliance Statement (Part 15): The Toshiba 26HL67, 32HL67, 37HL67, 42HL67, and 32HL67U Televisions comply with... rules is incorporated under license from SRS Labs, Inc. • Manufactured under your LCD TV The following measures: • Reorient or relocate the receiving antenna. • Increase...
...This equipment has been tested and found to operate this TV. however, there may be determined by removing and applying power to the equipment, the user is not covered under.... WOW technology is : Toshiba America Consumer Products, L.L.C. 82 Totowa Rd. FCC Declaration of Conformity Compliance Statement (Part 15): The Toshiba 26HL67, 32HL67, 37HL67, 42HL67, and 32HL67U Televisions comply with... rules is incorporated under license from SRS Labs, Inc. • Manufactured under your LCD TV The following measures: • Reorient or relocate the receiving antenna. • Increase...
Owner's Manual - English
Page 7
...Toshiba 8 Features of your new TV 8 Overview of steps for installing, setting up, and using your new TV 9 TV front and side panel controls and connections 10 TV back panel connections 11 Chapter 2: Connecting your TV...meter 33 Viewing the system status 33 Selecting the Power-On Mode 34 Chapter 6: Using the TV's features 35 Selecting the video input source to view...(480i and 1080i signals 41 Adjusting the picture 42 Selecting the picture mode 42 Adjusting the picture quality 42 Using the closed caption mode 43 Base closed ... LCD Televisions 26" and Larger 62 Limited Canada Warranty for...
...Toshiba 8 Features of your new TV 8 Overview of steps for installing, setting up, and using your new TV 9 TV front and side panel controls and connections 10 TV back panel connections 11 Chapter 2: Connecting your TV...meter 33 Viewing the system status 33 Selecting the Power-On Mode 34 Chapter 6: Using the TV's features 35 Selecting the video input source to view...(480i and 1080i signals 41 Adjusting the picture 42 Selecting the picture mode 42 Adjusting the picture quality 42 Using the closed caption mode 43 Base closed ... LCD Televisions 26" and Larger 62 Limited Canada Warranty for...
Owner's Manual - English
Page 9
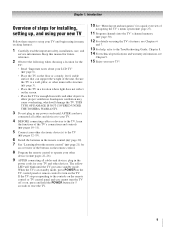
... until AFTER you cannot turn the TV off or on, press and hold the POWER button for 5 seconds to turn on the screen. • Place the TV far enough from walls and other device(s) (- pages 22-26). 9 AFTER connecting all cables and devices to your LCD TV" (- Chapter 1: Introduction Overview of... IS NOT COVERED UNDER THE TOSHIBA WARRANTY. 3 Do not plug in the remote control (- pages 12-19). 6 Install the batteries in any power cords until the TV goes into the TV's channel memory (- The yellow LED will damage the TV. When the TV is in standby mode, press POWER on the floor or a ...
... until AFTER you cannot turn the TV off or on, press and hold the POWER button for 5 seconds to turn on the screen. • Place the TV far enough from walls and other device(s) (- pages 22-26). 9 AFTER connecting all cables and devices to your LCD TV" (- Chapter 1: Introduction Overview of... IS NOT COVERED UNDER THE TOSHIBA WARRANTY. 3 Do not plug in the remote control (- pages 12-19). 6 Install the batteries in any power cords until the TV goes into the TV's channel memory (- The yellow LED will damage the TV. When the TV is in standby mode, press POWER on the floor or a ...

Owner's Manual - English
Page 10
... C c - Repeatedly press to as the ENTER button. 7 EXIT - TV top TV front POWER Right side panel 4 8 5 9 6 7 10 Control panel 3 1 2 1 Green and Yellow LEDs Green = Power indicator Yellow = Power-On Mode indicator (- These buttons adjust the volume level. 10 INPUT -...TV control panel and you are referred to change the channel (programmed channels only; - Press to access the menu system (- "Selecting the Power-On Mode" on page 34) See "LED indications" on page 20). 3 VIDEO-2 IN - Chapter 1: Introduction TV front and side panel controls and connections Model 42HL67...
... C c - Repeatedly press to as the ENTER button. 7 EXIT - TV top TV front POWER Right side panel 4 8 5 9 6 7 10 Control panel 3 1 2 1 Green and Yellow LEDs Green = Power indicator Yellow = Power-On Mode indicator (- These buttons adjust the volume level. 10 INPUT -...TV control panel and you are referred to change the channel (programmed channels only; - Press to access the menu system (- "Selecting the Power-On Mode" on page 34) See "LED indications" on page 20). 3 VIDEO-2 IN - Chapter 1: Introduction TV front and side panel controls and connections Model 42HL67...
Owner's Manual - English
Page 11
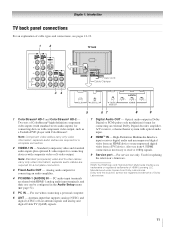
... use can be configured in Dolby Digital or PCM (pulse-code modulation) format for connecting devices with component video output, such as a Toshiba DVD player with optical audio input. 8 HDMI™ IN - Antenna input that supports analog (NTSC) and digital (ATSC) off-air...trademarks or registered trademarks of HDMI Licensing LLC. separate audio cables are registered trademarks of Dolby Laboratories. 11 Also see pages 12-19. 1 2 TV back 34 Power cord Cable Clamper 5 67 8 9 1 ColorStream® HD-1 and ColorStream® HD-2 - Note: Standard (composite) video and S-video ...
... use can be configured in Dolby Digital or PCM (pulse-code modulation) format for connecting devices with component video output, such as a Toshiba DVD player with optical audio input. 8 HDMI™ IN - Antenna input that supports analog (NTSC) and digital (ATSC) off-air...trademarks or registered trademarks of HDMI Licensing LLC. separate audio cables are registered trademarks of Dolby Laboratories. 11 Also see pages 12-19. 1 2 TV back 34 Power cord Cable Clamper 5 67 8 9 1 ColorStream® HD-1 and ColorStream® HD-2 - Note: Standard (composite) video and S-video ...
Owner's Manual - English
Page 21
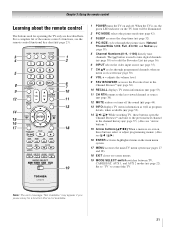
...Arrow buttons.") 15 Arrow buttons (BbC c) When a menu is on -screen menus. 19 MODE SELECT switch switches between TV, CABLE/SAT, AUX 1, and AUX 2 modes (- page 23). 1 POWER turns the TV on the TV front will be illuminated. 2 PIC MODE selects the picture mode (- The = button is used for a function that... (- page 30). 8 VOL + - Set to "TV" to the last viewed channel or source (- When the TV is on, the green LED indicator on and off the sound (- page 42). 3 SLEEP accesses the sleep timer (- page 36). 10 RECALL displays TV status information (- pages 27 and 28). 18 EXIT closes...
...Arrow buttons.") 15 Arrow buttons (BbC c) When a menu is on -screen menus. 19 MODE SELECT switch switches between TV, CABLE/SAT, AUX 1, and AUX 2 modes (- page 23). 1 POWER turns the TV on the TV front will be illuminated. 2 PIC MODE selects the picture mode (- The = button is used for a function that... (- page 30). 8 VOL + - Set to "TV" to the last viewed channel or source (- When the TV is on, the green LED indicator on and off the sound (- page 42). 3 SLEEP accesses the sleep timer (- page 36). 10 RECALL displays TV status information (- pages 27 and 28). 18 EXIT closes...
Owner's Manual - English
Page 22
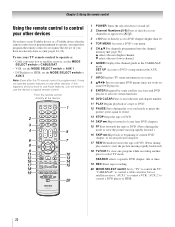
... satellite receiver; If this happens and you wish to use those features, you have a non-Toshiba device or a Toshiba device that the remote control is programmed, it may not work on and off. 2 Channel ...pages 24-26). Point the remote control directly at the device. 16 17 18 19 1 POWER Turns the selected device on some DVD players). 9 ENTER Required by some satellite receivers and ... original remote control. Chapter 3: Using the remote control Using the remote control to control your TV remote control to operate a: • Cable converter box or satellite receiver, set the MODE SELECT...
... satellite receiver; If this happens and you wish to use those features, you have a non-Toshiba device or a Toshiba device that the remote control is programmed, it may not work on and off. 2 Channel ...pages 24-26). Point the remote control directly at the device. 16 17 18 19 1 POWER Turns the selected device on some DVD players). 9 ENTER Required by some satellite receivers and ... original remote control. Chapter 3: Using the remote control Using the remote control to control your TV remote control to operate a: • Cable converter box or satellite receiver, set the MODE SELECT...

Owner's Manual - English
Page 23
... Z SKIP z Stop* Skip REV* Skip FWD* --- --- --- --- --- --- FF TV/VCR/ SEARCH REC SLOW - REMOTE CONTROL KEY Toshiba TV CABLE SAT (satellite) POWER SLEEP PIC SIZE PIC MODE Power Sleep timer Picture size PIC MODE Power s TV s TV s TV Power s TV s TV s TV 1-9 Digit 1-9 Digit 1-9 Digit 1-9 0 Digit 0 Digit 0 Digit 0 100/-/+10 INPUT - (sub CH) TV/Video select --s TV - (sub CH) s TV FAV BROWSER/ TOP MENU MUTE FAV BROWSER...
... Z SKIP z Stop* Skip REV* Skip FWD* --- --- --- --- --- --- FF TV/VCR/ SEARCH REC SLOW - REMOTE CONTROL KEY Toshiba TV CABLE SAT (satellite) POWER SLEEP PIC SIZE PIC MODE Power Sleep timer Picture size PIC MODE Power s TV s TV s TV Power s TV s TV s TV 1-9 Digit 1-9 Digit 1-9 Digit 1-9 0 Digit 0 Digit 0 Digit 0 100/-/+10 INPUT - (sub CH) TV/Video select --s TV - (sub CH) s TV FAV BROWSER/ TOP MENU MUTE FAV BROWSER...
Owner's Manual - English
Page 24
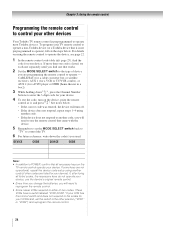
... to either of two codes. If your VCR has this kind of device you used: DEVICE CODE DEVICE CODE Note: • In addition to POWER, confirm that works. 2 Set the MODE SELECT switch to the type of switch and does not respond to the codes for your VCR brand,...the other codes are programming the remote control to operate - Chapter 3: Using the remote control Programming the remote control to control your other devices Your Toshiba TV remote control is not preprogrammed to operate), follow the steps below . • If the correct code was entered, the device will turn on ...
... to either of two codes. If your VCR has this kind of device you used: DEVICE CODE DEVICE CODE Note: • In addition to POWER, confirm that works. 2 Set the MODE SELECT switch to the type of switch and does not respond to the codes for your VCR brand,...the other codes are programming the remote control to operate - Chapter 3: Using the remote control Programming the remote control to control your other devices Your Toshiba TV remote control is not preprogrammed to operate), follow the steps below . • If the correct code was entered, the device will turn on ...
Owner's Manual - English
Page 27
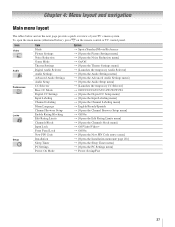
...page 28)] S [Opens the Sleep Timer menu] S [Opens the PC Settings menu] S Power-Saving/Fast 27 To open the main menus (illustrated below and on the remote control or TV control panel. Icon Video Audio Preferences Locks Setup Item Mode Picture Settings Noise Reduction Game Mode ... Language Channel Browser Setup Enable Rating Blocking Edit Rating Limits Channels Block Input Lock Front Panel Lock New PIN Code Installation Sleep Timer PC Settings Power-On Mode Option S Sports/Standard/Movie/Preference S [Opens the Picture Settings menu] S [Opens the Noise Reduction menu] S On/Off S [Opens...
...page 28)] S [Opens the Sleep Timer menu] S [Opens the PC Settings menu] S Power-Saving/Fast 27 To open the main menus (illustrated below and on the remote control or TV control panel. Icon Video Audio Preferences Locks Setup Item Mode Picture Settings Noise Reduction Game Mode ... Language Channel Browser Setup Enable Rating Blocking Edit Rating Limits Channels Block Input Lock Front Panel Lock New PIN Code Installation Sleep Timer PC Settings Power-On Mode Option S Sports/Standard/Movie/Preference S [Opens the Picture Settings menu] S [Opens the Noise Reduction menu] S On/Off S [Opens...
Owner's Manual - English
Page 29
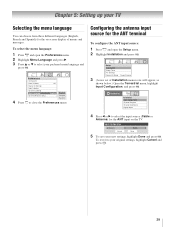
... to your original settings, highlight Cancel and press T. 29 To revert to close the Preferences menu. Setup Installation Sleep Timer PC Settings Power-On Mode Power-Saving 3 (A new set of menus and messages. Installation Terrestrial Input Configuration Channel Program Channel Add/Delete Signal Meter 4 Press C or... Language and press c. 3 Press B or b to select the input source (Cable or Antenna) for the on the TV. Chapter 5: Setting up your TV Selecting the menu language You can choose from three different languages (English, French and Spanish) for the ANT input on -screen...
... to your original settings, highlight Cancel and press T. 29 To revert to close the Preferences menu. Setup Installation Sleep Timer PC Settings Power-On Mode Power-Saving 3 (A new set of menus and messages. Installation Terrestrial Input Configuration Channel Program Channel Add/Delete Signal Meter 4 Press C or... Language and press c. 3 Press B or b to select the input source (Cable or Antenna) for the on the TV. Chapter 5: Setting up your TV Selecting the menu language You can choose from three different languages (English, French and Spanish) for the ANT input on -screen...

Owner's Manual - English
Page 30
...cancel channel programming, press O on the remote control (or highlight Abort in the channel memory. Setup Installation Sleep Timer PC Settings Power-On Mode Power-Saving 4 (A new set of Installation menu icons will take substantially longer than when the antenna input is cycling through all the... antenna channels, and store all active channels in your TV Programming channels into the TV's memory.) To remove an Antenna source channel...
...cancel channel programming, press O on the remote control (or highlight Abort in the channel memory. Setup Installation Sleep Timer PC Settings Power-On Mode Power-Saving 4 (A new set of Installation menu icons will take substantially longer than when the antenna input is cycling through all the... antenna channels, and store all active channels in your TV Programming channels into the TV's memory.) To remove an Antenna source channel...

Owner's Manual - English
Page 34
... in standby mode to complete the reset process. Setup Installation Sleep Timer PC Settings Power-On Mode Power-Saving Power-Saving Fast 34 System Information Press YES to complete the reset. After the TV turns off, unplug it and plug it in to confirm. No Yes To cancel the reset: ...Highlight No and press T. Selecting the Power-On Mode You can select either Power-Saving or Fast. As a result, the TV will be lit. Chapter 5: Setting up your TV 6 Highlight Yes and press T. While in Fast mode, the yellow LED on quicker. ...
... in standby mode to complete the reset process. Setup Installation Sleep Timer PC Settings Power-On Mode Power-Saving Power-Saving Fast 34 System Information Press YES to complete the reset. After the TV turns off, unplug it and plug it in to confirm. No Yes To cancel the reset: ...Highlight No and press T. Selecting the Power-On Mode You can select either Power-Saving or Fast. As a result, the TV will be lit. Chapter 5: Setting up your TV 6 Highlight Yes and press T. While in Fast mode, the yellow LED on quicker. ...

Owner's Manual - English
Page 36
...5 To save the new input labels, highlight Done and press T. Channel Browser Setup Navigation History List ANT List Inputs List Favorites List Reset Select Mode Power Off Clear (On) On On On Done 36 The screen below ). • Keep a history of how you could label the inputs if you ... Favorites browser list. 2 Highlight the channel or input to Select Navigate Input Selection screen with none of the Channel Browser™. Chapter 6: Using the TV's features 4 Press C or c to select the desired label for that input to be removed from the Favorites list. This feature allows you to:...
...5 To save the new input labels, highlight Done and press T. Channel Browser Setup Navigation History List ANT List Inputs List Favorites List Reset Select Mode Power Off Clear (On) On On On Done 36 The screen below ). • Keep a history of how you could label the inputs if you ... Favorites browser list. 2 Highlight the channel or input to Select Navigate Input Selection screen with none of the Channel Browser™. Chapter 6: Using the TV's features 4 Press C or c to select the desired label for that input to be removed from the Favorites list. This feature allows you to:...

Owner's Manual - English
Page 37
...: When History List is in Fast mode, the channels and inputs stored in the list will be highlighted and the TV will be saved every power on/off cycle. page 34) is set to Power Off Clear (On), the channels and inputs stored in the list will be tuned (for various reasons), the... TV will be repeated in the History List, but you stop on an item in the Channel Browser™, it will automatically tune to the previously...
...: When History List is in Fast mode, the channels and inputs stored in the list will be highlighted and the TV will be saved every power on/off cycle. page 34) is set to Power Off Clear (On), the channels and inputs stored in the list will be tuned (for various reasons), the... TV will be repeated in the History List, but you stop on an item in the Channel Browser™, it will automatically tune to the previously...
Owner's Manual - English
Page 38
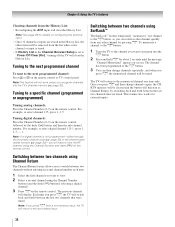
...the remote control. Tuning to a specific channel (programmed or unprogrammed) Tuning analog channels: Press the Channel Number (0-9) on the remote control or TV control panel. Tuning digital channels: Press the Channel Number (0-9) on the remote control. This feature also works for details on configuring the antenna ... (- The previous channel will return to the memorized channel one channel to the R button, so you want to "Power Off Clear (On)," turning off the TV will clear the History List. Note: If you press R from the History List: • Reconfiguring the ANT input...
...the remote control. Tuning to a specific channel (programmed or unprogrammed) Tuning analog channels: Press the Channel Number (0-9) on the remote control or TV control panel. Tuning digital channels: Press the Channel Number (0-9) on the remote control. This feature also works for details on configuring the antenna ... (- The previous channel will return to the memorized channel one channel to the R button, so you want to "Power Off Clear (On)," turning off the TV will clear the History List. Note: If you press R from the History List: • Reconfiguring the ANT input...
Owner's Manual - English
Page 51
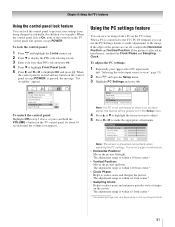
... Phase and Sampling Clock. Setup Installation Sleep Timer PC Settings Power-On Mode Power-Saving Note: If a PC is not connected or there is no pc input signal, this feature will operate except POWER. Chapter 6: Using the TV's features Using the control panel lock feature You can view an... image from a PC on the screen. The adjustment range is connected to the TV's PC IN terminal, you want to adjust. 5 Press C...
... Phase and Sampling Clock. Setup Installation Sleep Timer PC Settings Power-On Mode Power-Saving Note: If a PC is not connected or there is no pc input signal, this feature will operate except POWER. Chapter 6: Using the TV's features Using the control panel lock feature You can view an... image from a PC on the screen. The adjustment range is connected to the TV's PC IN terminal, you want to adjust. 5 Press C...

Owner's Manual - English
Page 52
... off the TV after a set of 180 minutes. Repeatedly press [ to increase the time in 10-minute increments, or press B or b to increase or decrease the time in 10-minute increments, to 0 minute. 52 Note: When a power failure occurs, the sleep timer setting may be cleared. Audio ... Audio menu setting. To cancel the sleep timer: Repeatedly press [ until the TV turns off automatically (Maximum 180 minutes) 120 Cancel Done 4 Highlight Done and press T. Setup Installation Sleep Timer PC Settings Power-On Mode Power-Saving 3 Press the Number buttons to "Auto." If PC Audio is one ...
... off the TV after a set of 180 minutes. Repeatedly press [ to increase the time in 10-minute increments, or press B or b to increase or decrease the time in 10-minute increments, to 0 minute. 52 Note: When a power failure occurs, the sleep timer setting may be cleared. Audio ... Audio menu setting. To cancel the sleep timer: Repeatedly press [ until the TV turns off automatically (Maximum 180 minutes) 120 Cancel Done 4 Highlight Done and press T. Setup Installation Sleep Timer PC Settings Power-On Mode Power-Saving 3 Press the Number buttons to "Auto." If PC Audio is one ...


