Printable Spec Sheet
Page 1
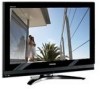
...of each video frame, and automatically adjusts the backlight intensity based on the image content. CineSpeed™ LCD panels have the best seat in low light environments. New gloss black cosmetics complement the set and incorporate the slim SoundStrip™ speaker system, for cleaner high-action home theater images. DynaLight&#... cabinet. A wide 176 degree viewing angle ensures that of gradation for a smooth, natural-looking picture without image banding. CineSpeed™ - Gloss Black Cabinetry - PRELIMINARY 42HL67 42" Diagonal REGZA® LCD TV PixelPure 3G™ -
...of each video frame, and automatically adjusts the backlight intensity based on the image content. CineSpeed™ LCD panels have the best seat in low light environments. New gloss black cosmetics complement the set and incorporate the slim SoundStrip™ speaker system, for cleaner high-action home theater images. DynaLight&#... cabinet. A wide 176 degree viewing angle ensures that of gradation for a smooth, natural-looking picture without image banding. CineSpeed™ - Gloss Black Cabinetry - PRELIMINARY 42HL67 42" Diagonal REGZA® LCD TV PixelPure 3G™ -
Owner's Manual - English
Page 1
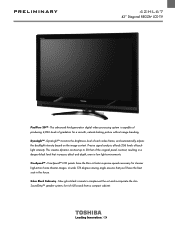
... on the back of steps for setting up your new TV, see page 9. Integrated High Definition LCD Television HIGH-DEFINITION TELEVISION 26HL67 32HL67 32HL67U 37HL67 42HL67 For an overview of your TV. Record these numbers whenever you communicate with your Toshiba dealer about this TV. Note: To display a High Definition picture, the TV must be receiving a High Definition...
... on the back of steps for setting up your new TV, see page 9. Integrated High Definition LCD Television HIGH-DEFINITION TELEVISION 26HL67 32HL67 32HL67U 37HL67 42HL67 For an overview of your TV. Record these numbers whenever you communicate with your Toshiba dealer about this TV. Note: To display a High Definition picture, the TV must be receiving a High Definition...
Owner's Manual - English
Page 7
...Toshiba 8 Features of your new TV 8 Overview of steps for installing, setting up, and using your new TV 9 TV front and side panel controls and connections 10 TV back panel connections 11 Chapter 2: Connecting your TV...Setting up your TV 29 Selecting the...42 Selecting the picture mode 42 Adjusting the picture quality 42 Using the closed caption mode 43 Base closed captions 43 Digital CC Settings...settings feature 51 Setting the PC Audio 52 Setting the sleep timer 52 Displaying TV...TV's advanced features 54 Using the advanced picture settings... the advanced audio settings features 57 Using ...
...Toshiba 8 Features of your new TV 8 Overview of steps for installing, setting up, and using your new TV 9 TV front and side panel controls and connections 10 TV back panel connections 11 Chapter 2: Connecting your TV...Setting up your TV 29 Selecting the...42 Selecting the picture mode 42 Adjusting the picture quality 42 Using the closed caption mode 43 Base closed captions 43 Digital CC Settings...settings feature 51 Setting the PC Audio 52 Setting the sleep timer 52 Displaying TV...TV's advanced features 54 Using the advanced picture settings... the advanced audio settings features 57 Using ...
Owner's Manual - English
Page 8
... optical output format (- page 17). • Two sets of ColorStream® HD high-resolution component video inputs (- Chapter 1: Introduction Welcome to Toshiba Thank you for a separate digital converter set-top box (in most innovative LCD TVs on -demand, a cable operator's enhanced program guide ...and data-enhanced television services may require the use of a set-top box. This digital television is...
... optical output format (- page 17). • Two sets of ColorStream® HD high-resolution component video inputs (- Chapter 1: Introduction Welcome to Toshiba Thank you for a separate digital converter set-top box (in most innovative LCD TVs on -demand, a cable operator's enhanced program guide ...and data-enhanced television services may require the use of a set-top box. This digital television is...
Owner's Manual - English
Page 9
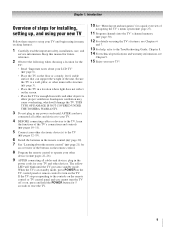
...your other immovable structure (- page 20). 7 See "Learning about your LCD TV" (- THIS TYPE OF DAMAGE IS NOT COVERED UNDER THE TOSHIBA WARRANTY. 3 Do not plug in any power cords until the TV goes into the TV's channel memory (- Keep this manual for future reference. 2 Observe the...the unit. Inadequate ventilation may cause overheating, which will blink until AFTER you cannot turn on the TV. Chapter 1: Introduction Overview of steps for installing, setting up your TV and begin using its many exciting features. 1 Carefully read the important safety, installation, care, ...
...your other immovable structure (- page 20). 7 See "Learning about your LCD TV" (- THIS TYPE OF DAMAGE IS NOT COVERED UNDER THE TOSHIBA WARRANTY. 3 Do not plug in any power cords until the TV goes into the TV's channel memory (- Keep this manual for future reference. 2 Observe the...the unit. Inadequate ventilation may cause overheating, which will blink until AFTER you cannot turn on the TV. Chapter 1: Introduction Overview of steps for installing, setting up your TV and begin using its many exciting features. 1 Carefully read the important safety, installation, care, ...
Owner's Manual - English
Page 11
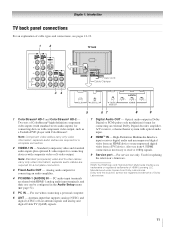
Two sets of Dolby Laboratories. 11 separate audio cables are required for connecting devices with component video output, such as a Toshiba DVD player with composite video or S-video output. For use only. Optical audio output in the Audio Setup menu (- HDMI... input terminals are registered trademarks of ColorStream® high-definition component video inputs (with optical audio input. 8 HDMI™ IN - Chapter 1: Introduction TV back panel connections For an explanation of HDMI Licensing LLC. page 52). 5 PC IN - Antenna input that supports analog (NTSC) and digital (ATSC...
Two sets of Dolby Laboratories. 11 separate audio cables are required for connecting devices with component video output, such as a Toshiba DVD player with composite video or S-video output. For use only. Optical audio output in the Audio Setup menu (- HDMI... input terminals are registered trademarks of ColorStream® high-definition component video inputs (with optical audio input. 8 HDMI™ IN - Chapter 1: Introduction TV back panel connections For an explanation of HDMI Licensing LLC. page 52). 5 PC IN - Antenna input that supports analog (NTSC) and digital (ATSC...
Owner's Manual - English
Page 12
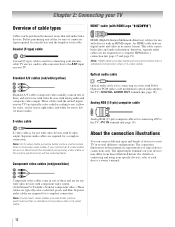
...blue) About the connection illustrations You can be sure of connector types required by your TV. Standard A/V cables (red/white/yellow) Standard A/V cables (composite video) usually come in sets of devices to each cable. An HDMI cable delivers digital audio and video in several...inputs on connecting and using your specific devices, refer to your TV) are required for use with devices with component video output. (ColorStream® is for a complete connection. S-video cable is Toshiba's brand of typical device connections only. Separate audio cables are typically...
...blue) About the connection illustrations You can be sure of connector types required by your TV. Standard A/V cables (red/white/yellow) Standard A/V cables (composite video) usually come in sets of devices to each cable. An HDMI cable delivers digital audio and video in several...inputs on connecting and using your specific devices, refer to your TV) are required for use with devices with component video output. (ColorStream® is for a complete connection. S-video cable is Toshiba's brand of typical device connections only. Separate audio cables are typically...

Owner's Manual - English
Page 14
... operate other countries, and may not be able to use , distribution, or revision of television programs, videotapes, DVDs, and other materials is set to your TV Connecting a VCR with S-video and a cable box An S-video connection will need: • coaxial cables • S-video cable - Select... the ANT video input source on the TV. Chapter 2: Connecting your VCR's audio out terminal using the white audio cable only. Note: When you use a Cable box, you may subject you ...
... operate other countries, and may not be able to use , distribution, or revision of television programs, videotapes, DVDs, and other materials is set to your TV Connecting a VCR with S-video and a cable box An S-video connection will need: • coaxial cables • S-video cable - Select... the ANT video input source on the TV. Chapter 2: Connecting your VCR's audio out terminal using the white audio cable only. Note: When you use a Cable box, you may subject you ...
Owner's Manual - English
Page 15
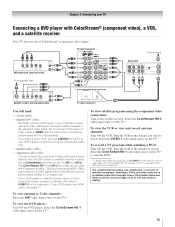
...video cable (plus audio cables) from ANT OUT to TV Y PB PR AUDIO OUT L Satellite COMPONENT VIDEO S-VIDEO VIDEO R IN OUT OUT Satellite receiver with ColorStream® (component video), a VCR, and a satellite receiver Your TV has two sets of the United States and other devices, see page 17.... Select the ColorStream HD-2 video input source on the TV.* To view the DVD player: Turn ON the DVD player. Chapter 2: Connecting...
...video cable (plus audio cables) from ANT OUT to TV Y PB PR AUDIO OUT L Satellite COMPONENT VIDEO S-VIDEO VIDEO R IN OUT OUT Satellite receiver with ColorStream® (component video), a VCR, and a satellite receiver Your TV has two sets of the United States and other devices, see page 17.... Select the ColorStream HD-2 video input source on the TV.* To view the DVD player: Turn ON the DVD player. Chapter 2: Connecting...

Owner's Manual - English
Page 17
..., it is recommended that you will need : • one HDMI-to-DVI adapter cable (HDMI type A connector) per HDMI device - See "Setting the HDMI™ audio mode" (- page 32). The recommended length is being standardized for reception of HDMI Licensing LLC. 17 An HDMI-to-DVI ... HDMI input on your electronic components, turn off your TV receives digital audio and uncompressed digital video from an HDMI source device, or uncompressed digital video from EIA/CEA-861-D-compliant[1] consumer electronic devices (such as a set-top box or DVD player with HDMI or DVI output...
..., it is recommended that you will need : • one HDMI-to-DVI adapter cable (HDMI type A connector) per HDMI device - See "Setting the HDMI™ audio mode" (- page 32). The recommended length is being standardized for reception of HDMI Licensing LLC. 17 An HDMI-to-DVI ... HDMI input on your electronic components, turn off your TV receives digital audio and uncompressed digital video from an HDMI source device, or uncompressed digital video from EIA/CEA-861-D-compliant[1] consumer electronic devices (such as a set-top box or DVD player with HDMI or DVI output...

Owner's Manual - English
Page 18
... a Dolby®* Digital g or 2-channel down-mixed PCM (pulse-code modulation) signal for use external speakers with optical audio input. LINE IN LR TV upper back panel Audio Digital Audio Selector Audio Settings Advanced Audio Settings Audio Setup 4 In the Optical Output Format field, select either Dolby Digital or PCM, depending on the...
... a Dolby®* Digital g or 2-channel down-mixed PCM (pulse-code modulation) signal for use external speakers with optical audio input. LINE IN LR TV upper back panel Audio Digital Audio Selector Audio Settings Advanced Audio Settings Audio Setup 4 In the Optical Output Format field, select either Dolby Digital or PCM, depending on the...
Owner's Manual - English
Page 19
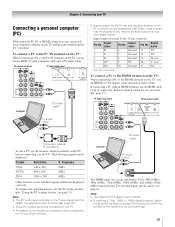
...either the PC IN or HDMI connection, you may be displayed: Format Resolution V. TV upper back panel TV lower back panel PC audio output Conversion adapter (if necessary) • To use the PC setting feature (- Computer PC audio cable PC audio output The HDMI input can be hidden....). • Some PC models cannot be displayed correctly. • To display the optimum picture, use a PC, set the monitor output resolution on the TV and hear the sound from the TV's speakers. no overscanning). 19 Signal name 6 Ground 7 Ground 8 Ground 9 NC 10 Ground Pin No. For ...
...either the PC IN or HDMI connection, you may be displayed: Format Resolution V. TV upper back panel TV lower back panel PC audio output Conversion adapter (if necessary) • To use the PC setting feature (- Computer PC audio cable PC audio output The HDMI input can be hidden....). • Some PC models cannot be displayed correctly. • To display the optimum picture, use a PC, set the monitor output resolution on the TV and hear the sound from the TV's speakers. no overscanning). 19 Signal name 6 Ground 7 Ground 8 Ground 9 NC 10 Ground Pin No. For ...
Owner's Manual - English
Page 21
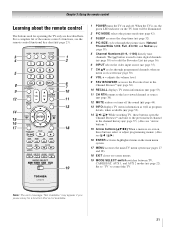
... 42). 3 SLEEP accesses the sleep timer (- page 44). 13 INFO displays TV status information as well as program details, when available (- pages 27 and 28). 18 EXIT closes on -screen, these buttons open the Channel Browser™ and tune to the previous/next channel in the channel history (- page 22). Set to "TV" to...
... 42). 3 SLEEP accesses the sleep timer (- page 44). 13 INFO displays TV status information as well as program details, when available (- pages 27 and 28). 18 EXIT closes on -screen, these buttons open the Channel Browser™ and tune to the previous/next channel in the channel history (- page 22). Set to "TV" to...
Owner's Manual - English
Page 22
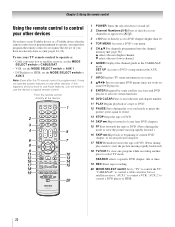
...control directly at the device. 16 17 18 19 1 POWER Turns the selected device on any other devices If you have a non-Toshiba device or a Toshiba device that the remote control is programmed, it may not work on some DVD players). 9 ENTER Required by some satellite receivers and DVD... remote control Using the remote control to control your TV remote control to operate a: • Cable converter box or satellite receiver, set the MODE SELECT switch to CABLE/SAT. • VCR, set the MODE SELECT switch to AUX 1. • DVD player or HTIB, set the MODE SELECT switch to AUX 2. SEARCH selects...
...control directly at the device. 16 17 18 19 1 POWER Turns the selected device on any other devices If you have a non-Toshiba device or a Toshiba device that the remote control is programmed, it may not work on some DVD players). 9 ENTER Required by some satellite receivers and DVD... remote control Using the remote control to control your TV remote control to operate a: • Cable converter box or satellite receiver, set the MODE SELECT switch to CABLE/SAT. • VCR, set the MODE SELECT switch to AUX 1. • DVD player or HTIB, set the MODE SELECT switch to AUX 2. SEARCH selects...

Owner's Manual - English
Page 23
... your TV. REMOTE CONTROL KEY Toshiba TV CABLE SAT (satellite) POWER SLEEP PIC SIZE PIC MODE Power Sleep timer Picture size PIC MODE Power s TV s TV s TV Power s TV s TV s TV 1-9 Digit 1-9 Digit 1-9 Digit 1-9 0 Digit 0 Digit 0 Digit 0 100/-/+10 INPUT - (sub CH) TV/Video select --s TV - (sub CH) s TV FAV BROWSER/ TOP MENU MUTE FAV BROWSER DVD TOP Menu* Sound mute --s TV --s TV SET UP...
... your TV. REMOTE CONTROL KEY Toshiba TV CABLE SAT (satellite) POWER SLEEP PIC SIZE PIC MODE Power Sleep timer Picture size PIC MODE Power s TV s TV s TV Power s TV s TV s TV 1-9 Digit 1-9 Digit 1-9 Digit 1-9 0 Digit 0 Digit 0 Digit 0 100/-/+10 INPUT - (sub CH) TV/Video select --s TV - (sub CH) s TV FAV BROWSER/ TOP MENU MUTE FAV BROWSER DVD TOP Menu* Sound mute --s TV --s TV SET UP...
Owner's Manual - English
Page 24
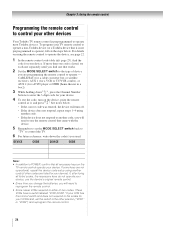
...reference, write down E, press the Channel Number buttons to enter the 3-digit code for your VCR brand, set the switch to operate - See notes below . For details on the TV remote control operate your device. Chapter 3: Using the remote control Programming the remote control to control your other...codes. If, after trying all necessary keys on using another code. • If the device does not respond to operate a non-Toshiba device (or a Toshiba device that it , and press p. If some keys are not operational, repeat the device code setup using the remote control to operate...
...reference, write down E, press the Channel Number buttons to enter the 3-digit code for your VCR brand, set the switch to operate - See notes below . For details on the TV remote control operate your device. Chapter 3: Using the remote control Programming the remote control to control your other...codes. If, after trying all necessary keys on using another code. • If the device does not respond to operate a non-Toshiba device (or a Toshiba device that it , and press p. If some keys are not operational, repeat the device code setup using the remote control to operate...
Owner's Manual - English
Page 27
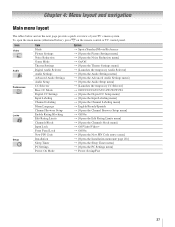
...Fast 27 Icon Video Audio Preferences Locks Setup Item Mode Picture Settings Noise Reduction Game Mode Theater Settings Digital Audio Selector Audio Settings Advanced Audio Settings Audio Setup CC Selector Base CC Mode Digital CC Settings Input Labeling Channel Labeling Menu Language Channel Browser Setup Enable Rating ...entry screen] S [Opens the Installation menu (- To open the main menus (illustrated below and on the remote control or TV control panel. Chapter 4: Menu layout and navigation Main menu layout The tables below ), press Y on the next page provide a quick overview ...
...Fast 27 Icon Video Audio Preferences Locks Setup Item Mode Picture Settings Noise Reduction Game Mode Theater Settings Digital Audio Selector Audio Settings Advanced Audio Settings Audio Setup CC Selector Base CC Mode Digital CC Settings Input Labeling Channel Labeling Menu Language Channel Browser Setup Enable Rating ...entry screen] S [Opens the Installation menu (- To open the main menus (illustrated below and on the remote control or TV control panel. Chapter 4: Menu layout and navigation Main menu layout The tables below ), press Y on the next page provide a quick overview ...
Owner's Manual - English
Page 28
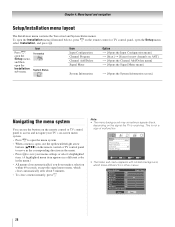
...receiving. To open the Installation menu (illustrated below), press Y on the remote control or TV control panel, open the Installation sub-menu. Video Mode Picture Settings Noise Reduction Game Mode Theater Settings Sports Off Navigate ENTER Select CH RTN Back EXIT Exit • The Video sub-menu appears...screen] Navigating the menu system You can use the buttons on the remote control or TV control panel to access and navigate your TV's on-screen menu system. • Press Y to save your menu settings or select a highlighted item. (A highlighted menu item appears in a different color in ...
...receiving. To open the Installation menu (illustrated below), press Y on the remote control or TV control panel, open the Installation sub-menu. Video Mode Picture Settings Noise Reduction Game Mode Theater Settings Sports Off Navigate ENTER Select CH RTN Back EXIT Exit • The Video sub-menu appears...screen] Navigating the menu system You can use the buttons on the remote control or TV control panel to access and navigate your TV's on-screen menu system. • Press Y to save your menu settings or select a highlighted item. (A highlighted menu item appears in a different color in ...
Owner's Manual - English
Page 29
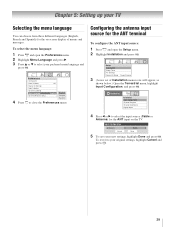
...Done 5 To save your original settings, highlight Cancel and press T. 29 Setup Installation Sleep Timer PC Settings Power-On Mode Power-Saving 3 (A new set of menus and messages. To.... 2 Highlight Installation and press T. Preferences CC Selector Base CC Mode Digital CC Settings Input Labeling Channel Labeling Menu Language Channel Browser Setup Off English English Français...2 Highlight Menu Language and press c. 3 Press B or b to your new settings, highlight Done and press T. Installation Terrestrial Input Configuration Channel Program Channel Add/Delete Signal Meter 4...
...Done 5 To save your original settings, highlight Cancel and press T. 29 Setup Installation Sleep Timer PC Settings Power-On Mode Power-Saving 3 (A new set of menus and messages. To.... 2 Highlight Installation and press T. Preferences CC Selector Base CC Mode Digital CC Settings Input Labeling Channel Labeling Menu Language Channel Browser Setup Off English English Français...2 Highlight Menu Language and press c. 3 Press B or b to your new settings, highlight Done and press T. Installation Terrestrial Input Configuration Channel Program Channel Add/Delete Signal Meter 4...

Owner's Manual - English
Page 30
... To cancel channel programming, press O on the remote control or TV control panel, your area and store them in its memory. Setup Installation Sleep Timer PC Settings Power-On Mode Power-Saving 4 (A new set of programmed channels (and does NOT erase channels that were previously programmed...open the Setup menu. 2 Highlight Installation and press T. 3 (A new set of Channels Found - 73 Scanning Digital Channels Found Channel - 118 Abort The TV will stop only on the channels you programmed into the TV's channel memory When you can manually add or delete individual channels. Follow the...
... To cancel channel programming, press O on the remote control or TV control panel, your area and store them in its memory. Setup Installation Sleep Timer PC Settings Power-On Mode Power-Saving 4 (A new set of programmed channels (and does NOT erase channels that were previously programmed...open the Setup menu. 2 Highlight Installation and press T. 3 (A new set of Channels Found - 73 Scanning Digital Channels Found Channel - 118 Abort The TV will stop only on the channels you programmed into the TV's channel memory When you can manually add or delete individual channels. Follow the...


