
User Guide
Page 9
The program can assist you in configuring and managing your print server in NetWare environments. Software Installation The PSAdmin is 192.168.0.10) 2. To enable network communication with print server, your CD-drive, and the following message appears: 9 Insert the setup CD into your computer must have a proper IP address, e.g. 192.168.0.100 (the print server's default IP is a proprietary Windows-based management program that can be installed from the setup CD of print server. Installing the PSAdmin and Print Server's Driver 1. 3.
The program can assist you in configuring and managing your print server in NetWare environments. Software Installation The PSAdmin is 192.168.0.10) 2. To enable network communication with print server, your CD-drive, and the following message appears: 9 Insert the setup CD into your computer must have a proper IP address, e.g. 192.168.0.100 (the print server's default IP is a proprietary Windows-based management program that can be installed from the setup CD of print server. Installing the PSAdmin and Print Server's Driver 1. 3.
User Guide
Page 12
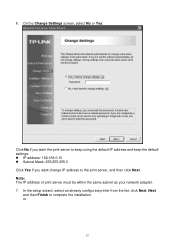
In the setup wizard, select an already configured printer from the list, click Next, Next and then Finish to the print server, and then click Next. or 12 Note: The IP address of print server must be within the same subnet as your network adapter. 7. On the Change Settings screen, select No or Yes: Click No if you want the print server to keep using the default IP address and keep the default settings: z IP address: 192.168.0.10 z Subnet Mask: 255.255.255.0 Click Yes if you want change IP address to complete the installation. 6.
In the setup wizard, select an already configured printer from the list, click Next, Next and then Finish to the print server, and then click Next. or 12 Note: The IP address of print server must be within the same subnet as your network adapter. 7. On the Change Settings screen, select No or Yes: Click No if you want the print server to keep using the default IP address and keep the default settings: z IP address: 192.168.0.10 z Subnet Mask: 255.255.255.0 Click Yes if you want change IP address to complete the installation. 6.

User Guide
Page 19
... up the necessary parameters for the print server. TCP/IP Wizard 1. Click Wizard button just like to manually specify an IP address to the device, please skip to obtain IP-related settings automatically from DHCP server". This setting, by using Wizard. Setup a print server by default, is a DHCP server on your network. Wizard Wizard...
... up the necessary parameters for the print server. TCP/IP Wizard 1. Click Wizard button just like to manually specify an IP address to the device, please skip to obtain IP-related settings automatically from DHCP server". This setting, by using Wizard. Setup a print server by default, is a DHCP server on your network. Wizard Wizard...

User Guide
Page 22
... from your LAN. The default value is optional. Specify an IP address: IP Address: This option shows the print server's current IP address maybe obtained from a DHCP server: This option enables or disables the DHCP feature of the gateway to manually specify the IP address of the print server. Subnet ...address maybe obtained from the DHCP server or manually specified. Each option is optional 22 This option also allows you manually specify a fixed IP address to the print server, if DHCP option is disabled. Note: 1.Once this option is enabled, the print server will be grayed ...
... from your LAN. The default value is optional. Specify an IP address: IP Address: This option shows the print server's current IP address maybe obtained from a DHCP server: This option enables or disables the DHCP feature of the gateway to manually specify the IP address of the print server. Subnet ...address maybe obtained from the DHCP server or manually specified. Each option is optional 22 This option also allows you manually specify a fixed IP address to the print server, if DHCP option is disabled. Note: 1.Once this option is enabled, the print server will be grayed ...

User Guide
Page 33
... must meet the IP addressing requirements of the network segment. (default: 192.168.0.10) Subnet Mask: This option allows you to view IP address from the print server. Use DHCP/BOOTP: This option allows you to view gateway from your network, this option allows the print server to obtain IP-related settings automatically from...
... must meet the IP addressing requirements of the network segment. (default: 192.168.0.10) Subnet Mask: This option allows you to view IP address from the print server. Use DHCP/BOOTP: This option allows you to view gateway from your network, this option allows the print server to obtain IP-related settings automatically from...

User Guide
Page 37
... the print server: System Setup 1.Click Setup, it then appears the sub-menu. 2.Click System, it then as the URL, default: 192.168.0.10. Setup Menu Meanwhile, you have finished the IP address configuration with print server. Then the print server's home page will appear in the following picture. 37 The setup... you to view the SMB Workgroup Name from the print server. You should use web browser to setup the print server's System, Printer, NetWare, TCP/IP, SNMP and AppleTalk. Preparation Enter the IP address of the print server helps administrator to configure the print server.
... the print server: System Setup 1.Click Setup, it then appears the sub-menu. 2.Click System, it then as the URL, default: 192.168.0.10. Setup Menu Meanwhile, you have finished the IP address configuration with print server. Then the print server's home page will appear in the following picture. 37 The setup... you to view the SMB Workgroup Name from the print server. You should use web browser to setup the print server's System, Printer, NetWare, TCP/IP, SNMP and AppleTalk. Preparation Enter the IP address of the print server helps administrator to configure the print server.

User Guide
Page 39
... After setup password is empty. Click TCP/IP, it then appears the sub-menu. 2. TCP/IP Setup: 1. Click Setup, it then as login user name. ․Password: The default password is completed from your network. ․User Name: You must be input the default administration user name, admin as shown in ...the following picture. If there is a DHCP/BOOTP server on your DHCP server. 39 This option allows the print server to obtain IP-related settings automatically from the print server, you to ...
... After setup password is empty. Click TCP/IP, it then appears the sub-menu. 2. TCP/IP Setup: 1. Click Setup, it then as login user name. ․Password: The default password is completed from your network. ․User Name: You must be input the default administration user name, admin as shown in ...the following picture. If there is a DHCP/BOOTP server on your DHCP server. 39 This option allows the print server to obtain IP-related settings automatically from the print server, you to ...
User Guide
Page 45
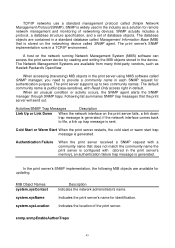
... that is configured with Read Only access right in each SNMP request for identification. The print server supports up to life, a link up trap message is generated. Cold Start or Warm Start When the print server restarts, the cold start or warm start trap message...sysLocation Description Indicates the network administrator's name. Indicates the location of database objects. TCP/IP networks use a standard management protocol called SNMP manager, you need to provide a community name in default. Following list summaries SNMP trap messages that does not match the community name the ...
... that is configured with Read Only access right in each SNMP request for identification. The print server supports up to life, a link up trap message is generated. Cold Start or Warm Start When the print server restarts, the cold start or warm start trap message...sysLocation Description Indicates the network administrator's name. Indicates the location of database objects. TCP/IP networks use a standard management protocol called SNMP manager, you need to provide a community name in default. Following list summaries SNMP trap messages that does not match the community name the ...
User Guide
Page 52
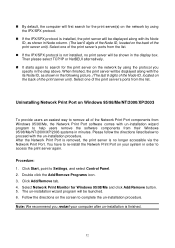
...program will be displayed along with its Node ID, as shown in minutes. When finished, the print server will be launched. 6. „ By default, the computer will first search for the print server(s) on the network by using the IPX/SPX protocol. „ If the IPX/SPX protocol ...in the step above. Click Start, point to complete the un-installation procedure. Double click the Add/Remove Programs icon. 3. Then please select TCP/IP or NetBEUI alternatively. „ It starts again to re-install the Network Print Port on the screen to Settings, and select Control Panel. 2. ...
...program will be displayed along with its Node ID, as shown in minutes. When finished, the print server will be launched. 6. „ By default, the computer will first search for the print server(s) on the network by using the IPX/SPX protocol. „ If the IPX/SPX protocol ...in the step above. Click Start, point to complete the un-installation procedure. Double click the Add/Remove Programs icon. 3. Then please select TCP/IP or NetBEUI alternatively. „ It starts again to re-install the Network Print Port on the screen to Settings, and select Control Panel. 2. ...
User Guide
Page 53
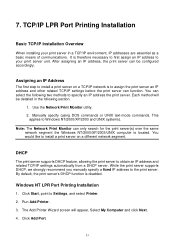
... Network Print Monitor utility. 2. This applies to the print server. While the print server supports DHCP, we strongly recommend you manually specify a fixed IP address to Windows NT/2000/XP/2003 and UNIX systems). Run Add Printer. 3. Click Add Port. 53 DHCP The print server supports DHCP feature,.... Each method will appear, Select My Computer and click Next. 4. Note: The Network Print Monitor can select the following section. 1. By default, the print server's DHCP function is located. Windows NT LPR Port Printing Installation 1. Click Start, point to obtain an...
... Network Print Monitor utility. 2. This applies to the print server. While the print server supports DHCP, we strongly recommend you manually specify a fixed IP address to Windows NT/2000/XP/2003 and UNIX systems). Run Add Printer. 3. Click Add Port. 53 DHCP The print server supports DHCP feature,.... Each method will appear, Select My Computer and click Next. 4. Note: The Network Print Monitor can select the following section. 1. By default, the print server's DHCP function is located. Windows NT LPR Port Printing Installation 1. Click Start, point to obtain an...
User Guide
Page 54
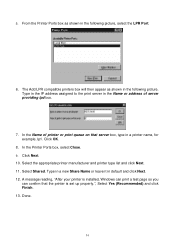
.... From the Printer Ports box as shown in the following picture. Click Next. 10. Select Shared. Done. 54 5. Type in the IP address assigned to the print server in default and click Next. 12. Type in a new Share Name or leave it in the Name or address of printer or print queue...
.... From the Printer Ports box as shown in the following picture. Click Next. 10. Select Shared. Done. 54 5. Type in the IP address assigned to the print server in default and click Next. 12. Type in a new Share Name or leave it in the Name or address of printer or print queue...

User Guide
Page 58
..."SCO Admin". 2. Click "OK". 6. For example: Test. Printer Connection Type: Choose "On Remote Server". Enter /Printer / Make Default. For example: the print server has a static IP address: 192.168.1.100 2. Input "accept a1". 5. Protocol Type: Choose "lpd (BSD)". For example: 192.168.1.250. If ...for details about configuring your UNIX for the first print server port. 4. Make/Model: Select the printer model. Remote System: Input the IP address of the printer server. Input "lpsystem -tbsd 192.168.1.100". 3. If the printer connected to the second print server port,...
..."SCO Admin". 2. Click "OK". 6. For example: Test. Printer Connection Type: Choose "On Remote Server". Enter /Printer / Make Default. For example: the print server has a static IP address: 192.168.1.100 2. Input "accept a1". 5. Protocol Type: Choose "lpd (BSD)". For example: 192.168.1.250. If ...for details about configuring your UNIX for the first print server port. 4. Make/Model: Select the printer model. Remote System: Input the IP address of the printer server. Input "lpsystem -tbsd 192.168.1.100". 3. If the printer connected to the second print server port,...
User Guide
Page 71
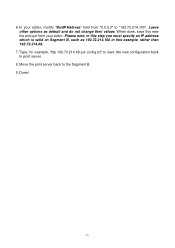
Move the print server back to "192.72.214.100". Type, for example, "tftp 192.72.214.68 put config.txt" to print server. 8. Leave other options as 192.72.214.100 in this new file and quit from "0.0.0.0" to the Segment B. 9. When done, save this new configuration back to save this example, rather than 192.72.214.68. 7. Please note, in this step you must specify an IP address which is valid on Segment B, such as default and do not change their values. Done! 71 6. In your editor, modify "BoxIPAddress" field from your editor.
Move the print server back to "192.72.214.100". Type, for example, "tftp 192.72.214.68 put config.txt" to print server. 8. Leave other options as 192.72.214.100 in this new file and quit from "0.0.0.0" to the Segment B. 9. When done, save this new configuration back to save this example, rather than 192.72.214.68. 7. Please note, in this step you must specify an IP address which is valid on Segment B, such as default and do not change their values. Done! 71 6. In your editor, modify "BoxIPAddress" field from your editor.
User Manual
Page 5
... Chapter 3. More Configuration for the Print Server 38 4.1 Login...38 4.2 Status ...39 4.2.1 4.2.2 4.2.3 System ...40 Printer ...41 TCP/IP ...42 4.3 Setup ...42 4.3.1 System ...42 4.3.2 TCP/IP ...43 4.4 Misc ...44 4.4.1 Factory Default ...44 4.4.2 Firmware Upgrade ...45 4.5 Restart ...46 Appendix A: How to Configure the Print Server 3 3.1 Using PSWizard in Windows XP/... D: Additional Installation Instructions 53 IV CONTENTS Chapter 1. Introduction 1 1.1 Product Overview ...1 1.2 Components and Features 1 1.3 LED Indicator...1 1.4 Factory Defaults ...1 Chapter 2.
... Chapter 3. More Configuration for the Print Server 38 4.1 Login...38 4.2 Status ...39 4.2.1 4.2.2 4.2.3 System ...40 Printer ...41 TCP/IP ...42 4.3 Setup ...42 4.3.1 System ...42 4.3.2 TCP/IP ...43 4.4 Misc ...44 4.4.1 Factory Default ...44 4.4.2 Firmware Upgrade ...45 4.5 Restart ...46 Appendix A: How to Configure the Print Server 3 3.1 Using PSWizard in Windows XP/... D: Additional Installation Instructions 53 IV CONTENTS Chapter 1. Introduction 1 1.1 Product Overview ...1 1.2 Components and Features 1 1.3 LED Indicator...1 1.4 Factory Defaults ...1 Chapter 2.

User Manual
Page 6
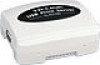
...; One Setup CD contains driver and manual for repair or replacement. 1.4 Factory Defaults ¾ Username: admin ¾ IP Address: 192.168.0.10 ¾ Subnet Mask: 255.255.255.0 )Note: The TL-PS110U is produced without password by increasing network printer performance and management. TL-PS110U Single USB2.0 Port Fast Ethernet Print Server Chapter 1. LAN Port has... (Orange) USB On (Green) On (Orange) When power switched on, the Status indicator will flash five times, and then on the Ethernet network, and by default. 1
...; One Setup CD contains driver and manual for repair or replacement. 1.4 Factory Defaults ¾ Username: admin ¾ IP Address: 192.168.0.10 ¾ Subnet Mask: 255.255.255.0 )Note: The TL-PS110U is produced without password by increasing network printer performance and management. TL-PS110U Single USB2.0 Port Fast Ethernet Print Server Chapter 1. LAN Port has... (Orange) USB On (Green) On (Orange) When power switched on, the Status indicator will flash five times, and then on the Ethernet network, and by default. 1
User Manual
Page 21
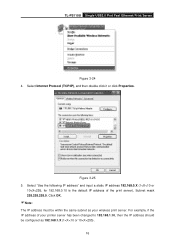
Select Internet Protocol (TCP/IP), and then double click it or click Properties. TL-PS110U Single USB2.0 Port Fast Ethernet Print Server Figure 3-24 4. Select "Use the following IP address" and input a static IP address 192.168.0.X (1 Figure 3-25 5.
Select Internet Protocol (TCP/IP), and then double click it or click Properties. TL-PS110U Single USB2.0 Port Fast Ethernet Print Server Figure 3-24 4. Select "Use the following IP address" and input a static IP address 192.168.0.X (1 Figure 3-25 5.
User Manual
Page 22
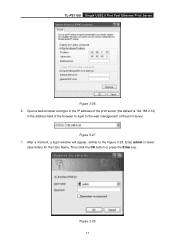
TL-PS110U Single USB2.0 Port Fast Ethernet Print Server Figure 3-26 6. After a moment, a login window will appear, similar to the web management of the print server. Enter admin in the address field of the browser to login to the Figure 3-28. Figure 3-27 7. Figure 3-28 17 Open a web-browser and type in the IP address of the print server (the default is 192.168.0.10) in lower case letters for the User Name. Then click the OK button or press the Enter key.
TL-PS110U Single USB2.0 Port Fast Ethernet Print Server Figure 3-26 6. After a moment, a login window will appear, similar to the web management of the print server. Enter admin in the address field of the browser to login to the Figure 3-28. Figure 3-27 7. Figure 3-28 17 Open a web-browser and type in the IP address of the print server (the default is 192.168.0.10) in lower case letters for the User Name. Then click the OK button or press the Enter key.
User Manual
Page 23
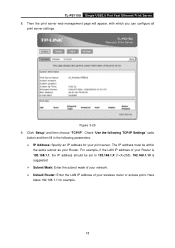
Figure 3-29 9. For example, if the LAN IP address of your Router is 192.168.1.1, the IP address should be within the same subnet as your print server. Check "Use the following TCP/IP Settings" radio button and then fill in the following parameters. ¾ IP Address: Specify an IP address for your Router. Click "Setup" and then choose "TCP/IP". The IP address must be set to 192.168.1.X (1 Then the print server web management page will appear, with which you can configure all print server settings. TL-PS110U Single USB2.0 Port Fast Ethernet Print Server 8.
Figure 3-29 9. For example, if the LAN IP address of your Router is 192.168.1.1, the IP address should be within the same subnet as your print server. Check "Use the following TCP/IP Settings" radio button and then fill in the following parameters. ¾ IP Address: Specify an IP address for your Router. Click "Setup" and then choose "TCP/IP". The IP address must be set to 192.168.1.X (1 Then the print server web management page will appear, with which you can configure all print server settings. TL-PS110U Single USB2.0 Port Fast Ethernet Print Server 8.
User Manual
Page 25
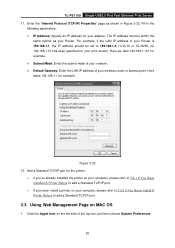
TL-PS110U Single USB2.0 Port Fast Ethernet Print Server 11. For example, if the LAN IP address of your adapter. Enter the "Internet Protocol (TCP/IP) Properties" page as your Router. The IP address must be set to 192.168.1.X (1 Fill in the following parameters. ¾ IP Address: Specify an IP address for your Router is 192.168.1.1, the IP address should be within the same subnet as shown in Figure 3-32.
TL-PS110U Single USB2.0 Port Fast Ethernet Print Server 11. For example, if the LAN IP address of your adapter. Enter the "Internet Protocol (TCP/IP) Properties" page as your Router. The IP address must be set to 192.168.1.X (1 Fill in the following parameters. ¾ IP Address: Specify an IP address for your Router is 192.168.1.1, the IP address should be within the same subnet as shown in Figure 3-32.

User Manual
Page 27
Change its IP Address, Subnet Mask and Default Router to 192.168.1.10, 255.255.255.0 and 192.168.1.1. After the configuration, click Save & Restart. 22 Open the Safari and log into the TL-PS110U. TL-PS110U Single USB2.0 Port Fast Ethernet Print Server 2 1 3 4 5 Figure 3-35 4.
Change its IP Address, Subnet Mask and Default Router to 192.168.1.10, 255.255.255.0 and 192.168.1.1. After the configuration, click Save & Restart. 22 Open the Safari and log into the TL-PS110U. TL-PS110U Single USB2.0 Port Fast Ethernet Print Server 2 1 3 4 5 Figure 3-35 4.
