
User Guide
Page 5
.... 100Mbps On (Green) 10Mbps On (Orange) LAN Port has a valid network connection at 10Mbps. Wait 10 seconds until all the LEDs have stopped flashing. Note: The Status LED should prepare the following items: „ One Windows-based computer with print server setup CD „ One printer with the USB cable. 3. Follow these...
.... 100Mbps On (Green) 10Mbps On (Orange) LAN Port has a valid network connection at 10Mbps. Wait 10 seconds until all the LEDs have stopped flashing. Note: The Status LED should prepare the following items: „ One Windows-based computer with print server setup CD „ One printer with the USB cable. 3. Follow these...

User Guide
Page 9
Installing the PSAdmin and Print Server's Driver 1. Insert the setup CD into your print server in configuring and managing your CD-drive, and the following message appears: 9 To enable network communication with print server, your computer must have a proper IP address, e.g. 192.168.0.100 (the print server's default IP is a proprietary Windows-based management program that can be installed from the setup CD of print server. Software Installation The PSAdmin is 192.168.0.10) 2. The program can assist you in NetWare environments. 3.
Installing the PSAdmin and Print Server's Driver 1. Insert the setup CD into your print server in configuring and managing your CD-drive, and the following message appears: 9 To enable network communication with print server, your computer must have a proper IP address, e.g. 192.168.0.100 (the print server's default IP is a proprietary Windows-based management program that can be installed from the setup CD of print server. Software Installation The PSAdmin is 192.168.0.10) 2. The program can assist you in NetWare environments. 3.
User Guide
Page 24
... 0" and press the [Insert] key to add the print queues you specify in Step 5. 8. Run the PSAdmin from their Windows PC systems in Step 6 into your Windows. 3. Click the Wizard icon in this chapter). 6. Type in a Print server and a Print Queue Name (For more detailed... the list (For NetWare 4.x's PCONSOLE, please select "Print queues assigned" option instead). 10. Select the "Print server Configuration" option and select the "Queue Serviced by clicking the "Reset" icon from their Windows PC, and the PSAdmin software comes with the un-installation procedure. Click Start, point...
... 0" and press the [Insert] key to add the print queues you specify in Step 5. 8. Run the PSAdmin from their Windows PC systems in Step 6 into your Windows. 3. Click the Wizard icon in this chapter). 6. Type in a Print server and a Print Queue Name (For more detailed... the list (For NetWare 4.x's PCONSOLE, please select "Print queues assigned" option instead). 10. Select the "Print server Configuration" option and select the "Queue Serviced by clicking the "Reset" icon from their Windows PC, and the PSAdmin software comes with the un-installation procedure. Click Start, point...

User Guide
Page 37
... name of the print server: System Setup 1.Click Setup, it then appears the sub-menu. 2.Click System, it then as the URL, default: 192.168.0.10. You should use web browser to view the Shared Name from the print server. Preparation Enter the IP address of the print server as shown...
... name of the print server: System Setup 1.Click Setup, it then appears the sub-menu. 2.Click System, it then as the URL, default: 192.168.0.10. You should use web browser to view the Shared Name from the print server. Preparation Enter the IP address of the print server as shown...

User Guide
Page 40
... the SMB name of the network segment. The IP address must meet the IP addressing requirements of print server to support the SMB printing on Windows 2000 and above. Gateway: This option allows you to input gateway from the print server. Rendezvous Settings: Enable/Disable the Rendezvous support for Mac ...OS 10. IP Address: This option allows you to input IP address from the print server. Note: On the TCP/IP Setup screen, specify a fixed IP ...
... the SMB name of the network segment. The IP address must meet the IP addressing requirements of print server to support the SMB printing on Windows 2000 and above. Gateway: This option allows you to input gateway from the print server. Rendezvous Settings: Enable/Disable the Rendezvous support for Mac ...OS 10. IP Address: This option allows you to input IP address from the print server. Note: On the TCP/IP Setup screen, specify a fixed IP ...
User Guide
Page 51
... then appear, along with the print server's Node ID (The last 6 digits of the Node ID, located on the back of ) your printer is installed, Windows can print a test page so you can confirm that the printer is now connected to (one of the print server unit...
... then appear, along with the print server's Node ID (The last 6 digits of the Node ID, located on the back of ) your printer is installed, Windows can print a test page so you can confirm that the printer is now connected to (one of the print server unit...
User Guide
Page 54
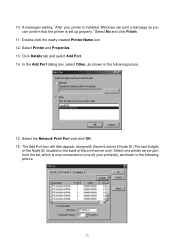
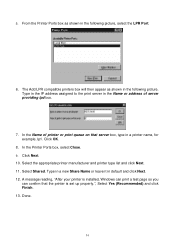
Click OK. 8. In the Printer Ports box, select Close. 9. A message reading, "After your printer is installed, Windows can print a test page so you can confirm that server box, type in a printer name, for example, lp1. Select the appropriate printer manufacturer and printer ... the Name of server providing lpd box. 7. Type in the IP address assigned to the print server in default and click Next. 12. Click Next. 10.
Click OK. 8. In the Printer Ports box, select Close. 9. A message reading, "After your printer is installed, Windows can print a test page so you can confirm that server box, type in a printer name, for example, lp1. Select the appropriate printer manufacturer and printer ... the Name of server providing lpd box. 7. Type in the IP address assigned to the print server in default and click Next. 12. Click Next. 10.
User Guide
Page 67
... Installation (through the Network Print Port) If your Windows NT server that is used as a router, select Start from the bottom left hand corner of the screen. 2. Double-click the Network icon. 4. For example: 12345ABC. 10. Done. 67 RIP for NWLink IPX/SPX compatible transport.... From your print server and Windows 95/98/Me/NT/2000/XP/2003 are damaged, contact your (first) network interface card and...
... Installation (through the Network Print Port) If your Windows NT server that is used as a router, select Start from the bottom left hand corner of the screen. 2. Double-click the Network icon. 4. For example: 12345ABC. 10. Done. 67 RIP for NWLink IPX/SPX compatible transport.... From your print server and Windows 95/98/Me/NT/2000/XP/2003 are damaged, contact your (first) network interface card and...

User Manual
Page 6
...manual for repair or replacement. 1.4 Factory Defaults ¾ Username: admin ¾ IP Address: 192.168.0.10 ¾ Subnet Mask: 255.255.255.0 )Note: The TL-PS110U is produced without password by default. 1 Introduction 1.1 Product Overview The external print servers enhance capability by increasing ...Connect with host-based printers, e.g. TL-PS110U Single USB2.0 Port Fast Ethernet Print Server Chapter 1. If not, please contact your printers at convenient locations directly on the Ethernet network, and by letting you place your local dealer for Windows system ¾ One external AC ...
...manual for repair or replacement. 1.4 Factory Defaults ¾ Username: admin ¾ IP Address: 192.168.0.10 ¾ Subnet Mask: 255.255.255.0 )Note: The TL-PS110U is produced without password by default. 1 Introduction 1.1 Product Overview The external print servers enhance capability by increasing ...Connect with host-based printers, e.g. TL-PS110U Single USB2.0 Port Fast Ethernet Print Server Chapter 1. If not, please contact your printers at convenient locations directly on the Ethernet network, and by letting you place your local dealer for Windows system ¾ One external AC ...
User Manual
Page 13
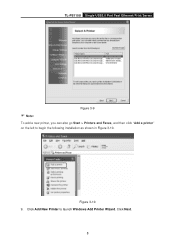
Figure 3-10 9. Click Add New Printer to begin the following installation as shown in Figure 3-10. TL-PS110U Single USB2.0 Port Fast Ethernet Print Server ) Note: Figure 3-9 To add a new printer, you can also go Start > Printers and Faxes, and then click "Add a printer" on the left to launch Windows Add Printer Wizard. Click Next. 8
Figure 3-10 9. Click Add New Printer to begin the following installation as shown in Figure 3-10. TL-PS110U Single USB2.0 Port Fast Ethernet Print Server ) Note: Figure 3-9 To add a new printer, you can also go Start > Printers and Faxes, and then click "Add a printer" on the left to launch Windows Add Printer Wizard. Click Next. 8
User Manual
Page 22
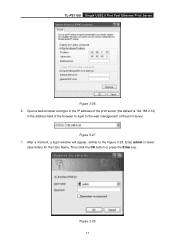
TL-PS110U Single USB2.0 Port Fast Ethernet Print Server Figure 3-26 6. Enter admin in the address field of the browser to login to the Figure 3-28. After a moment, a login window will appear, similar to the web management of the print server. Figure 3-28 17 Open a web-browser and type in the IP address of the print server (the default is 192.168.0.10) in lower case letters for the User Name. Then click the OK button or press the Enter key. Figure 3-27 7.
TL-PS110U Single USB2.0 Port Fast Ethernet Print Server Figure 3-26 6. Enter admin in the address field of the browser to login to the Figure 3-28. After a moment, a login window will appear, similar to the web management of the print server. Figure 3-28 17 Open a web-browser and type in the IP address of the print server (the default is 192.168.0.10) in lower case letters for the User Name. Then click the OK button or press the Enter key. Figure 3-27 7.
User Manual
Page 43
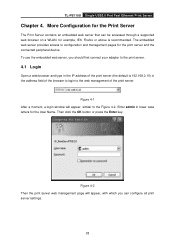
... a WLAN, for example, IE6, Firefox or above is 192.168.0.10) in the address field of the browser to login to configuration and management pages for the User Name. TL-PS110U Single USB2.0 Port Fast Ethernet Print Server Chapter 4. Figure 4-1 After a moment, a login window will appear, with which you should first connect your adapter...
... a WLAN, for example, IE6, Firefox or above is 192.168.0.10) in the address field of the browser to login to configuration and management pages for the User Name. TL-PS110U Single USB2.0 Port Fast Ethernet Print Server Chapter 4. Figure 4-1 After a moment, a login window will appear, with which you should first connect your adapter...
Installation Instructions
Page 1
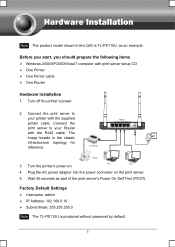
... is produced without password by default. 1 Factory Default Settings ¾ Username: admin ¾ IP Address: 192.168.0.10 ¾ Subnet Mask: 255.255.255.0 Note The TL-PS110U is the classic infrastructure topology for reference: 3. Wait 40 seconds as an example. Connect the print server to your printer... connector on . 4. Note The product model shown in this QIG is TL-PS110U, as part of the print server's Power On Self Test (POST). Before you start, you should prepare the following items ¾ Windows 2000/XP/2003/Vista/7 computer with the RJ45 cable. Turn the printer's...
... is produced without password by default. 1 Factory Default Settings ¾ Username: admin ¾ IP Address: 192.168.0.10 ¾ Subnet Mask: 255.255.255.0 Note The TL-PS110U is the classic infrastructure topology for reference: 3. Wait 40 seconds as an example. Connect the print server to your printer... connector on . 4. Note The product model shown in this QIG is TL-PS110U, as part of the print server's Power On Self Test (POST). Before you start, you should prepare the following items ¾ Windows 2000/XP/2003/Vista/7 computer with the RJ45 cable. Turn the printer's...


