
User Manual
Page 6
... repair or replacement. 1.4 Factory Defaults ¾ Username: admin ¾ IP Address: 192.168.0.10 ¾ Subnet Mask: 255.255.255.0 )Note: The TL-PS110U is produced without password by increasing network printer performance and management. TL-PS110U Single USB2.0 Port Fast Ethernet Print Server Chapter 1. LAN Port has a valid network connection at 100Mbps. LAN Port has a valid network connection at 10Mbps.
... repair or replacement. 1.4 Factory Defaults ¾ Username: admin ¾ IP Address: 192.168.0.10 ¾ Subnet Mask: 255.255.255.0 )Note: The TL-PS110U is produced without password by increasing network printer performance and management. TL-PS110U Single USB2.0 Port Fast Ethernet Print Server Chapter 1. LAN Port has a valid network connection at 100Mbps. LAN Port has a valid network connection at 10Mbps.
User Manual
Page 7
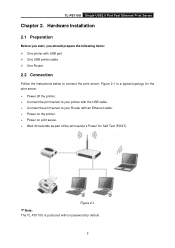
TL-PS110U Single USB2.0 Port Fast Ethernet Print Server Chapter 2. Figure 2-1 is produced without password by default. 2 Figure 2-1 )Note: The TL-PS110U is a typical typology for the print server. ¾ Power off the printer. ¾ Connect the print server to your printer with the USB cable. ¾ Connect the print server to your Router with USB port ¾ One USB printer cable ¾ One Router 2.2 Connection...
TL-PS110U Single USB2.0 Port Fast Ethernet Print Server Chapter 2. Figure 2-1 is produced without password by default. 2 Figure 2-1 )Note: The TL-PS110U is a typical typology for the print server. ¾ Power off the printer. ¾ Connect the print server to your printer with the USB cable. ¾ Connect the print server to your Router with USB port ¾ One USB printer cable ¾ One Router 2.2 Connection...
User Manual
Page 12
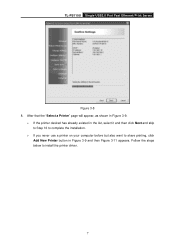
TL-PS110U Single USB2.0 Port Fast Ethernet Print Server Figure 3-8 8. Follow the steps below to share printing, click Add New Printer button in Figure 3-9 and then Figure 3-11 appears. After that the "Select a Printer" page will appear, as shown in Figure 3-9. ¾ If the printer desired has already existed in the list, select it and then click Next and skip to Step 16 to complete the installation. ¾ If you never use a printer on your computer before but also want to install the printer driver. 7
TL-PS110U Single USB2.0 Port Fast Ethernet Print Server Figure 3-8 8. Follow the steps below to share printing, click Add New Printer button in Figure 3-9 and then Figure 3-11 appears. After that the "Select a Printer" page will appear, as shown in Figure 3-9. ¾ If the printer desired has already existed in the list, select it and then click Next and skip to Step 16 to complete the installation. ¾ If you never use a printer on your computer before but also want to install the printer driver. 7
User Manual
Page 13
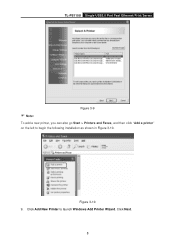
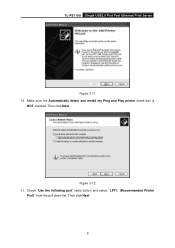
Figure 3-10 9. Click Add New Printer to begin the following installation as shown in Figure 3-10. TL-PS110U Single USB2.0 Port Fast Ethernet Print Server ) Note: Figure 3-9 To add a new printer, you can also go Start > Printers and Faxes, and then click "Add a printer" on the left to launch Windows Add Printer Wizard. Click Next. 8
Figure 3-10 9. Click Add New Printer to begin the following installation as shown in Figure 3-10. TL-PS110U Single USB2.0 Port Fast Ethernet Print Server ) Note: Figure 3-9 To add a new printer, you can also go Start > Printers and Faxes, and then click "Add a printer" on the left to launch Windows Add Printer Wizard. Click Next. 8
User Manual
Page 14
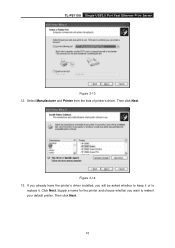
Check "Use the following port" radio button and select "LPT1: (Recommended Printer Port)" from the pull-down list. Figure 3-12 11. Then click Next. TL-PS110U Single USB2.0 Port Fast Ethernet Print Server Figure 3-11 10. Then click Next. 9 Make sure the Automatically detect and install my Plug and Play printer check box is NOT checked.
Check "Use the following port" radio button and select "LPT1: (Recommended Printer Port)" from the pull-down list. Figure 3-12 11. Then click Next. TL-PS110U Single USB2.0 Port Fast Ethernet Print Server Figure 3-11 10. Then click Next. 9 Make sure the Automatically detect and install my Plug and Play printer check box is NOT checked.
User Manual
Page 15
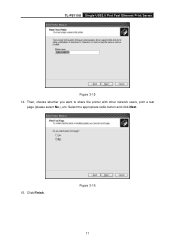
Select Manufacturer and Printer from the lists of printer's driver. Click Next. Supply a name for the printer and choose whether you will be asked whether to keep it or to make it . Then click Next. 10 Figure 3-14 13. If you already have the printer's driver installed, you want to replace it your default printer. TL-PS110U Single USB2.0 Port Fast Ethernet Print Server Figure 3-13 12. Then click Next.
Select Manufacturer and Printer from the lists of printer's driver. Click Next. Supply a name for the printer and choose whether you will be asked whether to keep it or to make it . Then click Next. 10 Figure 3-14 13. If you already have the printer's driver installed, you want to replace it your default printer. TL-PS110U Single USB2.0 Port Fast Ethernet Print Server Figure 3-13 12. Then click Next.
User Manual
Page 16
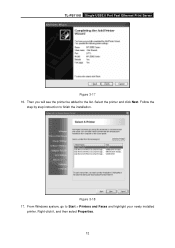
Then, choose whether you want to share the printer with other network users, print a test page (please select No.), etc. TL-PS110U Single USB2.0 Port Fast Ethernet Print Server Figure 3-15 14. Select the appropriate radio-button and click Next. 15. Figure 3-16 11 Click Finish.
Then, choose whether you want to share the printer with other network users, print a test page (please select No.), etc. TL-PS110U Single USB2.0 Port Fast Ethernet Print Server Figure 3-15 14. Select the appropriate radio-button and click Next. 15. Figure 3-16 11 Click Finish.
User Manual
Page 17
Figure 3-18 17. Follow the step by step instruction to Start > Printers and Faxes and highlight your newly installed printer. From Windows system, go to finish the installation. TL-PS110U Single USB2.0 Port Fast Ethernet Print Server Figure 3-17 16. Select the printer and click Next. Right-click it, and then select Properties. 12 Then you will see the printer be added to the list.
Figure 3-18 17. Follow the step by step instruction to Start > Printers and Faxes and highlight your newly installed printer. From Windows system, go to finish the installation. TL-PS110U Single USB2.0 Port Fast Ethernet Print Server Figure 3-17 16. Select the printer and click Next. Right-click it, and then select Properties. 12 Then you will see the printer be added to the list.
User Manual
Page 21
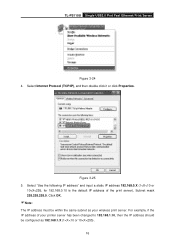
Figure 3-25 5. Select "Use the following IP address" and input a static IP address 192.168.0.X (1 Select Internet Protocol (TCP/IP), and then double click it or click Properties. TL-PS110U Single USB2.0 Port Fast Ethernet Print Server Figure 3-24 4.
Figure 3-25 5. Select "Use the following IP address" and input a static IP address 192.168.0.X (1 Select Internet Protocol (TCP/IP), and then double click it or click Properties. TL-PS110U Single USB2.0 Port Fast Ethernet Print Server Figure 3-24 4.
User Manual
Page 25
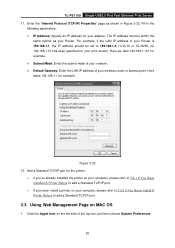
Enter the "Internet Protocol (TCP/IP) Properties" page as your Router. Fill in the following parameters. ¾ IP Address: Specify an IP address for your Router is 192.168.1.1, the IP address should be within the same subnet as shown in Figure 3-32. The IP address must be set to 192.168.1.X (1 For example, if the LAN IP address of your adapter. TL-PS110U Single USB2.0 Port Fast Ethernet Print Server 11.
Enter the "Internet Protocol (TCP/IP) Properties" page as your Router. Fill in the following parameters. ¾ IP Address: Specify an IP address for your Router is 192.168.1.1, the IP address should be within the same subnet as shown in Figure 3-32. The IP address must be set to 192.168.1.X (1 For example, if the LAN IP address of your adapter. TL-PS110U Single USB2.0 Port Fast Ethernet Print Server 11.

User Manual
Page 29
Figure 3-39 24 Click the Apple icon > System Performances > Print & Fax to add a Standard TCP/IP port for the printer. TL-PS110U Single USB2.0 Port Fast Ethernet Print Server Figure 3-38 6.
Figure 3-39 24 Click the Apple icon > System Performances > Print & Fax to add a Standard TCP/IP port for the printer. TL-PS110U Single USB2.0 Port Fast Ethernet Print Server Figure 3-38 6.

User Manual
Page 30
Click Printing and then . Select "LPD" for Protocol, enter 192.168.1.10 for Address and lp1 for example. TL-PS110U Single USB2.0 Port Fast Ethernet Print Server 7. Figure 3-40 8. And then click Add. 25 Here takes EPSON Style Photo 720 for Queue. Select "IP Printer", and then configure the following parameters. Select your printer model from the list.
Click Printing and then . Select "LPD" for Protocol, enter 192.168.1.10 for Address and lp1 for example. TL-PS110U Single USB2.0 Port Fast Ethernet Print Server 7. Figure 3-40 8. And then click Add. 25 Here takes EPSON Style Photo 720 for Queue. Select "IP Printer", and then configure the following parameters. Select your printer model from the list.
User Manual
Page 32
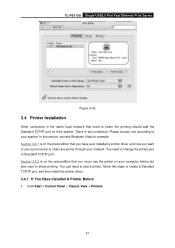
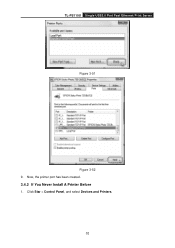
.... You just need to add a printer, follow the steps to Standard TCP/IP port. You need to change the printer port to create a Standard TCP/IP port, and then install the printer driver. 3.4.1 If You Have Installed A Printer Before 1. Click Start > Control Panel > Classic View > Printers. 27 TL-PS110U Single USB2.0 Port Fast Ethernet Print Server Figure 3-42 3.4 Printer Installation Other computers in the same...
.... You just need to add a printer, follow the steps to Standard TCP/IP port. You need to change the printer port to create a Standard TCP/IP port, and then install the printer driver. 3.4.1 If You Have Installed A Printer Before 1. Click Start > Control Panel > Classic View > Printers. 27 TL-PS110U Single USB2.0 Port Fast Ethernet Print Server Figure 3-42 3.4 Printer Installation Other computers in the same...
User Manual
Page 33
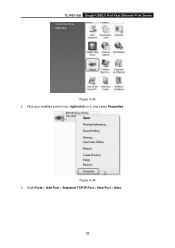
Click Ports > Add Port > Standard TCP/IP Port > New Port > Next. 28 Find your installed printer icon, right-click on it, and select Properties. TL-PS110U Single USB2.0 Port Fast Ethernet Print Server Figure 3-43 2. Figure 3-44 3.
Click Ports > Add Port > Standard TCP/IP Port > New Port > Next. 28 Find your installed printer icon, right-click on it, and select Properties. TL-PS110U Single USB2.0 Port Fast Ethernet Print Server Figure 3-43 2. Figure 3-44 3.
User Manual
Page 37
TL-PS110U Single USB2.0 Port Fast Ethernet Print Server Figure 3-51 Figure 3-52 9. Now, the printer port has been created. 3.4.2 If You Never Install A Printer Before 1. Click Star > Control Panel, and select Devices and Printers. 32
TL-PS110U Single USB2.0 Port Fast Ethernet Print Server Figure 3-51 Figure 3-52 9. Now, the printer port has been created. 3.4.2 If You Never Install A Printer Before 1. Click Star > Control Panel, and select Devices and Printers. 32

User Manual
Page 38
Select Add a local printer. Select "Create a new port", and the type of port is "Standard TCP/IP Port". 33 Figure 3-53 3. Figure 3-54 Figure 3-55 4. TL-PS110U Single USB2.0 Port Fast Ethernet Print Server 2. Click Add a printer.
Select Add a local printer. Select "Create a new port", and the type of port is "Standard TCP/IP Port". 33 Figure 3-53 3. Figure 3-54 Figure 3-55 4. TL-PS110U Single USB2.0 Port Fast Ethernet Print Server 2. Click Add a printer.
User Manual
Page 40
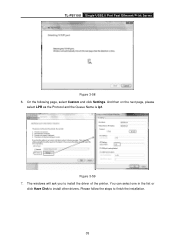
And then on the next page, please select LPR as the Protocol and the Queue Name is lp1. On the following page, select Custom and click Settings. TL-PS110U Single USB2.0 Port Fast Ethernet Print Server Figure 3-58 6. The windows will ask you to install other drivers. You can select one in the list or click Have Disk to install the driver of the printer. Please follow the steps to finish the installation. 35 Figure 3-59 7.
And then on the next page, please select LPR as the Protocol and the Queue Name is lp1. On the following page, select Custom and click Settings. TL-PS110U Single USB2.0 Port Fast Ethernet Print Server Figure 3-58 6. The windows will ask you to install other drivers. You can select one in the list or click Have Disk to install the driver of the printer. Please follow the steps to finish the installation. 35 Figure 3-59 7.

User Manual
Page 42
TL-PS110U Single USB2.0 Port Fast Ethernet Print Server Figure 3-62 8. Figure 3-63 37 After that, the new printer is in the list. And you can enjoy the sharing.
TL-PS110U Single USB2.0 Port Fast Ethernet Print Server Figure 3-62 8. Figure 3-63 37 After that, the new printer is in the list. And you can enjoy the sharing.
User Manual
Page 44
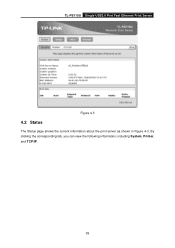
TL-PS110U Single USB2.0 Port Fast Ethernet Print Server Figure 4-3 4.2 Status The Status page shows the current information about the print server as shown in Figure 4-3. By clicking the corresponding tab, you can view the following information, including System, Printer, and TCP/IP. 39
TL-PS110U Single USB2.0 Port Fast Ethernet Print Server Figure 4-3 4.2 Status The Status page shows the current information about the print server as shown in Figure 4-3. By clicking the corresponding tab, you can view the following information, including System, Printer, and TCP/IP. 39
User Manual
Page 46
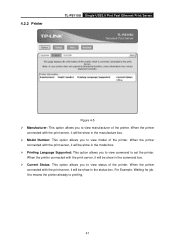
... box. It is means the printer already to printing. 41 When the printer connected with the print server, it will be show in the model box. ¾ Printing Language Supported: This option allows you to view command to set the printer. For Example: Waiting for job. 4.2.2 Printer TL-PS110U Single USB2.0 Port Fast Ethernet Print Server Figure 4-5 ¾ Manufacturer: This option...
... box. It is means the printer already to printing. 41 When the printer connected with the print server, it will be show in the model box. ¾ Printing Language Supported: This option allows you to view command to set the printer. For Example: Waiting for job. 4.2.2 Printer TL-PS110U Single USB2.0 Port Fast Ethernet Print Server Figure 4-5 ¾ Manufacturer: This option...


