User Guide
Page 1
... WINDOWS PC 24 4. CONFIGURATION FROM EMBEDDED WEB SERVER 30 OVERVIEW...30 USING EMBEDDED WEB SERVER ...30 SETUP MENU ...37 INSTALLING PRINT SERVER ON NETWARE 4.X/5.X 42 SETTING UP A MACINTOSH COMPUTER 44 6. NETWORK PRINT MONITOR 48 PREPARATION ...48 TCP/IP PROTOCOL INSTALLATION 49 IPX/SPX-COMPATIBLE PROTOCOL INSTALLATION 49 NETBEUI PROTOCOL INSTALLATION 50...
... WINDOWS PC 24 4. CONFIGURATION FROM EMBEDDED WEB SERVER 30 OVERVIEW...30 USING EMBEDDED WEB SERVER ...30 SETUP MENU ...37 INSTALLING PRINT SERVER ON NETWARE 4.X/5.X 42 SETTING UP A MACINTOSH COMPUTER 44 6. NETWORK PRINT MONITOR 48 PREPARATION ...48 TCP/IP PROTOCOL INSTALLATION 49 IPX/SPX-COMPATIBLE PROTOCOL INSTALLATION 49 NETBEUI PROTOCOL INSTALLATION 50...
User Guide
Page 12
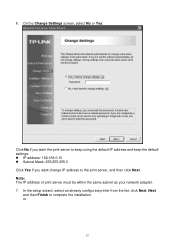
6. On the Change Settings screen, select No or Yes: Click No if you want the print server to keep using the default IP address and keep the default settings: z IP address: 192.168.0.10 z Subnet Mask: 255.255.255.0 Click Yes if you want change IP address to complete the installation. In the setup wizard, select an already configured printer from the list, click Next, Next and then Finish to the print server, and then click Next. Note: The IP address of print server must be within the same subnet as your network adapter. 7. or 12
6. On the Change Settings screen, select No or Yes: Click No if you want the print server to keep using the default IP address and keep the default settings: z IP address: 192.168.0.10 z Subnet Mask: 255.255.255.0 Click Yes if you want change IP address to complete the installation. In the setup wizard, select an already configured printer from the list, click Next, Next and then Finish to the print server, and then click Next. Note: The IP address of print server must be within the same subnet as your network adapter. 7. or 12

User Guide
Page 19
TCP/IP Wizard 1. This setting, by using Wizard. If there is disabled. The IP address must meet the IP addressing requirements of the network segment. .../IP Wizard. 2 Select "Obtain an IP address from your DHCP server. This option allows the print server to function. If you in setting up the necessary parameters for the print server. Setup a print server by default, is a DHCP server on your network. Click Wizard button... step. 3 In the IP Address option, type an IP address for your print server device to obtain IP-related settings automatically from DHCP server".
TCP/IP Wizard 1. This setting, by using Wizard. If there is disabled. The IP address must meet the IP addressing requirements of the network segment. .../IP Wizard. 2 Select "Obtain an IP address from your DHCP server. This option allows the print server to function. If you in setting up the necessary parameters for the print server. Setup a print server by default, is a DHCP server on your network. Click Wizard button... step. 3 In the IP Address option, type an IP address for your print server device to obtain IP-related settings automatically from DHCP server".

User Guide
Page 20
... NetWare client computer, such as Windows 95/98/Me, create a printer that is currently configured to which the print server device will save the above settings into your NetWare file server as follow 3. Type in a Print Queue Names. Done. 8. 4 (Optional) In the Subnet Mask option, type the Subnet Mask your LAN...
... NetWare client computer, such as Windows 95/98/Me, create a printer that is currently configured to which the print server device will save the above settings into your NetWare file server as follow 3. Type in a Print Queue Names. Done. 8. 4 (Optional) In the Subnet Mask option, type the Subnet Mask your LAN...

User Guide
Page 21
... 95/98/Me, run PSAdmin. 3. Run PCONSOLE in the Print server that created during PCONSOLE. 6. (Optional) In Bindery Settings, Select NetWare file server(s) that print server can do Bindery mode. 7. (Optional) In NDS Settings, Select NetWare file server(s), NetWare 4.x or later that print server can do NDS mode. 8. Click OK. Manual Setup...
... 95/98/Me, run PSAdmin. 3. Run PCONSOLE in the Print server that created during PCONSOLE. 6. (Optional) In Bindery Settings, Select NetWare file server(s) that print server can do Bindery mode. 7. (Optional) In NDS Settings, Select NetWare file server(s), NetWare 4.x or later that print server can do NDS mode. 8. Click OK. Manual Setup...

User Guide
Page 22
... This option also lets you to the print server. The option also allows you manually specify a subnet mask to modify the print server's TCP/IP settings. Each option is disabled. Properties -TCP/IP Options The TCP/IP options allow you to the print server, if DHCP option is detailed as follows...
... This option also lets you to the print server. The option also allows you manually specify a subnet mask to modify the print server's TCP/IP settings. Each option is disabled. Properties -TCP/IP Options The TCP/IP options allow you to the print server, if DHCP option is detailed as follows...

User Guide
Page 23
Click Reset button just like a picture < >. 2. Refresh searches the network for new settings to establish a new connection or for all attached print server(s). 23 Make sure that the upgrade file is located in order to take effect. Reset 1. ...
Click Reset button just like a picture < >. 2. Refresh searches the network for new settings to establish a new connection or for all attached print server(s). 23 Make sure that the upgrade file is located in order to take effect. Reset 1. ...
User Guide
Page 24
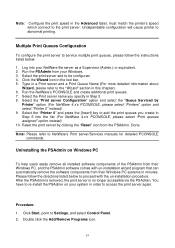
... by clicking the "Reset" icon from your Windows. 3. Click Start, point to NetWare's Print server/Services manuals for detailed PCONSOLE commands. Note: Please refer to Settings, and select Control Panel. 2. Note: Configure the print speed in the Advanced label, must match the printer's speed which connect to abnormal printing. Undependable configuration...
... by clicking the "Reset" icon from your Windows. 3. Click Start, point to NetWare's Print server/Services manuals for detailed PCONSOLE commands. Note: Please refer to Settings, and select Control Panel. 2. Note: Configure the print speed in the Advanced label, must match the printer's speed which connect to abnormal printing. Undependable configuration...
User Guide
Page 26
Using the appropriate software on your system as follow below information: 1.Click Start button. 2.Select Settings, and then select "Printers" option. 3.Click Add Printer icon. For example, to the print server's web page. Contact your intranet option, appear as Windows PC ...
Using the appropriate software on your system as follow below information: 1.Click Start button. 2.Select Settings, and then select "Printers" option. 3.Click Add Printer icon. For example, to the print server's web page. Contact your intranet option, appear as Windows PC ...
User Guide
Page 30
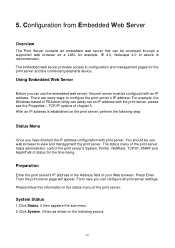
... IP address with the print server, please see the Properties - Using Embedded Web Server Before you can configure all print server settings. You should be use the embedded web server, the print server must be accessed through a supported web browser on the print server, perform the following ...
... IP address with the print server, please see the Properties - Using Embedded Web Server Before you can configure all print server settings. You should be use the embedded web server, the print server must be accessed through a supported web browser on the print server, perform the following ...
User Guide
Page 32
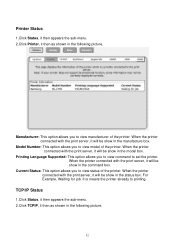
... will be show in the manufacture box. Manufacturer: This option allows you to view model of the printer. Model Number: This option allows you to set the printer. For Example, Waiting for job. When the printer connected with the print server, it will be show in the model box. Current Status...
... will be show in the manufacture box. Manufacturer: This option allows you to view model of the printer. Model Number: This option allows you to set the printer. For Example, Waiting for job. When the printer connected with the print server, it will be show in the model box. Current Status...

User Guide
Page 33
...: 192.168.0.10) Subnet Mask: This option allows you to view gateway from your network, this option allows the print server to obtain IP-related settings automatically from the print server. Click Status, it then as shown in the following picture. 33 IP Address: This option allows you to view DHCP...
...: 192.168.0.10) Subnet Mask: This option allows you to view gateway from your network, this option allows the print server to obtain IP-related settings automatically from the print server. Click Status, it then as shown in the following picture. 33 IP Address: This option allows you to view DHCP...
User Guide
Page 34
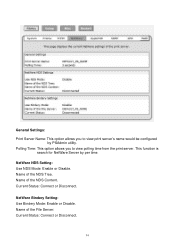
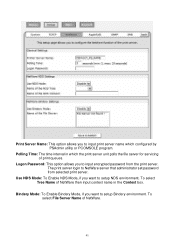
Name of the File Server: Current Status: Connect or Disconnect. 34 Name of the NDS Content. Current Status: Connect or Disconnect. NetWare Bindery Setting: Use Bindery Mode: Enable or Disable. Name of the NDS Tree. This function is search for NetWare Server by PSAdmin utility. Polling Time: This option allows you to view polling time from the print server. NetWare NDS Setting: Use NDS Mode: Enable or Disable. General Settings: Print Server Name: This option allows you to view print server's name would be configured by per time.
Name of the File Server: Current Status: Connect or Disconnect. 34 Name of the NDS Content. Current Status: Connect or Disconnect. NetWare Bindery Setting: Use Bindery Mode: Enable or Disable. Name of the NDS Tree. This function is search for NetWare Server by PSAdmin utility. Polling Time: This option allows you to view polling time from the print server. NetWare NDS Setting: Use NDS Mode: Enable or Disable. General Settings: Print Server Name: This option allows you to view print server's name would be configured by per time.

User Guide
Page 35
AppleTalk Settings: If no any zone exists, the print server itself displays the zone name as an asterisk (*) in the current AppleTalk Status of the print server's ...
AppleTalk Settings: If no any zone exists, the print server itself displays the zone name as an asterisk (*) in the current AppleTalk Status of the print server's ...

User Guide
Page 39
.... Click Setup, it then as login user name. ․Password: The default password is empty. This option allows the print server to obtain IP-related settings automatically from the print server, you to select DHCP/ BOOTP option.
.... Click Setup, it then as login user name. ․Password: The default password is empty. This option allows the print server to obtain IP-related settings automatically from the print server, you to select DHCP/ BOOTP option.

User Guide
Page 40
Subnet Mask: This option allows you to input subnet mask from the print server. SMB Workgroup/Shared Name Setting: This option allows you to change the SMB name of the network segment. IP Address: This option allows you to input IP address from the ... router or gateway to input gateway from the print server. Note: On the TCP/IP Setup screen, specify a fixed IP address is highly recommended. Rendezvous Settings: Enable/Disable the Rendezvous support for Mac OS 10.
Subnet Mask: This option allows you to input subnet mask from the print server. SMB Workgroup/Shared Name Setting: This option allows you to change the SMB name of the network segment. IP Address: This option allows you to input IP address from the ... router or gateway to input gateway from the print server. Note: On the TCP/IP Setup screen, specify a fixed IP address is highly recommended. Rendezvous Settings: Enable/Disable the Rendezvous support for Mac OS 10.
User Guide
Page 41
... password from selected print server. Polling Time: The time interval in the Context box. Logon Password: This option allows you to NetWare server that administrator set password from the print server.
... password from selected print server. Polling Time: The time interval in the Context box. Logon Password: This option allows you to NetWare server that administrator set password from the print server.

User Guide
Page 42
.... At your NDS tree after the NetWare system was installed, please read the following section before you by default, the installation program will only be set up the Bindery Emulation function for you install the print server. OU=TECH.OU=ABC-USA.O=ABC ; 5. Log into your print server. 7. By...a Bindery connection. 8. If you have ever added any organization units (OU) to "Auto Setup" section in order for the first time, by adding "SET BINDERY CONTEXT =" in the AUTOEXEC.NCF file. Please restart your NetWare file server in this line, or if you install the NetWare file server for...
.... At your NDS tree after the NetWare system was installed, please read the following section before you by default, the installation program will only be set up the Bindery Emulation function for you install the print server. OU=TECH.OU=ABC-USA.O=ABC ; 5. Log into your print server. 7. By...a Bindery connection. 8. If you have ever added any organization units (OU) to "Auto Setup" section in order for the first time, by adding "SET BINDERY CONTEXT =" in the AUTOEXEC.NCF file. Please restart your NetWare file server in this line, or if you install the NetWare file server for...

User Guide
Page 43
We also assume that is set on the network. AppleTalk Setup The print server can print jobs submitted from Macintosh workstations connected to NetWare's Print Server/Services manuals for detailed PCONSOLE ... the Chooser window and selecting a printer that is for identification purpose or just leave it in default (This enables the print server automatically search and link itself to the default zone that at least an AppleTalk Zone exists on the AppleTalk router, if found). If no any zone exists, the print...
We also assume that is set on the network. AppleTalk Setup The print server can print jobs submitted from Macintosh workstations connected to NetWare's Print Server/Services manuals for detailed PCONSOLE ... the Chooser window and selecting a printer that is for identification purpose or just leave it in default (This enables the print server automatically search and link itself to the default zone that at least an AppleTalk Zone exists on the AppleTalk router, if found). If no any zone exists, the print...

User Guide
Page 44
... example: ATALK_PS-40EEED-1. You may also change the default Chooser name and Zone name of a PRINT SERVER by default (recommended). 6.Data Format: In this option. Setting Up a Macintosh Computer 1. At a Macintosh computer, from the Apple menu, select Chooser. 2. If you are using your printer vendor. If your printer does not appear...
... example: ATALK_PS-40EEED-1. You may also change the default Chooser name and Zone name of a PRINT SERVER by default (recommended). 6.Data Format: In this option. Setting Up a Macintosh Computer 1. At a Macintosh computer, from the Apple menu, select Chooser. 2. If you are using your printer vendor. If your printer does not appear...