Quick Installation Guide
Page 1
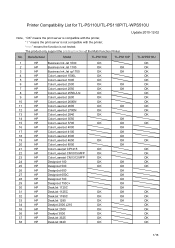
" \ " means the print server is not compatible with the printer; Manufacturer Model TL-PS110U TL-PS110P TL-WPS510U 1 HP Business Ink Jet 1000 OK OK 2 HP Business Ink Jet 1100 OK OK OK 3 HP Business Ink Jet cp1700 OK OK OK 4 HP ... HP DeskJet 3420 OK OK 1/16 The product only support the printing function of the Multi Function Printer. "--" means the function is not tested; Printer Compatibility List for TL-PS110U/TL-PS110P/TL-WPS510U Update:2010-12-02 Note:"OK" means the print server is...
" \ " means the print server is not compatible with the printer; Manufacturer Model TL-PS110U TL-PS110P TL-WPS510U 1 HP Business Ink Jet 1000 OK OK 2 HP Business Ink Jet 1100 OK OK OK 3 HP Business Ink Jet cp1700 OK OK OK 4 HP ... HP DeskJet 3420 OK OK 1/16 The product only support the printing function of the Multi Function Printer. "--" means the function is not tested; Printer Compatibility List for TL-PS110U/TL-PS110P/TL-WPS510U Update:2010-12-02 Note:"OK" means the print server is...

User Guide
Page 49
... IP address automatically", if a DHCP server is not already installed, click Add. 4. Double click the Network icon. 3. Select Microsoft from the Manufacturers list. 6. Select Protocol and click Add. 5. Note: Using TCP/IP protocol to Settings, and select Control Panel. 2. Click Start, point to access ...9. TCP/IP Protocol Installation 1. Click Start, point to Settings and select Control Panel. 2. Select TCP/IP Protocol from the Network Protocols list and follow the instructions on the LAN. 8. If the IPX/SPX-compatible Protocol is not already installed, click Add. 4. IPX/SPX...
... IP address automatically", if a DHCP server is not already installed, click Add. 4. Double click the Network icon. 3. Select Microsoft from the Manufacturers list. 6. Select Protocol and click Add. 5. Note: Using TCP/IP protocol to Settings, and select Control Panel. 2. Click Start, point to access ...9. TCP/IP Protocol Installation 1. Click Start, point to Settings and select Control Panel. 2. Select TCP/IP Protocol from the Network Protocols list and follow the instructions on the LAN. 8. If the IPX/SPX-compatible Protocol is not already installed, click Add. 4. IPX/SPX...
User Guide
Page 54
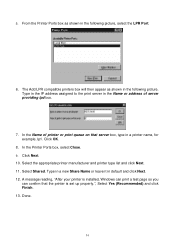
... the LPR Port. 6. Type in the IP address assigned to the print server in default and click Next. 12. 5. The Add LPR compatible printers box will then appear as shown in the following picture. In the Printer Ports box, select Close. 9. Select the appropriate printer manufacturer ...and printer type list and click Next. 11. A message reading, "After your printer is set up properly.", Select Yes (Recommended) and click Finish. 13. Done. 54...
... the LPR Port. 6. Type in the IP address assigned to the print server in default and click Next. 12. 5. The Add LPR compatible printers box will then appear as shown in the following picture. In the Printer Ports box, select Close. 9. Select the appropriate printer manufacturer ...and printer type list and click Next. 11. A message reading, "After your printer is set up properly.", Select Yes (Recommended) and click Finish. 13. Done. 54...
