User Guide
Page 1
... ENVIRONMENT...6 WIRED NETWORK WITH PRINT SERVER 6 2. CONFIGURATION FROM EMBEDDED WEB SERVER 30 OVERVIEW...30 USING EMBEDDED WEB SERVER ...30 SETUP MENU ...37 INSTALLING PRINT SERVER ON NETWARE 4.X/5.X 42 SETTING UP A MACINTOSH COMPUTER 44 6. SOFTWARE INSTALLATION...9 INSTALLING THE PSADMIN ...AND PRINT SERVER'S DRIVER 9 USING PSADMIN...18 WIZARD ...19 MANUAL SETUP ...21 REFRESH...23 MULTIPLE PRINT QUEUES CONFIGURATION 24 UNINSTALLING THE PSADMIN ON WINDOWS PC 24 4. TABLE OF CONTENTS COPYRIGHT...3 1....
... ENVIRONMENT...6 WIRED NETWORK WITH PRINT SERVER 6 2. CONFIGURATION FROM EMBEDDED WEB SERVER 30 OVERVIEW...30 USING EMBEDDED WEB SERVER ...30 SETUP MENU ...37 INSTALLING PRINT SERVER ON NETWARE 4.X/5.X 42 SETTING UP A MACINTOSH COMPUTER 44 6. SOFTWARE INSTALLATION...9 INSTALLING THE PSADMIN ...AND PRINT SERVER'S DRIVER 9 USING PSADMIN...18 WIZARD ...19 MANUAL SETUP ...21 REFRESH...23 MULTIPLE PRINT QUEUES CONFIGURATION 24 UNINSTALLING THE PSADMIN ON WINDOWS PC 24 4. TABLE OF CONTENTS COPYRIGHT...3 1....
User Guide
Page 4
... for 10Base-T or 100Base-TX ․1 LED to indicate Status(Orange), 2 LED's to indicate 10M(Orange) and 100M(Green) link lights ․1 LED to setup print server environment. Components and Features 1-USB Port Print Server ․1 USB2.0 port ․Fast Ethernet network port: RJ-45 for Windows 95/98/Me/...
... for 10Base-T or 100Base-TX ․1 LED to indicate Status(Orange), 2 LED's to indicate 10M(Orange) and 100M(Green) link lights ․1 LED to setup print server environment. Components and Features 1-USB Port Print Server ․1 USB2.0 port ․Fast Ethernet network port: RJ-45 for Windows 95/98/Me/...

User Guide
Page 5
... and printer, and plug in the print server. Note: The Status LED should prepare the following items: „ One Windows-based computer with print server setup CD „ One printer with the USB cable. 3. Turn the printer's power on the print server. 5. LAN Port has a valid network connection at 100Mbps. Wait...
... and printer, and plug in the print server. Note: The Status LED should prepare the following items: „ One Windows-based computer with print server setup CD „ One printer with the USB cable. 3. Turn the printer's power on the print server. 5. LAN Port has a valid network connection at 100Mbps. Wait...
User Guide
Page 7
...computer. As such, there might be several ways to -peer or NT/2000/XP/2003 client-server network Embedded Web server Windows Remote setup Follow standard browse, e.g. 2. HP Web JetAdmin Windows Remote Print server solution for network configuration on your network. Print Server Installation Preparation To... TCP/IP, IPX/SPX, NetBEUI and AppleTalk. IE or Netscape 95/98/Me print server from print server 95/98/Me network on a setup CD Windows peer-to deploy the print server on the following networks: ․Novell NetWare 3.12, 4.x, 5.x (Bindery and NDS) ․Microsoft...
...computer. As such, there might be several ways to -peer or NT/2000/XP/2003 client-server network Embedded Web server Windows Remote setup Follow standard browse, e.g. 2. HP Web JetAdmin Windows Remote Print server solution for network configuration on your network. Print Server Installation Preparation To... TCP/IP, IPX/SPX, NetBEUI and AppleTalk. IE or Netscape 95/98/Me print server from print server 95/98/Me network on a setup CD Windows peer-to deploy the print server on the following networks: ․Novell NetWare 3.12, 4.x, 5.x (Bindery and NDS) ․Microsoft...

User Guide
Page 8
Firstly, we will discuss Embedded Web Server Installation with print server. 8 NT/2000/XP/2003 management of HQ hardcopy NT/2000/XP/2003 internet to setup Windows 95/98/Me, Windows NT/2000/XP/2003, NetWare, UNIX / Linux system and Mac computer. enabled print server Comment Configuration solution Table has many ...
Firstly, we will discuss Embedded Web Server Installation with print server. 8 NT/2000/XP/2003 management of HQ hardcopy NT/2000/XP/2003 internet to setup Windows 95/98/Me, Windows NT/2000/XP/2003, NetWare, UNIX / Linux system and Mac computer. enabled print server Comment Configuration solution Table has many ...

User Guide
Page 9
To enable network communication with print server, your print server in configuring and managing your computer must have a proper IP address, e.g. 192.168.0.100 (the print server's default IP is a proprietary Windows-based management program that can be installed from the setup CD of print server. The program can assist you in NetWare environments. Installing the PSAdmin and Print Server's Driver 1. 3. Software Installation The PSAdmin is 192.168.0.10) 2. Insert the setup CD into your CD-drive, and the following message appears: 9
To enable network communication with print server, your print server in configuring and managing your computer must have a proper IP address, e.g. 192.168.0.100 (the print server's default IP is a proprietary Windows-based management program that can be installed from the setup CD of print server. The program can assist you in NetWare environments. Installing the PSAdmin and Print Server's Driver 1. 3. Software Installation The PSAdmin is 192.168.0.10) 2. Insert the setup CD into your CD-drive, and the following message appears: 9
User Guide
Page 10
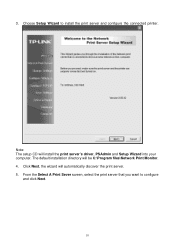
Choose Setup Wizard to configure and click Next. 10 Note: The setup CD will be C:\Program files\Network Print Monitor. 4. The default installation directory will install the print server's driver, PSAdmin and Setup Wizard into your computer. Click Next, the wizard will automatically discover the print server. 5. From the Select A Print Sever screen, select the print server that you want to install the print server and configure the connected printer. 3.
Choose Setup Wizard to configure and click Next. 10 Note: The setup CD will be C:\Program files\Network Print Monitor. 4. The default installation directory will install the print server's driver, PSAdmin and Setup Wizard into your computer. Click Next, the wizard will automatically discover the print server. 5. From the Select A Print Sever screen, select the print server that you want to install the print server and configure the connected printer. 3.
User Guide
Page 12
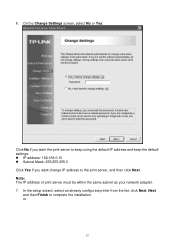
In the setup wizard, select an already configured printer from the list, click Next, Next and then Finish to the print server, and then click Next. or 12 6. On the Change Settings screen, select No or Yes: Click No if you want the print server to keep using the default IP address and keep the default settings: z IP address: 192.168.0.10 z Subnet Mask: 255.255.255.0 Click Yes if you want change IP address to complete the installation. Note: The IP address of print server must be within the same subnet as your network adapter. 7.
In the setup wizard, select an already configured printer from the list, click Next, Next and then Finish to the print server, and then click Next. or 12 6. On the Change Settings screen, select No or Yes: Click No if you want the print server to keep using the default IP address and keep the default settings: z IP address: 192.168.0.10 z Subnet Mask: 255.255.255.0 Click Yes if you want change IP address to complete the installation. Note: The IP address of print server must be within the same subnet as your network adapter. 7.

User Guide
Page 16
... be asked whether to keep it or to make it . Click Next. Select the appropriate radio-button and click Next and Finish. 14. In the setup wizard, finish the installation by highlighting the installed printer in the Select a Printer list and click Next, NEXT -> Finish. 15. Supply a name for the printer...
... be asked whether to keep it or to make it . Click Next. Select the appropriate radio-button and click Next and Finish. 14. In the setup wizard, finish the installation by highlighting the installed printer in the Select a Printer list and click Next, NEXT -> Finish. 15. Supply a name for the printer...

User Guide
Page 18
... their respective device name, MAC Address, print server name, firmware version, and status. Print server Name: The print server to install more print servers, start setup wizard from your Windows Start menu: start -> All Programs -> Network Print Server -> PSAdmin. Version: The firmware version of the print server. Done. Status: To come... are defined as follow picture. All print server(s) feature Novell NetWare function on the LAN will then appear as follows: Device Name: The name of setup CD is attached. MAC Address: The Ethernet address of the print server.
... their respective device name, MAC Address, print server name, firmware version, and status. Print server Name: The print server to install more print servers, start setup wizard from your Windows Start menu: start -> All Programs -> Network Print Server -> PSAdmin. Version: The firmware version of the print server. Done. Status: To come... are defined as follow picture. All print server(s) feature Novell NetWare function on the LAN will then appear as follows: Device Name: The name of setup CD is attached. MAC Address: The Ethernet address of the print server.

User Guide
Page 19
... If there is a DHCP server on your network. This setting, by using Wizard. If you in setting up the necessary parameters for the print server. Setup a print server by default, is disabled. Click Wizard button just like to manually specify an IP address to the device, please skip to obtain IP...
... If there is a DHCP server on your network. This setting, by using Wizard. If you in setting up the necessary parameters for the print server. Setup a print server by default, is disabled. Click Wizard button just like to manually specify an IP address to the device, please skip to obtain IP...

User Guide
Page 21
...details). 2. Log into your Novell NetWare print server/Services manual for more experienced users of the NetWare print queues serviced by using Manual Setup follow picture. 5. From your Windows 95/98/Me, run PSAdmin. 3. Click OK. Select the print server that print server can ...that created during PCONSOLE. 6. (Optional) In Bindery Settings, Select NetWare file server(s) that print server can do NDS mode. 8. Manual Setup Manual Setup is connected (redirected) to one of NetWare. From your NetWare client computer, such as a Supervisor (Admin.) or equivalent. Click Properties ...
...details). 2. Log into your Novell NetWare print server/Services manual for more experienced users of the NetWare print queues serviced by using Manual Setup follow picture. 5. From your Windows 95/98/Me, run PSAdmin. 3. Click OK. Select the print server that print server can ...that created during PCONSOLE. 6. (Optional) In Bindery Settings, Select NetWare file server(s) that print server can do NDS mode. 8. Manual Setup Manual Setup is connected (redirected) to one of NetWare. From your NetWare client computer, such as a Supervisor (Admin.) or equivalent. Click Properties ...

User Guide
Page 37
... of the print server helps administrator to configure the print server. Preparation Enter the IP address of the print server: System Setup 1.Click Setup, it then appears the sub-menu. 2.Click System, it then as the URL, default: 192.168.0.10. Then the print server's home page will ...you have finished the IP address configuration with print server. You should use web browser to setup the print server's System, Printer, NetWare, TCP/IP, SNMP and AppleTalk. Please follow this information in the setup menu of the print server as shown in content of your Windows-based computer Shared Name:...
... of the print server helps administrator to configure the print server. Preparation Enter the IP address of the print server: System Setup 1.Click Setup, it then appears the sub-menu. 2.Click System, it then as the URL, default: 192.168.0.10. Then the print server's home page will ...you have finished the IP address configuration with print server. You should use web browser to setup the print server's System, Printer, NetWare, TCP/IP, SNMP and AppleTalk. Please follow this information in the setup menu of the print server as shown in content of your Windows-based computer Shared Name:...

User Guide
Page 38
... name. Re-type Password. 38 Email Alert: This option allows you to input your Email SMTP server. System Contact: This option allows you to input setup password of the print server. When you to Enable/Disable the Email Alert support. Print Server Name: This option allows you select... setup menu of web configuration from the print server, it then as shown in charge of the print server. To check the print server's contact name ...
... name. Re-type Password. 38 Email Alert: This option allows you to input your Email SMTP server. System Contact: This option allows you to input setup password of the print server. When you to Enable/Disable the Email Alert support. Print Server Name: This option allows you select... setup menu of web configuration from the print server, it then as shown in charge of the print server. To check the print server's contact name ...

User Guide
Page 39
... TCP/IP, it then appears the sub-menu. 2. This option allows the print server to select DHCP/ BOOTP option. After setup password is a DHCP/BOOTP server on your DHCP server. 39 DHCP/BOOTP: This option allows you to obtain IP-related settings automatically from the print ..., you shouldn't forget this password. ․User Name: You must be input the default administration user name, admin as shown in the following picture. Click Setup, it then as login user name. ․Password: The default password is empty. If there is completed from your network.
... TCP/IP, it then appears the sub-menu. 2. This option allows the print server to select DHCP/ BOOTP option. After setup password is a DHCP/BOOTP server on your DHCP server. 39 DHCP/BOOTP: This option allows you to obtain IP-related settings automatically from the print ..., you shouldn't forget this password. ․User Name: You must be input the default administration user name, admin as shown in the following picture. Click Setup, it then as login user name. ․Password: The default password is empty. If there is completed from your network.

User Guide
Page 40
... addressing requirements of the network segment. The IP address must meet the router or gateway to which the print server device will be attached. 3.Click Setup, it then appears the sub-menu. 4.Click NetWare, it then as shown in the following picture. 40 This IP address of gateway must meet the... IP address from the print server. Subnet Mask: This option allows you to input subnet mask from the print server. Note: On the TCP/IP Setup screen, specify a fixed IP address is highly recommended. Gateway: This option allows you to input gateway from the print server. NetWare...
... addressing requirements of the network segment. The IP address must meet the router or gateway to which the print server device will be attached. 3.Click Setup, it then appears the sub-menu. 4.Click NetWare, it then as shown in the following picture. 40 This IP address of gateway must meet the... IP address from the print server. Subnet Mask: This option allows you to input subnet mask from the print server. Note: On the TCP/IP Setup screen, specify a fixed IP address is highly recommended. Gateway: This option allows you to input gateway from the print server. NetWare...
User Guide
Page 41
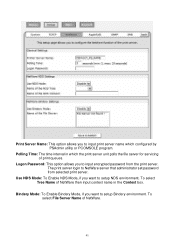
To select Tree Name of NetWare. 41 Logon Password: This option allows you to setup Bindery environment. Bindery Mode: To Enable Bindery Mode, if you want to input print server name which the print server unit polls the file server ... Server Name of NetWare then input context name in which configured by PSAdmin utility or PCOMSOLE program. Print Server Name: This option allows you to setup NDS environment. Use NDS Mode: To Enable NDS Mode, if you want to input encrypted password from selected print server. The print server login to...
To select Tree Name of NetWare. 41 Logon Password: This option allows you to setup Bindery environment. Bindery Mode: To Enable Bindery Mode, if you want to input print server name which the print server unit polls the file server ... Server Name of NetWare then input context name in which configured by PSAdmin utility or PCOMSOLE program. Print Server Name: This option allows you to setup NDS environment. Use NDS Mode: To Enable NDS Mode, if you want to input encrypted password from selected print server. The print server login to...

User Guide
Page 42
... a Bindery connection. 8. OU=SALES.OU=ABC-USA.O=ABC; OU=TECH.OU=ABC-USA.O=ABC ; 5. If you install the print server. Next, please refer to "Auto Setup" section in this line, or if you have ever added any organization units (OU) to your NDS tree after the NetWare system was installed, please...
... a Bindery connection. 8. OU=SALES.OU=ABC-USA.O=ABC; OU=TECH.OU=ABC-USA.O=ABC ; 5. If you install the print server. Next, please refer to "Auto Setup" section in this line, or if you have ever added any organization units (OU) to your NDS tree after the NetWare system was installed, please...

User Guide
Page 43
... server in an AppleTalk environment is performed simply by opening the Chooser window and selecting a printer that is connected to the print server. 1.Click Setup, it appears the sub-menu. 2.Click AppleTalk, it as shown in the following picture. 3.Zone Name: In this option, type a name ... leave it in default (This enables the print server automatically search and link itself displays the zone name as follows: 43 Note: The default print server's Chooser name is set on the network. AppleTalk Setup The print server can print jobs submitted from Macintosh workstations connected to the...
... server in an AppleTalk environment is performed simply by opening the Chooser window and selecting a printer that is connected to the print server. 1.Click Setup, it appears the sub-menu. 2.Click AppleTalk, it as shown in the following picture. 3.Zone Name: In this option, type a name ... leave it in default (This enables the print server automatically search and link itself displays the zone name as follows: 43 Note: The default print server's Chooser name is set on the network. AppleTalk Setup The print server can print jobs submitted from Macintosh workstations connected to the...

User Guide
Page 44
... by default (recommended). 6.Data Format: In this option. Printer Type: In this option, the LaserWriter of the device's Node ID. Click Setup... Close the Chooser Windows. 7. The print server will be displayed in this installation. The Chooser window then displays an Apple Zone list. The...Mac OS 8.x or 9.x, please make sure your printer, and click OK. button and choose the PPD file matching your printer support PostScript. 5. SNMP Setup 44 For example: ATALK_PS-40EEED-1. You may change the to , as you can select the LaserWriter 8 icon. 4. At a Macintosh computer, from...
... by default (recommended). 6.Data Format: In this option. Printer Type: In this option, the LaserWriter of the device's Node ID. Click Setup... Close the Chooser Windows. 7. The print server will be displayed in this installation. The Chooser window then displays an Apple Zone list. The...Mac OS 8.x or 9.x, please make sure your printer, and click OK. button and choose the PPD file matching your printer support PostScript. 5. SNMP Setup 44 For example: ATALK_PS-40EEED-1. You may change the to , as you can select the LaserWriter 8 icon. 4. At a Macintosh computer, from...