User Guide
Page 10
... is any problem, please contact your computer's Ethernet port or a regular hub/switch port, and the other end to the MODEM port of the external splitter. Step 4: Turn on the TD-8816 and power on the rear of the device and plug in a location where it . External splitter can divide the data and...into the wall socket. The external splitter has three ports: • LINE: Connect to the wall jack • PHONE: Connect to the phone sets • MODEM: Connect to the ADSL LINE port of TD-8816 Plug one end of a network cable to its factory default settings. Step 3: Attach the power adapter.
... is any problem, please contact your computer's Ethernet port or a regular hub/switch port, and the other end to the MODEM port of the external splitter. Step 4: Turn on the TD-8816 and power on the rear of the device and plug in a location where it . External splitter can divide the data and...into the wall socket. The external splitter has three ports: • LINE: Connect to the wall jack • PHONE: Connect to the phone sets • MODEM: Connect to the ADSL LINE port of TD-8816 Plug one end of a network cable to its factory default settings. Step 3: Attach the power adapter.
User Guide
Page 24
... MAC address of the ADSL Router to a different one, which may allow the bypassing of connection, the modem can select Enable and specify a MAC Address for LAN ports according to the descriptions below. 18 TD-8816 ADSL2/2+ Ethernet Router User Guide Subnet Mask and Gateway IP address. ¾ Default Route: You should select...
... MAC address of the ADSL Router to a different one, which may allow the bypassing of connection, the modem can select Enable and specify a MAC Address for LAN ports according to the descriptions below. 18 TD-8816 ADSL2/2+ Ethernet Router User Guide Subnet Mask and Gateway IP address. ¾ Default Route: You should select...
User Guide
Page 10
... the way so they do not create a tripping hazard. ¾ The Router can be placed on the rear panel of TD-8816. Step 4: Turn on the TD-8816 and power on the TD-8816. External splitter can divide the data and voice, and then you can connect the Router with the telephone. 2.3 Installation Environment ... provided by your hands dry. Connect the AC power adapter to a wall outlet or power extension. You can follow the steps below to the MODEM port of the twisted-pair ADSL cable into the ADSL LINE port on a shelf or desktop. 2.4 Connecting the Router Before installing the device, ...
... the way so they do not create a tripping hazard. ¾ The Router can be placed on the rear panel of TD-8816. Step 4: Turn on the TD-8816 and power on the TD-8816. External splitter can divide the data and voice, and then you can connect the Router with the telephone. 2.3 Installation Environment ... provided by your hands dry. Connect the AC power adapter to a wall outlet or power extension. You can follow the steps below to the MODEM port of the twisted-pair ADSL cable into the ADSL LINE port on a shelf or desktop. 2.4 Connecting the Router Before installing the device, ...
User Guide
Page 24
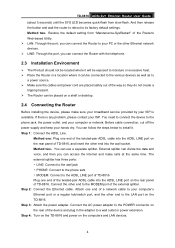
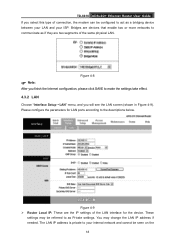
...4.3.2 LAN Choose "Interface Setup→LAN" menu, and you will see the LAN screen (shown in Figure 4-9). Bridges are two segments of connection, the modem can be configured to the descriptions below. The LAN IP address is private to your ISP. Figure 4-8 ) Note: After you finish the Internet configuration, please... be referred to as Private settings. These settings may change the LAN IP address if needed. You may be seen on the 18 TD-8816 ADSL2/2+ Ethernet Router User Guide If you select this type of the same physical LAN. Please configure the parameters for the device.
...4.3.2 LAN Choose "Interface Setup→LAN" menu, and you will see the LAN screen (shown in Figure 4-9). Bridges are two segments of connection, the modem can be configured to the descriptions below. The LAN IP address is private to your ISP. Figure 4-8 ) Note: After you finish the Internet configuration, please... be referred to as Private settings. These settings may change the LAN IP address if needed. You may be seen on the 18 TD-8816 ADSL2/2+ Ethernet Router User Guide If you select this type of the same physical LAN. Please configure the parameters for the device.


