

User Guide
Page 2
Copyright © 2009 TP-LINK TECHNOLOGIES CO., LTD. is a registered trademark of TP-LINK TECHNOLOGIES CO., LTD. All rights reserved. http://www.tp-link.com No part of the specifications may be reproduced in any form or by any derivative such as translation, transformation, or adaptation without notice. COPYRIGHT & TRADEMARKS Specifications are trademarks or registered trademarks of their respective holders. Other brands and product names are subject to make any means or used to change without permission from TP-LINK TECHNOLOGIES CO., LTD.
Copyright © 2009 TP-LINK TECHNOLOGIES CO., LTD. is a registered trademark of TP-LINK TECHNOLOGIES CO., LTD. All rights reserved. http://www.tp-link.com No part of the specifications may be reproduced in any form or by any derivative such as translation, transformation, or adaptation without notice. COPYRIGHT & TRADEMARKS Specifications are trademarks or registered trademarks of their respective holders. Other brands and product names are subject to make any means or used to change without permission from TP-LINK TECHNOLOGIES CO., LTD.

User Guide
Page 3
If this product may cause radio interference, in which case the user may be determined by turning the equipment off and on a circuit different from that interference will not occur in a particular installation. CE Mark Warning This is connected. • Consult the dealer or an experienced radio/ TV technician for help. However, there is subject to the following measures: • Reorient or relocate the receiving antenna. • Increase the separation between the equipment and receiver. • Connect the equipment into an outlet on , the user is encouraged to try to correct ...
If this product may cause radio interference, in which case the user may be determined by turning the equipment off and on a circuit different from that interference will not occur in a particular installation. CE Mark Warning This is connected. • Consult the dealer or an experienced radio/ TV technician for help. However, there is subject to the following measures: • Reorient or relocate the receiving antenna. • Increase the separation between the equipment and receiver. • Connect the equipment into an outlet on , the user is encouraged to try to correct ...
User Guide
Page 4
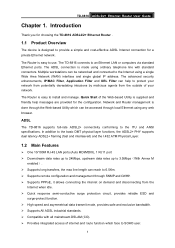
Package Contents The following items should be found in your package: ¾ One TD-8816 ADSL2/2+ Ethernet Router ¾ One AC power Adapter for TD-8816 ADSL2/2+ Ethernet Router ¾ Quick Installation Guide ¾ One RJ45 cable ¾ Two RJ11 cables ¾ One ADSL splitter ¾ One Resource CD , including: z This User Guide z Other Helpful Information ) Note: Make sure that the package contains the above items. If any of the listed items are damaged or missing, please contact with your distributor.
Package Contents The following items should be found in your package: ¾ One TD-8816 ADSL2/2+ Ethernet Router ¾ One AC power Adapter for TD-8816 ADSL2/2+ Ethernet Router ¾ Quick Installation Guide ¾ One RJ45 cable ¾ Two RJ11 cables ¾ One ADSL splitter ¾ One Resource CD , including: z This User Guide z Other Helpful Information ) Note: Make sure that the package contains the above items. If any of the listed items are damaged or missing, please contact with your distributor.
User Guide
Page 5
Hardware Installation 3 2.1 The Front Panel ...3 2.2 The Back Panel...3 2.3 Installation Environment 4 2.4 Connecting the Router 4 Chapter 3. Quick Installation Guide 6 3.1 Configure PC...6 3.2 Login ...9 Chapter 4. Software Configuration 12 4.1 Status ...12 4.2 Quick Start ...13 4.3 Interface Setup...13 4.3.1 Internet ...13 4.3.2 LAN...18 4.4 Advanced Setup...22 4.4.1 Firewall ...22 4.4.2 Routing ...22 4.4.3 NAT ...23 4.4.4 QoS ...27 4.4.5 VLAN ...28 4.4.6 ADSL ...30 4.5 Access Management 31 4.5.1 ACL...31 4.5.2 Filter...32 4.5.3 SNMP ...39 4.5.4 UPnP ...40 4.5.5 DDNS ...40 4.5.6 ...
Hardware Installation 3 2.1 The Front Panel ...3 2.2 The Back Panel...3 2.3 Installation Environment 4 2.4 Connecting the Router 4 Chapter 3. Quick Installation Guide 6 3.1 Configure PC...6 3.2 Login ...9 Chapter 4. Software Configuration 12 4.1 Status ...12 4.2 Quick Start ...13 4.3 Interface Setup...13 4.3.1 Internet ...13 4.3.2 LAN...18 4.4 Advanced Setup...22 4.4.1 Firewall ...22 4.4.2 Routing ...22 4.4.3 NAT ...23 4.4.4 QoS ...27 4.4.5 VLAN ...28 4.4.6 ADSL ...30 4.5 Access Management 31 4.5.1 ACL...31 4.5.2 Filter...32 4.5.3 SNMP ...39 4.5.4 UPnP ...40 4.5.5 DDNS ...40 4.5.6 ...
User Guide
Page 7
...transmit mode, provides safe and exclusive bandwidth. ¾ Supports All ADSL industrial standards. ¾ Compatible with standard connectors. ADSL The TD-8816 supports full-rate ADSL2+ connectivity conforming to install and manage. In addition to the basic DMT physical layer functions, the ADSL2+ PHY... your network. Quick Start of internet and route function which can help messages are provided for a private Ethernet network. The TD-8816 connects to use. Network and Router management is easy to an Ethernet LAN or computers via standard Ethernet ports. The advanced ...
...transmit mode, provides safe and exclusive bandwidth. ¾ Supports All ADSL industrial standards. ¾ Compatible with standard connectors. ADSL The TD-8816 supports full-rate ADSL2+ connectivity conforming to install and manage. In addition to the basic DMT physical layer functions, the ADSL2+ PHY... your network. Quick Start of internet and route function which can help messages are provided for a private Ethernet network. The TD-8816 connects to use. Network and Router management is easy to an Ethernet LAN or computers via standard Ethernet ports. The advanced ...
User Guide
Page 8
Parameters provided in this User Guide stands for setting up the product, which may differ from the actual situation. 2 TD-8816 ADSL2/2+ Ethernet Router User Guide ¾ Real-time Configuration and device monitoring. ¾ Supports Multiple PVC (Permanent Virtual Circuit). ¾ Built-in DHCP server. ¾ ... system log and flow Statistics. ¾ Supports firmware upgrade and Web management. 1.3 Conventions The Router or device mentioned in the pictures are just references for TD-8816 without any explanations.
Parameters provided in this User Guide stands for setting up the product, which may differ from the actual situation. 2 TD-8816 ADSL2/2+ Ethernet Router User Guide ¾ Real-time Configuration and device monitoring. ¾ Supports Multiple PVC (Permanent Virtual Circuit). ¾ Built-in DHCP server. ¾ ... system log and flow Statistics. ¾ Supports firmware upgrade and Web management. 1.3 Conventions The Router or device mentioned in the pictures are just references for TD-8816 without any explanations.

User Guide
Page 9
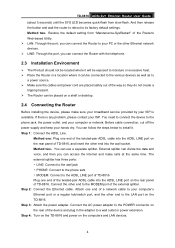
... refer to reset the Router's factory defaults. Method one: With the Router powered on the front panel, which indicate the device's working status. TD-8816 ADSL2/2+ Ethernet Router User Guide Chapter 2. LED Explanation: LED Status Indication On There is a successful connection on LAN port but no activity LAN ...There is no connection on LAN port or the connection is abnormal On The LINE port is linked up ADSL Flash The ADSL Router is training Off The LINE port is linked down On A successful PPP connection has been established Internet Flash Off Data is being transferred over...
... refer to reset the Router's factory defaults. Method one: With the Router powered on the front panel, which indicate the device's working status. TD-8816 ADSL2/2+ Ethernet Router User Guide Chapter 2. LED Explanation: LED Status Indication On There is a successful connection on LAN port but no activity LAN ...There is no connection on LAN port or the connection is abnormal On The LINE port is linked up ADSL Flash The ADSL Router is training Off The LINE port is linked down On A successful PPP connection has been established Internet Flash Off Data is being transferred over...
User Guide
Page 10
...• LINE: Connect to the wall jack • PHONE: Connect to the phone sets • MODEM: Connect to the ADSL LINE port of TD-8816 Plug one end of the Router's Web-based Utility. ¾ LAN: Through the port, you can connect the Router with the telephone. 2.3 Installation...and plug in a location where it . Connect the other Ethernet network devices. ¾ LINE: Through the port, you can use a separate splitter. TD-8816 ADSL2/2+ Ethernet Router User Guide (about 5 seconds) until the SYS LED becomes quick-flash from "Maintenance-SysRestart" of a network cable to your hands ...
...• LINE: Connect to the wall jack • PHONE: Connect to the phone sets • MODEM: Connect to the ADSL LINE port of TD-8816 Plug one end of the Router's Web-based Utility. ¾ LAN: Through the port, you can connect the Router with the telephone. 2.3 Installation...and plug in a location where it . Connect the other Ethernet network devices. ¾ LINE: Through the port, you can use a separate splitter. TD-8816 ADSL2/2+ Ethernet Router User Guide (about 5 seconds) until the SYS LED becomes quick-flash from "Maintenance-SysRestart" of a network cable to your hands ...
User Guide
Page 12
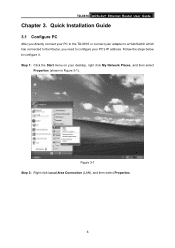
Follow the steps below to configure your PC's IP address. Step 1: Click the Start menu on your adapter to a Hub/Switch which has connected to the Router, you directly connect your PC to the TD-8816 or connect your desktop, right click My Network Places, and then select Properties (shown in Figure 3-1). Quick Installation Guide 3.1 Configure PC After you need to configure it. Figure 3-1 Step 2: Right click Local Area Connection (LAN), and then select Properties. 6 TD-8816 ADSL2/2+ Ethernet Router User Guide Chapter 3.
Follow the steps below to configure your PC's IP address. Step 1: Click the Start menu on your adapter to a Hub/Switch which has connected to the Router, you directly connect your PC to the TD-8816 or connect your desktop, right click My Network Places, and then select Properties (shown in Figure 3-1). Quick Installation Guide 3.1 Configure PC After you need to configure it. Figure 3-1 Step 2: Right click Local Area Connection (LAN), and then select Properties. 6 TD-8816 ADSL2/2+ Ethernet Router User Guide Chapter 3.
User Guide
Page 13
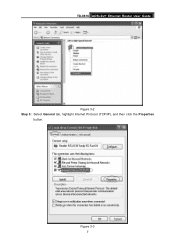
Figure 3-3 7 TD-8816 ADSL2/2+ Ethernet Router User Guide Figure 3-2 Step 3: Select General tab, highlight Internet Protocol (TCP/IP), and then click the Properties button.
Figure 3-3 7 TD-8816 ADSL2/2+ Ethernet Router User Guide Figure 3-2 Step 3: Select General tab, highlight Internet Protocol (TCP/IP), and then click the Properties button.
User Guide
Page 14
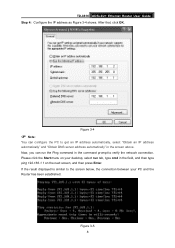
Please click the Start menu on the next screen, and then press Enter. TD-8816 ADSL2/2+ Ethernet Router User Guide Step 4: Configure the IP address as Figure 3-4 shows. Now, you can configure the PC to get an IP address automatically, ...
Please click the Start menu on the next screen, and then press Enter. TD-8816 ADSL2/2+ Ethernet Router User Guide Step 4: Configure the IP address as Figure 3-4 shows. Now, you can configure the PC to get an IP address automatically, ...
User Guide
Page 15
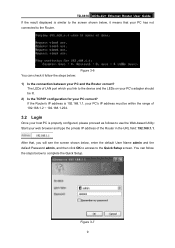
... Name admin and the default Password admin, and then click OK to access to the Quick Setup screen. You can check it means that , you link to the device and the LEDs on your PC's adapter should be within the range of 192.168.1.2 ~ 192.168.1.254. 3.2 Login Once your host... PC is properly configured, please proceed as follows to use the Web-based Utility: Start your PC correct? Figure 3-7 9 TD-8816 ADSL2/2+ Ethernet Router User Guide If the result displayed is similar to the screen shown below, it follow the steps below : 1) Is the connection between...
... Name admin and the default Password admin, and then click OK to access to the Quick Setup screen. You can check it means that , you link to the device and the LEDs on your PC's adapter should be within the range of 192.168.1.2 ~ 192.168.1.254. 3.2 Login Once your host... PC is properly configured, please proceed as follows to use the Web-based Utility: Start your PC correct? Figure 3-7 9 TD-8816 ADSL2/2+ Ethernet Router User Guide If the result displayed is similar to the screen shown below, it follow the steps below : 1) Is the connection between...

User Guide
Page 16
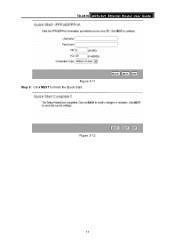
Then click Next. 10 Click the NEXT button. Figure 3-9 Step 3: Select the connection type to connect to the ISP (We select PPPoE/PPPoA mode for the Router, and then click the NEXT button. Figure 3-8 Step 2: Configure the time for example here), and then click the NEXT button. Figure 3-10 Step 4: Configure the following options provided by your ISP: Username, Password, VPI, VCI and Connection Type. TD-8816 ADSL2/2+ Ethernet Router User Guide Step 1: Select the Quick Start tab, then click RUN WIZARD, and you will see the next screen.
Then click Next. 10 Click the NEXT button. Figure 3-9 Step 3: Select the connection type to connect to the ISP (We select PPPoE/PPPoA mode for the Router, and then click the NEXT button. Figure 3-8 Step 2: Configure the time for example here), and then click the NEXT button. Figure 3-10 Step 4: Configure the following options provided by your ISP: Username, Password, VPI, VCI and Connection Type. TD-8816 ADSL2/2+ Ethernet Router User Guide Step 1: Select the Quick Start tab, then click RUN WIZARD, and you will see the next screen.
User Guide
Page 17
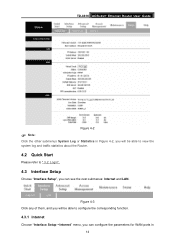
Figure 3-12 11 TD-8816 ADSL2/2+ Ethernet Router User Guide Figure 3-11 Step 5: Click NEXT to finish the Quick Start.
Figure 3-12 11 TD-8816 ADSL2/2+ Ethernet Router User Guide Figure 3-11 Step 5: Click NEXT to finish the Quick Start.

User Guide
Page 18
... the detailed configurations or status information. To apply any of the main menus. Click any settings you have altered on the Interface Setup screen. 12 TD-8816 ADSL2/2+ Ethernet Router User Guide Chapter 4.
... the detailed configurations or status information. To apply any of the main menus. Click any settings you have altered on the Interface Setup screen. 12 TD-8816 ADSL2/2+ Ethernet Router User Guide Chapter 4.
User Guide
Page 19
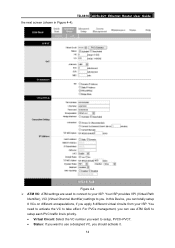
Figure 4-3 Click any of them, and you will be able to configure the corresponding function. 4.3.1 Internet Choose "Interface Setup→Internet" menu, you can configure the parameters for WAN ports in Figure 4-2, you will be able to view the system log and traffic statistics about the Router. 4.2 Quick Start Please refer to " 3.2: Login". 4.3 Interface Setup Choose "Interface Setup", you can see the next submenus: Internet and LAN. TD-8816 ADSL2/2+ Ethernet Router User Guide Figure 4-2 ) Note: Click the other submenus System Log or Statistics in 13
Figure 4-3 Click any of them, and you will be able to configure the corresponding function. 4.3.1 Internet Choose "Interface Setup→Internet" menu, you can configure the parameters for WAN ports in Figure 4-2, you will be able to view the system log and traffic statistics about the Router. 4.2 Quick Start Please refer to " 3.2: Login". 4.3 Interface Setup Choose "Interface Setup", you can see the next submenus: Internet and LAN. TD-8816 ADSL2/2+ Ethernet Router User Guide Figure 4-2 ) Note: Click the other submenus System Log or Statistics in 13
User Guide
Page 20
... can totally setup 8 VCs on different encapsulations, if you apply 8 different virtual circuits from your ISP. In this Device, you can use a designed VC, you . TD-8816 ADSL2/2+ Ethernet Router User Guide the next screen (shown in Figure 4-4). Figure 4-4 ¾ ATM VC: ATM settings are used to connect to take effect.
... can totally setup 8 VCs on different encapsulations, if you apply 8 different virtual circuits from your ISP. In this Device, you can use a designed VC, you . TD-8816 ADSL2/2+ Ethernet Router User Guide the next screen (shown in Figure 4-4). Figure 4-4 ¾ ATM VC: ATM settings are used to connect to take effect.

User Guide
Page 21
.... 1. Please input the value provided by the parameters specified below to use. This option is from 0 to specify the RIP (Routing Information protocol) version 15 TD-8816 ADSL2/2+ Ethernet Router User Guide • VPI: Identifies the virtual path between endpoints in an ATM network. Figure 4-5 ¾ Encapsulation: Select the encapsulation mode for...
.... 1. Please input the value provided by the parameters specified below to use. This option is from 0 to specify the RIP (Routing Information protocol) version 15 TD-8816 ADSL2/2+ Ethernet Router User Guide • VPI: Identifies the virtual path between endpoints in an ATM network. Figure 4-5 ¾ Encapsulation: Select the encapsulation mode for...

User Guide
Page 22
... packet. OUT only means the ADLS router will only send but will not accept RIP packet. ¾ Multicast: Select IGMP version, or disable the function. TD-8816 ADSL2/2+ Ethernet Router User Guide for WAN interface, including RIP1, RIP2-B and RIP2-M. Both means the ADSL Router will not accept the IP address if...
... packet. OUT only means the ADLS router will only send but will not accept RIP packet. ¾ Multicast: Select IGMP version, or disable the function. TD-8816 ADSL2/2+ Ethernet Router User Guide for WAN interface, including RIP1, RIP2-B and RIP2-M. Both means the ADSL Router will not accept the IP address if...
User Guide
Page 23
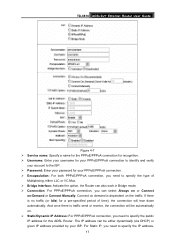
...) or given IP address provided by your PPPoE/PPPoA connection. ¾ Encapsulation: For both PPPoE/PPPoA connection, you need to specify the IP address, 17 TD-8816 ADSL2/2+ Ethernet Router User Guide Figure 4-7 ¾ Service name: Specify a name for the PPPoE/PPPoA connection for recognition. ¾ Username: Enter your username for your...
...) or given IP address provided by your PPPoE/PPPoA connection. ¾ Encapsulation: For both PPPoE/PPPoA connection, you need to specify the IP address, 17 TD-8816 ADSL2/2+ Ethernet Router User Guide Figure 4-7 ¾ Service name: Specify a name for the PPPoE/PPPoA connection for recognition. ¾ Username: Enter your username for your...
