
User Guide
Page 5
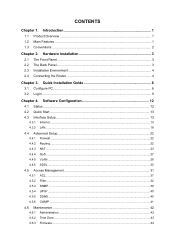
......6 3.2 Login ...9 Chapter 4. Introduction 1 1.1 Product Overview ...1 1.2 Main Features ...1 1.3 Conventions ...2 Chapter 2. Hardware Installation 3 2.1 The Front Panel ...3 2.2 The Back Panel...3 2.3 Installation Environment 4 2.4 Connecting the Router 4 Chapter 3. Software Configuration 12 4.1 Status ...12 4.2 Quick Start ...13 4.3 Interface Setup...13 4.3.1 Internet ...13 4.3.2 LAN...18 4.4 Advanced Setup...22 4.4.1 Firewall ...22 4.4.2 Routing ...22 4.4.3 NAT ...23 4.4.4 QoS ...27 4.4.5 VLAN ......
......6 3.2 Login ...9 Chapter 4. Introduction 1 1.1 Product Overview ...1 1.2 Main Features ...1 1.3 Conventions ...2 Chapter 2. Hardware Installation 3 2.1 The Front Panel ...3 2.2 The Back Panel...3 2.3 Installation Environment 4 2.4 Connecting the Router 4 Chapter 3. Software Configuration 12 4.1 Status ...12 4.2 Quick Start ...13 4.3 Interface Setup...13 4.3.1 Internet ...13 4.3.2 LAN...18 4.4 Advanced Setup...22 4.4.1 Firewall ...22 4.4.2 Routing ...22 4.4.3 NAT ...23 4.4.4 QoS ...27 4.4.5 VLAN ......
User Guide
Page 7
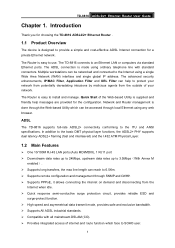
... the Web-based Utility is designed to install and manage. The ADSL connection is easy to 6.5Km. ¾ Supports remote configuration and management through local Ethernet using a single Wide Area Network (WAN) interface and single global IP address. The advanced security ..., the max line length can help messages are provided for a private Ethernet network. Introduction Thank you for choosing the TD-8816 ADSL2/2+ Ethernet Router . 1.1 Product Overview The device is supplied and friendly help to protect your network from potentially devastating intrusions by malicious agents...
... the Web-based Utility is designed to install and manage. The ADSL connection is easy to 6.5Km. ¾ Supports remote configuration and management through local Ethernet using a single Wide Area Network (WAN) interface and single global IP address. The advanced security ..., the max line length can help messages are provided for a private Ethernet network. Introduction Thank you for choosing the TD-8816 ADSL2/2+ Ethernet Router . 1.1 Product Overview The device is supplied and friendly help to protect your network from potentially devastating intrusions by malicious agents...
User Guide
Page 8
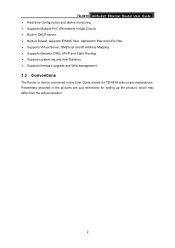
TD-8816 ADSL2/2+ Ethernet Router User Guide ¾ Real-time Configuration and device monitoring. ¾ Supports Multiple PVC (Permanent Virtual Circuit). ¾ Built-in DHCP server. ¾ Built-in firewall, supports IP/MAC filter, Application ...UPnP and Static Routing. ¾ Supports system log and flow Statistics. ¾ Supports firmware upgrade and Web management. 1.3 Conventions The Router or device mentioned in the pictures are just references for TD-8816 without any explanations. Parameters provided in this User Guide stands for setting up the product, which may differ from the...
TD-8816 ADSL2/2+ Ethernet Router User Guide ¾ Real-time Configuration and device monitoring. ¾ Supports Multiple PVC (Permanent Virtual Circuit). ¾ Built-in DHCP server. ¾ Built-in firewall, supports IP/MAC filter, Application ...UPnP and Static Routing. ¾ Supports system log and flow Statistics. ¾ Supports firmware upgrade and Web management. 1.3 Conventions The Router or device mentioned in the pictures are just references for TD-8816 without any explanations. Parameters provided in this User Guide stands for setting up the product, which may differ from the...
User Guide
Page 12
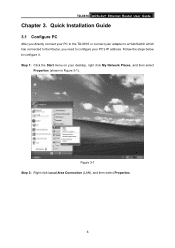
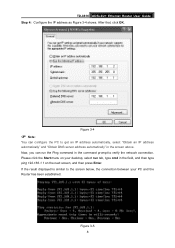
TD-8816 ADSL2/2+ Ethernet Router User Guide Chapter 3. Step 1: Click the Start menu on your PC's IP address. Figure 3-1 Step 2: Right click Local Area Connection (LAN), and then select Properties. 6 Follow the steps below to configure your desktop, right click My Network Places, and then select Properties (shown in Figure 3-1). Quick Installation Guide 3.1 Configure PC After you directly connect your PC to the TD-8816 or connect your adapter to a Hub/Switch which has connected to the Router, you need to configure it.
TD-8816 ADSL2/2+ Ethernet Router User Guide Chapter 3. Step 1: Click the Start menu on your PC's IP address. Figure 3-1 Step 2: Right click Local Area Connection (LAN), and then select Properties. 6 Follow the steps below to configure your desktop, right click My Network Places, and then select Properties (shown in Figure 3-1). Quick Installation Guide 3.1 Configure PC After you directly connect your PC to the TD-8816 or connect your adapter to a Hub/Switch which has connected to the Router, you need to configure it.
User Guide
Page 14
... Enter. Figure 3-4 ) Note: You can run tab, type cmd in the screen above. Now, you can configure the PC to verify the network connection. Figure 3-5 8 After that, click OK. TD-8816 ADSL2/2+ Ethernet Router User Guide Step 4: Configure the IP address as Figure 3-4 shows. If the result displayed is similar to the screen below, the... "Obtain an IP address automatically" and "Obtain DNS server address automatically" in the field, and then type ping 192.168.1.1 on your PC and the Router has been established.
... Enter. Figure 3-4 ) Note: You can run tab, type cmd in the screen above. Now, you can configure the PC to verify the network connection. Figure 3-5 8 After that, click OK. TD-8816 ADSL2/2+ Ethernet Router User Guide Step 4: Configure the IP address as Figure 3-4 shows. If the result displayed is similar to the screen below, the... "Obtain an IP address automatically" and "Obtain DNS server address automatically" in the field, and then type ping 192.168.1.1 on your PC and the Router has been established.
User Guide
Page 15
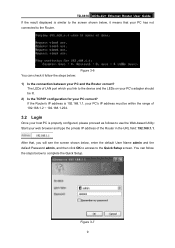
...the private IP address of 192.168.1.2 ~ 192.168.1.254. 3.2 Login Once your host PC is properly configured, please proceed as follows to the Router. You can check it means that , you link to the Quick Setup screen. Figure 3-7 9 The LEDs of LAN port which you will see the screen...168.1.1, your PC's IP address must be lit. 2) Is the TCP/IP configuration for your PC correct? Figure 3-6 You can follow the steps below: 1) Is the connection between your PC and the Router correct? TD-8816 ADSL2/2+ Ethernet Router User Guide If the result displayed is similar to the screen shown below, ...
...the private IP address of 192.168.1.2 ~ 192.168.1.254. 3.2 Login Once your host PC is properly configured, please proceed as follows to the Router. You can check it means that , you link to the Quick Setup screen. Figure 3-7 9 The LEDs of LAN port which you will see the screen...168.1.1, your PC's IP address must be lit. 2) Is the TCP/IP configuration for your PC correct? Figure 3-6 You can follow the steps below: 1) Is the connection between your PC and the Router correct? TD-8816 ADSL2/2+ Ethernet Router User Guide If the result displayed is similar to the screen shown below, ...

User Guide
Page 16
Figure 3-8 Step 2: Configure the time for example here), and then click the NEXT button. Figure 3-9 Step 3: Select the connection type to connect to the ISP (We select PPPoE/PPPoA mode for the Router, and then click the NEXT button. Click the NEXT button. Then click Next. 10 Figure 3-10 Step 4: Configure the following options provided by your ISP: Username, Password, VPI, VCI and Connection Type. TD-8816 ADSL2/2+ Ethernet Router User Guide Step 1: Select the Quick Start tab, then click RUN WIZARD, and you will see the next screen.
Figure 3-8 Step 2: Configure the time for example here), and then click the NEXT button. Figure 3-9 Step 3: Select the connection type to connect to the ISP (We select PPPoE/PPPoA mode for the Router, and then click the NEXT button. Click the NEXT button. Then click Next. 10 Figure 3-10 Step 4: Configure the following options provided by your ISP: Username, Password, VPI, VCI and Connection Type. TD-8816 ADSL2/2+ Ethernet Router User Guide Step 1: Select the Quick Start tab, then click RUN WIZARD, and you will see the next screen.

User Guide
Page 18
...the main menus. The information will get help from this chapter to configure the corresponding function. Figure 4-1 Choose "Status→Device Info" menu, and you will vary depending on the settings of the Router configured on the page, please click the SAVE button. 4.1 Status Choose... Installation Guide" for first-time installation. After your successful login, you will be able to configure the advanced settings through the Web-based Utility. TD-8816 ADSL2/2+ Ethernet Router User Guide Chapter 4. Click any settings you have altered on the Interface Setup screen. 12 There...
...the main menus. The information will get help from this chapter to configure the corresponding function. Figure 4-1 Choose "Status→Device Info" menu, and you will vary depending on the settings of the Router configured on the page, please click the SAVE button. 4.1 Status Choose... Installation Guide" for first-time installation. After your successful login, you will be able to configure the advanced settings through the Web-based Utility. TD-8816 ADSL2/2+ Ethernet Router User Guide Chapter 4. Click any settings you have altered on the Interface Setup screen. 12 There...
User Guide
Page 19
Figure 4-3 Click any of them, and you will be able to " 3.2: Login". 4.3 Interface Setup Choose "Interface Setup", you can see the next submenus: Internet and LAN. TD-8816 ADSL2/2+ Ethernet Router User Guide Figure 4-2 ) Note: Click the other submenus System Log or Statistics in Figure 4-2, you will be able to view the system log and traffic statistics about the Router. 4.2 Quick Start Please refer to configure the corresponding function. 4.3.1 Internet Choose "Interface Setup→Internet" menu, you can configure the parameters for WAN ports in 13
Figure 4-3 Click any of them, and you will be able to " 3.2: Login". 4.3 Interface Setup Choose "Interface Setup", you can see the next submenus: Internet and LAN. TD-8816 ADSL2/2+ Ethernet Router User Guide Figure 4-2 ) Note: Click the other submenus System Log or Statistics in Figure 4-2, you will be able to view the system log and traffic statistics about the Router. 4.2 Quick Start Please refer to configure the corresponding function. 4.3.1 Internet Choose "Interface Setup→Internet" menu, you can configure the parameters for WAN ports in 13

User Guide
Page 21
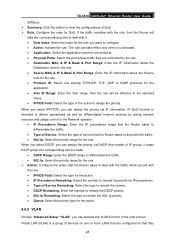
...Enter the TCP MTU as your ISP provides you should follow the configuration below , including PCR (Peak Cell Rate), SCR (Sustained Cell Rate) and MBS (Maximum Burst Size), please configure them according your needs. ¾ Encapsulation: There are all ...controlled by your ISP. • PVCs Summary: Click the button, you can be activated or deactivated per PVC basis. ¾ Default Route: If enable this function, the current PVC will be considered as the default gateway to proceed. 1. TD-8816 ADSL2/2+ Ethernet Router...
...Enter the TCP MTU as your ISP provides you should follow the configuration below , including PCR (Peak Cell Rate), SCR (Sustained Cell Rate) and MBS (Maximum Burst Size), please configure them according your needs. ¾ Encapsulation: There are all ...controlled by your ISP. • PVCs Summary: Click the button, you can be activated or deactivated per PVC basis. ¾ Default Route: If enable this function, the current PVC will be considered as the default gateway to proceed. 1. TD-8816 ADSL2/2+ Ethernet Router...
User Guide
Page 24
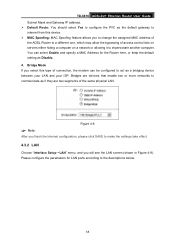
...bypassing of access control lists on servers either hiding a computer on a network or allowing it to impersonate another computer. Please configure the parameters for the Router here, or keep the default setting as if they are devices that enable two or more networks to communicate as Disable. ...¾ MAC Spoofing: MAC Spoofing feature allows you will see the LAN screen (shown in Figure 4-9). TD-8816 ADSL2/2+ Ethernet Router User Guide Subnet Mask and Gateway IP address. ¾ Default Route: You should select Yes to configure the PVC as a bridging device between your LAN and your ISP.
...bypassing of access control lists on servers either hiding a computer on a network or allowing it to impersonate another computer. Please configure the parameters for the Router here, or keep the default setting as if they are devices that enable two or more networks to communicate as Disable. ...¾ MAC Spoofing: MAC Spoofing feature allows you will see the LAN screen (shown in Figure 4-9). TD-8816 ADSL2/2+ Ethernet Router User Guide Subnet Mask and Gateway IP address. ¾ Default Route: You should select Yes to configure the PVC as a bridging device between your LAN and your ISP.

User Guide
Page 27
TD-8816 ADSL2/2+ Ethernet Router User Guide addresses. Figure 4-11 • DHCP Server IP for Relay Agent: Enter the DHCP server IP Address runs on WAN side. If it is enabled, the DHCP requests from local PCs will forward to the DHCP server runs on WAN side. ) Note: If you select Disabled, the DHCP function will not take effect. 21 To have this function working properly, please run on router mode only, disable the DHCP server on the LAN port, and make sure the routing table has the correct routing entry. Each of the device's interfaces can be configured as a DHCP relay.
TD-8816 ADSL2/2+ Ethernet Router User Guide addresses. Figure 4-11 • DHCP Server IP for Relay Agent: Enter the DHCP server IP Address runs on WAN side. If it is enabled, the DHCP requests from local PCs will forward to the DHCP server runs on WAN side. ) Note: If you select Disabled, the DHCP function will not take effect. 21 To have this function working properly, please run on router mode only, disable the DHCP server on the LAN port, and make sure the routing table has the correct routing entry. Each of the device's interfaces can be configured as a DHCP relay.
User Guide
Page 28
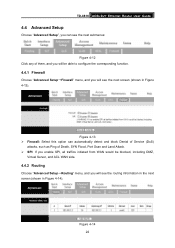
TD-8816 ADSL2/2+ Ethernet Router User Guide 4.4 Advanced Setup Choose "Advanced Setup", you can automatically detect and block Denial of Service (DoS) attacks, such as Ping of them, and you ... any of Death, SYN Flood, Port Scan and Land Attack. ¾ SPI: If you enable SPI, all traffics initiated from WAN would be able to configure the corresponding function. 4.4.1 Firewall Choose "Advanced Setup→Firewall" menu, and you will see the routing information in the next screen (shown in Figure 4-13...
TD-8816 ADSL2/2+ Ethernet Router User Guide 4.4 Advanced Setup Choose "Advanced Setup", you can automatically detect and block Denial of Service (DoS) attacks, such as Ping of them, and you ... any of Death, SYN Flood, Port Scan and Land Attack. ¾ SPI: If you enable SPI, all traffics initiated from WAN would be able to configure the corresponding function. 4.4.1 Firewall Choose "Advanced Setup→Firewall" menu, and you will see the routing information in the next screen (shown in Figure 4-13...

User Guide
Page 30
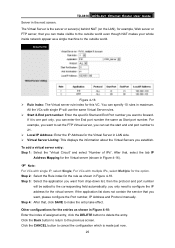
... can define the Address Mapping rules; This field is no need to explain. ) Note: For VCs with multiple IPs, each VC can configure the Virtual 24 DMZ Choose "Advanced Setup→NAT→DMZ" in the next screen. It prevents outside public network. We select Multiple .... Virtual Server Choose "Advanced Setup→NAT→Virtual Server" in Figure 4-16, you can configure the DMZ host in Figure 4-16, you can set DMZ and Virtual servers. TD-8816 ADSL2/2+ Ethernet Router User Guide Figure 4-16 ¾ Virtual Circuit: Enter Virtual Circuit Index that has company data. ...
... can define the Address Mapping rules; This field is no need to explain. ) Note: For VCs with multiple IPs, each VC can configure the Virtual 24 DMZ Choose "Advanced Setup→NAT→DMZ" in the next screen. It prevents outside public network. We select Multiple .... Virtual Server Choose "Advanced Setup→NAT→Virtual Server" in Figure 4-16, you can configure the DMZ host in Figure 4-16, you can set DMZ and Virtual servers. TD-8816 ADSL2/2+ Ethernet Router User Guide Figure 4-16 ¾ Virtual Circuit: Enter Virtual Circuit Index that has company data. ...
User Guide
Page 31
... port number the same as a single machine to cancel the configuration which is the server or server(s) behind NAT (on the LAN), for the virtual server; You can make the entry take effect. TD-8816 ADSL2/2+ Ethernet Router User Guide Server in maximum. For VCs with single IP will... be added to the corresponding field automatically, you only need to configure the IP address for example, Web server or FTP server, that ,...
... port number the same as a single machine to cancel the configuration which is the server or server(s) behind NAT (on the LAN), for the virtual server; You can make the entry take effect. TD-8816 ADSL2/2+ Ethernet Router User Guide Server in maximum. For VCs with single IP will... be added to the corresponding field automatically, you only need to configure the IP address for example, Web server or FTP server, that ,...
User Guide
Page 32
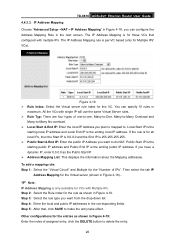
TD-8816 ADSL2/2+ Ethernet Router User Guide 4.4.3.3. The IP Address Mapping is the ending local IP address. Figure 4-19... Select the "Virtual Circuit" and Multiple for those VCs that , click SAVE to make the entry take effect. Other configurations for Multiple IPs' VCs). The IP Address Mapping rule is the ending public IP address. Public Start IP is the ... Rule index for this VC. If you have a dynamic IP, enter 0.0.0.0 as shown in maximum. Step 5: After that configured with single IP will use the same Virtual Server rules. ¾ Rule Typ: There are four types of one-to-one...
TD-8816 ADSL2/2+ Ethernet Router User Guide 4.4.3.3. The IP Address Mapping is the ending local IP address. Figure 4-19... Select the "Virtual Circuit" and Multiple for those VCs that , click SAVE to make the entry take effect. Other configurations for Multiple IPs' VCs). The IP Address Mapping rule is the ending public IP address. Public Start IP is the ... Rule index for this VC. If you have a dynamic IP, enter 0.0.0.0 as shown in maximum. Step 5: After that configured with single IP will use the same Virtual Server rules. ¾ Rule Typ: There are four types of one-to-one...
User Guide
Page 33
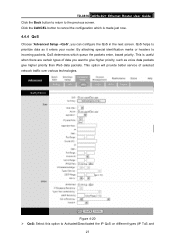
Click the CANCEL button to prioritize data as voice data packets give higher priority than Web data packets. QoS helps to cancel the configuration which queue the packets enter, based priority. This is made just now. 4.4.4 QoS Choose "Advanced Setup→QoS", you want to incoming ... ¾ QoS: Select this option to the previous screen. This option will provide better service of data you can configure the QoS in the next screen. TD-8816 ADSL2/2+ Ethernet Router User Guide Click the Back button to return to Activated/Deactivated the IP QoS on different types (IP ToS and 27...
Click the CANCEL button to prioritize data as voice data packets give higher priority than Web data packets. QoS helps to cancel the configuration which queue the packets enter, based priority. This is made just now. 4.4.4 QoS Choose "Advanced Setup→QoS", you want to incoming ... ¾ QoS: Select this option to the previous screen. This option will provide better service of data you can configure the QoS in the next screen. TD-8816 ADSL2/2+ Ethernet Router User Guide Click the Back button to return to Activated/Deactivated the IP QoS on different types (IP ToS and 27...
User Guide
Page 34
...it is activated. • Application: Select the application that the rule aimed at. • Physical Ports: Select the port whose traffic flow are configured so that they 28 When you select IPP/TOS, you can activate the VLAN function in the next screen. It maps the IP group into... rule will take effect only when it . • Rule Index: Select the index for the rule you can assign the priority via IP information. TD-8816 ADSL2/2+ Ethernet Router User Guide DiffServ). ¾ Summary: Click the button to deal with the traffic. • 802.1p: Select the priority range for the rule...
...it is activated. • Application: Select the application that the rule aimed at. • Physical Ports: Select the port whose traffic flow are configured so that they 28 When you select IPP/TOS, you can activate the VLAN function in the next screen. It maps the IP group into... rule will take effect only when it . • Rule Index: Select the index for the rule you can assign the priority via IP information. TD-8816 ADSL2/2+ Ethernet Router User Guide DiffServ). ¾ Summary: Click the button to deal with the traffic. • 802.1p: Select the priority range for the rule...

User Guide
Page 35
There are two types of physical connections, it is configured with null (0) VID) received on this port. 2. PVID is assigned to the same wire, when in fact they are based on logical instead of VLAN ... they were attached to untagged frames or priority tagged frames (frames with an access list specifying membership in Figure 4-22). Define VLAN Group 29 TD-8816 ADSL2/2+ Ethernet Router User Guide can communicate as follows: Port-Based VLAN: Each physical switch port is very flexible for each Interface in Figure 4-21, you can...
There are two types of physical connections, it is configured with null (0) VID) received on this port. 2. PVID is assigned to the same wire, when in fact they are based on logical instead of VLAN ... they were attached to untagged frames or priority tagged frames (frames with an access list specifying membership in Figure 4-22). Define VLAN Group 29 TD-8816 ADSL2/2+ Ethernet Router User Guide can communicate as follows: Port-Based VLAN: Each physical switch port is very flexible for each Interface in Figure 4-21, you can...
User Guide
Page 18
...please click the SAVE button. 4.1 Status Choose "Status", you will be able to configure the corresponding function. TD-8816 ADSL2/2+ Ethernet Router User Guide Chapter 4. Software Configuration This User Guide recommends using the "Quick Installation Guide" for first-time installation. ...There are the detailed configurations or status information. After your successful login, you click one...
...please click the SAVE button. 4.1 Status Choose "Status", you will be able to configure the corresponding function. TD-8816 ADSL2/2+ Ethernet Router User Guide Chapter 4. Software Configuration This User Guide recommends using the "Quick Installation Guide" for first-time installation. ...There are the detailed configurations or status information. After your successful login, you click one...


