Operating Instructions
Page 2
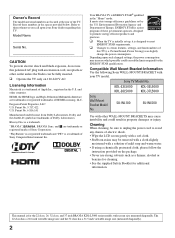
..., Power Savings) can be removed with a cloth slightly moistened with screen size measured diagonally. Sony TV Model No. Model Name Serial No. Blu-ray Disc is for the 22 class, 26, 32 class, and 37 inch BRAVIA KDL-L5000 series models with a solution...32 class has a 31.5 inch viewable image size (measured diagonally). 2 Environmental Protection Agency and Department of the TV. Owner's Record The model and serial numbers are trademarks or registered marks of Sony Corporation. Refer to certain features, settings, and functionalities of electric shock. • Wipe the LCD screen...
..., Power Savings) can be removed with a cloth slightly moistened with screen size measured diagonally. Sony TV Model No. Model Name Serial No. Blu-ray Disc is for the 22 class, 26, 32 class, and 37 inch BRAVIA KDL-L5000 series models with a solution...32 class has a 31.5 inch viewable image size (measured diagonally). 2 Environmental Protection Agency and Department of the TV. Owner's Record The model and serial numbers are trademarks or registered marks of Sony Corporation. Refer to certain features, settings, and functionalities of electric shock. • Wipe the LCD screen...
Operating Instructions
Page 3
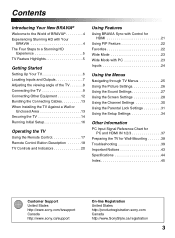
... Wide Mode 23 Wide Mode with PC 23 Inputs 24 Using the Menus Navigating through TV Menus 25 Using the Picture Settings 26 Using the Sound Settings 27 Using the Screen Settings 28 Using the Channel Settings 30 Using the Parental Lock Settings 31 Using the ...and HDMI IN 1/2/3 37 Preparing the TV for Wall-Mounting 38 Troubleshooting 39 Important Notices 43 Specifications 44 Index 45 Customer Support United States http://www.sony.com/tvsupport Canada http://www.sony.ca/support On-line Registration United States http://productregistration.sony.com Canada http://www.SonyStyle.ca/...
... Wide Mode 23 Wide Mode with PC 23 Inputs 24 Using the Menus Navigating through TV Menus 25 Using the Picture Settings 26 Using the Sound Settings 27 Using the Screen Settings 28 Using the Channel Settings 30 Using the Parental Lock Settings 31 Using the ...and HDMI IN 1/2/3 37 Preparing the TV for Wall-Mounting 38 Troubleshooting 39 Important Notices 43 Specifications 44 Index 45 Customer Support United States http://www.sony.com/tvsupport Canada http://www.sony.ca/support On-line Registration United States http://productregistration.sony.com Canada http://www.SonyStyle.ca/...
Operating Instructions
Page 5
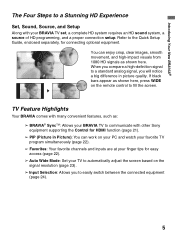
... 1080 HD signals as : ➢ BRAVIA® SyncTM: Allows your BRAVIA TV to communicate with other Sony equipment supporting the Control for HDMI function (page 21). ➢ PIP (Picture in picture quality. TV Feature Highlights Your BRAVIA comes with many convenient features, such as shown here.... Introducing Your New BRAVIA® The Four Steps to a Stunning HD Experience Set, Sound, Source, and Setup Along with your TV to automatically adjust the screen based on the signal resolution (page 23). ➢ Input Selection: Allows you will notice a big difference in Picture): You can...
... 1080 HD signals as : ➢ BRAVIA® SyncTM: Allows your BRAVIA TV to communicate with other Sony equipment supporting the Control for HDMI function (page 21). ➢ PIP (Picture in picture quality. TV Feature Highlights Your BRAVIA comes with many convenient features, such as shown here.... Introducing Your New BRAVIA® The Four Steps to a Stunning HD Experience Set, Sound, Source, and Setup Along with your TV to automatically adjust the screen based on the signal resolution (page 23). ➢ Input Selection: Allows you will notice a big difference in Picture): You can...
Operating Instructions
Page 6
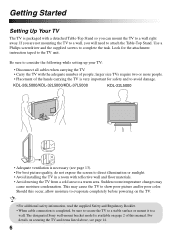
...or mount it to evaporate completely before powering on securing the TV and items listed above, see page 13). • For best picture quality, do not expose the screen to direct illumination or sunlight. • Avoid installing the TV in a room with reflective wall and floor materials. •... Avoid moving the TV from a cold area to a wall right away. Should this manual. The designated Sony wall-mount bracket model is very...
...or mount it to evaporate completely before powering on securing the TV and items listed above, see page 13). • For best picture quality, do not expose the screen to direct illumination or sunlight. • Avoid installing the TV in a room with reflective wall and floor materials. •... Avoid moving the TV from a cold area to a wall right away. Should this manual. The designated Sony wall-mount bracket model is very...

Operating Instructions
Page 16
..., you can be sure to stop or cancel the Auto Program. button: TOOLS Allows you to the TV (you will perform the following: • Set the language for the On Screen Display (OSD) text • Choose your viewing environment • Signal source connection check • Scan...buttons described below to On under Channel settings. Follow the help text provided on the TV. Initial Setup • Select Cancel to select Home for this TV. "Retail" optimizes the picture for the screen display. "Home" optimizes the picture for normal home use for ENERGY STAR compliant mode....
..., you can be sure to stop or cancel the Auto Program. button: TOOLS Allows you to the TV (you will perform the following: • Set the language for the On Screen Display (OSD) text • Choose your viewing environment • Signal source connection check • Scan...buttons described below to On under Channel settings. Follow the help text provided on the TV. Initial Setup • Select Cancel to select Home for this TV. "Retail" optimizes the picture for the screen display. "Home" optimizes the picture for normal home use for ENERGY STAR compliant mode....
Operating Instructions
Page 18
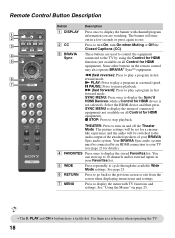
...to stop playback. SYNC MENU: Press once to pause playback. See page 23. 6 RETURN Press to go back to the previous screen or exit from the screen when displaying menu items and settings. 7 MENU Press to display the menu with channel/program information you are used to control the ...equipment connected to the TV by an HDMI connection to your BRAVIA Sync audio system. X PAUSE: Press to display the Sync'd HDMI Devices...
...to stop playback. SYNC MENU: Press once to pause playback. See page 23. 6 RETURN Press to go back to the previous screen or exit from the screen when displaying menu items and settings. 7 MENU Press to display the menu with channel/program information you are used to control the ...equipment connected to the TV by an HDMI connection to your BRAVIA Sync audio system. X PAUSE: Press to display the Sync'd HDMI Devices...
Operating Instructions
Page 20
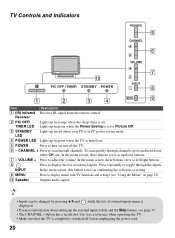
...press and hold down buttons. 7 - VOLUME + Press to toggle through the inputs. In the menu screen, these buttons serve as a reference when operating the TV. • Make sure that the TV is turned on. 5 POWER Press to Picture Off. 3 STANDBY LED Lights up in red when ... 1 2 3 4 Item Description 1 (IR) Infrared Receives IR signal from the remote control. INPUT In the menu screen, this button serves as left/right buttons. 8 Press to display menu with TV functions and settings (see page 35. • The CHANNEL + button has a tactile dot. Press repeatedly to adjust ...
...press and hold down buttons. 7 - VOLUME + Press to toggle through the inputs. In the menu screen, these buttons serve as a reference when operating the TV. • Make sure that the TV is turned on. 5 POWER Press to Picture Off. 3 STANDBY LED Lights up in red when ... 1 2 3 4 Item Description 1 (IR) Infrared Receives IR signal from the remote control. INPUT In the menu screen, this button serves as left/right buttons. 8 Press to display menu with TV functions and settings (see page 35. • The CHANNEL + button has a tactile dot. Press repeatedly to adjust ...
Operating Instructions
Page 22
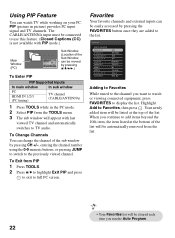
... the TOOLS menu. 3 The sub window will appear with PIP mode.) Main Window (PC) Sub Window (Location of the list. Highlight Add to full PC screen. To Change Channels You can be easily accessed by pressing the FAVORITES button once they are added to the list. Favorites Add to Favorites Cable... the 10th item, the item listed at the top of the Sub Window can watch or viewing connected equipment, press FAVORITES to TV audio. When you want to watch TV while working on your PC. Using PIP Feature You can be moved by pressing V/v/B/b.) To Enter PIP PIP Supported Inputs In main...
... the TOOLS menu. 3 The sub window will appear with PIP mode.) Main Window (PC) Sub Window (Location of the list. Highlight Add to full PC screen. To Change Channels You can be easily accessed by pressing the FAVORITES button once they are added to the list. Favorites Add to Favorites Cable... the 10th item, the item listed at the top of the Sub Window can watch or viewing connected equipment, press FAVORITES to TV audio. When you want to watch TV while working on your PC. Using PIP Feature You can be moved by pressing V/v/B/b.) To Enter PIP PIP Supported Inputs In main...
Operating Instructions
Page 23
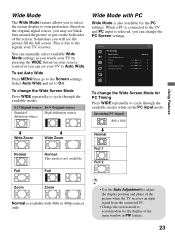
...Adjustment to adjust the display position and phase of the picture when the TV receives an input signal from the connected PC. • Change the screen mode to your preference. When a PC is due to the signals your TV to cycle through the available modes. 4:3 Original source 16:9 Original source...Center Vertical Center PC Normal 0 0 0 0 To change the Wide Screen Mode Press WIDE repeatedly to the TV and PC input is selected, you can set to the Screen settings. Sometimes you may see the picture fill the full screen. Based on the original signal source, you will see black bars ...
...Adjustment to adjust the display position and phase of the picture when the TV receives an input signal from the connected PC. • Change the screen mode to your preference. When a PC is due to the signals your TV to cycle through the available modes. 4:3 Original source 16:9 Original source...Center Vertical Center PC Normal 0 0 0 0 To change the Wide Screen Mode Press WIDE repeatedly to the TV and PC input is selected, you can set to the Screen settings. Sometimes you may see the picture fill the full screen. Based on the original signal source, you will see black bars ...
Operating Instructions
Page 25
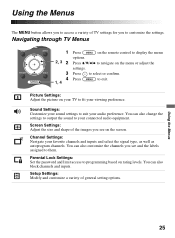
... change the settings to output the sound to them. Setup Settings: Modify and customize a variety of general setting options. Navigating through TV Menus WIDE INPUT 1 Press on the remote control to display the menu options. 2, 3 2 Press V/v/B/b to suit your sound settings to navigate... on the screen. Picture Settings: Adjust the picture on rating levels. You can also customize the channels you see and the labels assigned to your TV to programming based on your connected audio equipment. Parental Lock Settings: Set the...
... change the settings to output the sound to them. Setup Settings: Modify and customize a variety of general setting options. Navigating through TV Menus WIDE INPUT 1 Press on the remote control to display the menu options. 2, 3 2 Press V/v/B/b to suit your sound settings to navigate... on the screen. Picture Settings: Adjust the picture on rating levels. You can also customize the channels you see and the labels assigned to your TV to programming based on your connected audio equipment. Parental Lock Settings: Set the...
Operating Instructions
Page 28
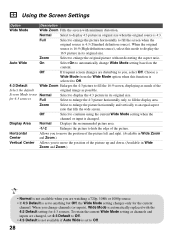
...replaced with minimum distortion. Full Select to enlarge the picture horizontally to enlarge the original picture without distorting the aspect ratio. Off If frequent screen changes are watching a 720p, 1080i or 1080p source. • If 4:3 Default is set to automatically change channels (or inputs), Wide ...edge of the Select the default original image as channels and inputs are changed . To retain the current Wide Mode setting as possible. Screen Mode to use Normal for the current channel. When you , select Off. Select to enlarge the 4:3 picture horizontally only, to ...
...replaced with minimum distortion. Full Select to enlarge the picture horizontally to enlarge the original picture without distorting the aspect ratio. Off If frequent screen changes are watching a 720p, 1080i or 1080p source. • If 4:3 Default is set to automatically change channels (or inputs), Wide ...edge of the Select the default original image as channels and inputs are changed . To retain the current Wide Mode setting as possible. Screen Mode to use Normal for the current channel. When you , select Off. Select to enlarge the 4:3 picture horizontally only, to ...
Operating Instructions
Page 29
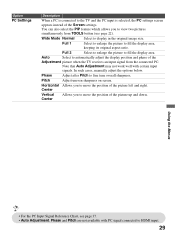
...you to move the position of the picture up and down. Pitch Adjust uneven sharpness on screen. Auto Select to automatically adjust the display position and phase of the Adjustment picture when the TV receives an input signal from TOOLS button (see page 37. • Auto Adjustment, Phase... and Pitch are not available with certain input signals. Full 2 Select to enlarge the picture to the TV and the PC input is selected, the PC settings screen appears instead of the picture left and right. Option PC Settings Description When a PC is connected to fill the...
...you to move the position of the picture up and down. Pitch Adjust uneven sharpness on screen. Auto Select to automatically adjust the display position and phase of the Adjustment picture when the TV receives an input signal from TOOLS button (see page 37. • Auto Adjustment, Phase... and Pitch are not available with certain input signals. Full 2 Select to enlarge the picture to the TV and the PC input is selected, the PC settings screen appears instead of the picture left and right. Option PC Settings Description When a PC is connected to fill the...
Operating Instructions
Page 34
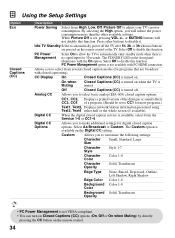
... CC Allows you to CC1 for most programs.) Text1, Text2, Displays network/station information presented using Text3, Text4 either half or the whole screen (if available). While Picture Off is turned on. The STANDBY LED on the Digital CC setting. Digital CC When the digital closed caption ... signal input for digital closed caption service is not available with the On option. PC Power Management Select On to allow the TV to adjust your TV's power consumption. Select Off to disable it. Off Closed Captions (CC) is no buttons are broadcast with closed caption options....
... CC Allows you to CC1 for most programs.) Text1, Text2, Displays network/station information presented using Text3, Text4 either half or the whole screen (if available). While Picture Off is turned on. The STANDBY LED on the Digital CC setting. Digital CC When the digital closed caption ... signal input for digital closed caption service is not available with the On option. PC Power Management Select On to allow the TV to adjust your TV's power consumption. Select Off to disable it. Off Closed Captions (CC) is no buttons are broadcast with closed caption options....
Operating Instructions
Page 35
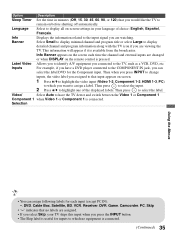
...to highlight one of choice: English, Español, Français. Language Select to display all on-screen settings in minutes (Off, 15, 30, 45, 60, 90, or 120) that input appears on screen. 1 Press V/v to highlight the video input (Video 1-2, Component 1-2, HDMI 1-3, PC) to which no ...Component 1 Component 1 when Video 1 or Component 1 is available from the broadcaster. Label Video Allows you to identify A/V equipment you would like the TV to the TV, such as a VCR, DVD, etc. Then when you press INPUT to change inputs, the video label you assigned to that you connected to ...
...to highlight one of choice: English, Español, Français. Language Select to display all on-screen settings in minutes (Off, 15, 30, 45, 60, 90, or 120) that input appears on screen. 1 Press V/v to highlight the video input (Video 1-2, Component 1-2, HDMI 1-3, PC) to which no ...Component 1 Component 1 when Video 1 or Component 1 is available from the broadcaster. Label Video Allows you to identify A/V equipment you would like the TV to the TV, such as a VCR, DVD, etc. Then when you press INPUT to change inputs, the video label you assigned to that you connected to ...
Operating Instructions
Page 36
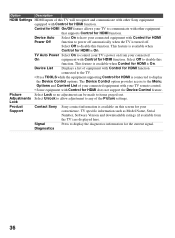
...to disable this function. Select Off to control your TV's power on this screen for HDMI is On. This feature is connected to display the diagnostics information for HDMI does not support the Device Control feature. TV specific information such as Model Name, Serial Number, ... for your connected On equipment with Control for HDMI function. Lock Product Contact Sony Sony contact information is available when Control for HDMI function. This feature is available on from the TV) are displayed here. Signal Press to display the Device Control options. Device ...
...to disable this function. Select Off to control your TV's power on this screen for HDMI is On. This feature is connected to display the diagnostics information for HDMI does not support the Device Control feature. TV specific information such as Model Name, Serial Number, ... for your connected On equipment with Control for HDMI function. Lock Product Contact Sony Sony contact information is available when Control for HDMI function. This feature is available on from the TV) are displayed here. Signal Press to display the Device Control options. Device ...
Operating Instructions
Page 40
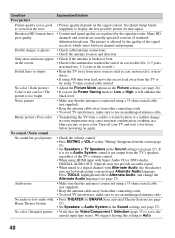
... by the quality of standard- on the screen • Check if the antenna has reached the end of its serviceable life. (3-5 years in normal use an undamaged antenna cable. Blurry picture / Poor color • Transporting the TV from the TV or try using 75 ohm coaxial cable instead... coaxial cable (not supplied). • Keep the antenna cable away from the TV's speakers regardless of the TV's volume control. • When using a 75-ohm coaxial cable (not supplied). • Keep the antenna cable away from the screen (page 19). • Set Speakers to use . No audio or low...
... by the quality of standard- on the screen • Check if the antenna has reached the end of its serviceable life. (3-5 years in normal use an undamaged antenna cable. Blurry picture / Poor color • Transporting the TV from the TV or try using 75 ohm coaxial cable instead... coaxial cable (not supplied). • Keep the antenna cable away from the TV's speakers regardless of the TV's volume control. • When using a 75-ohm coaxial cable (not supplied). • Keep the antenna cable away from the screen (page 19). • Set Speakers to use . No audio or low...
Operating Instructions
Page 41
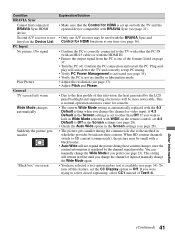
... is not listed on the Device List PC Input No picture / No signal Poor Picture General TV screen feels warm Wide Mode changes automatically Suddenly the picture gets smaller "Black box" on screen Explanation/Solution • Make sure that the Control for HDMI is set up PC timing. •... (see page 28). • Check the Auto Wide option in the Screen settings (see page 28). • The picture gets smaller during these content changes since the content information is regulated by the LCD panel backlight and supporting electronics will remain in standby or hibernation mode. •...
... is not listed on the Device List PC Input No picture / No signal Poor Picture General TV screen feels warm Wide Mode changes automatically Suddenly the picture gets smaller "Black box" on screen Explanation/Solution • Make sure that the Control for HDMI is set up PC timing. •... (see page 28). • Check the Auto Wide option in the Screen settings (see page 28). • The picture gets smaller during these content changes since the content information is regulated by the LCD panel backlight and supporting electronics will remain in standby or hibernation mode. •...
Operating Instructions
Page 42
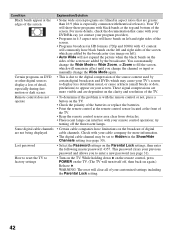
... change the Wide Mode to Wide Zoom, or Zoom to fill the screen, which may cause your TV's screen to display less detail than 16:9 (this is with black bands at the top and bottom of the screen which are filmed in affect until you to factory settings Explanation/Solution •...; Some wide screen programs are added by the broadcaster (see page 31). • Turn on the TV. Your TV will have bands on left and right sides of the screen. • Programs broadcast in HD formats (720p and 1080i) with theatrical...
... change the Wide Mode to Wide Zoom, or Zoom to fill the screen, which may cause your TV's screen to display less detail than 16:9 (this is with black bands at the top and bottom of the screen which are filmed in affect until you to factory settings Explanation/Solution •...; Some wide screen programs are added by the broadcaster (see page 31). • Turn on the TV. Your TV will have bands on left and right sides of the screen. • Programs broadcast in HD formats (720p and 1080i) with theatrical...
Operating Instructions
Page 44
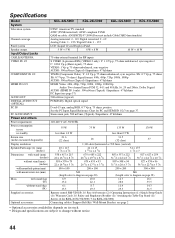
...: American TV standard ATSC (8VSB terrestrial): ATSC compliant 8VSB QAM on cable: ANSI/SCTE 07 2000 (Does not include CableCARD functionality) Channel coverage Analog terrestrial: 2 - 69 / Digital terrestrial: 2 - 69 Analog Cable: 1 - 135 / Digital Cable: 1 - 135 Panel system LCD (Liquid .../60 Hz Power consumption in use 55 W 75 W 135 W 170 W in standby less than 1.0 W less than 0.5 W Screen size (inches measured diagonally) 21.6 (22 class) 26 31.5 (32 class) 37 Display resolution 1,366 dots (horizontal) × 768 lines (vertical) Speaker/Full range (2) (mm) (inches) 40 ...
...: American TV standard ATSC (8VSB terrestrial): ATSC compliant 8VSB QAM on cable: ANSI/SCTE 07 2000 (Does not include CableCARD functionality) Channel coverage Analog terrestrial: 2 - 69 / Digital terrestrial: 2 - 69 Analog Cable: 1 - 135 / Digital Cable: 1 - 135 Panel system LCD (Liquid .../60 Hz Power consumption in use 55 W 75 W 135 W 170 W in standby less than 1.0 W less than 0.5 W Screen size (inches measured diagonally) 21.6 (22 class) 26 31.5 (32 class) 37 Display resolution 1,366 dots (horizontal) × 768 lines (vertical) Speaker/Full range (2) (mm) (inches) 40 ...

Operating Instructions
Page 45
..., 20 POWER LED 20 Product Support 36 R Rating 31 Reset 26, 27, 42 RETURN button 18 S SERVICE 7 Settings Channel 30 Parental Lock 31 Picture 26 Screen 28 Setup 34 Sound 27 Sharpness 26 Show/Hide Channels 30 Sleep Timer 35 Sound Mode 27 Speaker 27 STANDBY LED 20 Steady Sound 27... T TOOLS 19 Treble 27 Troubleshooting 39-42 TV Rating 32 (Continued) 45 Other Information Index 0-9 buttons 19 4:3 Default 28 A AC power cord 8 Add Digital Channels 30 Advanced Settings 26 Alternate Audio 27 AUDIO OUT...
..., 20 POWER LED 20 Product Support 36 R Rating 31 Reset 26, 27, 42 RETURN button 18 S SERVICE 7 Settings Channel 30 Parental Lock 31 Picture 26 Screen 28 Setup 34 Sound 27 Sharpness 26 Show/Hide Channels 30 Sleep Timer 35 Sound Mode 27 Speaker 27 STANDBY LED 20 Steady Sound 27... T TOOLS 19 Treble 27 Troubleshooting 39-42 TV Rating 32 (Continued) 45 Other Information Index 0-9 buttons 19 4:3 Default 28 A AC power cord 8 Add Digital Channels 30 Advanced Settings 26 Alternate Audio 27 AUDIO OUT...


